DIY - Cusco Oil Catch Tank Install
 11-16-2006, 09:53 PM
#1
For this you will need
10mm Socket to remove Plenum
A piece of 5/8 power steering hose to supplement the piece of hose you already get. You also need hose clamps.
Flat head screwdriver
Here is a nice shot of everything you get.
JDM TYTE YO!

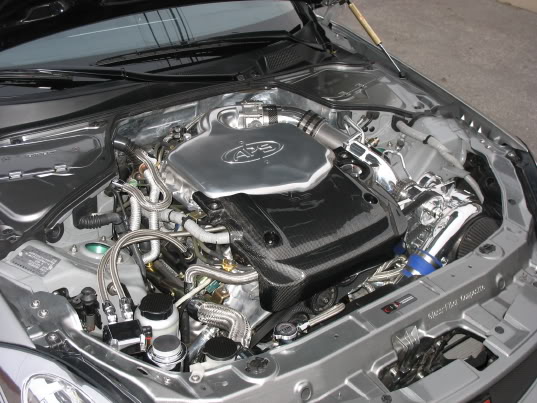
Remove the engine cover by removing these four screws. The ones in the back are a pain, but if you use a 10mm combo wrench you will be able to get it under the strut.

Set the engine cover and the screws aside.
Remove the hose that connects the PCV to the lower collector (circled in red)
I found the clips to be quite the pain, however if you just pull hard enough on the hose, it comes off.

Set that hose aside.
From here plug the two hoses into the catch can and mount it where you would like. I mounted mine to the head shield around my pop charger.

I then ran the hoses under the piece of plastic in front of the car. I drilled two small holes so I could just zip tie it under that plastic piece.

Start the car, check for any whistling noises - put the engine cover back on and enjoy!
Disregard the horridly dirty engine bay. It is cleaned and detailed now.
10mm Socket to remove Plenum
A piece of 5/8 power steering hose to supplement the piece of hose you already get. You also need hose clamps.
Flat head screwdriver
Here is a nice shot of everything you get.
JDM TYTE YO!
Remove the engine cover by removing these four screws. The ones in the back are a pain, but if you use a 10mm combo wrench you will be able to get it under the strut.
Set the engine cover and the screws aside.
Remove the hose that connects the PCV to the lower collector (circled in red)
I found the clips to be quite the pain, however if you just pull hard enough on the hose, it comes off.
Set that hose aside.
From here plug the two hoses into the catch can and mount it where you would like. I mounted mine to the head shield around my pop charger.
I then ran the hoses under the piece of plastic in front of the car. I drilled two small holes so I could just zip tie it under that plastic piece.
Start the car, check for any whistling noises - put the engine cover back on and enjoy!
Disregard the horridly dirty engine bay. It is cleaned and detailed now.
Last edited by Roger V; 11-19-2006 at 04:45 PM.


 11-19-2006, 02:41 PM
#5
Registered User
iTrader: (2)
Join Date: Nov 2004
Location: Texas
Posts: 1,172
Likes: 0
Received 0 Likes
on
0 Posts
So what about the other valve/head cover? That breather hose from the drivers side that goes to the intake, shouldn't that go through the catch can too? Or using that hose from the passenger side sufficent enough to catch bypass oil?
That is where I get confused, I have seen some catch cans use the middle hose that is in front of the plenum that goes from both covers with something like a T-Fitting.
That is where I get confused, I have seen some catch cans use the middle hose that is in front of the plenum that goes from both covers with something like a T-Fitting.
11-20-2006, 02:47 PM
#7
Registered User
iTrader: (2)
Join Date: Nov 2004
Location: Texas
Posts: 1,172
Likes: 0
Received 0 Likes
on
0 Posts
Originally Posted by Roger V
Edited to show where I mounted the catch tank. Peking, from my understanding, placing the catch tank between the PCV valve and collector is sufficient.

Trending Topics

 11-25-2006, 11:16 AM
#10
Banned
iTrader: (93)
Join Date: Apr 2005
Location: Bis-Man, ND
Posts: 3,254
Likes: 0
Received 0 Likes
on
0 Posts
Is this write up saying that my catch just goes in place on that little bit of hose that was removed in the 3rd pic? Wish you had a picture of it before you put that dang cover back on!!!
Last edited by Nic@CiNcity; 11-25-2006 at 11:25 AM.
11-25-2006, 11:29 AM
#11
Registered User
iTrader: (10)
Join Date: Feb 2006
Location: OC
Posts: 725
Likes: 0
Received 0 Likes
on
0 Posts
Yes it replaces that hose between the lower plenum and the passenger side valve cover.
This is a G35 but same thing. This angle shows the connections a little better. Sorry I don't have a larger picture of the engine bay.
This is a G35 but same thing. This angle shows the connections a little better. Sorry I don't have a larger picture of the engine bay.

 01-09-2007, 06:41 PM
#17
Registered User
iTrader: (154)
Join Date: Jun 2003
Location: Hills of Anaheim
Posts: 10,735
Likes: 0
Received 0 Likes
on
0 Posts
They connect to the two spots that the old hose came from. One hose goes from the PVC to the catch can and the other goes from the manifold to the catch can.
01-24-2007, 08:06 AM
#20
Registered User
iTrader: (109)

Join Date: Sep 2005
Location: Huntersville, NC
Posts: 2,154
Likes: 0
Received 0 Likes
on
0 Posts
Nice read, I just installed mine a couple of days ago on my S/C'ed Z. A little different then pictured above but basically the same concept. ill snap some pics and post them up soon. Had a couple of questions? When is a good time to replace the PCV? Its a fairly inexpensive part and relatively easy to change so since my Z is pushing high mileage (70k) I was wondering if it might be a good idea to do it. Also on the other side of the engine as per suggestions by some of the members of this forum I was thinking about installing a compressor filter and close off the line running to the intake. Would this be a better idea then installing another can? I know I need to do something there since I can see dark residue inside my TB. I know the passengers side needs to be under pressure but is it the same for the drivers? Will it be safe to vent those fumes in the engine bay? Any input would be great, thanks!