DIY: Making your own [budget] BBK
 07-16-2008, 12:21 PM
#1

Having been autocrossing & then tracking the z for 3.5 years, 50K miles i needed to replace the stock rotors. I looked into upgrading to used 06+ or brembo calipers but wanted new parts. ArizonaZcar came closest to what i wanted to do but i wanted to keep the rear parking brake intact and also wanted a larger / thicker pad then they have with their rear caliper choice.
[if you're likely to lop off a thumb with a grinder then go order their kits, an excellent choice for 6 pot fronts!]
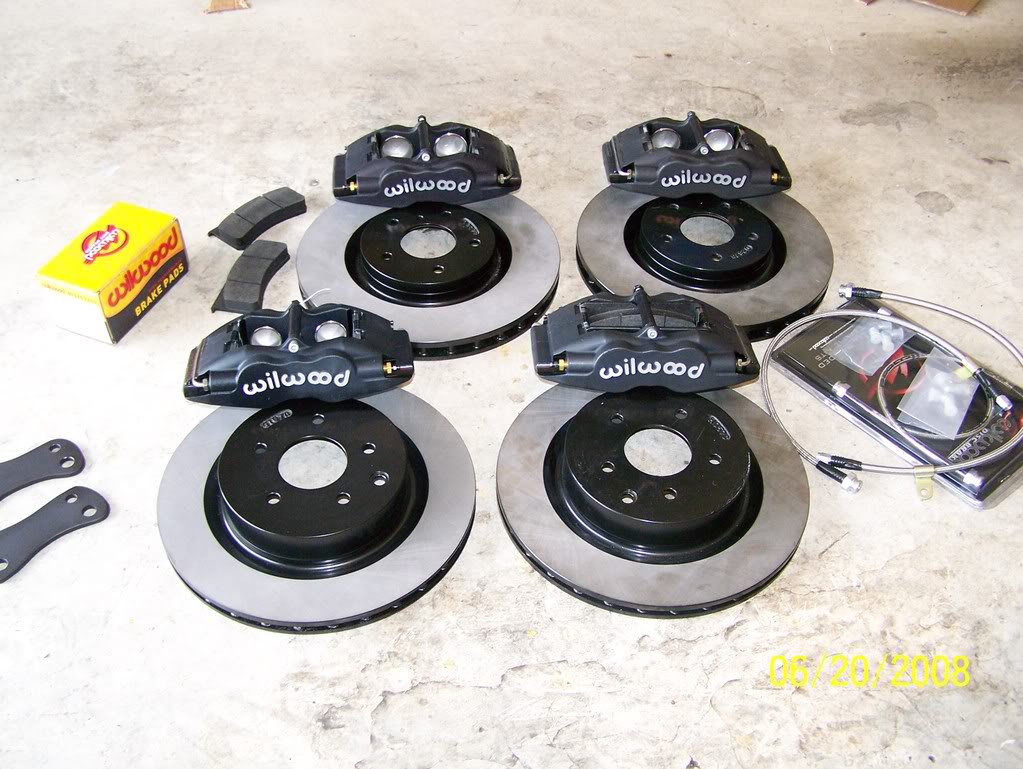
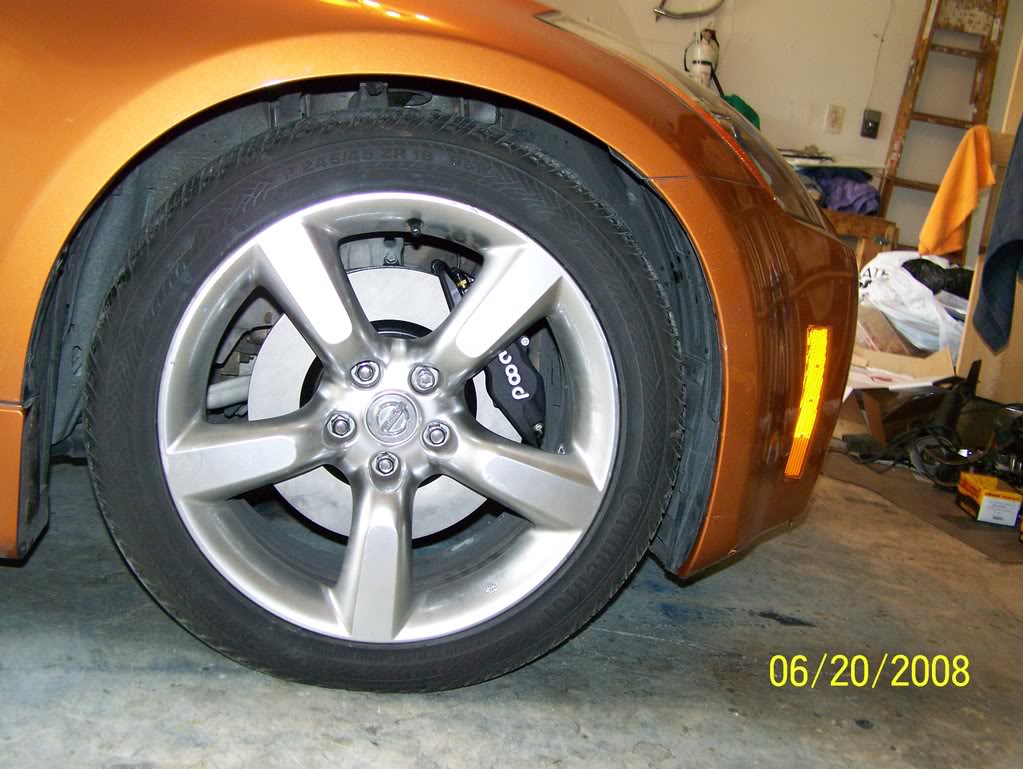
The assembled parts on installation day.
The Plan: after stealing many ideas from the 23+ page long DIY brake thread i decided to order a pile of parts and make my own 4 wheel BBK, went for budget on most choices [ie plain over slotted rotors, black over red calipers, rotor size/type] going for the most brake 'bang' for my buck. Also now after 500+ miles tested i feel okay posting what i did to guide you other adventurous folk.
The Disclaimer: They are brakes!, they are IMPORTANT!, don't do this if you aren't sure you're doing it right, test them in unoccupied spaces that will only inconvience the poor rescue team scooping up your battered remains...
The Parts: Total Price $$1350! (+s/h)
Front calipers: [summitracing]
WIL-120-7429 R(ight) & L(eft) which are Wilwood 4 pot forged billet superlites with the 1.75" pistons
went with these for the pad selection, .8" thick , had a pair of dynalites for the rears but after seeing the thin pads (still much bigger than stock rear pads, how nissan can put them on a 'sports' car?) that came with the dynalites i decided to go big and use the FBSuperlites on the rear also
*editorial gibberish - if you have brembos already then i don't think you'll gain anything by doing this, slightly bigger pads, cheaper cost for pads, go spend your $$ somewhere else, how 'bout coilovers?
if you simply must have 6 pot calipers, go for it, no their is no difference in braking ability over the 4 pot caliper on this rotor, the increased pots (6 or 8 etc) are for large rotors so that the aluminum hub can be larger so that the heavy braking surface is smaller at the edge of the rotor and the smaller multi pots can all fit
SO having a higher number of pots on a rotor that isn't optomized for it is just a $ waster
Rear calipers:[summitracing]
WIL-120-7477 R / L 4 pot forged billet superlites with the 1.38" pistons
front & rear SS lines: [hrpworld or summitracing]
wil-220-9196 & 9197 with proper connectors
brake pads: [summitracing]
2 sets of wil-150-8854 bp10 - good street pad, good to 1100 degrees!
*optional wil-150-5939k (polymatrix b) track only pads (good to 1300 degrees!) $120 bucks for excellent track pads!! will do a celebration dance every time i have to replace em, you spend so much more for regular BBK pads (god bless wilwood!)
front & rear rotors
i went with brembo sized plain rotors (1 piece) [zeckhausen racing], i use my old 17 stock rims for my track tires so had to fit under them
2 piece are better than 1 piece BUT for my use, non $$ winning track days, i feel that the brembo rotors are more than sufficent and much much cheaper than any 2 piece rotor choice out their
Front Rotor info new [old]
324mm x 30mm [296 x 24] ( 20.5# vs 16.5# )
(12.76" x 1.18") [11.65]
Front Pad - 11.5 sq in vs 11.3 / .8" thick vs .49" (13.96 brembo)
Rear Rotor info new [old]
322mm x 22mm [292 x 16] (18.5# vs 12#)
(12.68" x .866") [11.5]
Rear Pad - 11.5 sq in vs 6.18 stock / .8" thick vs .4 (7.97 brembo)
larger is better for braking torque but the real benefit is the higher heat asorbtion. ~ 25% in front and ~50%!! in back.
The Mounting brackets:
I started with the front brackets.
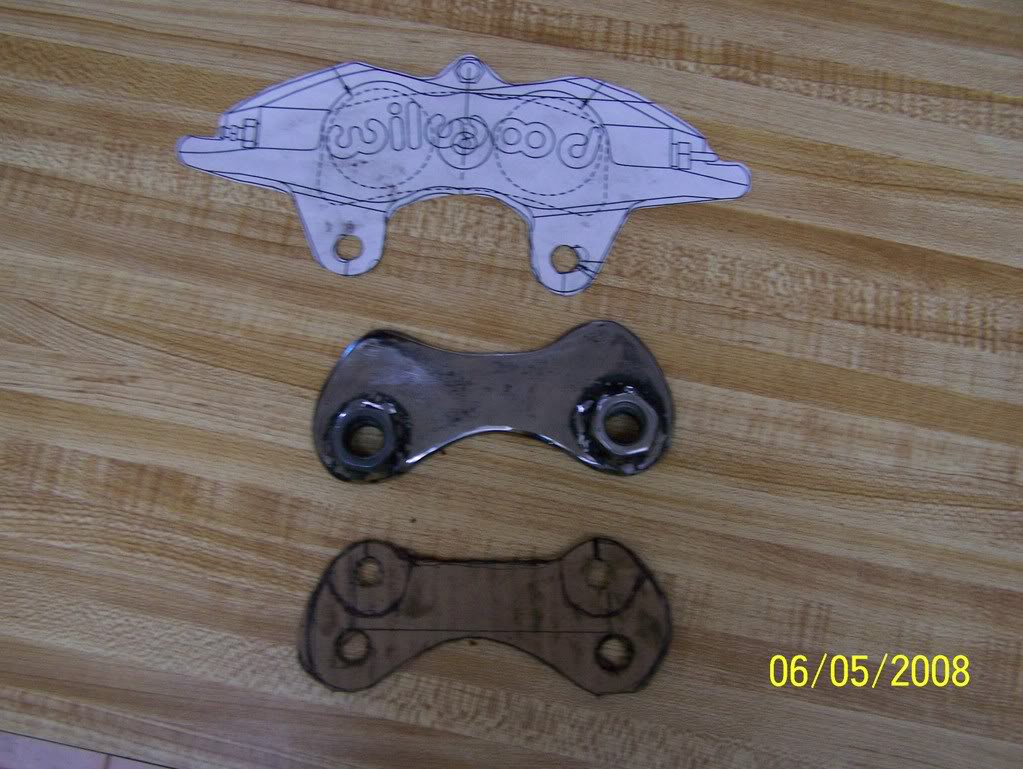
these are my first mockup attempts, i used the paper caliper while awaiting the UPS guy (had the rotor) cardboard mockup bracket, very quick to make for quick cutting but it didn't hold up in the testing phase... the middle one is the first 1/4 steel plate mockup, welded nuts to it as spacers (planned to drill the threads out) but when actual caliper arrived found my spacer calculations where off and ended up using some washers
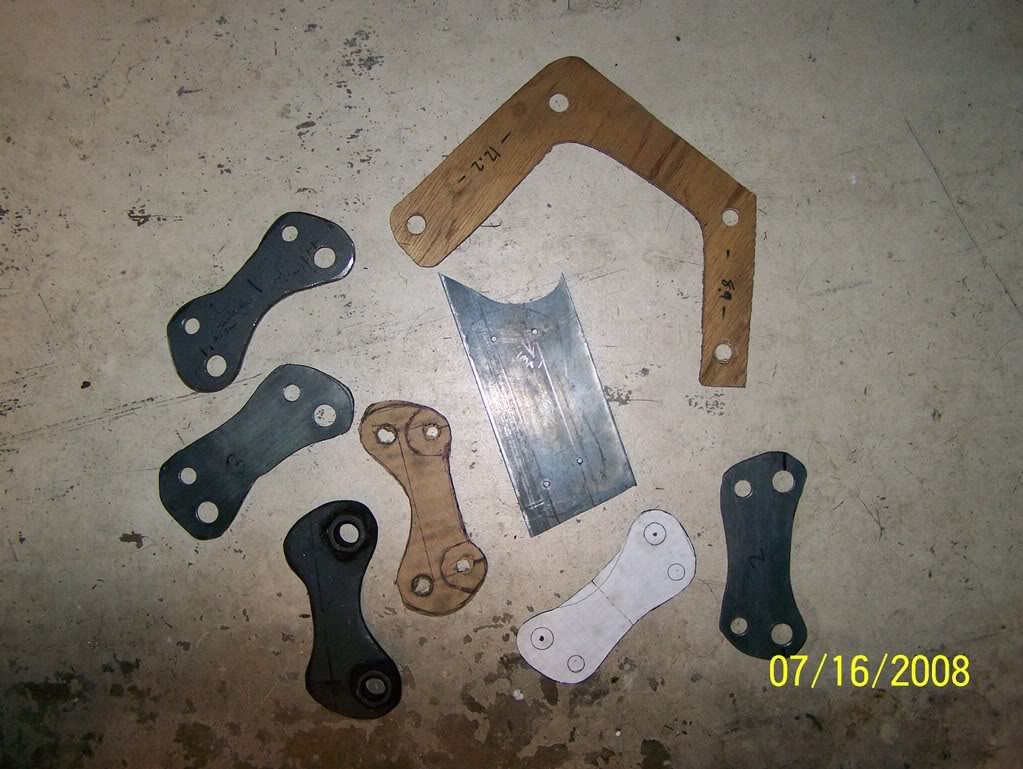
several failed attempts.. mostly on 1/8" thick practice plate , the upper right is the plywood rear template and the lower right is the successful front template in 1/8" sheet
here are outlines of the final brackets just prior to installation
And here's the trick for DIY brackets
1) get some 1/4" plywood for your own mockups
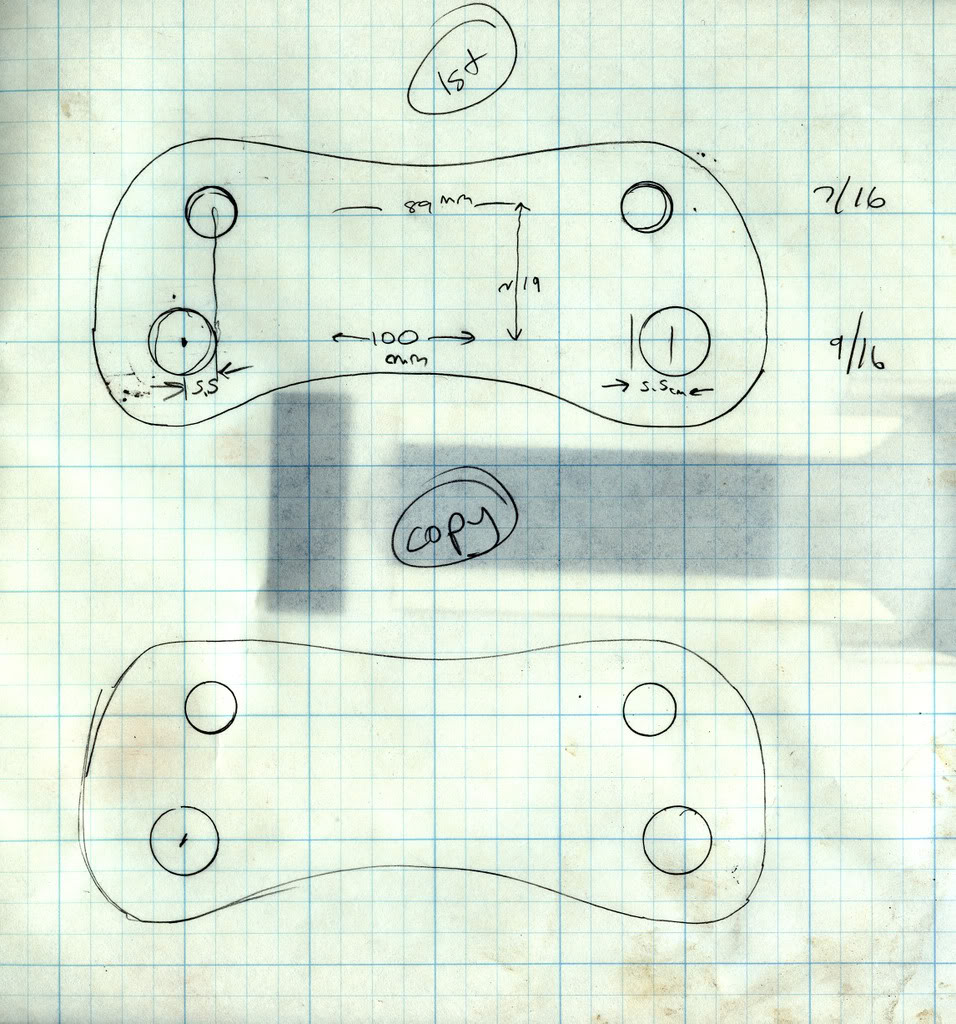
2) print out my pics, noting that the paper is 4 squares to the inch [the heavy lines are 1" apart] adjust this until it prints true
3) cut out the paper brackets, tape the outline onto the ply, trace outline it
4) using .5mm pencil ( or equivalent, NOT a sharpie, something thin as accuracy is important, measure once cut twice etc etc...)
poke hole thru the lower left mounting hole (point a) (it's centered on the graph paper!)
measure exactly 100mm to the right hole, mark this point (b)
draw line from point a to b
measure up from both points (90 degree angles are important) 18*mm[*see below]
draw parallel line 18mm above line ab
cross measure upper left to bott R, Bott L to Upper R to ensure your rectangle is square (redo until it is, paper is much cheaper than steel)
measure in from left and right top 5.5mm, mark points c & d,
measure from c to d, it should be 89mm (100 - 5.5 - 5.5=89)
once you have all these points poke small holes through onto the ply
*i measured/ labeled the tracing wrong* see futher posts if you have parts in hand, will post correct measurements next week!! SORRY!
[18mm* note from above, i know, it's marked 19mm, my brake pad tops sit 1mm above my brake rotors and i plan to redo them using either 5/16 or 3/8 steel plate in the next month or so ( also powdercoat em and calipers), this will require some slight sanding to the car brake mount points, 19mm works just fine, split it at 18.5? try all three, ply is cheap!]
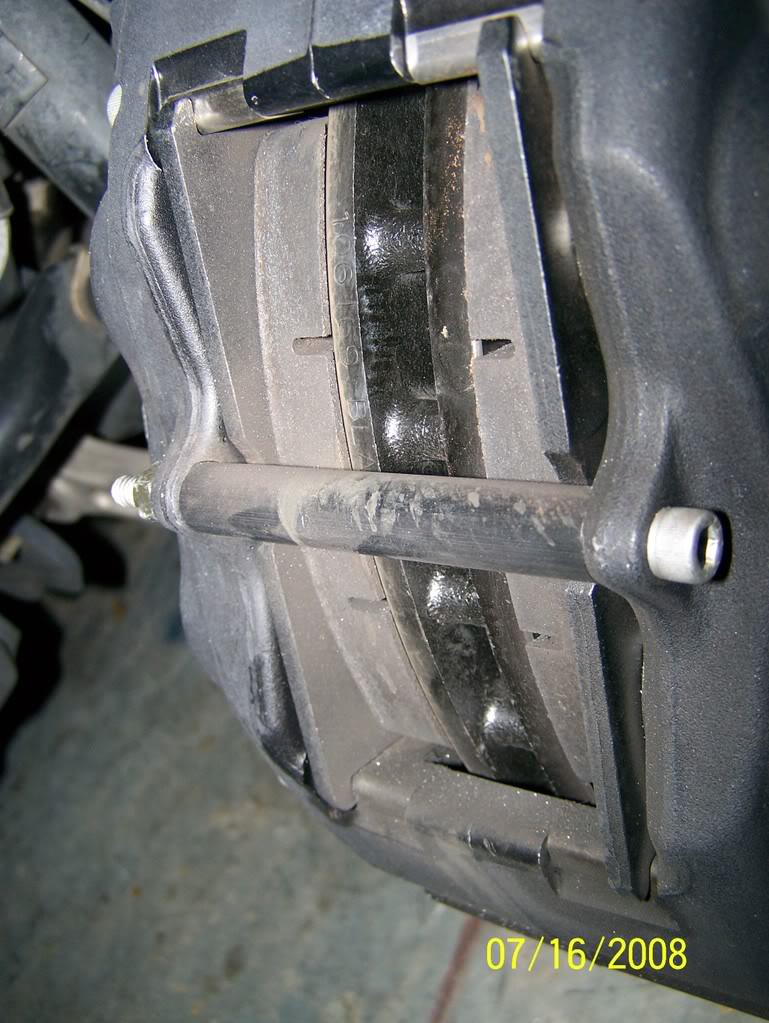
added a pic of how the front pad stands a little above the rotor at 19mm between the caliper bolt centerline and the mounting bolt CL
accurately start the holes with a small nail tap to dent the wood, drill thru with a small drill bit, drill the top holes to 7/16 and the bottom to 9/16 - i use a stepped drill bit
remove paper, jigsaw out the bracket
Testing your fancy new bracket...
bolt bracket to caliper, it goes to the inside, insert a brake pad to check clearance, always use a washer next to aluminum parts
put on new rotor use lugnuts (with a large holed washer) to keep it tight, square
bolt bracket & caliper to car mount, i started with 2 washers between bracket and the mount as spacers, tighten up fairly snug without crushing the plywood
check how the rotor is centered in the caliper, should be close, try 3 washers which is closer? (don't get too **** until your doing this with the actual metal bracket) rotate rotor, make vroom vroom and brake squealing noises...
check how top of rotor aligns with top of brake pads
check how caliper mount area fits against mounting hole area
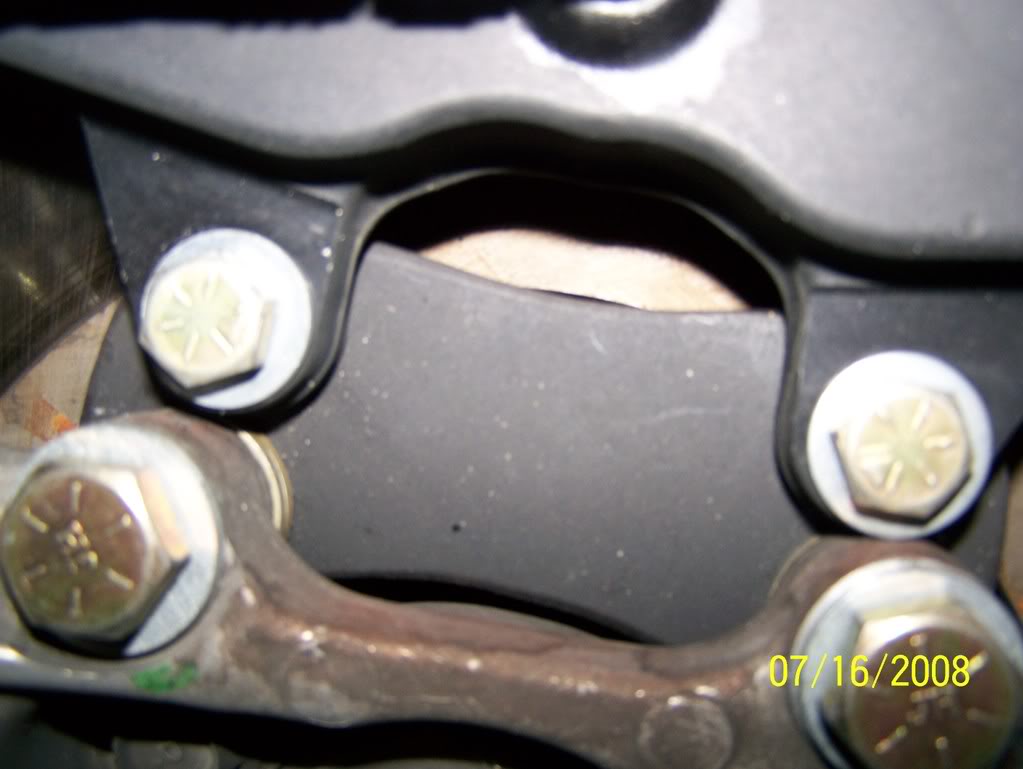
added a pic of what i mean by caliper to mount area fitment, its a very close fit already sinking it down 1 mm will need some small adjustments (took this pic today while changing to the trackpads / track tires for sat (running around alot thur, fri so this was the only free time) - also you can see the 2 washers i used as spacers on the bottom mounting hole bolts (gold colored) to center the caliper
the caliper has a casting ridge along the bottom of the hole tabs which can be sanded off ?1/3 mm here, then mark contact areas and sand as needed for clearance, should be less than 1mm! if it's more than that recheck all your work to this point because mine wasn't ( i used a sanding pad on a 4.5 inch grinder, careful, aluminum gets removed much quicker than steel!)
once wooden mockup mounting bracket is tweaked to your acceptance redo the same measurements onto the steel plate, jigsaws work but a cutting wheel on a grinder is faster. cut it out outside the line and then sand down to the line and round the corners and edges to make it pretty,
EYE PROTECTION FOLKS!!!
for the holes in metal use a metal punch to center the starting holes, i wasted much time thinking i could hold a drill bit steady to start the hole but each hole would wander .5mm or so and screw the whole works up
bolts etc - use grade 8 on final assembly!!!
i bought a variety of cheap grade 5s 7/16 and 9/16 1.25 inch, 1.5 inch & pile of washers for mockup, make sure they dont hit the rotor! use an extra washer on the outside to pull the bolt away from rotor ( if needed)
i plan on welding the NUTS (not bolts, edit, duh) to my next brackets for ease of installation
i used the wilwood instruction torques 7/16 47ftlbs/ 9/16 95 ft lbs and loctite red
thats all for todays lesson, planning to do the rear writeup after sebring 7/19!
http://s334.photobucket.com/albums/m410/alfajimBBK/ <-- my bbk pic place
[if you're likely to lop off a thumb with a grinder then go order their kits, an excellent choice for 6 pot fronts!]
The assembled parts on installation day.
The Plan: after stealing many ideas from the 23+ page long DIY brake thread i decided to order a pile of parts and make my own 4 wheel BBK, went for budget on most choices [ie plain over slotted rotors, black over red calipers, rotor size/type] going for the most brake 'bang' for my buck. Also now after 500+ miles tested i feel okay posting what i did to guide you other adventurous folk.
The Disclaimer: They are brakes!, they are IMPORTANT!, don't do this if you aren't sure you're doing it right, test them in unoccupied spaces that will only inconvience the poor rescue team scooping up your battered remains...
The Parts:
Total Price $$1350! (+s/h) Front calipers: [summitracing]
WIL-120-7429 R(ight) & L(eft) which are Wilwood 4 pot forged billet superlites with the 1.75" pistons
went with these for the pad selection, .8" thick
, had a pair of dynalites for the rears but after seeing the thin pads (still much bigger than stock rear pads, how nissan can put them on a 'sports' car?) that came with the dynalites i decided to go big and use the FBSuperlites on the rear also*editorial gibberish - if you have brembos already then i don't think you'll gain anything by doing this, slightly bigger pads, cheaper cost for pads, go spend your $$ somewhere else, how 'bout coilovers?
if you simply must have 6 pot calipers, go for it, no their is no difference in braking ability over the 4 pot caliper on this rotor, the increased pots (6 or 8 etc) are for large rotors so that the aluminum hub can be larger so that the heavy braking surface is smaller at the edge of the rotor and the smaller multi pots can all fit
SO having a higher number of pots on a rotor that isn't optomized for it is just a $ waster
Rear calipers:[summitracing]
WIL-120-7477 R / L 4 pot forged billet superlites with the 1.38" pistons
front & rear SS lines: [hrpworld or summitracing]
wil-220-9196 & 9197 with proper connectors
brake pads: [summitracing]
2 sets of wil-150-8854 bp10 - good street pad, good to 1100 degrees!
*optional wil-150-5939k (polymatrix b) track only pads (good to 1300 degrees!) $120 bucks for excellent track pads!! will do a celebration dance every time i have to replace em, you spend so much more for regular BBK pads (god bless wilwood!)
front & rear rotors
i went with brembo sized plain rotors (1 piece) [zeckhausen racing], i use my old 17 stock rims for my track tires so had to fit under them
2 piece are better than 1 piece BUT for my use, non $$ winning track days, i feel that the brembo rotors are more than sufficent and much much cheaper than any 2 piece rotor choice out their
Front Rotor info new [old]
324mm x 30mm [296 x 24] ( 20.5# vs 16.5# )
(12.76" x 1.18") [11.65]
Front Pad - 11.5 sq in vs 11.3 / .8" thick vs .49" (13.96 brembo)
Rear Rotor info new [old]
322mm x 22mm [292 x 16] (18.5# vs 12#)
(12.68" x .866") [11.5]
Rear Pad - 11.5 sq in vs 6.18 stock / .8" thick vs .4 (7.97 brembo)
larger is better for braking torque but the real benefit is the higher heat asorbtion. ~ 25% in front and ~50%!! in back.
The Mounting brackets:
I started with the front brackets.
these are my first mockup attempts, i used the paper caliper while awaiting the UPS guy (had the rotor) cardboard mockup bracket, very quick to make for quick cutting but it didn't hold up in the testing phase... the middle one is the first 1/4 steel plate mockup, welded nuts to it as spacers (planned to drill the threads out) but when actual caliper arrived found my spacer calculations where off and ended up using some washers
several failed attempts.. mostly on 1/8" thick practice plate , the upper right is the plywood rear template and the lower right is the successful front template in 1/8" sheet
here are outlines of the final brackets just prior to installation
And here's the trick for DIY brackets
1) get some 1/4" plywood for your own mockups
2) print out my pics, noting that the paper is 4 squares to the inch [the heavy lines are 1" apart] adjust this until it prints true
3) cut out the paper brackets, tape the outline onto the ply, trace outline it
4) using .5mm pencil ( or equivalent, NOT a sharpie, something thin as accuracy is important, measure once cut twice etc etc...)
poke hole thru the lower left mounting hole (point a) (it's centered on the graph paper!)
measure exactly 100mm to the right hole, mark this point (b)
draw line from point a to b
measure up from both points (90 degree angles are important) 18*mm[*see below]
draw parallel line 18mm above line ab
cross measure upper left to bott R, Bott L to Upper R to ensure your rectangle is square (redo until it is, paper is much cheaper than steel)
measure in from left and right top 5.5mm, mark points c & d,
measure from c to d, it should be 89mm (100 - 5.5 - 5.5=89)
once you have all these points poke small holes through onto the ply
*i measured/ labeled the tracing wrong* see futher posts if you have parts in hand, will post correct measurements next week!! SORRY!
[18mm* note from above, i know, it's marked 19mm, my brake pad tops sit 1mm above my brake rotors and i plan to redo them using either 5/16 or 3/8 steel plate in the next month or so ( also powdercoat em and calipers), this will require some slight sanding to the car brake mount points, 19mm works just fine, split it at 18.5? try all three, ply is cheap!]
added a pic of how the front pad stands a little above the rotor at 19mm between the caliper bolt centerline and the mounting bolt CL
accurately start the holes with a small nail tap to dent the wood, drill thru with a small drill bit, drill the top holes to 7/16 and the bottom to 9/16 - i use a stepped drill bit
remove paper, jigsaw out the bracket
Testing your fancy new bracket...
bolt bracket to caliper, it goes to the inside, insert a brake pad to check clearance, always use a washer next to aluminum parts
put on new rotor use lugnuts (with a large holed washer) to keep it tight, square
bolt bracket & caliper to car mount, i started with 2 washers between bracket and the mount as spacers, tighten up fairly snug without crushing the plywood
check how the rotor is centered in the caliper, should be close, try 3 washers which is closer? (don't get too **** until your doing this with the actual metal bracket) rotate rotor, make vroom vroom and brake squealing noises...
check how top of rotor aligns with top of brake pads
check how caliper mount area fits against mounting hole area
added a pic of what i mean by caliper to mount area fitment, its a very close fit already sinking it down 1 mm will need some small adjustments (took this pic today while changing to the trackpads / track tires for sat (running around alot thur, fri so this was the only free time) - also you can see the 2 washers i used as spacers on the bottom mounting hole bolts (gold colored) to center the caliper
the caliper has a casting ridge along the bottom of the hole tabs which can be sanded off ?1/3 mm here, then mark contact areas and sand as needed for clearance, should be less than 1mm! if it's more than that recheck all your work to this point because mine wasn't ( i used a sanding pad on a 4.5 inch grinder, careful, aluminum gets removed much quicker than steel!)
once wooden mockup mounting bracket is tweaked to your acceptance redo the same measurements onto the steel plate, jigsaws work but a cutting wheel on a grinder is faster. cut it out outside the line and then sand down to the line and round the corners and edges to make it pretty,
EYE PROTECTION FOLKS!!!
for the holes in metal use a metal punch to center the starting holes, i wasted much time thinking i could hold a drill bit steady to start the hole but each hole would wander .5mm or so and screw the whole works up
bolts etc - use grade 8 on final assembly!!!
i bought a variety of cheap grade 5s 7/16 and 9/16 1.25 inch, 1.5 inch & pile of washers for mockup, make sure they dont hit the rotor! use an extra washer on the outside to pull the bolt away from rotor ( if needed)
i plan on welding the NUTS (not bolts, edit, duh) to my next brackets for ease of installation
i used the wilwood instruction torques 7/16 47ftlbs/ 9/16 95 ft lbs and loctite red
thats all for todays lesson, planning to do the rear writeup after sebring 7/19!
http://s334.photobucket.com/albums/m410/alfajimBBK/ <-- my bbk pic place
Last edited by burntZ; 07-27-2008 at 11:32 AM. Reason: [to add more pics & i suck at measuring]

The following users liked this post:
EJohn (12-11-2023)
 07-17-2008, 04:45 PM
#6
Originally Posted by chopperman
Thanks for the write up. Looks really good. I bet it would be easier to take the brackets to a shop that has the machines to make more accurate cuts and holes. Instead of messing it up several times.
re two piece rotors - yes brembo 2 piece rotors would fit just fine but with that extra $1000+? you should just get a pre made kit from arizona z ( 2200ish front & rear)
thanks for all props, [bigger thanks for not flaming my rear bracket - if i saw that in someone elses plans i be thinking wtf?]
07-17-2008, 06:14 PM
#7
Originally Posted by burntZ
true, a water jet would do a much better job, the rub is that those machinists want some pretty accurate measurements... by the time i had the correct fit i had the brackets, my shortsightedness is another issue, the working brackets are on the car, i did as accurate traces as possible just before installing them but i really should of measured them all out ( but hadn't thought of doing the write up at the time)
re two piece rotors - yes brembo 2 piece rotors would fit just fine but with that extra $1000+? you should just get a pre made kit from arizona z ( 2200ish front & rear)
thanks for all props, [bigger thanks for not flaming my rear bracket - if i saw that in someone elses plans i be thinking wtf?]
re two piece rotors - yes brembo 2 piece rotors would fit just fine but with that extra $1000+? you should just get a pre made kit from arizona z ( 2200ish front & rear)
thanks for all props, [bigger thanks for not flaming my rear bracket - if i saw that in someone elses plans i be thinking wtf?]
Lol I was thinking WTF when I first saw the rear braket. Whatever works I guess.
Trending Topics
 07-18-2008, 04:45 PM
#10
Registered User

Join Date: Jun 2008
Location: norcal
Posts: 117
Likes: 0
Received 0 Likes
on
0 Posts
wow! i love it! i have some huge Z06 calipers and rotors at my house, i just need a weekend where i don't need to drive my car to make some brackets. i would have to drill the rotors new lug pattern.
i would agree with the above quote, 1/8" is too thin. usually aftermarket adapter brackets are 1/4".
great job man!
i would agree with the above quote, 1/8" is too thin. usually aftermarket adapter brackets are 1/4".
great job man!
Last edited by ZTEALTH; 07-18-2008 at 04:48 PM.
07-18-2008, 05:15 PM
#11
Originally Posted by Jeff92se
Props on the idea but those brackets are only 1/8" thick? IMHO that's way too thin.
actually the practice brackets are the 1/8" thick material - much quicker to cut (& cheaper, which BTW was the main theme)
final brackets are the 1/4" plate
re: differences in brands... (from internet info, not personel experiance)
ap (F1, other racing) best ( owned by brembo i believe- so they get credit)
alcon, brembo, baer are all racing developed proj mu / stoptech more tuner market ( but sponsered and are raced too ) wilwood are really good for their pricepoint - lots of experiance used by racers and now lots of kits by wilwood and others using there calipers.
caliper flex and heat flow are big caliper issues and i'm sure the bigger $ names deal better with these issues but for general fun track usage the wilwoods are good enough- far better than stock and their pad choices

AXLE SET PART NO. PAD TYPE/COMPOUND
15A - 5938K 7420 A PolyMatrix
15B - 5939K 7420 B PolyMatrix
15C - 6853K 7420 C PolyMatrix
15E - 6084K 7420 E PolyMatrix
15H - 8114K 7420 H PolyMatrix
15Q - 6829K 7420 Q PolyMatrix
150 - 8854K 7420 10 BP-10 Smart Pad
150 - 9416K 7420 20 BP-20 Smart Pad
150 - 9864K 7420 30 BP-30 Smart Pad
[150 - 8323K 7420 SM For Titanium Rotor]
check out the wilwood site for the ranges of heat / grip and v. cheap compared to the bigger kits / same with my rotor choice v. cheap ($ not quality (i hope)) to replace $85 vs $285 (X4)
[so $$ saved over the next years will pay for the upgrade! ( my mantra)]
i swapped from street bp10 on wed to the race B polys and what a diference, i would not of believed it - not big on soft braking / more on or off but VERY on, also very very squealy - people staring squealy so not a good street pad, not very stealthy at least....
will report back after tommorrows test...
will put up exactish measurements while redoing the brackets /calipers ( to perfection) in upcoming weeks
07-19-2008, 12:33 PM
#14
the calipers, pads, front brackets where wonderful!
haven't timed my video laps yet but by dash stopwatch laps where on average ~4-5 secs faster than prior visits [but also had much better tires this trip too ]
could not get the brakes to fade! pad wear neglible < 1mm for 145 tracks miles,
BUT .. at the lunch break checking pads / pressures etc saw a rear caliper riding high, thought had lost a caliper mounting bolt but after pulling the wheel saw that the rear caliper had bent the long way -the rear leg of the 'n' streched and raised the caliper top some above the pad, pics later...
really gasted my flabber that it could bend the long way
didn't dare track it any longer so came home early
stopped at a lowes on route home and will make a new 1/4" one tommorrow but will need to order 3/8" plate from onlinemetals.
[for my next venture to track mid august to test that one]
so 2 thumbs up for front system, tremendous improvement over stock, so you feel safe to proceed with that, would suggest the 1.62" front calipers vs the 1.75",
i might look into proprtioning valve but have to see if they are abs compatible
[wanders off to shower cause is v. stinky [ more than is usual even]]
haven't timed my video laps yet but by dash stopwatch laps where on average ~4-5 secs faster than prior visits [but also had much better tires this trip too ]
could not get the brakes to fade! pad wear neglible < 1mm for 145 tracks miles,
BUT
.. at the lunch break checking pads / pressures etc saw a rear caliper riding high, thought had lost a caliper mounting bolt but after pulling the wheel saw that the rear caliper had bent the long way -the rear leg of the 'n' streched and raised the caliper top some above the pad, pics later...really gasted my flabber that it could bend the long way
didn't dare track it any longer so came home early
stopped at a lowes on route home and will make a new 1/4" one tommorrow but will need to order 3/8" plate from onlinemetals.
[for my next venture to track mid august to test that one]
so 2 thumbs up for front system, tremendous improvement over stock, so you feel safe to proceed with that, would suggest the 1.62" front calipers vs the 1.75",
i might look into proprtioning valve but have to see if they are abs compatible
[wanders off to shower cause is v. stinky [ more than is usual even]]
07-19-2008, 06:53 PM
#15
Registered User
iTrader: (4)

Join Date: Jun 2005
Location: Right Here
Posts: 248
Likes: 0
Received 0 Likes
on
0 Posts
FYI, those Brembo-sized Centric plain rotors can be found for less:
Zeckhausenracing.com - Front $85/each Rear $73/each
Rockauto.com - Front $67/each Rear $60/each
Zeckhausenracing.com - Front $85/each Rear $73/each
Rockauto.com - Front $67/each Rear $60/each
07-20-2008, 07:11 AM
#17
Originally Posted by thinking
FYI, those Brembo-sized Centric plain rotors can be found for less:
Zeckhausenracing.com - Front $85/each Rear $73/each
Rockauto.com - Front $67/each Rear $60/each
Zeckhausenracing.com - Front $85/each Rear $73/each
Rockauto.com - Front $67/each Rear $60/each
There ya go! you can do it for sub $1300!
someone else posted that they could get you the four calipers for cheaper too
contact todd TCE ( a site sponser, TCE Performance products) they have some nice looking kits
Re: why the funky rear bracket -
wanted to keep the rear rotor with parking brake
wanted to use the larger forged billet superlite calipers ( much bigger pad than dynalites)
the rear stock caliper is much smaller than the front stock caliper so the car's mounting points stick out further up the face of the rotor to reach the smaller caliper, when putting a bbk caliper in this location the mounting holes overlap.
the smaller dynalites aren't as tall as the superlites so they can fit,
could have abandoned the parking brake (but none of the spot p. brake calipers i see offer wide enough disc space to fit) and used a front rotor on the back which then gives [*looks to give,i never bolted it together] enough room to leave it in the stock place (the next back up plan)
am off to take apart the failed bracket - am betting it failed near or at the top caliper mounting hole -
current plan - redo in 3/8" plate, looking into stronger alloys ( then ?alloy weldable plate from lowe's)
holding the thing you wouldn't believe it could fail like that without putting it between two train cars, i had tried to round everything to eliminate 'stress focal points'
my destuctive testing was succesful however, i was purposely seeing how hard i could stop the car into the sebring turn 7 hairpin, 110's to 30's mph,
vipers and vettes where hitting their brakes before i was , and the brakes where 'awesome' , 98% on the tomatometer!
and NO significant pad wear, i bet i get 4-5 (full) track days out of each set,
the rotors are still ~new smooth also, just some heat discoloration
before, with the stock b.s, i had to use good brake management to keep the car on track all day, i always tap the brake at the furthest cones to make sure i have pedal and then brake early and let the downshifting do some of the braking (coasting more)
when the pads started feeling buttery i'd give up on 5th gear and just stay at 100ish top speed and just practice my line through the corners ( which is where all the fun is anyway) try to run it like a race miata - not too fast but v quick through the corners, they are almost always the ones you should follow around to get on the right / fast lines - it's easy to be fast in a viper, vette or gt 500 ( had four of them out yest - have vid of 4 500's all running in a line-from chase car mode) but to be fast with only ~140hp is talent!
Last edited by burntZ; 07-20-2008 at 07:14 AM. Reason: sucks at spelling...
07-20-2008, 07:44 PM
#18
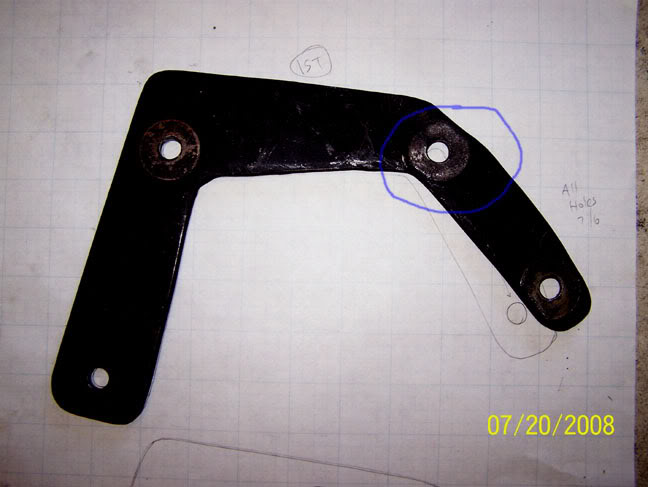
FAIL!
so it deformed around the bolt hole, the minimum thickness from inside of hole to side of bracket was 1.2 cm to top & 1.1 cm to the bottom
and i figure the torque used the bolt as a fulcrum?
so i added as much material as i could around the axle housing (which this fits over)
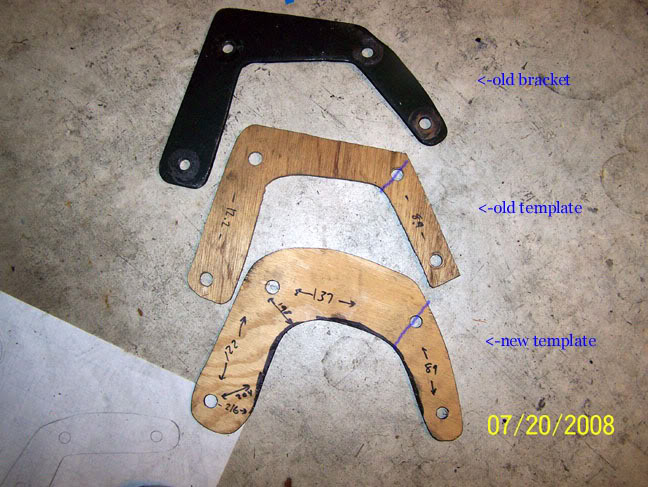
so the blue lines are thinnest points across bolt hole,
old bracket was 3.5cm (-1.1cm for the hole = ~2.4 cm material)
new one 5.1 cm (-1.1 hole = ~4cm of material)
therefore ~67% more material, & when made out of of 3/8 ~ 100% more material so it should handle twice the torque before bending?
or does that mean it will only bend 1/2 as far?
stay tuned....
07-21-2008, 07:03 AM
#19
Sponsor
TCE Performance Products
TCE Performance Products
iTrader: (1)

Join Date: Sep 2006
Location: AZ
Posts: 137
Likes: 0
Received 0 Likes
on
0 Posts
I'd suggest .375 or greater thickness if you can for that large a bracket.
Calipers will "twist" to a point based upon their mount offsets to the rotor- trying to pull to the mounts. And if you have some lighter brackets with a high fulcrum as you mentioned I'd say they'll offer greater deflection. If you goal is to fit all this around the center spindle/axle area you may not have much choice than to do as you have. One thing that could have helped you here was to use a radial mount caliper to allow you some more meat on the bracket then stud mount the caliper. More costly however....
BTW those hole centers are 3.5" on the fronts and 5.25" on the rears. (FSL front and FDL rears)
07-21-2008, 10:28 AM
#20
Banned
iTrader: (10)

Join Date: Apr 2006
Location: Orange Countizzle
Posts: 723
Likes: 0
Received 0 Likes
on
0 Posts
BBK 4 sale If anyone is interested, I have a set of Wilwood 6 Piston fronts (13'' slotted/drilled) / 4 piston rears(slotted/drilled) for sale! The only down side is that you will need the Hub Hat(parts#170-9289) and the Bracket (seems everyone's fabing one but new from Wilwood is $37.43 each). PM if interested.
Last edited by evil_tt; 07-21-2008 at 11:26 AM.