Wheel Hub Assembly (wheel bearing) replacement - FRONT - HOW TO
 12-12-2008, 06:26 PM
#1
Well, after almost 6 years of ownership, as well as membership on this site, I've decided to give back. I haven't seen a how to for replacing the front wheel hub assembly on the 350Z, so I decided to write one up since I was replacing mine.
This was done on my car, which is a 2003 Track model. Steps might be different on cars not equipped with the Brembo brakes.
Additionally, I take no responsibility for what happens to your car if you try to do this on your own. This i merely a documentation of my experience replacing the wheel hub assembly on my car.
Parts and Tools Needed:
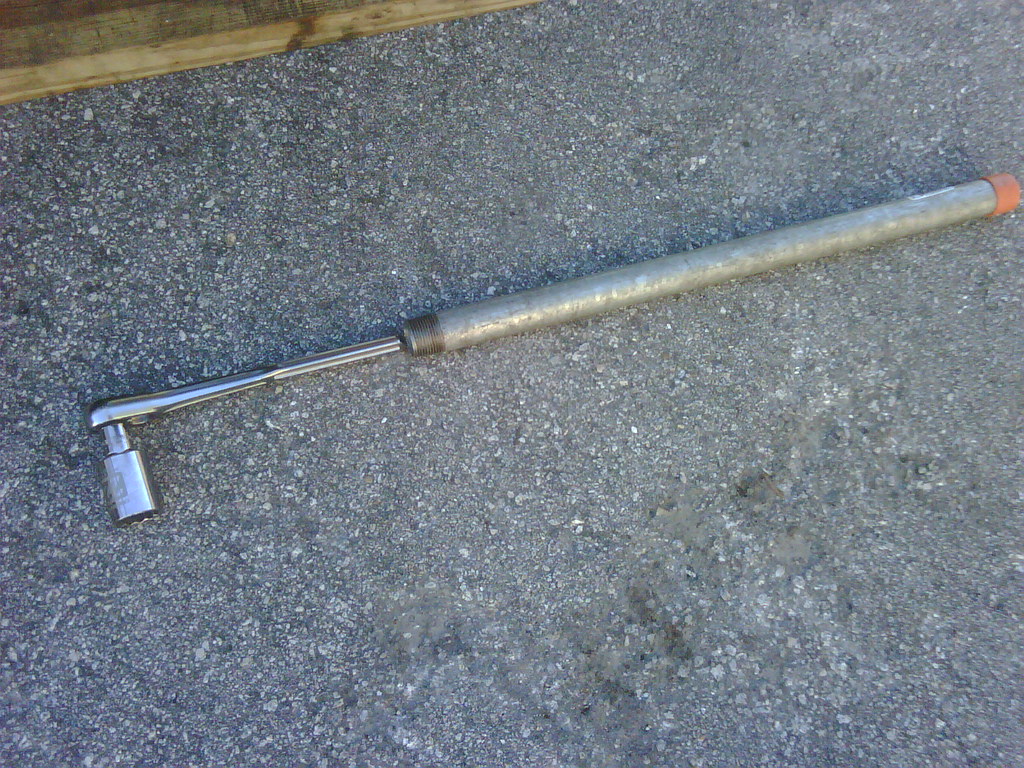
17mm socket
22mm socket
socket wrench
torque wrench (if you want to be accurate when re-tightening bolts)
small extension for socket wrench
floor jack
jack stand
zip ties or string or wire
a breaker bar/cheater bar of some sort is helpful
Step 1:
Loosen the lug nuts on the wheel/s where you will be replacing the hub assembly.
Step 2:
Jack up the car and place jack stands. I have to drive onto a block of wood to get my car high enough to fit the jack under the side skirt. (Note: if you are unsure of where to jack up the car from or where to place the jack stands, there is a picture in the service manual, and also floating around on this site.)
Step 3:
Completely loosen lug nuts and remove wheel.

Step 4:
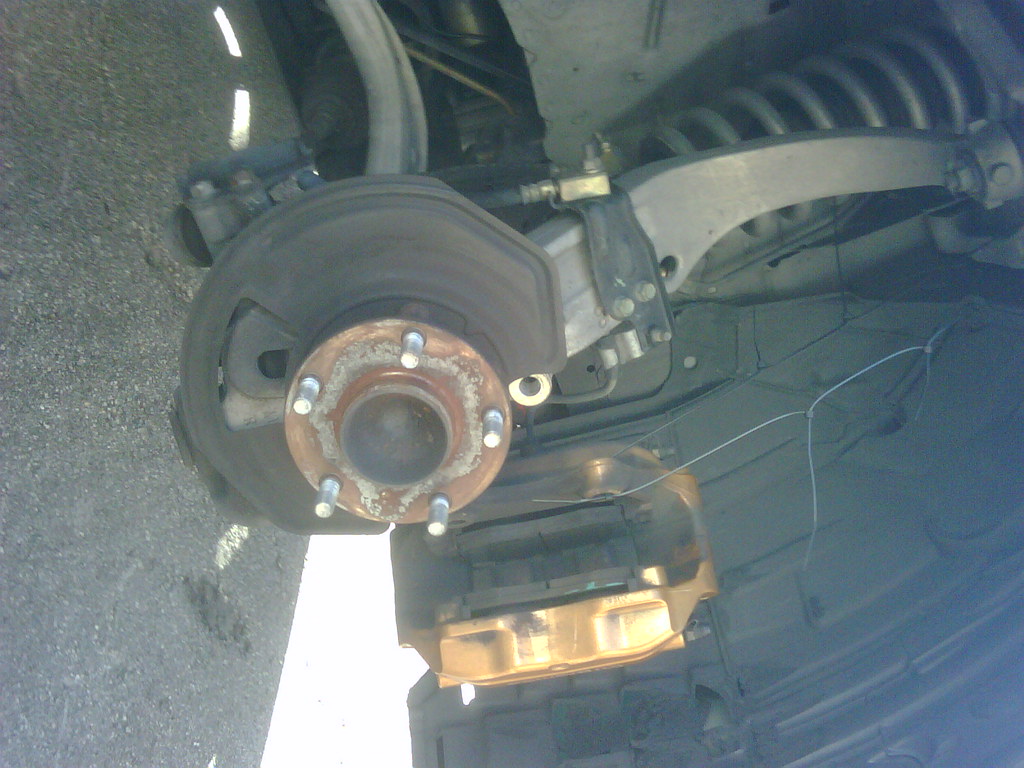
Remove the two 22mm bolts holding the brake caliper in place. I found it difficult to remove with just my 1/2" drive socket wrench, so I used a pipe on the wrench to provide extra leverage.
To provide some support for the brake caliper, I zip-tied it to the top of the control arm.

Step 5:
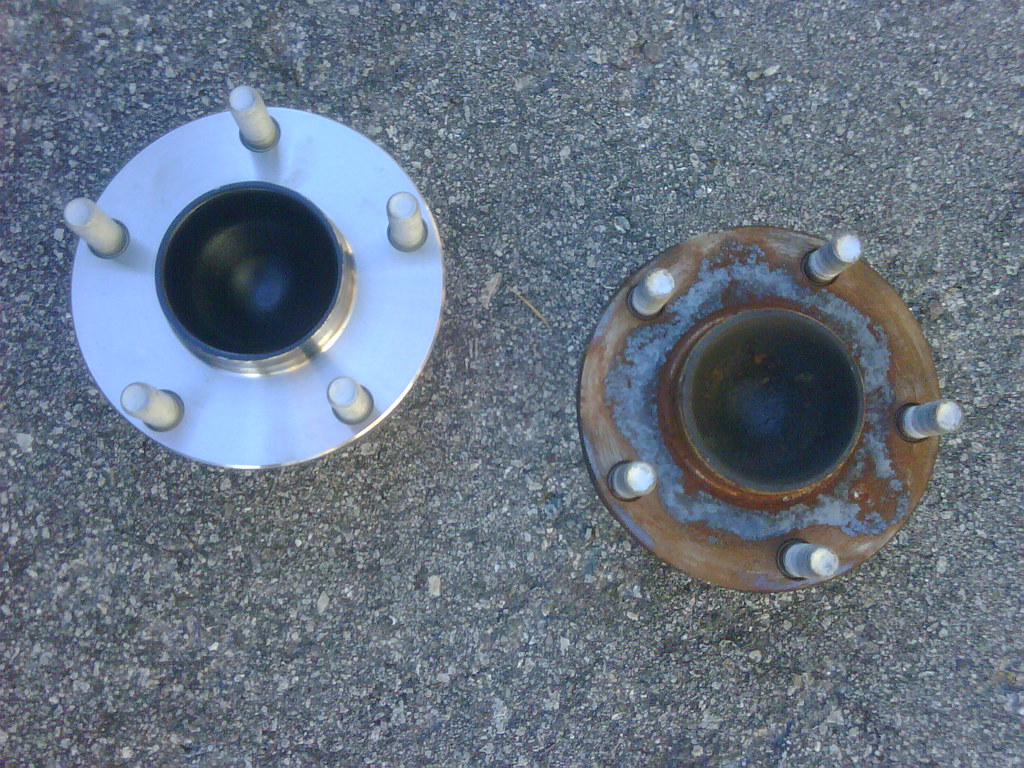
Remove the rotor from the hub. Some people have claimed to have trouble removing their rotor, but mine slide right off. If you have trouble I recommend figuring out a solution with a 2x4 and mallet.
Step 6:
Remove the four 17mm bolts that hold the hub assembly in place. They are located behind the hub assembly. One of the bolts is difficult to access due to the steering knuckle being in the way. I jacked up the suspension a bit to try and make it easier, but am not really sure if it made any difference. You don't need to actually remove the bolt completely anyway so it's not a problem.
The brake shield will also come off, so note its orientation.
Caution: When removing the four bolts, be careful not to have the hub assembly fall off the car and onto your foot while wearing sandals. The hub assembly is pretty heavy, and will hurt your foot (ask me how I know! )
)

Step 7:
Put it all back together with the new hub assembly!
Torque specs are:
Four 17mm bolts holding hub assembly: 78.5-98.1nm/ 58-72ft-lb
Two 22mm bolts holding brake caliper: 151-152nm/ 111.4-112.1lb-ft

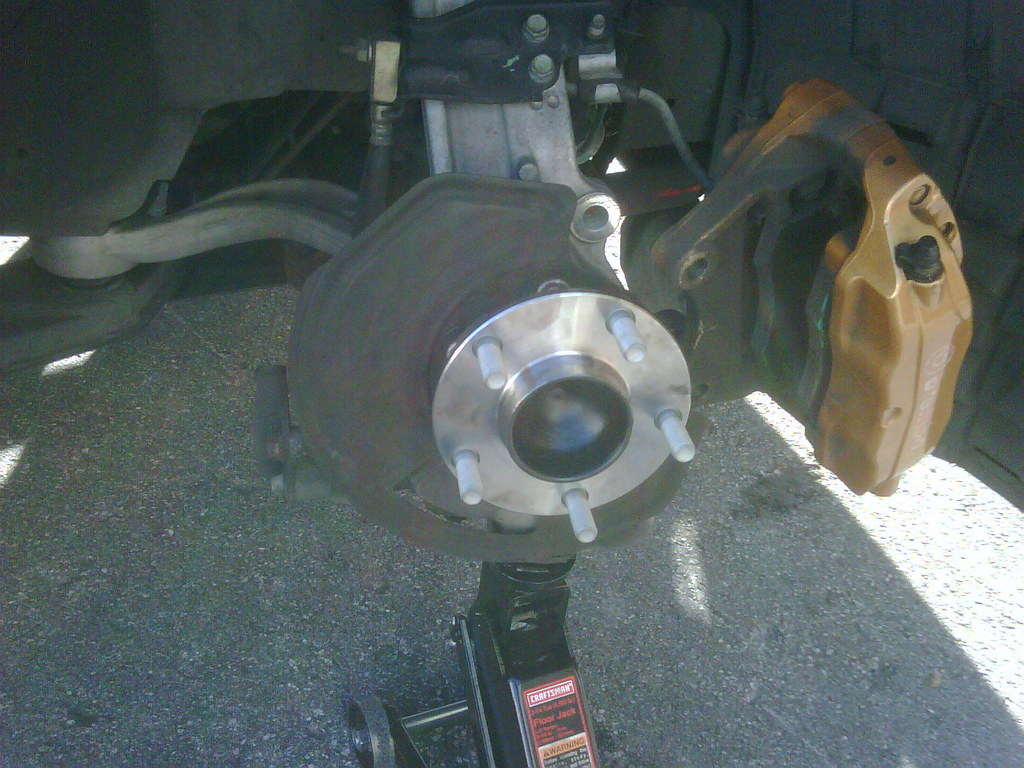
Step 8:
Take car for test drive and enjoy improved driving.

Step 9:
Kick back and enjoy a brewsky of your choice (of in my case what was given to me for free... thanks w0ady!)

The car drives soooo much better now that I replaced the faulty/worn bearing. Before I had serious noise coming from that bearing. It sounded like my friends lifted truck on off roading tires, but worse.
My brake pedal also feels much improved. The engagement of the brakes is way more solid and the pedal is much less mushy.
Overall, this is a pretty simple DIY. This was my first time replacing a part like this, and it took me about 45 min to replace the front passenger side assembly, start to finish. If you can lift the car and remove the wheel, you should be able to replace the hub assembly.
This was done on my car, which is a 2003 Track model. Steps might be different on cars not equipped with the Brembo brakes.
Additionally, I take no responsibility for what happens to your car if you try to do this on your own. This i merely a documentation of my experience replacing the wheel hub assembly on my car.
Parts and Tools Needed:
17mm socket
22mm socket
socket wrench
torque wrench (if you want to be accurate when re-tightening bolts)
small extension for socket wrench
floor jack
jack stand
zip ties or string or wire
a breaker bar/cheater bar of some sort is helpful
Step 1:
Loosen the lug nuts on the wheel/s where you will be replacing the hub assembly.
Step 2:
Jack up the car and place jack stands. I have to drive onto a block of wood to get my car high enough to fit the jack under the side skirt. (Note: if you are unsure of where to jack up the car from or where to place the jack stands, there is a picture in the service manual, and also floating around on this site.)
Step 3:
Completely loosen lug nuts and remove wheel.
Step 4:
Remove the two 22mm bolts holding the brake caliper in place. I found it difficult to remove with just my 1/2" drive socket wrench, so I used a pipe on the wrench to provide extra leverage.
To provide some support for the brake caliper, I zip-tied it to the top of the control arm.
Step 5:
Remove the rotor from the hub. Some people have claimed to have trouble removing their rotor, but mine slide right off. If you have trouble I recommend figuring out a solution with a 2x4 and mallet.
Step 6:
Remove the four 17mm bolts that hold the hub assembly in place. They are located behind the hub assembly. One of the bolts is difficult to access due to the steering knuckle being in the way. I jacked up the suspension a bit to try and make it easier, but am not really sure if it made any difference. You don't need to actually remove the bolt completely anyway so it's not a problem.
The brake shield will also come off, so note its orientation.
Caution: When removing the four bolts, be careful not to have the hub assembly fall off the car and onto your foot while wearing sandals. The hub assembly is pretty heavy, and will hurt your foot (ask me how I know!
)Step 7:
Put it all back together with the new hub assembly!
Torque specs are:
Four 17mm bolts holding hub assembly: 78.5-98.1nm/ 58-72ft-lb
Two 22mm bolts holding brake caliper: 151-152nm/ 111.4-112.1lb-ft
Step 8:
Take car for test drive and enjoy improved driving.
Step 9:
Kick back and enjoy a brewsky of your choice (of in my case what was given to me for free... thanks w0ady!)
The car drives soooo much better now that I replaced the faulty/worn bearing. Before I had serious noise coming from that bearing. It sounded like my friends lifted truck on off roading tires, but worse.
My brake pedal also feels much improved. The engagement of the brakes is way more solid and the pedal is much less mushy.
Overall, this is a pretty simple DIY. This was my first time replacing a part like this, and it took me about 45 min to replace the front passenger side assembly, start to finish. If you can lift the car and remove the wheel, you should be able to replace the hub assembly.

The following users liked this post:
aviate (02-28-2018)
12-14-2008, 08:11 AM
#2

Excellent write up!
I have this on the to do list - i have an occasional nasty grinding under load which must be the bearing and REALLY didn't want to shovel a pile of money to the stealership - this seems definetly do able!
good pics!
Thanks!
[note to self - wear protective shoes while dropping things on toes... )
)
I have this on the to do list - i have an occasional nasty grinding under load which must be the bearing and REALLY didn't want to shovel a pile of money to the stealership - this seems definetly do able!
good pics!
Thanks!
[note to self - wear protective shoes while dropping things on toes...
)
 12-14-2008, 02:37 PM
#4
Also, just to clarify, I only replaced one of the assemblies. Some people state that you might as well change them all together, but I didn't see the point since the other bearings weren't giving me any problems. Also, I could have definitely benefited from replacing this earlier. I originally thought the noise I had was a result of my tires (kdw2). But once I replaced the tires, I realized that the noise was coming from somewhere else. Sucks, because I probably would have bought another set of the kdw2s if I had known.
It is easy to see if you have bearing wear by testing it for axial play. Lift up the side where you suspect a problem, hold the tire on the top and bottom and see if there is any free play pushing in and out on the top and bottom of the wheel.


Trending Topics
12-15-2008, 02:03 PM
#8
I bought it from autopartswarehouse.com. It is a Timken replacement part. Cost is $133, and has free shipping. You can buy OEM replacements also, but based on what other members said on this site, the Timkens should be just as good, if not exactly the same.
Here is the link..
http://www.autopartswarehouse.com/de...MHA590027.html
Here is the link..
http://www.autopartswarehouse.com/de...MHA590027.html
 12-17-2008, 03:53 AM
#10
haven't seen a write-up for the rear either. The rear isn't sold as an assembly, so you would need to pull the hub and pull the bearing. I have seen people say they will just pull the hub assembly off, and take it to a shop to get the old bearing pulled and the new bearing installed.


 04-05-2009, 09:41 AM
#18
04-06-2009, 02:33 PM
#19
REAR ROTOR REMOVAL:
Your bit about hammering the rear rotors off (and the other comment about soaking in WD40 or PB Blaster) are incorrect. No need for hammering or any brute force at all:
https://my350z.com/forum/autocross-r...ml#post3173770
"You need to loosen the parking brake shoes. There is a little rubber plug on your rotor. Align this plug so it is at 11 or 12 o'clock. Then remove the plug. Now, with a flathead screwdriver, you need to turn the adjuster to loosen the parking brake shoes. If you do this, the rotor will come off freely just as the fronts. I see too many threads of people pounding away, when that is totally unnecessary and probably damages your parking brake system and rotors. The FSM is your friend:
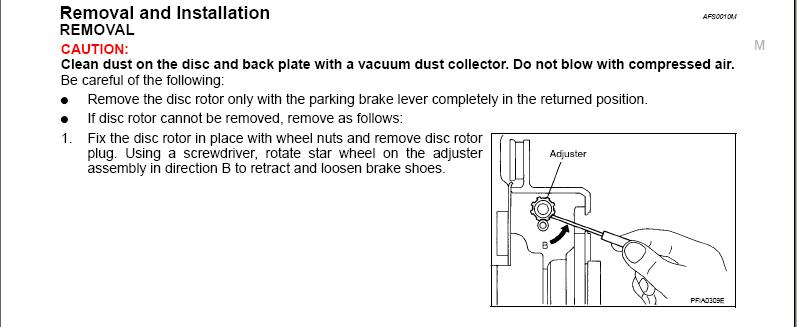
Once you have replaced your rotor or completed whatever work you are doing, you need to re-adjust the parking brake. From the FSM:

I thought I would add that it takes quite a few turns to loosen the rotor, so just keep at it!! Also, a flashlight helps in locating the adjuster if you have never adjusted it before...no pounding necessary!!"


