DIY - SPL Compression Rod Bushing Install
 09-07-2010, 05:01 AM
#1
350Z-holic

Thread Starter
iTrader: (60)
Join Date: Jan 2006
Location: San Antonio/I miss DFW, TX
Posts: 11,204
Likes: 0
Received 28 Likes
on
19 Posts
TOOLS NEEDED:
1. Impact - electric/air - recommended.
2. 19mm, 14mm & 10mm sockets, ratchet.
3. torque wrench ~ 104ft-lb capable.
4. PB blaster can.
5. pry bar or rubber hammer.
6. Spare cotter pin set. 2 each needed. (3/32" size - ill double check and update) :I use these:
7. DOM STEEL - see post 2 for details.
Installation method tools:
8a. PRESS - or run the arms over to a local shop separate from the car and use their press then go home and reinstall.
8b. use a large, wide opening vice as its not highly pressed in.
8c. use a large C-clamp styled ball joint remover tool.
- IE Harbor freight for all #8 items mentioned.
NOTE - I have had people ask me on other bushing install how to's (translink how to) along with this one:
If you want, you can send me your arms and I can press them out! so long as you can let the front of your car sit on jack stands. I don't mind as I already have all the right pieces of steel, press, etc...PM me as I'm a busy person.
Wing shaped undertray that is behind the engine oil undertray must be removed with 10mm sockets.
Start with spraying PB BLASTER at the huge 19mm nuts that hold the compression arm bushing in place with the under brace:
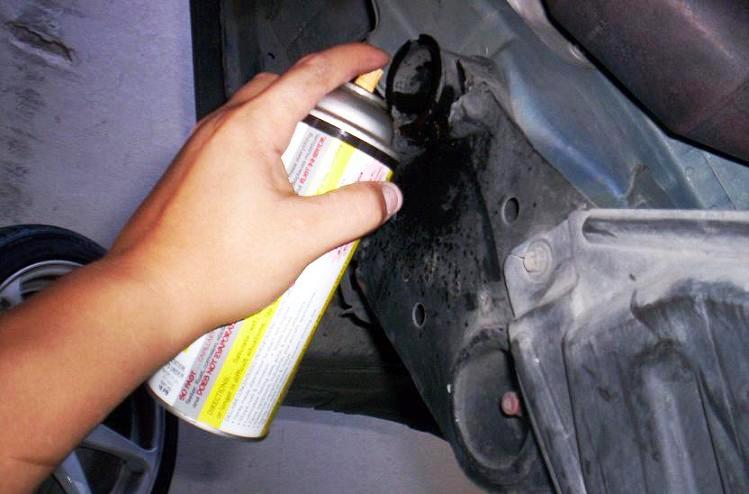
ALSO spray at the unibody above the bushing, so pb blaster flows down into the bushing to help separate the bushing from the stud that points down. This is crucial and its known to rust and cause issues like this:
https://my350z.com/forum/brakes-and-...wrong-fml.html
19mm NUT SOAKING IN PB BLASTER:
NOTE:!!!!
IMPACT: - use an impact to remove this nut. as you don't want to use a pry bar - you can possibly twist at a bad angle too much and risk breaking the unibody stud like this -
https://my350z.com/forum/brakes-and-...-problems.html
REMOVE THE UNDERBRACE:

Now with the underbrace removed, remove the nut at the compression arm ball joint by removing the cotter pin first.
Pry bar or rubber hammer hit the compression arm and it will slide down from the stud and come right off:

be sure not to hit the clutch slave line with the pry bar.
NOTE - you need to get spare cotter pins for re installation:
1. Impact - electric/air - recommended.
2. 19mm, 14mm & 10mm sockets, ratchet.
3. torque wrench ~ 104ft-lb capable.
4. PB blaster can.
5. pry bar or rubber hammer.
6. Spare cotter pin set. 2 each needed. (3/32" size - ill double check and update) :I use these:
7. DOM STEEL - see post 2 for details.
Installation method tools:
8a. PRESS - or run the arms over to a local shop separate from the car and use their press then go home and reinstall.
8b. use a large, wide opening vice as its not highly pressed in.
8c. use a large C-clamp styled ball joint remover tool.
- IE Harbor freight for all #8 items mentioned.
NOTE - I have had people ask me on other bushing install how to's (translink how to) along with this one:
If you want, you can send me your arms and I can press them out! so long as you can let the front of your car sit on jack stands. I don't mind as I already have all the right pieces of steel, press, etc...PM me as I'm a busy person.
Wing shaped undertray that is behind the engine oil undertray must be removed with 10mm sockets.
Start with spraying PB BLASTER at the huge 19mm nuts that hold the compression arm bushing in place with the under brace:
ALSO spray at the unibody above the bushing, so pb blaster flows down into the bushing to help separate the bushing from the stud that points down. This is crucial and its known to rust and cause issues like this:
https://my350z.com/forum/brakes-and-...wrong-fml.html
19mm NUT SOAKING IN PB BLASTER:
NOTE:!!!!
IMPACT: - use an impact to remove this nut. as you don't want to use a pry bar - you can possibly twist at a bad angle too much and risk breaking the unibody stud like this -
https://my350z.com/forum/brakes-and-...-problems.html
REMOVE THE UNDERBRACE:
Now with the underbrace removed, remove the nut at the compression arm ball joint by removing the cotter pin first.
Pry bar or rubber hammer hit the compression arm and it will slide down from the stud and come right off:
be sure not to hit the clutch slave line with the pry bar.
NOTE - you need to get spare cotter pins for re installation:
Last edited by JasonZ-YA; 01-12-2011 at 04:16 AM.

The following users liked this post:
photo2u (01-25-2018)
09-07-2010, 05:08 AM
#2
350Z-holic
Thread Starter
iTrader: (60)
Join Date: Jan 2006
Location: San Antonio/I miss DFW, TX
Posts: 11,204
Likes: 0
Received 28 Likes
on
19 Posts
PRESS OUT THE OEM RUBBER BUSHING:
NOW, THE SPL INSTRUCTIONS - gives part numbers to two huge sears sockets that you can go out and purchase and use ONE time for pressing out these bushings.
The sockets run about 50 bucks for the two!!?!?


So a common technique is to find correctly sized steel round stock to use as press drivers and receivers........
SPL recommended sockets to use ~ $50:
Driver - sears p/n 47754 = 1-11/16
Receiver - sears p/n 47793 = 2-3/8
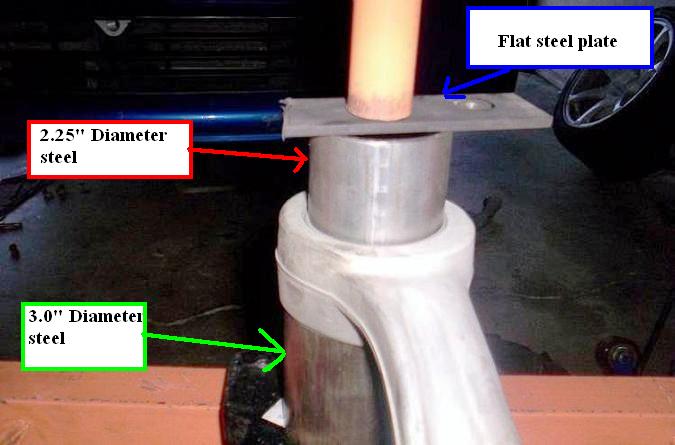
Z-YA recommended DOM STEEL ~ $5
Driver - 2.25" Out side diameter with 1/8 wall x 1.5 inch tall.
Receiver - 3.0" Out side diameter with 1/4 wall x 2.5 inch tall.
Flat plate to span across - 2"x3"x1/4" thick plate is fine.
Call around to your local steel salvage yards and find a place that will cut by the inch/foot and let them know what you need. usually it will be a cash sale, no receipt type deal. Also ask if they have a scrap bin and take a ruler/scale with you, as these are common sizes and usually easy to find.

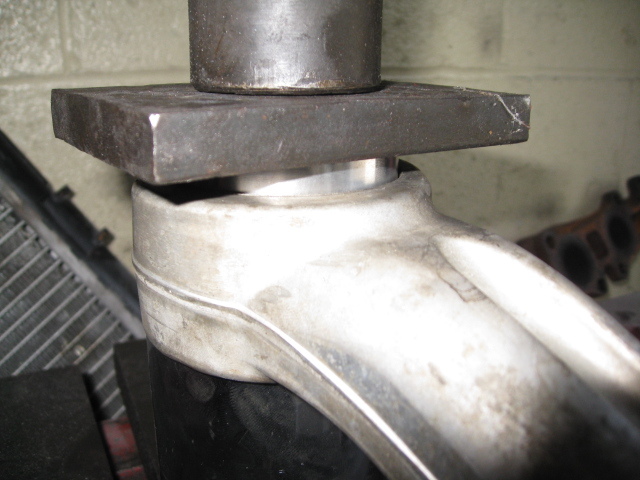
Using DOM STEEL to remove the old oem bushing:
OEM RUBBER BUSHING REMOVED FROM COMPRESSION ARM:

[B]
NOW, THE SPL INSTRUCTIONS - gives part numbers to two huge sears sockets that you can go out and purchase and use ONE time for pressing out these bushings.
The sockets run about 50 bucks for the two!!?!?
So a common technique is to find correctly sized steel round stock to use as press drivers and receivers........
SPL recommended sockets to use ~ $50:
Driver - sears p/n 47754 = 1-11/16
Receiver - sears p/n 47793 = 2-3/8
Z-YA recommended DOM STEEL ~ $5
Driver - 2.25" Out side diameter with 1/8 wall x 1.5 inch tall.
Receiver - 3.0" Out side diameter with 1/4 wall x 2.5 inch tall.
Flat plate to span across - 2"x3"x1/4" thick plate is fine.
Call around to your local steel salvage yards and find a place that will cut by the inch/foot and let them know what you need. usually it will be a cash sale, no receipt type deal. Also ask if they have a scrap bin and take a ruler/scale with you, as these are common sizes and usually easy to find.
Using DOM STEEL to remove the old oem bushing:
OEM RUBBER BUSHING REMOVED FROM COMPRESSION ARM:
[B]
Last edited by JasonZ-YA; 09-23-2010 at 06:47 AM.
The following users liked this post:
photo2u (01-25-2018)
09-07-2010, 05:09 AM
#3
350Z-holic
Thread Starter
iTrader: (60)
Join Date: Jan 2006
Location: San Antonio/I miss DFW, TX
Posts: 11,204
Likes: 0
Received 28 Likes
on
19 Posts
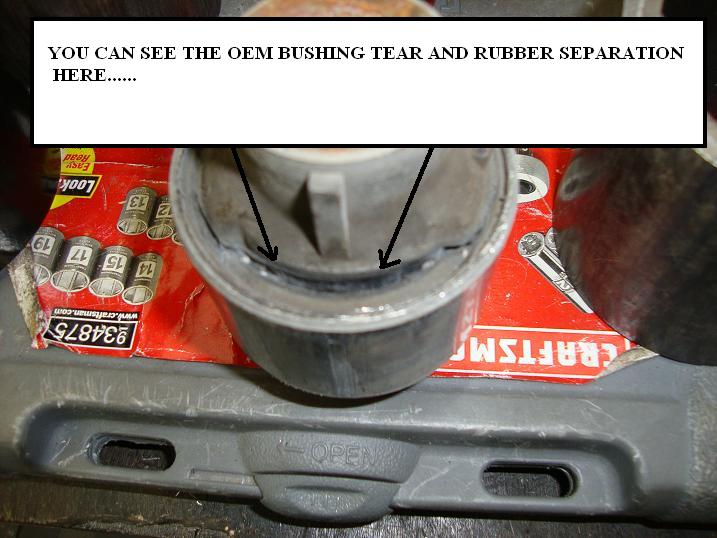
REASON FOR REPLACEMENT - TORN!!!
HERE IS THE DAMAGE: TORN COMPRESSION ARM BUSHING, IE BAD CASTER!

BEFORE PRESSING IN THE NEW SPL BUSHING - YOU MUST MEASURE TO ENSURE PROPER PRESS FIT:

HERE IS THE DAMAGE: TORN COMPRESSION ARM BUSHING, IE BAD CASTER!
BEFORE PRESSING IN THE NEW SPL BUSHING - YOU MUST MEASURE TO ENSURE PROPER PRESS FIT:
Last edited by JasonZ-YA; 09-07-2010 at 05:35 AM.
09-07-2010, 05:10 AM
#4
350Z-holic
Thread Starter
iTrader: (60)
Join Date: Jan 2006
Location: San Antonio/I miss DFW, TX
Posts: 11,204
Likes: 0
Received 28 Likes
on
19 Posts
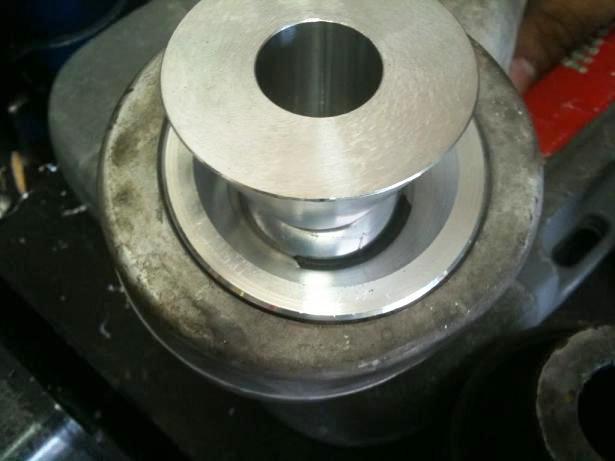
NOW TIME TO PUT THE SPL BUSHING IN:
COMPRESSION ARM MUST BE ORIENTED WHERE RECEIVING TAPERED EDGE IS UP TO ACCEPT THE BUSHING:

PRESSING THE SPL BUSHING IN:
Just need the flat plate to span the bushing. *pic borrowed from other thread.
SPL INSTALLED:

Last edited by JasonZ-YA; 09-07-2010 at 05:36 AM.
09-07-2010, 05:10 AM
#5
350Z-holic
Thread Starter
iTrader: (60)
Join Date: Jan 2006
Location: San Antonio/I miss DFW, TX
Posts: 11,204
Likes: 0
Received 28 Likes
on
19 Posts
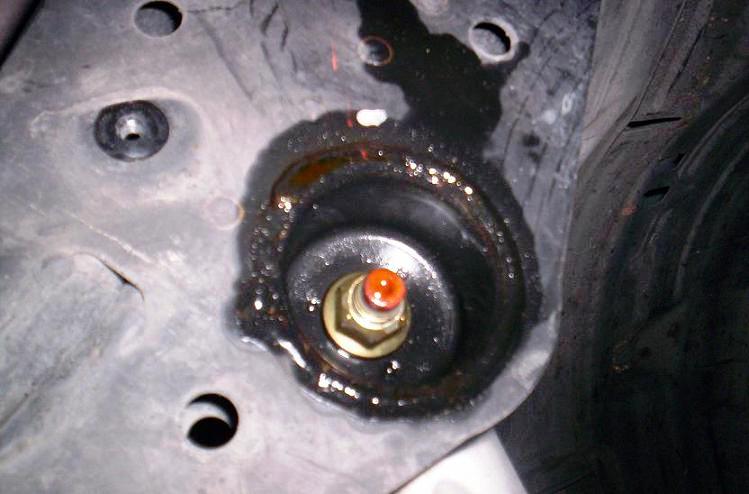
Prior to reinstalling the Compression arm with the newly pressed in SPL bushing, take good note of the downward pointing stud.......most i have seen have been rusted over and showing signs of corrosion. I recommend two products prior to reinstalling....
Rust converter:

Found at any local autozone/autoparts store - turns rust into a paintable primer.
And
I recommend reinstalling with the stud wet with anti-seize grease:

REINSTALLED:
I USED BLUE TAPE TEMPORARILY TO HOLD THE BUSHING CONE IN PLACE WHILE I PUT THE BRACE BACK ON:

DONE!
BACK ON THE CAR:

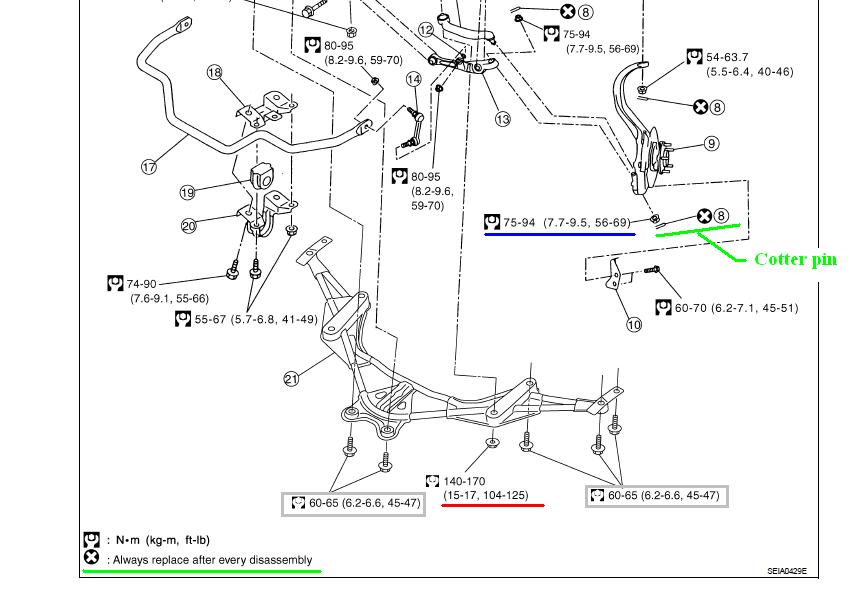
FSM (factory service manual) torque specs for re installing the under brace and all nuts associated:
I torqued the 19mm nut at the compression arm at 104ft-lbs, as its no longer a range with the elimination of rubber!
The other "ranges" are due to the soft unibody mounts for the remaining underbody brace 14mm bolts and or ball joint location.
-J
Rust converter:
Found at any local autozone/autoparts store - turns rust into a paintable primer.
And
I recommend reinstalling with the stud wet with anti-seize grease:
REINSTALLED:
I USED BLUE TAPE TEMPORARILY TO HOLD THE BUSHING CONE IN PLACE WHILE I PUT THE BRACE BACK ON:
DONE!
BACK ON THE CAR:
FSM (factory service manual) torque specs for re installing the under brace and all nuts associated:
I torqued the 19mm nut at the compression arm at 104ft-lbs, as its no longer a range with the elimination of rubber!
The other "ranges" are due to the soft unibody mounts for the remaining underbody brace 14mm bolts and or ball joint location.
-J
Last edited by JasonZ-YA; 01-12-2011 at 04:07 AM.
09-07-2010, 05:18 AM
#6
350Z-holic
Thread Starter
iTrader: (60)
Join Date: Jan 2006
Location: San Antonio/I miss DFW, TX
Posts: 11,204
Likes: 0
Received 28 Likes
on
19 Posts
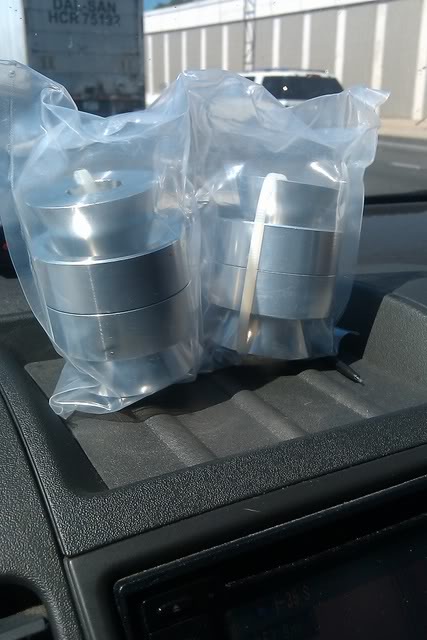
I Would like to thank ACIDJAKE75 for some of the pics provided as we did our installs within days of each other as I actually drove down to Austin while on a trip to SA and picked up my set along with the 3rd set for Nexx........
(my set shown here in my Xterra)
82fb1c4a.jpg?t=1281500433
My pup going with me to pick them up in Austin:
e904928e.jpg?t=1281982542
-J
(my set shown here in my Xterra)
82fb1c4a.jpg?t=1281500433
My pup going with me to pick them up in Austin:
e904928e.jpg?t=1281982542
-J
Last edited by JasonZ-YA; 09-07-2010 at 05:37 AM.
09-07-2010, 05:38 AM
#7
Thanks Bud! Great write-up as usual holmes.
Blue tape saved me some hassle when putting it all back together. With your pics and your steel parts (THANK YOU BTW!) - the install was breeze!
Car drives straight as an arrow - I still need to get alignment done but I dont pull anymore..
Blue tape saved me some hassle when putting it all back together. With your pics and your steel parts (THANK YOU BTW!) - the install was breeze!
Car drives straight as an arrow - I still need to get alignment done but I dont pull anymore..
Trending Topics
 09-07-2010, 10:38 AM
#9
350Z-holic
Thread Starter
iTrader: (60)
Join Date: Jan 2006
Location: San Antonio/I miss DFW, TX
Posts: 11,204
Likes: 0
Received 28 Likes
on
19 Posts
Would like to add...........
People have PM'd me already asking - "HOW DO I KNOW IF I NEED THIS BUSHING"
The oem bushing will TEAR once you lower your the 350z! let me explain!
The oem rubber bushing is designed to be at rest with a stock height Z.......once the Z is lowered, be it with springs, coilovers, doesnt matter the bushing is now being stretched as the compression arm is no longer level as it was at stock height......
RUBBER ISN'T MEANT TO BE PULLED CONSTANTLY! once again! if you lowered your Z, i would bet its torn! simple as that!
UNAWARE DAMAGE:
Also, if you have ever jacked up the front of the car and left the wheels on then you have prematurely added to this bushing tearing..........
HOW DO I CHECK:
well you can easily jack the front of the Z up and remove the wheels......put a flash light on the bushing and push down on the entire front spindle/suspension and you can easily see if its tearing, already torn....
It will look like the pics i already posted:

The other way would be to get an alignment.........look at your last alignment sheet, if your caster wasn't matching, that bushings torn! done and done...
Honestly, if your gonna lower a Z, and hope to have a good alignment, then this compression arm bushing should be on your list along with your springs/coilovers, etc... ONCE AGAIN, if your car is lowered, this bushing is probably poo poo...............
Doesn't matter if you lowered an inch or a mile, torn bushing is torn bushing!!! (F&F quote FTW)
-J
People have PM'd me already asking - "HOW DO I KNOW IF I NEED THIS BUSHING"
The oem bushing will TEAR once you lower your the 350z! let me explain!
The oem rubber bushing is designed to be at rest with a stock height Z.......once the Z is lowered, be it with springs, coilovers, doesnt matter the bushing is now being stretched as the compression arm is no longer level as it was at stock height......
RUBBER ISN'T MEANT TO BE PULLED CONSTANTLY! once again! if you lowered your Z, i would bet its torn! simple as that!
UNAWARE DAMAGE:
Also, if you have ever jacked up the front of the car and left the wheels on then you have prematurely added to this bushing tearing..........
HOW DO I CHECK:
well you can easily jack the front of the Z up and remove the wheels......put a flash light on the bushing and push down on the entire front spindle/suspension and you can easily see if its tearing, already torn....
It will look like the pics i already posted:
The other way would be to get an alignment.........look at your last alignment sheet, if your caster wasn't matching, that bushings torn! done and done...
Honestly, if your gonna lower a Z, and hope to have a good alignment, then this compression arm bushing should be on your list along with your springs/coilovers, etc... ONCE AGAIN, if your car is lowered, this bushing is probably poo poo...............
Doesn't matter if you lowered an inch or a mile, torn bushing is torn bushing!!! (F&F quote FTW)
-J
Last edited by JasonZ-YA; 09-17-2010 at 04:55 AM.


 11-04-2010, 02:18 PM
#14

Great write up. I just changed mine out on a 2005 G35 Sedan. This write up made things very simple. The longest part for me was that I couldn't find any 2.25 tubing in town. What I found instead was some 2" pipe (2.375" OD), and I had to spend about an hour on the belt sander to bring the OD down about 2.330". Other than the belt sander time, this was an easy install.
Curiuosly though, my OEM bushings were worn and slightly torn, but the design of my bushings is different that those shown in the OP's pics. Seems like Infiniti/Nissan must have redesigned the bushings to last longer. It is hard to explain, but my OEM bushings had "open" sections rather than having rubber all the way around the iside of the bushing. I'd takepics, but I already threw out the OEM bushings.
I can say that I definitely feel the bump alot more with the SPL bearings in there. I'm almost thinking of readjusting my shocks as it seems they are too stiff now and don'tas much rebound control as they did before. Anyone else notice anything similar?
Andrew
11-05-2010, 04:32 AM
#15
350Z-holic
Thread Starter
iTrader: (60)
Join Date: Jan 2006
Location: San Antonio/I miss DFW, TX
Posts: 11,204
Likes: 0
Received 28 Likes
on
19 Posts
Great write up. I just changed mine out on a 2005 G35 Sedan. This write up made things very simple. The longest part for me was that I couldn't find any 2.25 tubing in town. What I found instead was some 2" pipe (2.375" OD), and I had to spend about an hour on the belt sander to bring the OD down about 2.330". Other than the belt sander time, this was an easy install.
either way, glad you got it covered...
Curiously though, my OEM bushings were worn and slightly torn, but the design of my bushings is different that those shown in the OP's pics. Seems like Infiniti/Nissan must have redesigned the bushings to last longer. It is hard to explain, but my OEM bushings had "open" sections rather than having rubber all the way around the inside of the bushing. I'd takepics, but I already threw out the OEM bushings.
looked something like this right? as in, with open pockets??

-J

 11-21-2010, 03:01 PM
#18

Just checked my bushings this morning.... Yep they are torn. Guess I'll be doing this mod very soon.
One question I got for all you guys that have done it so far... Any NVH compared to using OEM bushings? I figured there would be since your going from soft rubber to aluminum bushings.
One question I got for all you guys that have done it so far... Any NVH compared to using OEM bushings? I figured there would be since your going from soft rubber to aluminum bushings.
Last edited by exarmyguy; 11-21-2010 at 04:23 PM.

