Bought a Magellan 1700 GPS 7 inch screen fits in Cubby
 06-03-2013, 09:16 PM
#101
Registered User
iTrader: (1)

Join Date: Mar 2010
Location: Michigan
Posts: 166
Likes: 0
Received 0 Likes
on
0 Posts
Not sure where to start, but basically the kenwood unit sits in the rear and everything was extended from the front to make it as much plug and play as possible.
The headunit is accessible by just removing the rear plastics. I had to cut a bit of the rear metal to fit the unit. The screen was extended with a custom 2.5 meter cable (70pin). The original nissan hu just sends the audio to the kenwood through the aux port as a video 1 input. Steering wheel controls are connected to the kenwood only. Stock audio kno_b controls outline of the main unit into the kenwood.
Remote has ir sensor using the nissan controls linked to the kenwood ir remote with a voltage drop so it gets 3.0v when the car is turned on.
I have a lot of schematics from the project, I kept it in case any of my friends want to do this to their Z, it took a decent amount of time to get it all planned, wired, installed, and tested. Some parts took a bit of time to order as well.
I wrapped all of the lines in wire loom, ran it from the front to the back, installed all the plastics again and it was testing time.
PM me with any questions or I can answer them here. I started a build thread but people did not reply, so I didnt bother posting more detail on it.
Last edited by Linuxglobal; 06-08-2013 at 05:58 PM.
 06-08-2013, 02:22 PM
#102

OP here nice to see how many people have followed through with this MOD after all this time. 
Anyways i ended up getting a double din installed & now my Magellan was sitting collecting dust.I decided to install it in the Upper chubby and go from there.
The screen is not as washed out in the Upper chubby being recessed as it was in the 06 Chubby as mounted on the first page. This was my number one issue with the Magellan i could'nt see **** driving during the day. Spike lol..
I was not going to pay $325 for non functioning buttons + $50 for Mask Finisher.
I got the Nav dash from the Dealer this week & started hacking away.This is what i came up with. Installed this morning. Some spots i have to touch up,dash scratches so damn easily
Last edited by kham25; 06-08-2013 at 03:46 PM.
06-08-2013, 02:26 PM
#103
Registered User
iTrader: (8)

Join Date: May 2009
Location: Mississauga, Canada
Posts: 402
Likes: 0
Received 0 Likes
on
0 Posts
Nice! I just got the navi piece from Mike at concept z performance. Also picked up a Magellan 1700 this week. I'm waiting on the rear view camera from eBay lol as for the button panel area, I'm going to fab something up and wrap it in black leather while relocating the gps unit's speaker somewhere
06-08-2013, 02:31 PM
#104
Nice! I just got the navi piece from Mike at concept z performance. Also picked up a Magellan 1700 this week. I'm waiting on the rear view camera from eBay lol as for the button panel area, I'm going to fab something up and wrap it in black leather while relocating the gps unit's speaker somewhere

BTW you can clearly hear the speaker behind the dash no need to relocate.. I tested it out before putting everything back together
Last edited by kham25; 06-08-2013 at 02:35 PM.
06-10-2013, 03:03 PM
#105
Registered User
iTrader: (8)
Join Date: May 2009
Location: Mississauga, Canada
Posts: 402
Likes: 0
Received 0 Likes
on
0 Posts
did you hardwire the GPS to the car? I've been reading into this, the Magellan's car adapter converts from 12v to 5v, so I can't just cut the cigarette socket part and hardwire it like that. I'm guessing I have to get an inline fuse or just get a socket extension in order to maintain the converter in the cigarette socket.
06-10-2013, 03:06 PM
#106
Registered User
iTrader: (1)
Join Date: Mar 2010
Location: Michigan
Posts: 166
Likes: 0
Received 0 Likes
on
0 Posts
did you hardwire the GPS to the car? I've been reading into this, the Magellan's car adapter converts from 12v to 5v, so I can't just cut the cigarette socket part and hardwire it like that. I'm guessing I have to get an inline fuse or just get a socket extension in order to maintain the converter in the cigarette socket.
06-10-2013, 03:19 PM
#107
Registered User
iTrader: (8)
Join Date: May 2009
Location: Mississauga, Canada
Posts: 402
Likes: 0
Received 0 Likes
on
0 Posts
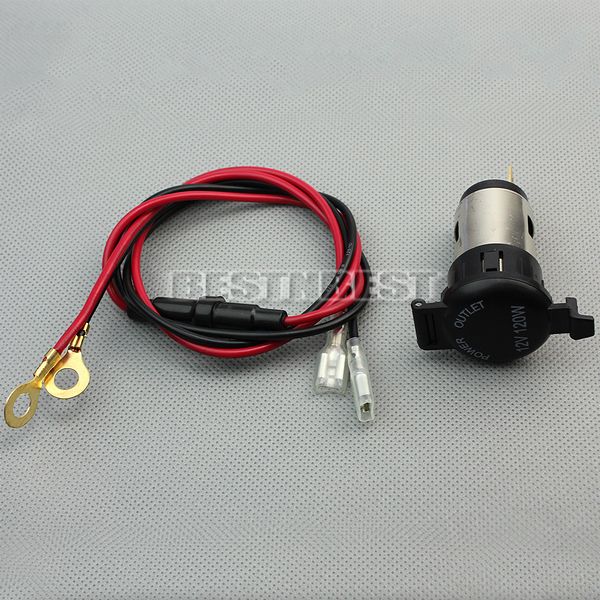
my concern is that the input on the plug is 12v and it outputs 5v to the GPS unit.
So my understanding from what you're saying, if I cut off the part circled in red in the pic attached and hardwire that to the radio's power, wouldn't it be sending 12v to the GPS and possibly fry it?
So my understanding from what you're saying, if I cut off the part circled in red in the pic attached and hardwire that to the radio's power, wouldn't it be sending 12v to the GPS and possibly fry it?
06-10-2013, 03:26 PM
#108
Registered User
iTrader: (1)
Join Date: Mar 2010
Location: Michigan
Posts: 166
Likes: 0
Received 0 Likes
on
0 Posts
my concern is that the input on the plug is 12v and it outputs 5v to the GPS unit.
So my understanding from what you're saying, if I cut off the part circled in red in the pic attached and hardwire that to the radio's power, wouldn't it be sending 12v to the GPS and possibly fry it?
So my understanding from what you're saying, if I cut off the part circled in red in the pic attached and hardwire that to the radio's power, wouldn't it be sending 12v to the GPS and possibly fry it?
That way the 12v will go to the adapter and the gps will get 5v.
 06-10-2013, 08:29 PM
#110
Registered User
iTrader: (8)
Join Date: May 2009
Location: Mississauga, Canada
Posts: 402
Likes: 0
Received 0 Likes
on
0 Posts
Gonna end up using an extension so that I don't have to ruin the original adapter in case I decide to swap units and sell off in the future. And by going the extension method, I can simply cut it and hardware it directly to the radio power...plus I don't have a soler nor have I ever soldered anything lol
06-10-2013, 08:32 PM
#111
Registered User
iTrader: (1)
Join Date: Mar 2010
Location: Michigan
Posts: 166
Likes: 0
Received 0 Likes
on
0 Posts
Gonna end up using an extension so that I don't have to ruin the original adapter in case I decide to swap units and sell off in the future. And by going the extension method, I can simply cut it and hardware it directly to the radio power...plus I don't have a soler nor have I ever soldered anything lol
 Just make sure you tape it together just so it doesnt slip out of the 12v socket over time. Solder cleans up well but i see your point down the road.
 I made so many little adapters for my headunit swap, you can actually make your own 5v step down driver if you want to get creative.
06-12-2013, 03:49 PM
#112
New Member

It�s wise to keep the Megellan�s power adapter intact. The adapter does in fact step-down the voltage, and also controls power spiking insuring a uniform power supply protecting the device and optimizing its processes.
The inexpensive and simple way to do this purchasing a generic power adapter.
Simply plug the Magellean into its own power adapter, plug the Megellan power adapter into this generic power plug (shown above), and wire the generic power plug to a power line from your car�s ignition, and ground the generic plug. Done!
--Spike
The inexpensive and simple way to do this purchasing a generic power adapter.

Simply plug the Magellean into its own power adapter, plug the Megellan power adapter into this generic power plug (shown above), and wire the generic power plug to a power line from your car�s ignition, and ground the generic plug. Done!
--Spike
06-12-2013, 06:29 PM
#113
Registered User
iTrader: (8)
Join Date: May 2009
Location: Mississauga, Canada
Posts: 402
Likes: 0
Received 0 Likes
on
0 Posts
Hey Spike, thanks for the idea. My idea is similar except I'm getting an extension(see attached), and cutting off the socket in the red box. I'll then hardwire the power into the radio's power and ground to the chassis.
This way, I'll still maintain the Magellan unit's step-down.
edit: I already ordered an extension online, otherwise I'd go with your idea to avoid cutting anything
This way, I'll still maintain the Magellan unit's step-down.
edit: I already ordered an extension online, otherwise I'd go with your idea to avoid cutting anything
06-12-2013, 07:36 PM
#114
Registered User
iTrader: (8)
Join Date: May 2009
Location: Mississauga, Canada
Posts: 402
Likes: 0
Received 0 Likes
on
0 Posts
So I've mounted the unit to the navi console. Like the earlier post in this thread, I used pipe hanger I found at Lowe's. I didn't need to use anything else to hold it up, as it is held in really tight, I tried sliding the unit up and down, side to side...won't budge.
Sometime this week I'm going to use cardboard to cut out two pieces to cover the space where the navi button panel would be. I'm using two because there is supposed to be two pieces(button panel and finisher), and I don't want to use a single straight piece.
My plan is to get nicely cut pieces and then wrap it with a thin foam or fabric for the leather "cushion" feel, and then wrap it in black leather. I plan to re-wire the speaker and hook it up to this cardboard piece...I'm just having trouble finding a small enough speaker cover...worst case I'll leave the speaker just behind the leather...I'm sure the sound will still be much better than having it in the unit, behing the navi console.
06-13-2013, 07:14 AM
#115
Registered User
iTrader: (8)
Join Date: May 2009
Location: Mississauga, Canada
Posts: 402
Likes: 0
Received 0 Likes
on
0 Posts
Hmm, I wanted to relocate the speaker up front with a speaker grill just so that there's something there lol it seems too plain being completely blank. I guess I can always look for a small Z logo and put it there...but I figured the speaker cover would be the most subtle..I'll see how the leather-wrapped piece comes out first haha
06-14-2013, 10:16 AM
#116
Registered User
iTrader: (8)
Join Date: May 2009
Location: Mississauga, Canada
Posts: 402
Likes: 0
Received 0 Likes
on
0 Posts
seems like I'm going to have fun getting the video-in for the backup camera to work. Magellan has it's own input plug set up:
http://forums.gpsreview.net/viewtopic.php?t=21775
Apparently an old ipod video 5th gen cable will work. For those that hooked up the camera to their Magellan, what did you use? The backup camera has a single yellow video RCA out...so you must have used an adapter of some sort to get it to 3.5mm.
http://forums.gpsreview.net/viewtopic.php?t=21775
Apparently an old ipod video 5th gen cable will work. For those that hooked up the camera to their Magellan, what did you use? The backup camera has a single yellow video RCA out...so you must have used an adapter of some sort to get it to 3.5mm.
06-14-2013, 12:12 PM
#117
Hmm, I wanted to relocate the speaker up front with a speaker grill just so that there's something there lol it seems too plain being completely blank. I guess I can always look for a small Z logo and put it there...but I figured the speaker cover would be the most subtle..I'll see how the leather-wrapped piece comes out first haha
After so long without having a backup cam I never gave thought to adding one
Last edited by kham25; 06-14-2013 at 05:03 PM.
06-15-2013, 12:42 AM
#118
Registered User
iTrader: (8)
Join Date: May 2009
Location: Mississauga, Canada
Posts: 402
Likes: 0
Received 0 Likes
on
0 Posts
Yea I've never had a backup camera, but for $20 shipped on ebay, figured why not since I'll have everything open and I've invested $300+ in the Magellan and navi piece.
06-15-2013, 07:09 AM
#119
Registered User
iTrader: (4)

Join Date: Apr 2008
Location: IN DAT CALI LIFE
Posts: 769
Likes: 0
Received 0 Likes
on
0 Posts
I have an 07 z with the Magellan in place, currently where the button panel goes I left it empty. I do have the 03-05 control unit, any ideas on how to fabricate this to work?
