Bought a Magellan 1700 GPS 7 inch screen fits in Cubby
 06-17-2013, 11:24 AM
#121
Registered User
iTrader: (8)

Join Date: May 2009
Location: Mississauga, Canada
Posts: 402
Likes: 0
Received 0 Likes
on
0 Posts
lol I'm going to be maintaining the stock bose headunit for now. So hopefully it'll remain OEM-looking. I'm happy with the stock head unit aside from the fact that it doesn't have aux in, but that isn't worth the upgrade for me since I listen to the radio most of the time. So far I've gotten everything except the cigarette socket extension, RCA male to male adapter, and an Ipod Video RCA cable. I just ordered the last two online, so once they're all in, I'll be going with the install. In the meantime, I'll start working on the cover piece and hope for the best lol
 06-19-2013, 08:23 AM
#122
Registered User

Can't you put the power plug in thru the back might have to cut alittle slot for in on the inside but if the screen goes in farther with the plug inside that would work great
Its ok in the chubby compartment nice and snug. The only thing i really dont like is the power cord showing
but what hell... If anyone is interested in the unit you seriously cant go wrong for the money .
What you guys think?
Can't you put the power plug in thru the back might have to cut alittle slot for in on the inside but if the screen goes in farther with the plug inside that would work great


 [/QUOTE]
Its ok in the chubby compartment nice and snug. The only thing i really dont like is the power cord showing
but what hell... If anyone is interested in the unit you seriously cant go wrong for the money .
What you guys think?
Can't you put the power plug in thru the back might have to cut alittle slot for in on the inside but if the screen goes in farther with the plug inside that would work great
[/QUOTE]
06-19-2013, 09:49 AM
#123
Registered User
iTrader: (8)
Join Date: May 2009
Location: Mississauga, Canada
Posts: 402
Likes: 0
Received 0 Likes
on
0 Posts
Can't you put the power plug in thru the back might have to cut alittle slot for in on the inside but if the screen goes in farther with the plug inside that would work great
Its ok in the chubby compartment nice and snug. The only thing i really dont like is the power cord showing
but what hell... If anyone is interested in the unit you seriously cant go wrong for the money .
What you guys think?
Can't you put the power plug in thru the back might have to cut alittle slot for in on the inside but if the screen goes in farther with the plug inside that would work great
Anyway, the OP has since upgraded to the 06+ navi centre console with the Magellan 1700(page 6 in this thread).
06-28-2013, 04:34 AM
#124
New Member

Join Date: Oct 2009
Location: Pittsburgh PA
Posts: 2
Likes: 0
Received 0 Likes
on
0 Posts
Hmm, I wanted to relocate the speaker up front with a speaker grill just so that there's something there lol it seems too plain being completely blank. I guess I can always look for a small Z logo and put it there...but I figured the speaker cover would be the most subtle..I'll see how the leather-wrapped piece comes out first haha
06-28-2013, 06:24 PM
#125
Registered User
iTrader: (8)
Join Date: May 2009
Location: Mississauga, Canada
Posts: 402
Likes: 0
Received 0 Likes
on
0 Posts
hey man, yea I actually finished it last week but haven't installed it yet bc I'm waiting on two a/v pieces(ipod video 5th gen a/v cable and RCA male to male adapter) to be able to hook up the backup camera to the Magellan's AV in port. Magellan and Apple have a "unique" a/v 3.5mm set up where they switch the ground and video feeds on the 3.5mm plug, so to get it work on the magellan, would need to grab the ipod video 5th gen av cable.
Anyway, here are some pics. I looked around for leather sheets but only found plain ones(smooth pattern)...but then I was walking through Honest Ed's(historic and famous thrift shop in downtown Toronto) and found a fake leather purse for $7.99 that had the perfect pattern lol
I used a cardboard box to cut out the template, I had to cut several different pieces to get it to fit as there are two bends needed for the panel to fit properly and line up. I know it sounds ghetto but whatever, it works. I don't have the tools or patience to go and purchase aluminum sheets (considered plastic but the bends required eliminated this option) and cutters, etc, etc...
I then cut up the purse and wrapped an initial layer around the new panel, before wrapping it with the 2nd layer. This gave the panel the "cushion" feel like the leather seats. I didn't want to use glue bc I wasn't sure how well it'll hold leather and cardboard as well as in the summer heat, so for the first layer, I stapled the back. This layer is hidden so i wasn't worried about it looking ghetto. For the final layer, I improvised and used small screws I had lying around as pin holders to hold the leather in place from behind.
I also cut a hole in the cardboard for the speaker..I plan to get a small grill cover and eventually cut a hole through the leather for the speaker sound. But people have said here that the speaker is loud enough behind the GPS unit, so I'm pretty sure the sound won't be muffled by the leather(it's fake, thing cheap leather lol).
Also, don't mind the gap at the bottom of the panel when installed. The problem is that the cardboard is too light, so it doesn't sit flush. My two options are either stick some piece of weight to hold it down, or use double sided tape on final installation.
I'll figure it out when I get to actually install.
Again, this is a 90% fit in my opinion(only issue is the bottom not being flush and the bottom corners not matching perfectly with the navi console trim, but considering the OEM panel is $300+, this is more than good enough for me and when the panel is held down flush at the bottom, it does look oem)
K long rant lol...and ignore the ghetto speaker wiring...I'm not a wiring expert, I don't solder, I've always just stripped, rolled, and electrical taped my decks when installed and they've been fine lol
06-28-2013, 06:25 PM
#126
Registered User
iTrader: (8)
Join Date: May 2009
Location: Mississauga, Canada
Posts: 402
Likes: 0
Received 0 Likes
on
0 Posts
btw, there's someone selling the 06+ OEM navi console trim for $150...get it now if you're doing this anyway...it's much better than the $250+ retail I paid for it.

 Black silicone works wonders btw
06-29-2013, 06:22 PM
Black silicone works wonders btw
06-29-2013, 06:22 PM
#128
Registered User
iTrader: (8)
Join Date: May 2009
Location: Mississauga, Canada
Posts: 402
Likes: 0
Received 0 Likes
on
0 Posts
Yea I'm still deciding on what to do about the bottom...didn't want anything somewhat permanent... Just in case I were to come by the oem button panel for super cheap haha
07-27-2013, 06:02 PM
#130
Registered User
iTrader: (8)
Join Date: May 2009
Location: Mississauga, Canada
Posts: 402
Likes: 0
Received 0 Likes
on
0 Posts
Finally got around to doing the install lol I didn't bother adjusting the leather panel's bottom. I'm far too lazy to do it now, but I also didn't want to use glue or double sided tape. So this'll do until i find(if ever) the button panel for cheap.
The back-up camera was pretty easy to hook up, I didn't bother taking apart the panels to run the lines, just squeezed it in the edges and all worked out.
It's a pretty decent camera for $30 shipped off ebay lol
I haven't tried it at night, so hopefully it isn't bad either.
I can also hear the speakr clearly, so I'm happy with the setup.
So to summarize, I've made a list of what I had to get to make this work:
- Nissan 06+ OEM navi console centre piece $230ish retail?
- Magellan 1700 (or whatever screen you choose) $60
- old ipod video AV cables (I ordered off eBay) $3
- eBay backup camera $30
- AV female to female adapter $1
- Piece of cardboard to fill in oem navi button panel space
- piece of leather (or a cheap lady's fake leather purse for material) - $8
---------------------------------------------
Total cost $332.
If you wait around, the OEM navi console piece goes on sale here used for about $150
 08-04-2013, 06:09 PM
#132
Registered User
iTrader: (8)
Join Date: May 2009
Location: Mississauga, Canada
Posts: 402
Likes: 0
Received 0 Likes
on
0 Posts
Yep, so the magellan unit automatically switches to aux video once it senses a feed. So I hooked up the back up camera's power to the green wire which powers up the reverse lights. This way whenever I go into reverse, the camera turns on and the gps unit switches to aux video. Works perfectly.

 12-02-2013, 10:56 AM
#136
i think i will tap into rear cigarette outlet. planning to install rear in car camera on mid hump and will power camera and front magellan from rear cigarette power as its easy to access since all plastic is removed already.
Once i tap into power should i tap into ground as well or should i tap into a ground near each device separately?
Once i tap into power should i tap into ground as well or should i tap into a ground near each device separately?
12-08-2013, 01:23 PM
#138
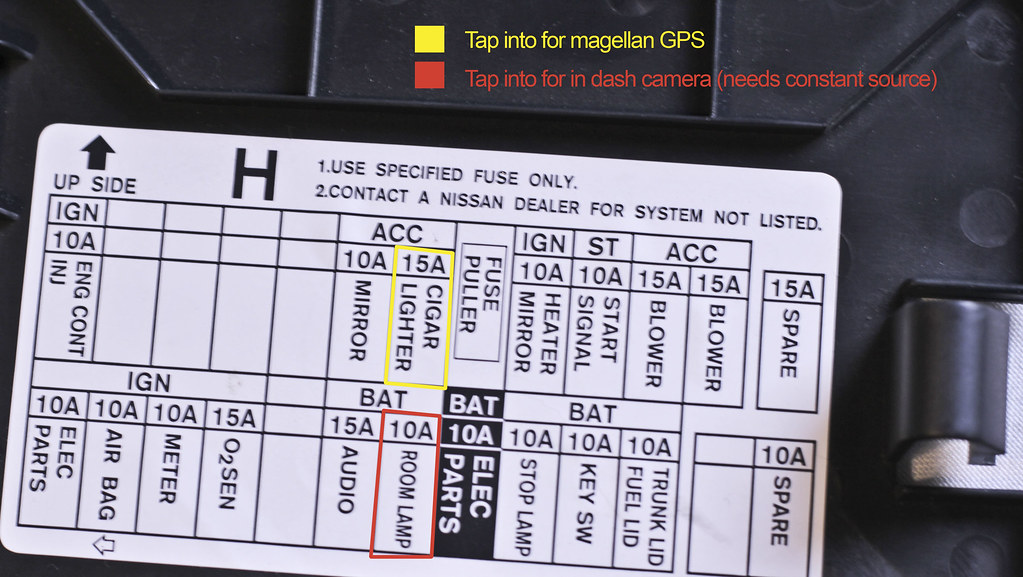
im planning on tapping into fuses for the megallan and another for an in dash camera that needs constant power. I looked at the fuses and have narrowed it down to 2 fuses for my needs. Anyone know if the fuses ive selected are good choices, i currently do not have my battery connected so i did not verify the dome light fuse for constant power. Also the power kit for my camera that cuts off power to avoid draining battery uses an inline 3 amp fuse
also are the spare slots to the right usable or are they just holder extra fuses?
also are the spare slots to the right usable or are they just holder extra fuses?
Last edited by ALO8; 12-08-2013 at 01:26 PM.
02-12-2014, 08:53 PM
#139
Registered User
iTrader: (8)
Join Date: May 2009
Location: Mississauga, Canada
Posts: 402
Likes: 0
Received 0 Likes
on
0 Posts
For those with their magellan installed, when you turn your car on,does the unit screen flicker? Or just shut off?
Mine does that sometimes...and I'll pull my shifter console trim out to unplug the cigarette adapter and plug it back in so it turns on properly. Doesn't always happen but it's enough to bother me...I'm guessing this isn't good for the unit.
I hardwired the power source to the red power 12v wire from the head unit harness.
I think I need to find a power source that is hot ...I currently have my dash cam tapped into the "eng cont inj" which is for the check engine light, and stays powered through the engine crank/startup. From the abox fuse box pic, anyone know if any of the other fuses are constant through crank? I can grab a multimeter off of a friend and check sometime but thought I'd ask here.
Last edited by l2iceman; 02-12-2014 at 09:05 PM.