Notices
Audio & Video 350Z Mobile entertainment and other electronics

Turn your OEM Glove Box Into A Sub Box

Thread Tools
 
Search this Thread
 
Old 03-13-2012, 03:31 PM
  #41  
TURBOROADSTER
Registered User
Thread Starter
iTrader: (4)
 
TURBOROADSTER's Avatar
 
Join Date: Aug 2010
Location: Granger , IN
Posts: 175
Likes: 0
Received 1 Like on 1 Post
Default

Right side sub is in and wired . Actually , 1 10" sounds very good , can't wait to get the other one in . Should be done by Friday .

Name:  007-1.jpg
Views: 2195
Size:  96.4 KB

Name:  006-4.jpg
Views: 1720
Size:  120.8 KB

Name:  005-4.jpg
Views: 1367
Size:  124.6 KB

Name:  004-5.jpg
Views: 1350
Size:  139.5 KB
Old 03-15-2012, 02:28 PM
  #42  
JMII
New Member
 
JMII's Avatar
 
Join Date: Oct 2011
Location: Margate, FL
Posts: 558
Received 41 Likes on 39 Posts
Default

How did you seal the gap between the stock plastic panel and the factory metal one?
Old 03-15-2012, 07:00 PM
  #43  
TURBOROADSTER
Registered User
Thread Starter
iTrader: (4)
 
TURBOROADSTER's Avatar
 
Join Date: Aug 2010
Location: Granger , IN
Posts: 175
Likes: 0
Received 1 Like on 1 Post
Default

Originally Posted by JMII
How did you seal the gap between the stock plastic panel and the factory metal one?
Read post #31
Old 03-16-2012, 11:23 AM
  #44  
JMII
New Member
 
JMII's Avatar
 
Join Date: Oct 2011
Location: Margate, FL
Posts: 558
Received 41 Likes on 39 Posts
Default

So between the metal and plastic bracket you have two 3/4" (1 1/2" total) mounting rings. Is the woofer sitting on top of the plastic and screwed into the wood which is attached to the metal factory mount? Sorry, just trying to get an idea of how you sandwiched everything together securely and kept things air tight.
Old 03-16-2012, 02:20 PM
  #45  
vh5150
Registered User
iTrader: (5)
 
vh5150's Avatar
 
Join Date: Aug 2007
Location: socal
Posts: 103
Likes: 0
Received 0 Likes on 0 Posts
Default

You got PM
Old 03-17-2012, 12:01 AM
  #46  
TURBOROADSTER
Registered User
Thread Starter
iTrader: (4)
 
TURBOROADSTER's Avatar
 
Join Date: Aug 2010
Location: Granger , IN
Posts: 175
Likes: 0
Received 1 Like on 1 Post
Default

Originally Posted by JMII
So between the metal and plastic bracket you have two 3/4" (1 1/2" total) mounting rings. Is the woofer sitting on top of the plastic and screwed into the wood which is attached to the metal factory mount? Sorry, just trying to get an idea of how you sandwiched everything together securely and kept things air tight.
The gap between the bose plate and plastic finisher panel is exactly 3/4" . So I applied a thin layer of Butyl to a 3/4" mdf ring and screwed it to the bose plate . I then put another thin layer on the other side of the ring and put on the plastic finisher panel . I then used another 3/4" mdf ring(Painted Black) on the outside of the finisher panel . The subs I'm using are 6 1/4" deep , so I had to bring them out a little farther . If your subs are 5 1/2 " deep or less , you don't need the ring on the outside of the plastic panel . Very easy to seal as long as you put some sort of sealant on both sides of each piece .
Old 03-18-2012, 02:13 PM
  #47  
vh5150
Registered User
iTrader: (5)
 
vh5150's Avatar
 
Join Date: Aug 2007
Location: socal
Posts: 103
Likes: 0
Received 0 Likes on 0 Posts
Default

PM'd ya again.
Old 03-18-2012, 03:23 PM
  #48  
vh5150
Registered User
iTrader: (5)
 
vh5150's Avatar
 
Join Date: Aug 2007
Location: socal
Posts: 103
Likes: 0
Received 0 Likes on 0 Posts
Default

PM'd (Last questions I swear)
Old 03-19-2012, 03:52 AM
  #49  
TURBOROADSTER
Registered User
Thread Starter
iTrader: (4)
 
TURBOROADSTER's Avatar
 
Join Date: Aug 2010
Location: Granger , IN
Posts: 175
Likes: 0
Received 1 Like on 1 Post
Default

Originally Posted by vh5150
PM'd (Last questions I swear)
I would rather you keep asking questions and do it right (have it sound good), than not do it right .
Old 03-20-2012, 06:49 AM
  #50  
vh5150
Registered User
iTrader: (5)
 
vh5150's Avatar
 
Join Date: Aug 2007
Location: socal
Posts: 103
Likes: 0
Received 0 Likes on 0 Posts
Default

Thanks. I really appreciate the help.
Old 04-03-2012, 04:23 PM
  #51  
TURBOROADSTER
Registered User
Thread Starter
iTrader: (4)
 
TURBOROADSTER's Avatar
 
Join Date: Aug 2010
Location: Granger , IN
Posts: 175
Likes: 0
Received 1 Like on 1 Post
Default

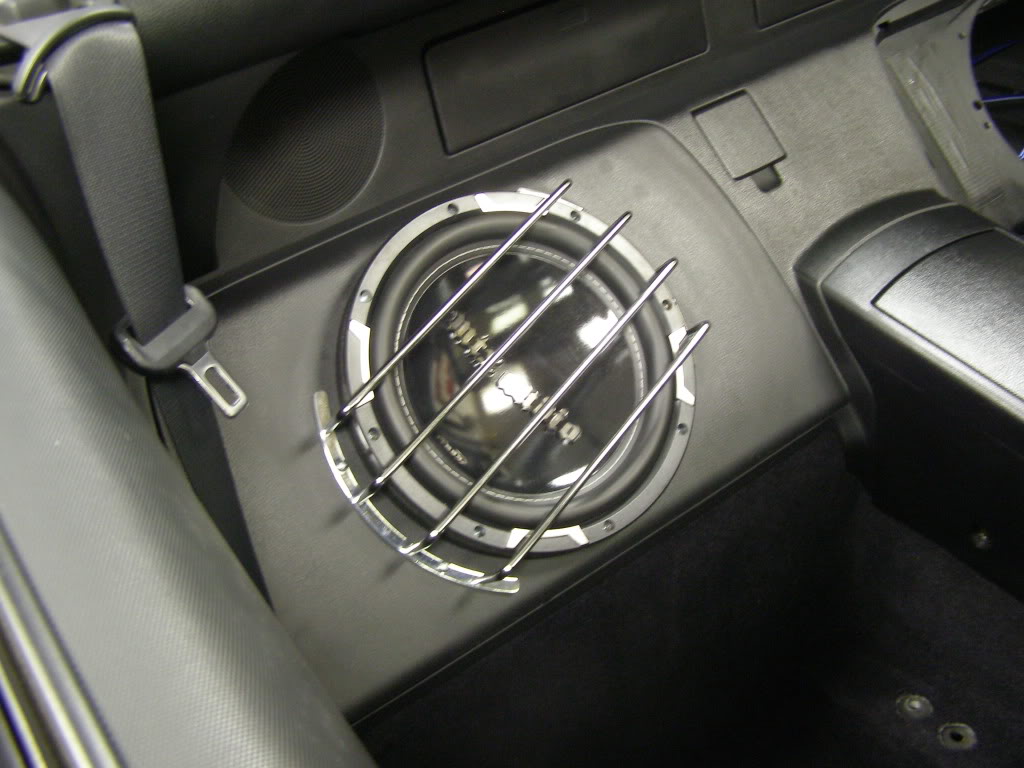
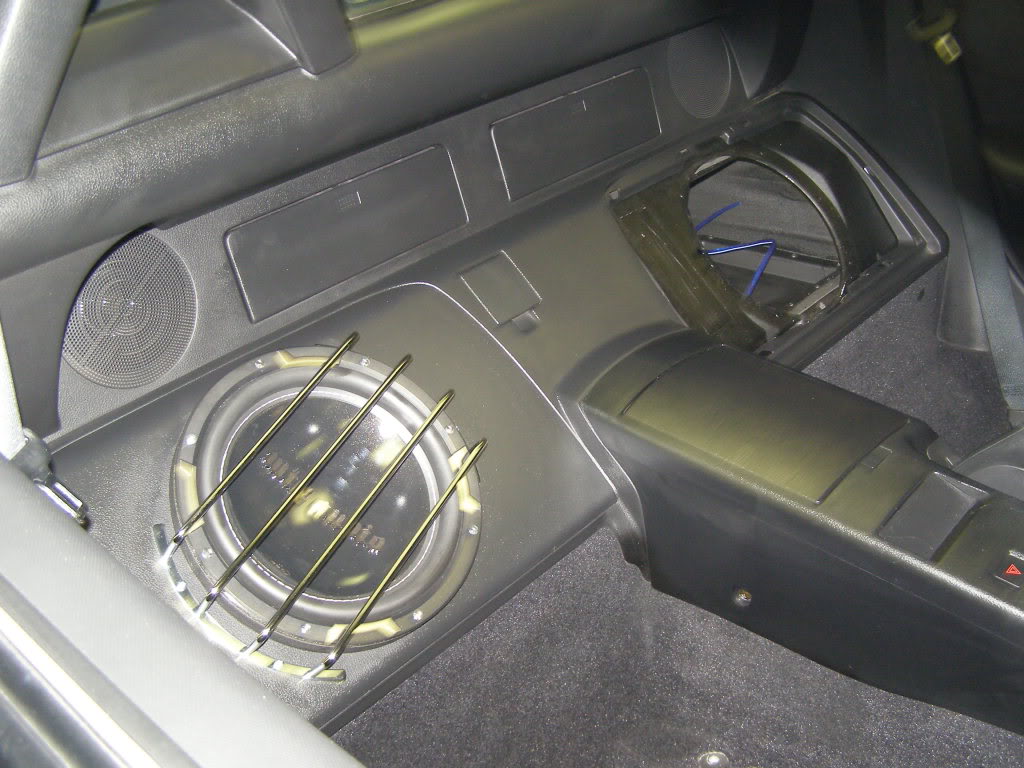
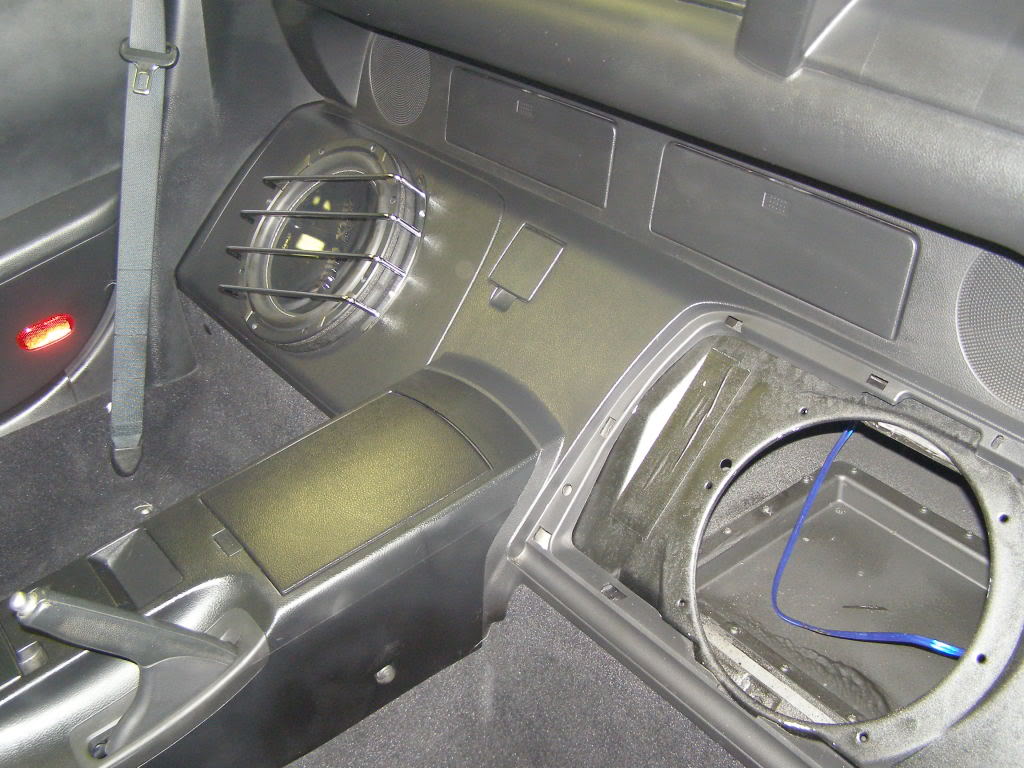
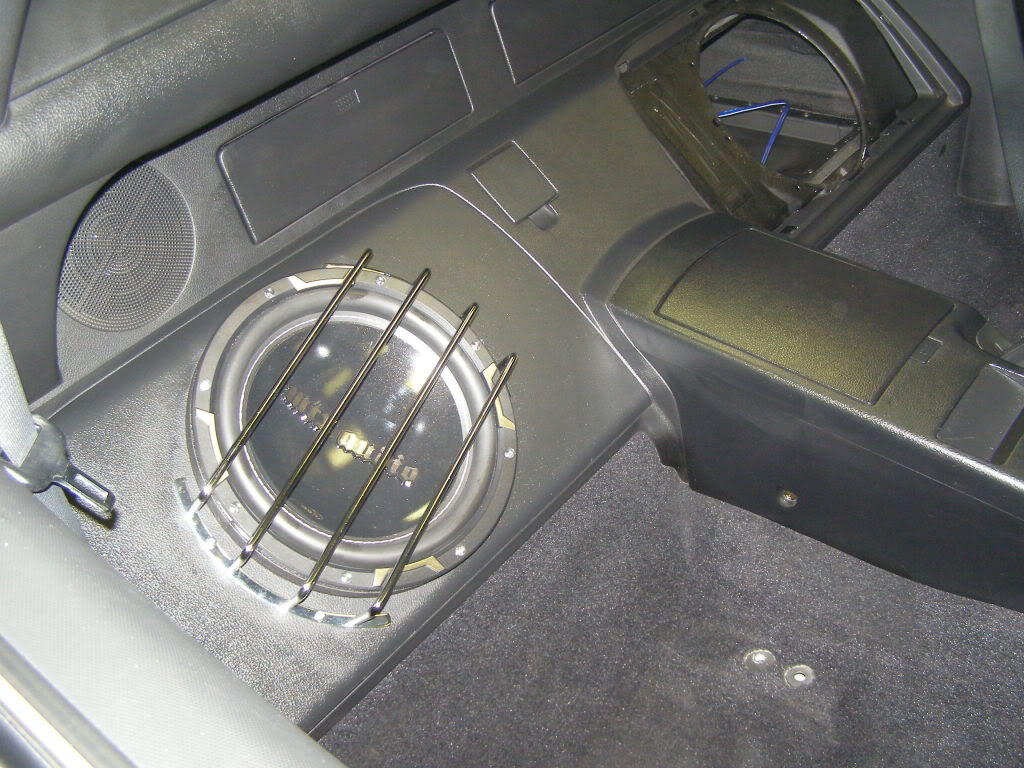
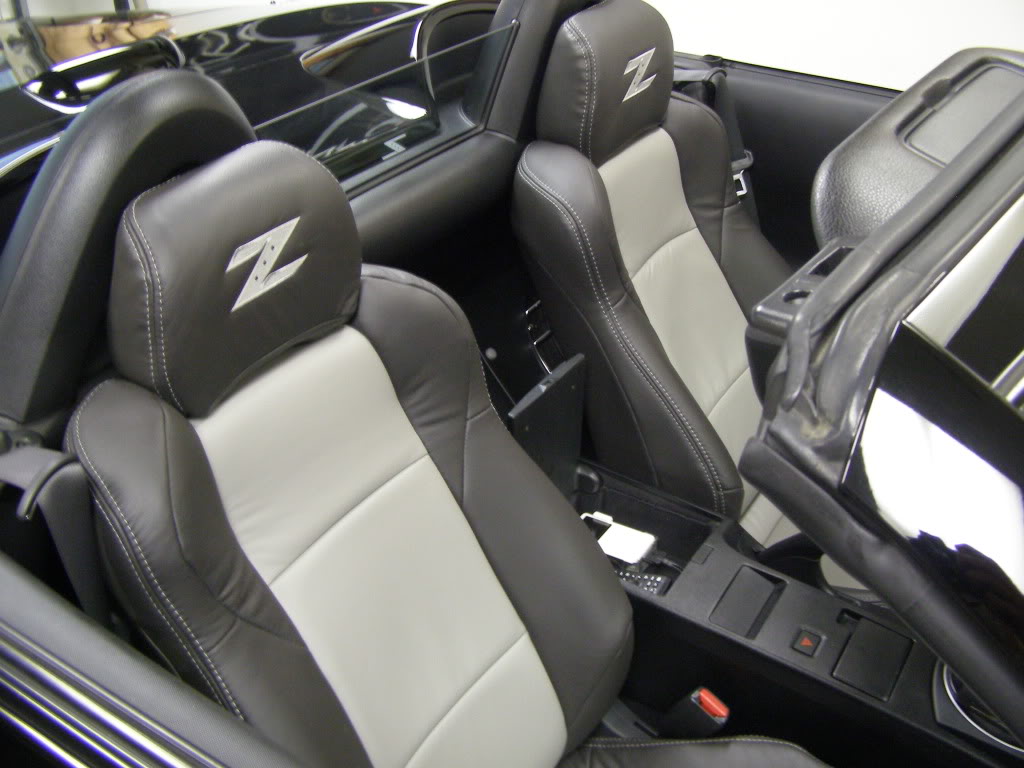
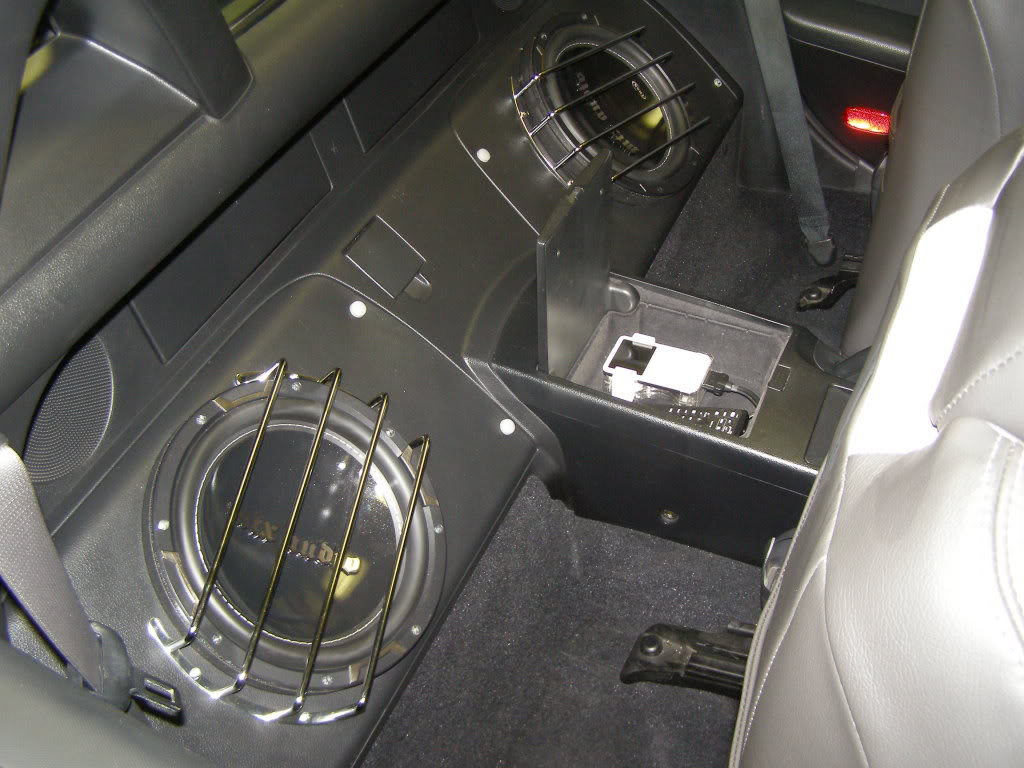
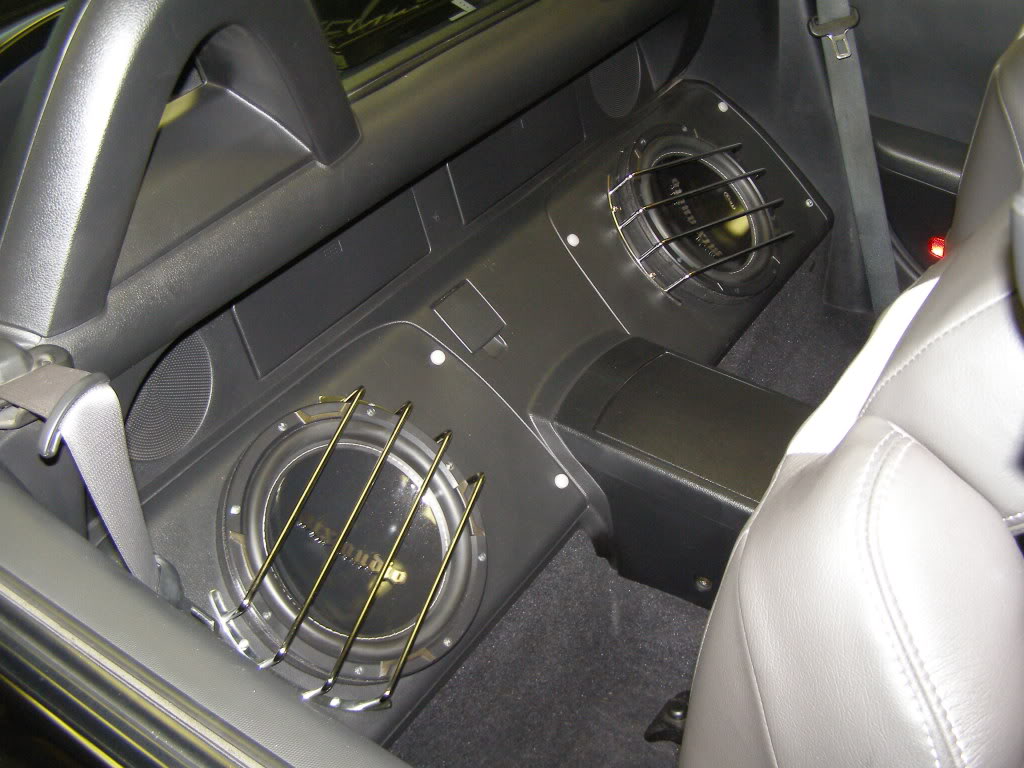
Car has been done for a couple of weeks now(sounds good) . Here are a few interior shots of the finished product . I need to find members now that live near me , to listen to it . That way they can tell everyone on this site what they think .
Name:  007-2.jpg
Views: 1300
Size:  99.2 KB

Name:  005-5.jpg
Views: 1716
Size:  113.2 KB

Name:  004-6.jpg
Views: 1419
Size:  112.9 KB
Old 04-04-2012, 07:04 AM
  #52  
Skrilla
New Member
iTrader: (15)
 
Skrilla's Avatar
 
Join Date: Mar 2006
Location: Arlington
Posts: 370
Likes: 0
Received 0 Likes on 0 Posts
Default

nice setup

Last edited by Skrilla; 04-04-2012 at 07:06 AM.
Old 04-21-2012, 09:08 PM
  #53  
vh5150
Registered User
iTrader: (5)
 
vh5150's Avatar
 
Join Date: Aug 2007
Location: socal
Posts: 103
Likes: 0
Received 0 Likes on 0 Posts
Default

Are those 4 additional screws around the finisher panel? So now that it's completed, how does yours sound compared to a CAS setup? Thanks!
Old 04-21-2012, 10:53 PM
  #54  
TURBOROADSTER
Registered User
Thread Starter
iTrader: (4)
 
TURBOROADSTER's Avatar
 
Join Date: Aug 2010
Location: Granger , IN
Posts: 175
Likes: 0
Received 1 Like on 1 Post
Default

Originally Posted by vh5150
Are those 4 additional screws around the finisher panel? So now that it's completed, how does yours sound compared to a CAS setup? Thanks!
There is no comparison , the CAS box had little in car bass and it rattled the **** out of things .
Old 04-22-2012, 06:12 AM
  #55  
vh5150
Registered User
iTrader: (5)
 
vh5150's Avatar
 
Join Date: Aug 2007
Location: socal
Posts: 103
Likes: 0
Received 0 Likes on 0 Posts
Default

Do those four screws on the finisher panel screw into the Bose plate underneath? What size/length are they? Are the white things some type of rubber/plastic washer or spacer? Thx.
Old 04-23-2012, 03:49 AM
  #56  
TURBOROADSTER
Registered User
Thread Starter
iTrader: (4)
 
TURBOROADSTER's Avatar
 
Join Date: Aug 2010
Location: Granger , IN
Posts: 175
Likes: 0
Received 1 Like on 1 Post
Default

Originally Posted by vh5150
Do those four screws on the finisher panel screw into the Bose plate underneath? What size/length are they? Are the white things some type of rubber/plastic washer or spacer? Thx.
I had a little rattle in one of the corners of both finisher panels . I am very **** about rattles , so i put screws in all 4 corners of each panel . The screws do not go into the steel bose plate , just the plastic under the panel . The white things (screw covers) actually are light grey , they match the center section of my seats .
Old 06-07-2012, 07:17 PM
  #57  
Darkcityavenger
Registered User
 
Darkcityavenger's Avatar
 
Join Date: Oct 2011
Location: Mill Spring N.C.
Posts: 5
Likes: 0
Received 0 Likes on 0 Posts
Default

Turboroadster you are the man! So after trying to build a box for my Alpine Type R 10" and putting it in the original sub area behind the seat it sounding like crap. I ran across this thread and boy am I glad. I went right by the instructions you gave and I can't believe the sound that this one 10" made. I took my time to ensure the glove box was sealed and I sprayed the heck out of the inside with underbody spray and it rocks. The only problem is the sub wouldn't sit straight up and down because the terminal hits the bottom of the box so I had to turn it to one side to get it to clear (like yours). The hardest thing for me was cutting out the original sub cover grill to fit over my sub. Mine didn't turn out as clean as yours but after a little black paint and I'm good. I have the 04 Black Touring Roadster also and I had used interior dye to two tone my seats light gray. I then say your pics so great minds think alike I say. Thanks so much for taking the time to start this thread you were a life saver.
Old 06-09-2012, 11:12 AM
  #58  
TURBOROADSTER
Registered User
Thread Starter
iTrader: (4)
 
TURBOROADSTER's Avatar
 
Join Date: Aug 2010
Location: Granger , IN
Posts: 175
Likes: 0
Received 1 Like on 1 Post
Default

Glad that your happy with it . Mine sounds very very good . I wish the (Know It All's) that were bashing this idea of mine , saying it wouldn't work or it would sound like A$$ , could hear my Z .
Old 06-13-2012, 08:45 PM
  #59  
pigpimpc
Registered User
iTrader: (1)
 
pigpimpc's Avatar
 
Join Date: Mar 2012
Location: san diego
Posts: 57
Likes: 0
Received 0 Likes on 0 Posts
Default

Nice ingenuity. I was going to fiberglass my glovebox mold but then that might need more fiberglass to reinforce. So instead I will fiberglass the glovebox, use the fiberglass as my new glovebox, and then use original glovebox as the sub enclosure.

Thanks op.
Old 11-25-2012, 02:19 PM
  #60  
Rome64
Registered User
iTrader: (11)
 
Rome64's Avatar
 
Join Date: Jan 2009
Location: Jacksonville
Posts: 20
Likes: 0
Received 0 Likes on 0 Posts
Default

Awesome!! I'm doing this.


Quick Reply: Turn your OEM Glove Box Into A Sub Box


All times are GMT -8. The time now is 06:45 AM.