Just ordered a Kenwood DDX470!!
 01-18-2014, 07:08 PM
#81
Registered User

Join Date: Nov 2013
Location: Texas/Ohio
Posts: 78
Likes: 0
Received 0 Likes
on
0 Posts
Makes sense.. Figured the video input would be enough to "signal" the headunit to flip to the input/output of the backup camera -- but apparently it's not. No big deal.. Running 1 cable or 5 is no different.
I just did a huge 40 hour install on this car,.. I know exactly how I 'll run it as I've taken all those panels apart.. and I can remove the panels over the wheel wells (that go over the edges of the rear speakers (next to seatbelts).. then remove weather stripping, panel, and door seal and run under carpet.. remove kick panel and route around there and up into back of headunit -- Not a bad install at all.
I bet the most difficult part of this is going to be getting the camera wire into the car
Yeah.. this wire should be obvious though right? It will be whatever wire is powering/running to the reverse lights (power and ground.. ) shouldn't be any way to confuse which wire to splice into here.
I see. Nice .. so the cheap cam is better than Honda's "upper end" .. can't beat that.
So bottom line -- This camera:
Nissan 350Z 370Z CMOS NTSC Car Park Rear View Backup Reverse Camera Night Vision | eBay
Is going to be just fine to buy? I know it's not much money.. but I don't want to waste $25 on some camera that for some reason is a piece of junk. So, if I'm understanding you right.. any of these cameras are going to be excellent, so just pick the one with the best price.
Considering this one is $23, and ships from the US.. I don't really see it getting much better than that.
Oh, and the wireless would be nice... but like I said.. the panels to run the wires down the driver or passenger "Edge" of the vehicle are incredibly easy to deal with (Especially now that I've removed and replaced them half a dozen times.. so routing these wires doesn't bother me any. ) -- It's nothing like having to remove the seats, the cubby/glovebox, outer panel, rear speaker panels, door panels, and so on.. Aside from 2 plastic screw ons all of those panels pull off.
So,.. I should go ahead and grab the camera I just linked?
And.. grab those LED reverse lights and tag lights.. and I'll be good to go?
Thanks
This is the camera I used

I recommend buying extra wire since the positive wire that comes with the camera will not reach the HU. Follow the antenna cable and route the video input and + wire (that one that connects to the reverse camera wire on the HU harness) back to the trunk area for a clean install.
Last edited by Texas325; 01-18-2014 at 07:09 PM.

 01-18-2014, 08:50 PM
#83

I recommend buying extra wire since the positive wire that comes with the camera will not reach the HU. Follow the antenna cable and route the video input and + wire (that one that connects to the reverse camera wire on the HU harness) back to the trunk area for a clean install.
From the looks of the wiring of the camera I just bought:
http://www.ebay.com/itm/Nissan-350Z-370Z-CMOS-NTSC-Car-Park-Rear-View-Backup-Reverse-Camera-Night-Vision-/281201911421?pt=Motors_Car_Truck_Parts_Accessories&fits=Make%3ANissan&hash=item4178f0a67d&vxp=mtr
The Reverse cable (the "power wire" as you called it).. Comes out of the Head unit end of the Video RCA. Thus, if the Video (Yellow) RCA cable is long enough then this wire will be as well as it literally comes out of the end of that cable (smartly) as that is where it will be utilized behind the headunit.
Thanks for the light links.. I ordered everything you recommended,.. The reverse lights, and Tag lights. I didn't look up what you linked, so hope they were the right lights for a 2008 350Z
Everything was from a US location,.. so all will arrive this week. I'll post the install as I did my stereo install.
Not sure I'll follow the antenna,.. as I know the wiring routes of the car up until you get to the spare tire very well.. At that point there is so much room and open area that wiring is quite simple until you get to the point of exit/entrance to the outside ... Hopefully this is a relatively area to fish the wires through.
And,.. as for this working with the navi unit.. That just depends on the inputs,.. If the Navigation has the proper inputs for a video input and a signal wire to indicate when the reverse light circuit is "on".. then of course it would work. I would strongly 'guess' that you will likely have to run it to your aftermarket headunit,.. Given how short it is being used (when backing up) -- I don't see why this would really matter a great degree. Maybe someone else can answer more clearly though.
Aftermarket headunits don't include all of their features because it is more cost effective to have people purchase their cameras, and other add-on components separately. Most people don't install this type of stuff themselves,.. but for those who can/do -- You save hundreds of dollars.
Just out of curiosity,.. I've never had a car with a backup camera. Does it really become something you USE a lot? Or is it more of a gadget?
Last edited by Chromatic; 01-18-2014 at 08:52 PM.
 01-18-2014, 09:31 PM
#85
One of the cams I bought came with a plain RCA cable, more than long enough to reach the headunit. The other came with a similarly-long RCA cable that had an extra wire added in, so you could use it to connect the backup light power to the headunit.
FWIW, I find the backup cam very useful, but you still want to have a direct look at what's behind you first.
I ran the cables forward along the right side of the rear compartment, then under the glove box across to the center, and then under the center console to the headunit. I did this long after the headunit was installed, but I didn't have to fully pull the panels. I was able to just pull up the edges and tuck the cables easily. I also added some additional trunk lighting while I was in there, in the form of an LED strip under the strut bar:
Last edited by dcains; 01-18-2014 at 09:35 PM.
01-18-2014, 10:17 PM
#86
So you went under the glove box and down center console. Hrmm.. I've had every panel on the inside out of the car now.. Were you able to fish it through the glove box without removing a panel?
Seems so much easier to me to run it down the very edge of the car the whole way.. It's 3 panels total.. all of which just pop off.
But I also have 9 speakers, amp, etc with tons of large gauge wire running.. So I"ll probably go down the driver side due to wire locations right now.
Speaking of lights under the strut bar.. I just noticed this atrocity of an addition in the same location on my car:
http://www.flickr.com/photos/111739693@N04/12019663174/
I do like the light when I pop the hatch though.. I'll clean that up this week.. I don't know what people's obsession with LEDS are.. but they are annoying! The white looks fine,.. just put up really unclean and wires showing.. The blue leds in the center I'm going to cut out, then I'll pull the White LED strips and re-run the wire cleanly where you can't see it and re-attach the two white LED strips.
Out of curiosity what did you use to attach your lights under there? I'm not a fan of "permanent" or adhesive that essentially ruins a piece if you wanted to remove the item placed there.
I was thinking maybe a hot-glue gun would be enough tack for the leds.. not sure though, so curious what you used. Unless you bought a strip that had adhesive on the back already.
As for the cords -- the camera I ordered has pictured the video cable with the reverse wire attached at the HU end,.. so hopefully their product pictures represent the product.
I have plenty of 14 gauge speaker wire left over from my system install last week if wire is needed.
01-19-2014, 06:09 AM
#87
Registered User
Join Date: Nov 2013
Location: Texas/Ohio
Posts: 78
Likes: 0
Received 0 Likes
on
0 Posts
Hrmm,.. Wouldn't that be dependent on which camera you bought? I suppose they are all likely the same though.
From the looks of the wiring of the camera I just bought:
Nissan 350Z 370Z CMOS NTSC Car Park Rear View Backup Reverse Camera Night Vision | eBay
The Reverse cable (the "power wire" as you called it).. Comes out of the Head unit end of the Video RCA. Thus, if the Video (Yellow) RCA cable is long enough then this wire will be as well as it literally comes out of the end of that cable (smartly) as that is where it will be utilized behind the headunit.
Thanks for the light links.. I ordered everything you recommended,.. The reverse lights, and Tag lights. I didn't look up what you linked, so hope they were the right lights for a 2008 350Z
Everything was from a US location,.. so all will arrive this week. I'll post the install as I did my stereo install.
Not sure I'll follow the antenna,.. as I know the wiring routes of the car up until you get to the spare tire very well.. At that point there is so much room and open area that wiring is quite simple until you get to the point of exit/entrance to the outside ... Hopefully this is a relatively area to fish the wires through.
And,.. as for this working with the navi unit.. That just depends on the inputs,.. If the Navigation has the proper inputs for a video input and a signal wire to indicate when the reverse light circuit is "on".. then of course it would work. I would strongly 'guess' that you will likely have to run it to your aftermarket headunit,.. Given how short it is being used (when backing up) -- I don't see why this would really matter a great degree. Maybe someone else can answer more clearly though.
Aftermarket headunits don't include all of their features because it is more cost effective to have people purchase their cameras, and other add-on components separately. Most people don't install this type of stuff themselves,.. but for those who can/do -- You save hundreds of dollars.
Just out of curiosity,.. I've never had a car with a backup camera. Does it really become something you USE a lot? Or is it more of a gadget?
The Video RCA provided will be long enough to reach from Kenwood HU but the (+) wire provided will not. When the car is in reverse, the camera is powered by the reverse lights and triggers the HU to switch to reverse camera video mode. You can go to any Radio Shack to buy a wire long enough tap from the HU to the camera + wire.
I have two (+) wires tapping into the car's reverse wire. One from the HU and one to power the camera.
Note: Kenwood has set up a Reverse camera input (Yellow video RCA) and a (+) reverse camera that triggers the HU to switch over camera video mode (unless you set up a manual switch).
The factory antenna wire routes from the HU>center console>rear panel (glove box/etc)>rear driver side area. You can see the wire itself from the hatch (You need to pull more panels if you want to see the full routing area). I zip-tied the camera wires along that route. I'm picky about where and how the wires route.
The backup camera is useful to me. It adds another view that mirrors and eyes cannot see. Backing into parking spaces, parallel parking and to prevent smashing into things.
Last edited by Texas325; 01-19-2014 at 06:33 AM.


 01-19-2014, 07:22 AM
#89
IIRC, I just tucked the cam wires under the carpeting in front/under the glove box, and then up under the center console to the waterfall.
I have a single LED strip (12 LED's, I think) under the strut bar, but it's very low-profile and placed far enough forward so it's not visible from behind the car. It came with thin 2-sided tape on the back, and that's been holding it in place for a few years now.
I don't think I've gone overboard with LED's, just added a few where Nissan might have put some lighting. Many cars have footwell lighting, and I've added some LED's there, as well. Not too bright, and they match the color of the OEM lighting up front:

They're wired differently than I've seen before, and here's the way I did it:
https://my350z.com/forum/body-interi...different.html
I have a single LED strip (12 LED's, I think) under the strut bar, but it's very low-profile and placed far enough forward so it's not visible from behind the car. It came with thin 2-sided tape on the back, and that's been holding it in place for a few years now.
I don't think I've gone overboard with LED's, just added a few where Nissan might have put some lighting. Many cars have footwell lighting, and I've added some LED's there, as well. Not too bright, and they match the color of the OEM lighting up front:
They're wired differently than I've seen before, and here's the way I did it:
https://my350z.com/forum/body-interi...different.html
01-19-2014, 09:14 PM
#90
Thanks for the tips, and pictures.
Your LEDS's look good.. Especially your rear ones under the strut bar.. That's where I'll relocate the ones I just found installed.. just a few more inches up and under, I believe when I snip off that center blue LED that is hard to make out in the picture I took.. I can get rid of pretty much all those wires you see in the picture.
Your kick panel/pedal lights are pretty cool. I'm not a huge fan of lights on at night.. especially leds,.. but a little accent lighting where the bulb is NOT in my view whatsoever is just fine. LED"s, and most lights starburst out and give bad halos to my eyes for whatever reasons... so your implementation of those accent lights is a neat idea I may do,.. though I may dial them down a little dimmer. To be honest though I really don't need lights in the foot wheel,.. it's so automatic. Wouuldn't be a bad idea to have them wired into the other lighting that comes on when the door opens though,.. but on all the time while driving probably not for *me*.
Looks good on your car though!
I do think if the picture is the right picture for the wiring that is going to come:
That it has longer wires for both the reverse hookup,.. and has the reverse wire on the end of the video wire for the headunit. Only way that would need extra wire is if the Video wire from the camera wouldn't route to the headunit (be long enough).. I'd find that a little odd given this is going into a 2 seater car.. but splicing wire I'm more than familiar with.. plenty of speaker wire (which to me knowledge is no different than any other electrical wire for this application.. just thicker.. so I'll splice that in if absolutely necessary for length.)
I still think my "easiest" and best option given the wires I already have going up the center console, the TON of wires up under the glove box and so on.. That going down the driver side edge .. then around carpet of driver side to the back of headunit it going to be the best area for this camera routing. I'm particular with wiring as well,.. too particular. The area with the last amount of wiring is down that driver sound .. as I only have 2 14 gauge speaker wires running down that side under the carpet.. should really be a snap to pull the hatch panels, panels that go over the left edge of the top speaker area.. The weather stripping.. couple seal panels .. kick panel and that should really do it for opening it up to route.
Figuring out how easy or hard it is to initially get the wire up through the tag light socket I guess I'll just have to figure out when this stuff arrives.
Last edited by Chromatic; 01-19-2014 at 09:18 PM.
01-20-2014, 06:57 AM
#91
Registered User
Join Date: Nov 2013
Location: Texas/Ohio
Posts: 78
Likes: 0
Received 0 Likes
on
0 Posts
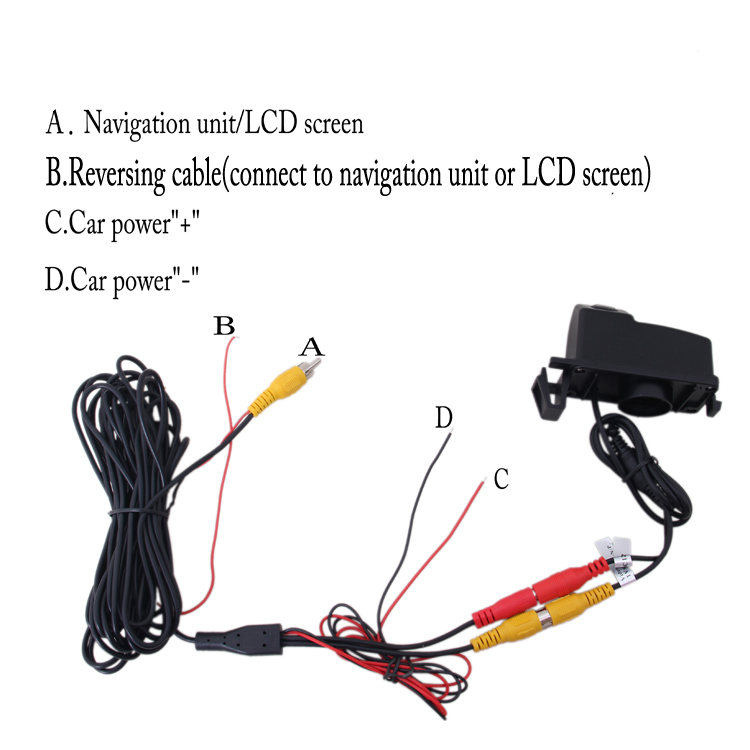
Those wires would work. I would test them out before you start routing the wires. I test the connections with one of the wires that came in with the camera and it didn't work at all. It looked like A&B on your photo but with both ends instead of a full harness. I ended up throwing it away...
As for the camera installation. I had to slide the rear bumper out to uncover rubber gasket.
Good luck with your install. To adjust the video settings when your in reverse mode. Press and hold the lower L corner of the screen. It should switch over to the menu.
Remember do a test connection. Routing those wires is a B...
01-20-2014, 07:33 AM
#92
Those wires would work. I would test them out before you start routing the wires. I test the connections with one of the wires that came in with the camera and it didn't work at all. It looked like A&B on your photo but with both ends instead of a full harness. I ended up throwing it away...
As for testing the pos and neg wires.. any quick ways to "test" those?
As for the camera installation. I had to slide the rear bumper out to uncover rubber gasket.
 )
)Good luck with your install. To adjust the video settings when your in reverse mode. Press and hold the lower L corner of the screen. It should switch over to the menu.
Remember do a test connection. Routing those wires is a B...
Appreciate the guidance.
01-20-2014, 10:20 AM
#93
Registered User
Join Date: Nov 2013
Location: Texas/Ohio
Posts: 78
Likes: 0
Received 0 Likes
on
0 Posts
The rear bumper is PITA. There's one part where you have to turn clips on each side 90 degrees but I found an easier way. Refer to the link below and the last page.
https://my350z.com/forum/body-interi...-pictures.html
01-20-2014, 01:40 PM
#94
I certainly didn't have to remove the rear bumper. I may have pulled off the license plate, but honestly, it's been about 3 years and I can't recall. I know I didn't pull the bumper, though. You might also be able to pull out one of the tail lights to reach in behind the bumper. Sorry I can't recall more specifically.
01-20-2014, 06:50 PM
#95
I certainly didn't have to remove the rear bumper. I may have pulled off the license plate, but honestly, it's been about 3 years and I can't recall. I know I didn't pull the bumper, though. You might also be able to pull out one of the tail lights to reach in behind the bumper. Sorry I can't recall more specifically.
I'd dremel the hole the existing tag light is coming through before removing the bumper.. But we'll just see when it gets here this week and I again start working on the car again.. A 30 minute project always ends up a 2-4 hour project for me, with this car.. it seems.
If I get stuck with routing the wires I'll definitely have the laptop fired up and be searching the site.
01-21-2014, 08:50 AM
#96
Check out this thread - the original regarding the rear view cam install. I promise, no bumper removal, no drilling.
https://my350z.com/forum/audio-and-v...ew-option.html
https://my350z.com/forum/audio-and-v...ew-option.html
01-21-2014, 02:15 PM
#97
Check out this thread - the original regarding the rear view cam install. I promise, no bumper removal, no drilling.
https://my350z.com/forum/audio-and-v...ew-option.html
https://my350z.com/forum/audio-and-v...ew-option.html
From there it's just your preference of how you want to run the wires through the car.
I know most prefer to run it straight up the middle.. but with my system/amp/speaker/sub setup in this car.. there's just no room in the glovebox area.. or the center console.
So, I'm going to remove all trim going down driver side edge and route it that way, under carpet.. remove kick plate up front.. and route it under carpet up and around to back of headunit. Already run some wires this way and it's not a big deal.
Now, this seems like about a 1-2 hour job.. but I'm sure it will turn into a 4-6 hour job.. I tend to double or triple install times... but that's ok.
I'm debating whether I want to even bother with wiring in a switch to turn the camera on when the car isn't in reverse.. I doubt I will to be honest.. I mean how often do you want to turn on your rear view camera to look at the ground?

Thanks for the link
01-22-2014, 06:42 PM
#98
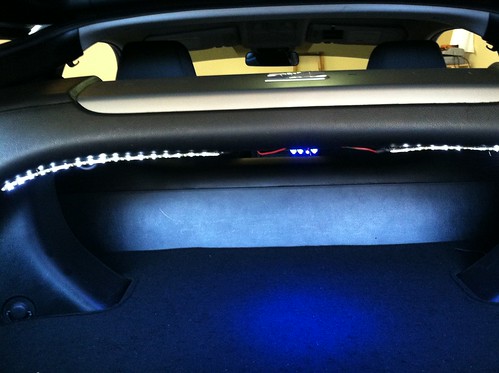
I eliminated the Center LED,.. removed everything and unwired it. Then made good use of my thumb nail and proceeded to remove the previous owners mess of some insanely hard to get off adhesive. After that was cleaned up I re-did his wiring (everything was just loosely touching and had some electrical tape around it.. ) with solder and heatshrink tubing, and made use of my hot glue gun to re-mount the LED strips further in -- Under center of bottom of Strut bar.
Turned out well, and the light it gives off is much better in this location, and looks much cleaner.
I highly recommend grabbing a pair of those LED strips somewhere cheap,.. and placing them under your strut bar (Take your pick of colors, they make them all.. but I like more "factory" or clean looking things.. So just white works for me.)
So when you open your hatch it really lights up back there,.. big improvement.
Again prev. owners setup:
http://www.flickr.com/photos/111739693@N04/12019663174/
Re-wired, and Re-located (minus blue LED):
http://www.flickr.com/photos/111739693@N04/12096067214/
Also, I bought an OEM trunk Mat with the Z logo. My car only had the mat that goes "under" this mat. Not sure if that's just the way it is with "base" models, but this new Floor Hatch mat looks great, is thicker, and will probably help quieten down the inside just that little bit more. I just put it on top of the old Mat. It still has some creases in it from shipping, but those will flatten out.
Got in my Kenwood KCA-iP202 in from Crutchfield today (allows me to use my iphone properly plugged in (Standard iPhone cords don't work):
http://www.crutchfield.com/p_113KCIP...ip202&skipvs=T

So just waiting on the Reverse Rear Camera to arrive any day this week (One that goes in the Taglight slot),.. then I'll be pulling the DDX470 back out one last time To Add a proper ground to the Headunit (didn't know the 350Z's ground coming from harness didn't go back to a ground on the other end of the factory harness.. odd.) -- Installing that new KCA-iP202 cable, and installing the Reverse Camera all in one go,.. then should be done.
Have a question or three-- The DDX470 Harness (Better picture below):
RJKBP2MIsGqsg~~60_3.JPG)
Has an "Illum" wire.. and several other wires I did NOT hook up to the factory harness. I basically hooked up Power, Ground, Remote, plugged it in.. And everything works fine.
I did notice that the unit would not turn on until I put in the Antenna wire, which is why I'm going to run a proper ground, because I don't think the headunit is supposed to need the antenna hooked into it to power on.
But more to the question: With these other wires on the DDX470 Harness,.. Which ones do I need to hook up that I haven't when I pull the headunit?
It works .. but not sure what the Illum wire does that is not already being done now.. and there may be another wire or two that I did not wire into the factory harness.
Since this is a DDX470 thread, I figured you guys could tell me the harness wires from the DDX470 that should be hooked in to get all the "features" so to speak. Or should I just leave it hooked up the way it is.. and these other wires don't do anything with our vehicles?
Here's another better picture of the back of headunit and harness:

With that new iP202 Cable.. It has a USB end, 3.5mm end,.. then on the OTHER end that it just a Iphone 4 cable plug.
How do I retain being able to swap in my USB stick if I plug this thing into the USB slot?
(Can I just run the USB cable it comes with up to the top compartment above radio in our cars..) -- Then plug the 3.5mm end into the Iphone Audio IN on the back of headunit?
Also,.. (With this iP202 Cable) - how do retain having an Auxillary male end to plug other Auxillary devices into? I notice on the back of this head unit there is another "Audio" 3.5mm jack by the RCA Pre-outs..
Do I run another 3.5mm Male to Male cord from there and out the that compartment I can access above the radio?
Just trying to get it straight.. because I know it allows Iphone/Ipod hook up (and control).. + USB hookup [Even though I will have to remove the Iphone part from the USB I'm sure..] + An Auxillary 3.5mm port to plug in other devices.. be it a computer, tablet, whatever.
Thanks.. sorry so long.. but as I started looking at this and the cord I have here in front of me, I started wondering.
01-23-2014, 02:37 AM
#99
Hook up all the wires, but especially the ground. Just get a crimp-on spade or ring connector and attach the ground wires under one of the screws holding the metal radio bracket to the chassis of the car as you're screwing the waterfall back in place. The "illum" wire allows the lighting of the head unit to automatically dim with the car's dash lights (when you turn on the parking lights, for example), so hook that one up, too. There is also a wire to power the car's antenna amplifier, and if that isn't connected you'll have very poor, or no, FM reception.
The iPhone cable does take that USB port (while the BT adapter takes the other), but I have mine in a spot that can easily be reached by just pulling back on the shifter surround, if I need to unplug and access it. Only time I needed it was to plug in a thumb drive with a jpg file I wanted to use as wallpaper on the head unit. I can't answer your other questions about the other connections - sorry, but since you bought it from Crutchfield, call them. They have great tech support.
The iPhone cable does take that USB port (while the BT adapter takes the other), but I have mine in a spot that can easily be reached by just pulling back on the shifter surround, if I need to unplug and access it. Only time I needed it was to plug in a thumb drive with a jpg file I wanted to use as wallpaper on the head unit. I can't answer your other questions about the other connections - sorry, but since you bought it from Crutchfield, call them. They have great tech support.
01-23-2014, 04:45 PM
#100
Hook up all the wires, but especially the ground. Just get a crimp-on spade or ring connector and attach the ground wires under one of the screws holding the metal radio bracket to the chassis of the car as you're screwing the waterfall back in place. The "illum" wire allows the lighting of the head unit to automatically dim with the car's dash lights (when you turn on the parking lights, for example), so hook that one up, too. There is also a wire to power the car's antenna amplifier, and if that isn't connected you'll have very poor, or no, FM reception.
I knew the the Illum light did something, I thought it had to go hand in hand with the lights of the vehicle,.. but wasn't sure. Thanks for clearing that up.
I did NOT know the DDX470 harness had a wire to go to the antenna "amplifier".. hell, I didn't know the car had an antenna amplifier. So that's great to know.. I sort of noticed the reception on FM channels was a little poor compared to when I had the pioneer in there.. but I don't listen to FM much. I'm sure that and other wires will be fairly obvious when I get back there to re-run ground, and hook the other wires I didn't the first time up to get any extra "features" however minor they might be.
The iPhone cable does take that USB port (while the BT adapter takes the other), but I have mine in a spot that can easily be reached by just pulling back on the shifter surround, if I need to unplug and access it. Only time I needed it was to plug in a thumb drive with a jpg file I wanted to use as wallpaper on the head unit.
I was thinking I could run a standard USB extension cable up from headunit into the top compartment above headunit, and I could plug the 202 cable's USB port into that and unplug it when I put my USB flash drive in. The 202 cable's 3.5mm cable is extra long so that will go to the back of the headunit to stay no problem.
I guess I'm just making sure with a USB extension that 202 cable will still "work" right. As I won't even use this cable if it essentially takes away my ability to swap a USB flash drive with music on it and ONLY allows for iphone/ipod hook up.
The USB part of this 202 MAY be just long enough to feed up to that top compartment above the headunit by itself,.. if so then I know that will work for obvious reasons.
So that just leaves the last question of the Aux input. This unit is advertised for the 202 Cable's Iphone/Ipod Aux input, AND an AV1 Auxillary input/output.
I made a quick diagram pointing it out a little more clearly:
http://www.flickr.com/photos/111739693@N04/12110237045/
In Yellow is the USB input (That cable itself might reach up to that compartment,.. if so then it surely will work with the 202 cable so I can swap in and out the USB thumb drive and Iphone as needed.. since that cable is a Kenwood and the 202 cable is a Kenwood) -- Agree?
In Blue is the Auxillary input for the Iphone/Ipod for use with the Kenwood 202 cable I bought,.. so that 3.5mm end of that cable will definitely go to this and it will ONLY be used for the Iphone.
But.. this unit has another Aux input/output Jack built into it.. which is tied into the AV1 selection -- It's circled in Red.
So,.. I'm thinking I can run just a standard male to male 3.5mm cable from this and out that top compartment so I can hook anything that outputs via a 3.5mm cable (be it a phone, computer, tablet, etc.. it will work fine when I switch the headunit to AV1 input.)
The similar looking black input above that one I circled is for the Microphone out for Bluetooth which I in use by the Mic I have hooked up for , well, bluetooth calls, voice recognition.
That accurate? Sound right?
Anyone else with a DDX470 can chime in here too.. But Cain, I appreciate what help you can offer. The camera should be coming in , I hope, tomorrow ( I ordered from a US seller Sunday,.. so even coming from california it should arrive Friday, maybe Saturday at the latest.)
Thanks!