Custom 8.4" Dash Tablet Install
 08-18-2016, 06:06 PM
#1
New Member
Thread Starter

8.4 INCH FULLY AUTOMATED DASH TABLET INSTALLATION TUTORIAL (2016)
I have been researching tablet installs for the 350Z and was initially planning to do the Nexus 7 install using the factory non-nav cubby as a mounting bracket. I decided to go a route I haven't yet seen before on a 350Z which is to install a bigger tablet. The problem is, if you want to go any bigger than 7" (screen size), you cannot use the factory cubby assembly for that flush, factory look. So instead, ill be deleting the cubby and installing the tablet right onto the back of the console. I realize that it might not look the best, but it's the only option and im determined to make it look decent.
The tab will be used for navigation, streaming movies/music, as a dash-cam (possibly), and for viewing my car's ECU data. The tablet will be programmed to run automatic tasks such as waking-up/sleeping when the car turns on or off. But in order for tasks like this and others to be possible, a Root must be performed on the tablet. If you choose not to root, you may still follow this guide as I install a tablet, and all the required wiring, into my 350Z.
WHAT WILL FIT?
Use ANY 8.3" or 8.4" tablet currently on the market.
Long version: The tablets that will have the best fit and least hassle will range from 8" to 9".
The opening of the dash console is roughly 6"x8" which would be the ideal screen size for a tablet. The tablet that comes the closest to having those dimensions and still will be able to fit behind the dash without damaging too much is the HTC Nexus 9. Its larger design will fill the entire dash opening, making it an ideal tab for this project, however, keep note that the larger the tablet, the larger the gaps on the sides will be due to the curve of the dash. Another problem you will run into using this tablet is the size - The 9" tablet will fit, but finding room for the USB cable is a problem simply because there is not enough room. There's a few ways around this if you're willing to put in the extra work: You could either use a wireless charging pad behind the tablet, OR, solder (hardwire) the power straight to the inside of the tablet. A bit of a tough job, but would pay off in the end. Nexus 9's go for about $200 used on ebay, which is a bit out of my budget, and the Amazon Fire HDX 2014 (8.9") could be an alternative if you cannot find a Nexus 9, though it's slightly bulkier. I wouldn't recommend using either of these tablets unless you are prepared to do some extra modding.
The tab I found to be the best candidate for my project is the Galaxy Tab S 8.4". It has a big 1440p Super-Amoled wide-screen, and can be found used for ~$150. I saw 8" tabs as an option but I prefer the wide-screen of the 8.4" tabs. To put it simple: Widescreen tabs are shaped more like a movie screen, so movies will appear larger. Another good thing about this tab is that it takes a sim card, so I am able to get internet straight from my cell provider. A tablet without a sim card could also get internet by tethering internet from your cell phone.
Here are some more wide-screen tabs with good fitment:
Galaxy Tab Pro 8.4"- Very similar to the Tab S but doesnt have Amoled, and has one less Gb of RAM. 1440p.
LG G Pad II 8.3 or G Pad X - Newer tabs with better performance than the Tab S/Pro, but it's 1080p.
LG G Pad 8.3 - Older model. Still good. 1080p.
As for 8" tabs (non-widescreen), I would recommend:
Galaxy Tab A 8.0 (720p)
Galaxy Tab E 8.0 (720p)
Galaxy Tab S2 8.0 (1440p)
LG G Pad X (1080p)
Asus Zenpad (1080p).
iPad Mini's can work, but not using the method shown in this guide. Their lengths (7.9") are just under the length of the dash opening (8").
A 9.6" or 9.7" tablet is really pushing it. You would be working with very little room, much like the Nexus 9, but even worse. Would require heavy modifications to the dash. 10" tabs could work if you cut the center piece on the dash. Would also require removal of double din stereo.
Keep it simple and use one of the tabs I listed above.
ITEMS USED'
Everything can be found on ebay or amazon. Total cost is ~$220 including tablet and tax.
Tablet - Galaxy Tab S 8.4 (~$150 used)
USB Cable - Right-angle USB cable (2ft or 0.5m) Get one that charges fast ($8)
Power Converter - 12v to 5v 3A converter with female USB ($5)
Fuse Tap - Mini ATM 15A fuse tap ($5)
Adhesive Pads - 3M double-sided adhesive pads for bottom of power converter ($3)
Dremmel - Or something to hack up your dash with. I used a disc dremmel ($5).
Moldable Glue and/or Gap Filler - Sugru Moldable Glue will fill the gaps and hold the tablet in place. You can use only Sugru but it gets pretty expensive so I suggest using some Great Stuff Gap Filler spray foam first as a foundation, then use the Sugru black putty to fill in the gaps from the front of the dash. ($20 & $7)
Screen Protector - Protect your tabs's screen ($5-$10)
Tools - 10mm socket and screwdriver
PC - To give your tablet root access (optional)
AutomateIt app - Program your tablet to do things automatically (free)(requires root access)(optional)
Torque app - Allows driver to view ECU's data in real-time and clear codes ($5)(requires OBD2 adapter)(optional)
OBD2 Adapter - Communicates data from car's ECU to a tablet ($5)(optional)
1. PREPARE TABLET
First, the tablet will be Rooted in order to gain ultimate control over the tablet. Once the tablet is rooted, the app "AutomateIt" can be downloaded/installed/configured. Then, download any other apps like: Navigation, music and movie players, etc.. Then final preparations will be made before the tablet gets installed onto the back of the dash.
1. Root the tablet - In order to, for example, automatically wake-up the tablet when the car turns on, the tablet MUST be rooted. There are plenty of "How-To Root" tutorials on the internet for almost every tablet available. Find out the model number of the tablet by going into settings and choosing "About Device". Now you can google instructions on how to root your specific tablet. Rooting requires slightly above-average computer knowledge.
Note: If you are using the Tab S 8.4 with the model number of "SM-T707A", the only way to root is to go to the Kingroot website from your tablet, and download/install their root app. Open the app and tap "Root Now". It will tell you if the rooting was done successfully. If you choose to remove the root, simply uninstall Kingroot from within the app's settings.
2. Install AutomateIt app - Once the tablet is rooted, install and open the AutomateIt app. A window will pop up asking for root access permission - Tap "Allow". AutomateIt can essentially program everything you want the tablet to do automatically. For example, you can program it to turn on GPS and Bluetooth when the car turns on. It can also be programmed to start certain apps at certain times. There are so many different tasks this app could do -- It's really up to the individual to decide how they want theirs setup. See section below for instructions on how to program AutomateIt.
3. Disable back/home/recent keys (Samsung only) and add on-screen buttons - The back/home/recent buttons on a Samsung tablet will have no use because they will be covered by the dash, so it's best to just disable them and add custom on-screen buttons instead. The app "Simple Control" will add buttons, and the app "All-in-One Gestures" will allow you to disable the Samsung back/home/recent buttons. Google Navbar will also allow you to have on-screen buttons, but I prefer the customizability of Simple Control.
4. Install an offline map app - Not everyone has free data with their cell phone plan so the best alternative would be to use an offline map app to use for navigation. It's free because it only uses the GPS instead of WiFi or data. Google Maps can be used offline but you need to download new maps every month to continue using it. There are a ton of offline map apps in the android app store. Choose one that suits you best.
5. Install Torque app - This is a must-have app for anyone with a dash tablet. Torque communicates with the car so that you can see the data coming from the car's ECU. Fault codes can also be viewed and cleared from the car's memory. In order for Torque to function, an OBD2 adapter must be installed in the car. Most cars made after year 2000 should have an OBD2 port.
6. Think about installing custom ROM's and/or kernels - This is not necessary, but sometimes they can be better for the tab's battery, and also, add more features. It is worth researching the benefits of custom ROM's.
7. Make final touches to tablet - Setup tablet desktop so that important apps are easily accessible. Make sure to set the tablet to always be in landscape mode. Install any apps you wish. Add music and movies. Bluetooth pair your cell phone and stereo to the tablet. Clean off the screen and install a new screen protector.
2. CONFIGURE AUTOMATEIT APP
In order for your tablet to do certain tasks automatically, you must set specific rules within the AutomateIt app. Every person will have their own preference on how to program their tablet but I will list some common rules:
- If tab is connected to a power source (car turns on)---> Turn screen on and set to never time out. Turn off airplane mode. Turn on GPS, bluetooth, and sound. Open music player app.
- If tab is disconnected from power source (car turns off) ---> Turn off screen, GPS, bluetooth, and sound. Close all apps. Turn on airplane and power saving modes.
- If GPS is turned on ---> Open navigation app.
If you have a data plan and WiFi tethering on your cell phone, you could share the data with the tablet so you can automatically be connected to the internet while you're driving. Make sure to make a rule in AutomateIt that will turn on/off Wifi at the appropriate times.
3. MODIFY DASH
The back of the dash console needs to be modified in order for a tablet to fit. A dremel is required to cut away certain parts of the dash. Note: If you ever want to return to stock, the cubby will have nothing to screw onto since you have dremmelled that part off, but the cubby will still sit in there fairly flush without being screwed to anything.
1. Remove center console and cubby assembly from the dash.
2. Unscrew cubby assembly from dash leaving only the console and the gauges.
3. Use dremel to cut away plastic on back of console. See pic.
4. Test fit the tablet and use dremel to clean up any imperfections.
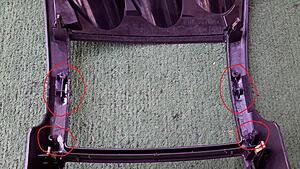
[Link to larger pic]
Note: The two plastic pieces circled on the bottom of the picture can be cut more or less depending on how big the tablet is. Always take measurements. I cut mine in about half.
4. WIRING
Since the tablet will be permanently installed in the car, it needs to get its power from the car. One easy way to do this is to take power from the cigarette lighter fuse in the fusebox. To do this, you'll need a fuse tap, a 12-to-5v converter, and a USB cable.
1. Splice red wire from fuse tap to red wire on 12to5v converter. Use whatever method works best for you. I soldered mine together. Then connect the USB cable to the female USB on the converter. The wiring is complete.
2. Install fuse tap - Locate the fusebox near the left foot of the driver. Use the chart on the back of the fusebox door to locate the "cigarette lighter 15A fuse". Use the remover tool (provided in the fusebox) to remove the 15A cigarette lighter fuse. Install that fuse onto the fuse tap. There should now be two 15A fuses installed on the fuse tap (usually fuse taps come with one preinstalled). Now simply install the fuse tap into where the cigarette lighter fuse was pulled from.
3. Install 12 to 5v converter - Just above the fuse box and to the left is a metal box (not sure what it's for). That is where I mounted the Converter. Use the 3M adhesive pads to stick the converter to the metal box. The black wire is a ground wire and should be bolted onto a secure ground location. You should be left with a dangling USB female end.
4. Connect a 2 ft. (or 0.5m) USB cable to the female USB on the converter. Find the hole that leads to the cubby area and run the 2 ft. USB cable through it to the tablet. Use a clothes hanger to help feed the USB cable through.
5. Secure down all the loose wiring under the dash. Use tape, zip-ties, or anything that can hold the wires securely. This is VERY important because you do not want your feet tangled in wires when trying to press the brakes.
Note: The Converter I used has 2 female USB ends. In the video, you can see one is dangling down but the other one is tucked through the hole and goes to the tablet. I wanted a converter with 2 USB ends so that I could charge another device if I want to.
5. INSTALL TABLET
Once the tablet is done being test-fit, it can now be installed onto the console permanently.
1. Setup the tablet in the desired location on the console.
2. Use Sugru putty to secure tablet onto console. Wait overnight for Sugru to dry.
3. Test fit console/tablet assembly onto dash. Use dremel to trim off any plastics that get in the way. The tablet I used for this guide required me to only cut out a small piece of plastic which was rubbing onto the USB connector.
4. Plug USB cable into tablet before permanently reinstalling console/tablet. Also reconnect gauge harness.
5. Carefully reinstall console/tablet. Make sure there are no gaps and that everything is correctly lined up.
6. Turn on car and enjoy :]
I have been researching tablet installs for the 350Z and was initially planning to do the Nexus 7 install using the factory non-nav cubby as a mounting bracket. I decided to go a route I haven't yet seen before on a 350Z which is to install a bigger tablet. The problem is, if you want to go any bigger than 7" (screen size), you cannot use the factory cubby assembly for that flush, factory look. So instead, ill be deleting the cubby and installing the tablet right onto the back of the console. I realize that it might not look the best, but it's the only option and im determined to make it look decent.
The tab will be used for navigation, streaming movies/music, as a dash-cam (possibly), and for viewing my car's ECU data. The tablet will be programmed to run automatic tasks such as waking-up/sleeping when the car turns on or off. But in order for tasks like this and others to be possible, a Root must be performed on the tablet. If you choose not to root, you may still follow this guide as I install a tablet, and all the required wiring, into my 350Z.
WHAT WILL FIT?
Use ANY 8.3" or 8.4" tablet currently on the market.
Long version: The tablets that will have the best fit and least hassle will range from 8" to 9".
The opening of the dash console is roughly 6"x8" which would be the ideal screen size for a tablet. The tablet that comes the closest to having those dimensions and still will be able to fit behind the dash without damaging too much is the HTC Nexus 9. Its larger design will fill the entire dash opening, making it an ideal tab for this project, however, keep note that the larger the tablet, the larger the gaps on the sides will be due to the curve of the dash. Another problem you will run into using this tablet is the size - The 9" tablet will fit, but finding room for the USB cable is a problem simply because there is not enough room. There's a few ways around this if you're willing to put in the extra work: You could either use a wireless charging pad behind the tablet, OR, solder (hardwire) the power straight to the inside of the tablet. A bit of a tough job, but would pay off in the end. Nexus 9's go for about $200 used on ebay, which is a bit out of my budget, and the Amazon Fire HDX 2014 (8.9") could be an alternative if you cannot find a Nexus 9, though it's slightly bulkier. I wouldn't recommend using either of these tablets unless you are prepared to do some extra modding.
The tab I found to be the best candidate for my project is the Galaxy Tab S 8.4". It has a big 1440p Super-Amoled wide-screen, and can be found used for ~$150. I saw 8" tabs as an option but I prefer the wide-screen of the 8.4" tabs. To put it simple: Widescreen tabs are shaped more like a movie screen, so movies will appear larger. Another good thing about this tab is that it takes a sim card, so I am able to get internet straight from my cell provider. A tablet without a sim card could also get internet by tethering internet from your cell phone.
Here are some more wide-screen tabs with good fitment:
Galaxy Tab Pro 8.4"- Very similar to the Tab S but doesnt have Amoled, and has one less Gb of RAM. 1440p.
LG G Pad II 8.3 or G Pad X - Newer tabs with better performance than the Tab S/Pro, but it's 1080p.
LG G Pad 8.3 - Older model. Still good. 1080p.
As for 8" tabs (non-widescreen), I would recommend:
Galaxy Tab A 8.0 (720p)
Galaxy Tab E 8.0 (720p)
Galaxy Tab S2 8.0 (1440p)
LG G Pad X (1080p)
Asus Zenpad (1080p).
iPad Mini's can work, but not using the method shown in this guide. Their lengths (7.9") are just under the length of the dash opening (8").
A 9.6" or 9.7" tablet is really pushing it. You would be working with very little room, much like the Nexus 9, but even worse. Would require heavy modifications to the dash. 10" tabs could work if you cut the center piece on the dash. Would also require removal of double din stereo.
Keep it simple and use one of the tabs I listed above.
ITEMS USED'
Everything can be found on ebay or amazon. Total cost is ~$220 including tablet and tax.
Tablet - Galaxy Tab S 8.4 (~$150 used)
USB Cable - Right-angle USB cable (2ft or 0.5m) Get one that charges fast ($8)
Power Converter - 12v to 5v 3A converter with female USB ($5)
Fuse Tap - Mini ATM 15A fuse tap ($5)
Adhesive Pads - 3M double-sided adhesive pads for bottom of power converter ($3)
Dremmel - Or something to hack up your dash with. I used a disc dremmel ($5).
Moldable Glue and/or Gap Filler - Sugru Moldable Glue will fill the gaps and hold the tablet in place. You can use only Sugru but it gets pretty expensive so I suggest using some Great Stuff Gap Filler spray foam first as a foundation, then use the Sugru black putty to fill in the gaps from the front of the dash. ($20 & $7)
Screen Protector - Protect your tabs's screen ($5-$10)
Tools - 10mm socket and screwdriver
PC - To give your tablet root access (optional)
AutomateIt app - Program your tablet to do things automatically (free)(requires root access)(optional)
Torque app - Allows driver to view ECU's data in real-time and clear codes ($5)(requires OBD2 adapter)(optional)
OBD2 Adapter - Communicates data from car's ECU to a tablet ($5)(optional)
1. PREPARE TABLET
First, the tablet will be Rooted in order to gain ultimate control over the tablet. Once the tablet is rooted, the app "AutomateIt" can be downloaded/installed/configured. Then, download any other apps like: Navigation, music and movie players, etc.. Then final preparations will be made before the tablet gets installed onto the back of the dash.
1. Root the tablet - In order to, for example, automatically wake-up the tablet when the car turns on, the tablet MUST be rooted. There are plenty of "How-To Root" tutorials on the internet for almost every tablet available. Find out the model number of the tablet by going into settings and choosing "About Device". Now you can google instructions on how to root your specific tablet. Rooting requires slightly above-average computer knowledge.
Note: If you are using the Tab S 8.4 with the model number of "SM-T707A", the only way to root is to go to the Kingroot website from your tablet, and download/install their root app. Open the app and tap "Root Now". It will tell you if the rooting was done successfully. If you choose to remove the root, simply uninstall Kingroot from within the app's settings.
2. Install AutomateIt app - Once the tablet is rooted, install and open the AutomateIt app. A window will pop up asking for root access permission - Tap "Allow". AutomateIt can essentially program everything you want the tablet to do automatically. For example, you can program it to turn on GPS and Bluetooth when the car turns on. It can also be programmed to start certain apps at certain times. There are so many different tasks this app could do -- It's really up to the individual to decide how they want theirs setup. See section below for instructions on how to program AutomateIt.
3. Disable back/home/recent keys (Samsung only) and add on-screen buttons - The back/home/recent buttons on a Samsung tablet will have no use because they will be covered by the dash, so it's best to just disable them and add custom on-screen buttons instead. The app "Simple Control" will add buttons, and the app "All-in-One Gestures" will allow you to disable the Samsung back/home/recent buttons. Google Navbar will also allow you to have on-screen buttons, but I prefer the customizability of Simple Control.
4. Install an offline map app - Not everyone has free data with their cell phone plan so the best alternative would be to use an offline map app to use for navigation. It's free because it only uses the GPS instead of WiFi or data. Google Maps can be used offline but you need to download new maps every month to continue using it. There are a ton of offline map apps in the android app store. Choose one that suits you best.
5. Install Torque app - This is a must-have app for anyone with a dash tablet. Torque communicates with the car so that you can see the data coming from the car's ECU. Fault codes can also be viewed and cleared from the car's memory. In order for Torque to function, an OBD2 adapter must be installed in the car. Most cars made after year 2000 should have an OBD2 port.
6. Think about installing custom ROM's and/or kernels - This is not necessary, but sometimes they can be better for the tab's battery, and also, add more features. It is worth researching the benefits of custom ROM's.
7. Make final touches to tablet - Setup tablet desktop so that important apps are easily accessible. Make sure to set the tablet to always be in landscape mode. Install any apps you wish. Add music and movies. Bluetooth pair your cell phone and stereo to the tablet. Clean off the screen and install a new screen protector.
2. CONFIGURE AUTOMATEIT APP
In order for your tablet to do certain tasks automatically, you must set specific rules within the AutomateIt app. Every person will have their own preference on how to program their tablet but I will list some common rules:
- If tab is connected to a power source (car turns on)---> Turn screen on and set to never time out. Turn off airplane mode. Turn on GPS, bluetooth, and sound. Open music player app.
- If tab is disconnected from power source (car turns off) ---> Turn off screen, GPS, bluetooth, and sound. Close all apps. Turn on airplane and power saving modes.
- If GPS is turned on ---> Open navigation app.
If you have a data plan and WiFi tethering on your cell phone, you could share the data with the tablet so you can automatically be connected to the internet while you're driving. Make sure to make a rule in AutomateIt that will turn on/off Wifi at the appropriate times.
3. MODIFY DASH
The back of the dash console needs to be modified in order for a tablet to fit. A dremel is required to cut away certain parts of the dash. Note: If you ever want to return to stock, the cubby will have nothing to screw onto since you have dremmelled that part off, but the cubby will still sit in there fairly flush without being screwed to anything.
1. Remove center console and cubby assembly from the dash.
2. Unscrew cubby assembly from dash leaving only the console and the gauges.
3. Use dremel to cut away plastic on back of console. See pic.
4. Test fit the tablet and use dremel to clean up any imperfections.
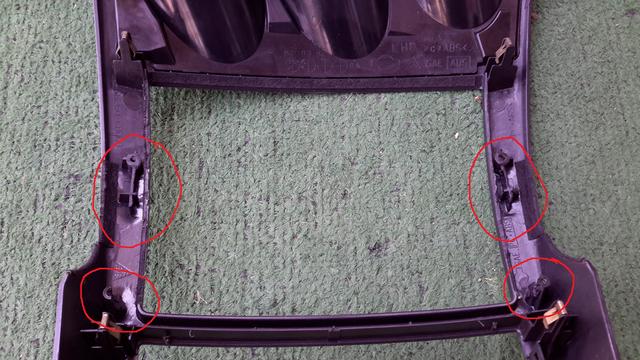
[Link to larger pic]
Note: The two plastic pieces circled on the bottom of the picture can be cut more or less depending on how big the tablet is. Always take measurements. I cut mine in about half.
4. WIRING
Since the tablet will be permanently installed in the car, it needs to get its power from the car. One easy way to do this is to take power from the cigarette lighter fuse in the fusebox. To do this, you'll need a fuse tap, a 12-to-5v converter, and a USB cable.
1. Splice red wire from fuse tap to red wire on 12to5v converter. Use whatever method works best for you. I soldered mine together. Then connect the USB cable to the female USB on the converter. The wiring is complete.
2. Install fuse tap - Locate the fusebox near the left foot of the driver. Use the chart on the back of the fusebox door to locate the "cigarette lighter 15A fuse". Use the remover tool (provided in the fusebox) to remove the 15A cigarette lighter fuse. Install that fuse onto the fuse tap. There should now be two 15A fuses installed on the fuse tap (usually fuse taps come with one preinstalled). Now simply install the fuse tap into where the cigarette lighter fuse was pulled from.
3. Install 12 to 5v converter - Just above the fuse box and to the left is a metal box (not sure what it's for). That is where I mounted the Converter. Use the 3M adhesive pads to stick the converter to the metal box. The black wire is a ground wire and should be bolted onto a secure ground location. You should be left with a dangling USB female end.
4. Connect a 2 ft. (or 0.5m) USB cable to the female USB on the converter. Find the hole that leads to the cubby area and run the 2 ft. USB cable through it to the tablet. Use a clothes hanger to help feed the USB cable through.
5. Secure down all the loose wiring under the dash. Use tape, zip-ties, or anything that can hold the wires securely. This is VERY important because you do not want your feet tangled in wires when trying to press the brakes.
5. INSTALL TABLET
Once the tablet is done being test-fit, it can now be installed onto the console permanently.
1. Setup the tablet in the desired location on the console.
2. Use Sugru putty to secure tablet onto console. Wait overnight for Sugru to dry.
3. Test fit console/tablet assembly onto dash. Use dremel to trim off any plastics that get in the way. The tablet I used for this guide required me to only cut out a small piece of plastic which was rubbing onto the USB connector.
4. Plug USB cable into tablet before permanently reinstalling console/tablet. Also reconnect gauge harness.
5. Carefully reinstall console/tablet. Make sure there are no gaps and that everything is correctly lined up.
6. Turn on car and enjoy :]
Last edited by openupitsdave; 09-30-2016 at 07:55 PM.

The following users liked this post:
350z-Helsinki (08-25-2020)

Thread
Thread Starter
Forum
Replies
Last Post
Extreme Dimensions
Body Exterior
7
08-19-2016 10:53 AM

