sintaxeror's build log - tons of PICS/No 56k!
 03-13-2008, 05:49 AM
#121
Registered User
iTrader: (1)

Join Date: Apr 2007
Location: Houston
Posts: 61
Likes: 0
Received 0 Likes
on
0 Posts
Looking awesome!! I am overcome with joy when I know there are more posts and pictures to view in this thread. You are doing an awesome job. Thank you for your contribution.
On with my question...I am at the same stage (running wire to doors, amp rack 80% complete, waiting on components from UPS) and tonight I am running wire into the doors. Is it ok to run the speaker wire alongside the power wire? I know to keep the RCA's seperate from the power, but I want do whatever to avoid that whine sound from the engine. Thanks Z Community!
On with my question...I am at the same stage (running wire to doors, amp rack 80% complete, waiting on components from UPS) and tonight I am running wire into the doors. Is it ok to run the speaker wire alongside the power wire? I know to keep the RCA's seperate from the power, but I want do whatever to avoid that whine sound from the engine. Thanks Z Community!
 03-13-2008, 06:02 AM
#122
Registered User
Thread Starter
iTrader: (3)

Join Date: Jun 2005
Location: St. Petersburg, FL
Posts: 670
Likes: 0
Received 0 Likes
on
0 Posts
Yep.. running speaker wires along side power wire is fine.. the signal level is way beyond that of RCA's and you won't hear any noise that is picked up.
03-13-2008, 06:27 AM
#123
Administrator

iTrader: (25)
Originally Posted by sintaxeror
[
Thats it for today! Let me know your thoughts as always!
Thats it for today! Let me know your thoughts as always!
03-13-2008, 06:53 AM
#124
Registered User
iTrader: (7)

Join Date: Aug 2006
Location: NJ
Posts: 2,136
Likes: 0
Received 0 Likes
on
0 Posts
Originally Posted by sintaxeror
Honestly I'm not sure why you guys had so much trouble.. I really didn't have a hard time with it... maybe the drivers side will teach me a lesson today?
03-13-2008, 05:29 PM
#126
Registered User
Thread Starter
iTrader: (3)
Join Date: Jun 2005
Location: St. Petersburg, FL
Posts: 670
Likes: 0
Received 0 Likes
on
0 Posts
UPDATE 3/13/08 Night
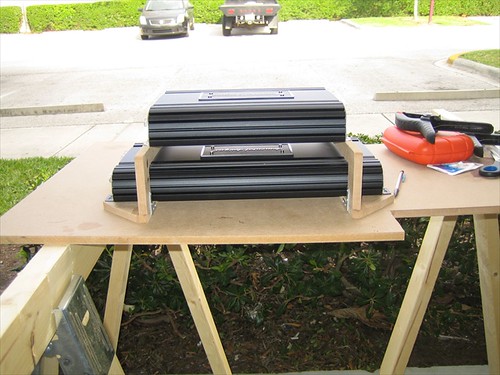
Started out and put a couple of coats of black on the amp rack.. I know my painting technique is bad but I really could care less how the finish comes out on these...

Flipped over..

Painted the bottoms..

Time to tackle the driver side door panel..

Switches popped off..

Door panel off..

Door panel inside..

Bare door..

speaker comes out..

now you can see why the stock speaker fits so easily..

unplugged the connector..

Took off the kick panel..

Other connector pulled out..

plastic jacket and lever taken off..

Boot pulled back..

Back of the connector.. this one is a little more tricky because there are closer wires..

Cut out... I nicked that blue wire JUST a bit.. but it will be okay.

test fit with speaker cable..

Inside piece cut out..

test fit with speaker cable..

This is the bit I use on my dremel.. makes this VERY easy.

wire fed through the inside connector.. look at all the plastic dust.

Inside connector in place with wire coming through..

Fed a zip tie through the boot..

Pulled through and into the door.

boot back over the connector..

Lever reinstalled..

All connected back up..

Wire pulled through the boot and tied up for now...

before I button everything back up.. I want to go get longer matching bolts for those that mount the stock speaker, for when I make spacers.

Got these from home depot.. the threads are different i suspect the stock bolts are metric.

Speaker back in..

main panel back on..

All finished..

running the wire..

Past the seat under the carpet.. I can't believe that I will make it through this entire install without removing the seats.

Big bundle of wires..

I decided now that I want to run the RCA's down the drivers side instead of the console... will just make wiring the amp a little easier and put a little more distance between them and the power wires.
Lower console out..

Upper console out..

center console out..

RCAs back out of the cubby..

Also moved the GPS antenna to the stock location.. much better signal now.

Deck out..

RCA's run to the dash..

Deck reinstalled.

Kickpanel back in..

Disconnected the battery, going to be messing with my power wires..

One distro block installed..

power wire stripped..

heat shrink..

connected...

holes drilled in amp rack..

a little plumbing strap to hold the amp rack in place.. just so it doesn't move around too much.

Amps screwed down..

Straps attached..

8 gauge power/ground...

4 gauge power/ground wires...

better look at the ends.. I ran out of heat shrink I'll pick up more tomorrow...

Thats it for today...out of daylight...
Started out and put a couple of coats of black on the amp rack.. I know my painting technique is bad but I really could care less how the finish comes out on these...
Flipped over..
Painted the bottoms..
Time to tackle the driver side door panel..
Switches popped off..
Door panel off..
Door panel inside..
Bare door..
speaker comes out..
now you can see why the stock speaker fits so easily..
unplugged the connector..
Took off the kick panel..
Other connector pulled out..
plastic jacket and lever taken off..
Boot pulled back..
Back of the connector.. this one is a little more tricky because there are closer wires..
Cut out... I nicked that blue wire JUST a bit.. but it will be okay.
test fit with speaker cable..
Inside piece cut out..
test fit with speaker cable..
This is the bit I use on my dremel.. makes this VERY easy.
wire fed through the inside connector.. look at all the plastic dust.
Inside connector in place with wire coming through..
Fed a zip tie through the boot..
Pulled through and into the door.
boot back over the connector..
Lever reinstalled..
All connected back up..
Wire pulled through the boot and tied up for now...
before I button everything back up.. I want to go get longer matching bolts for those that mount the stock speaker, for when I make spacers.
Got these from home depot.. the threads are different i suspect the stock bolts are metric.
Speaker back in..
main panel back on..
All finished..
running the wire..
Past the seat under the carpet.. I can't believe that I will make it through this entire install without removing the seats.
Big bundle of wires..
I decided now that I want to run the RCA's down the drivers side instead of the console... will just make wiring the amp a little easier and put a little more distance between them and the power wires.
Lower console out..
Upper console out..
center console out..
RCAs back out of the cubby..
Also moved the GPS antenna to the stock location.. much better signal now.
Deck out..
RCA's run to the dash..
Deck reinstalled.
Kickpanel back in..
Disconnected the battery, going to be messing with my power wires..
One distro block installed..
power wire stripped..
heat shrink..
connected...
holes drilled in amp rack..
a little plumbing strap to hold the amp rack in place.. just so it doesn't move around too much.
Amps screwed down..
Straps attached..
8 gauge power/ground...
4 gauge power/ground wires...
better look at the ends.. I ran out of heat shrink I'll pick up more tomorrow...
Thats it for today...out of daylight...
03-14-2008, 03:47 AM
#129
Registered User
iTrader: (7)
Join Date: Aug 2006
Location: NJ
Posts: 2,136
Likes: 0
Received 0 Likes
on
0 Posts
Imagine how much faster this install would go if he didn't have to stop to snap pics every two steps.
sintaxeror, I extend to you a thanks from the community for taking the extra effort in sharing your experiences.
sintaxeror, I extend to you a thanks from the community for taking the extra effort in sharing your experiences.
03-14-2008, 04:32 AM
#130
Registered User
Thread Starter
iTrader: (3)
Join Date: Jun 2005
Location: St. Petersburg, FL
Posts: 670
Likes: 0
Received 0 Likes
on
0 Posts
Originally Posted by 16psibrick
keep up the good work! guys this is the most in depth, step by step look at doing some instlalation related tasks in the Z...and he does it the right way too!
cant wait to see the final results!!!
cant wait to see the final results!!!
Suck it bitches! Bing says I do it the right way!

Originally Posted by StreetOC192
Imagine how much faster this install would go if he didn't have to stop to snap pics every two steps.
sintaxeror, I extend to you a thanks from the community for taking the extra effort in sharing your experiences.
sintaxeror, I extend to you a thanks from the community for taking the extra effort in sharing your experiences.
03-14-2008, 04:40 AM
#131
Registered User
iTrader: (1)

Join Date: Jun 2004
Location: Fishers, IN
Posts: 122
Likes: 0
Received 0 Likes
on
0 Posts
This thread I think has convinced me to tackle my install myself instead of paying a shop and wondering if they did a primo install. Thanks for the extensive write up and pics! The only questions I'll have is when hooking everything up to the amps and such, but I'll cross that bridge when I get there. Keep up the good work!
03-14-2008, 10:18 AM
#132
Administrator
iTrader: (25)
Awesome pics!!! I love it....
03-14-2008, 12:35 PM
#134
Registered User
iTrader: (1)
Join Date: Apr 2007
Location: Houston
Posts: 61
Likes: 0
Received 0 Likes
on
0 Posts
Might be a silly question...But I am running 4g wire from the battery and to a dist block that has two 4g outputs, which are going to my JL 300/4 and JL 500.1. Is this ok or must I decrease the size wire to 8g and get a new dist block? Seriously, I do not want to reloom/electrical tape-crimp terminals-shrink tube more cable...but you tell me whats best.
03-14-2008, 12:47 PM
#135
Registered User
iTrader: (7)
Join Date: Aug 2006
Location: NJ
Posts: 2,136
Likes: 0
Received 0 Likes
on
0 Posts
Originally Posted by thachadd
Might be a silly question...But I am running 4g wire from the battery and to a dist block that has two 4g outputs, which are going to my JL 300/4 and JL 500.1. Is this ok or must I decrease the size wire to 8g and get a new dist block? Seriously, I do not want to reloom/electrical tape-crimp terminals-shrink tube more cable...but you tell me whats best.
03-14-2008, 01:06 PM
#136
Registered User
Thread Starter
iTrader: (3)
Join Date: Jun 2005
Location: St. Petersburg, FL
Posts: 670
Likes: 0
Received 0 Likes
on
0 Posts
Originally Posted by StreetOC192
Do the JL amps have 4awg inputs for power? If they do, then this is fine, it's just over kill. What matters most is your fuse ratings!!!
03-14-2008, 05:05 PM
#137
Registered User
Thread Starter
iTrader: (3)
Join Date: Jun 2005
Location: St. Petersburg, FL
Posts: 670
Likes: 0
Received 0 Likes
on
0 Posts
UPDATE 3/14/08 Night
Not so many pictures today.. the weather made it a little difficult to take pictures every step.
First things first, I went to out and got some more heat shrink for the ground cable....

Connected to the distribution block..

Other cables connected to the block, this block will be grounded.

My Z looks afraid in this picture... and it should be...

Used the drill mounted wire brush to strip some paint away from this bolt hole.

Finished connecting the positive distribution block..

Added the ground block... Yes I know its crooked, it doesn't bother me..

Setting up the remote wire... used some spare speaker wire.. here with the soldered terminal.

Covered..

WTF nature.... you will notice after this point the pictures become less frequent. Yes I still installed amps in the rain without a garage. Yes I am a crazy ****.

Time to start wiring the amps...

Power and ground to the nine.2x...

Hooked up the remote, connected the battery back up, and tested to make sure it turned on..

Battery disconnected again.. back to wiring. Here is the 12 gauge wire for the sub...

Connected... nine.2x is finished...

Front stage speaker wires with terminals soldered on, and covers with heat shrink.

Left and Right speaker wires all connected to the nine.2.

The power wires were too short to connect to the amps outside the cubby, so I put them in and wired up the nine.2 the rest of the way... then connected the battery for a test before I strap them in.. Green means go!

Strapped in the front...

And in the back... You can see the ground cable too.

Alllll done...

Put the rear speaker cover on.. decided to leave them in there just because I didn't feel like taking them out... They will be faded all the way out though.

Since I have a door on the drivers side now.. I need to connect the latch..

I came in and got it, then realized the guy who sold me this stuff forgot to include the right bolts.. So I went to home depot to get some replacements, but when I got back the rain was worse and it was too dark to continue. More tomorrow! Comments and questions are welcome as always..
Not so many pictures today.. the weather made it a little difficult to take pictures every step.
First things first, I went to out and got some more heat shrink for the ground cable....
Connected to the distribution block..
Other cables connected to the block, this block will be grounded.
My Z looks afraid in this picture... and it should be...
Used the drill mounted wire brush to strip some paint away from this bolt hole.
Finished connecting the positive distribution block..
Added the ground block... Yes I know its crooked, it doesn't bother me..
Setting up the remote wire... used some spare speaker wire.. here with the soldered terminal.
Covered..
WTF nature.... you will notice after this point the pictures become less frequent. Yes I still installed amps in the rain without a garage. Yes I am a crazy ****.
Time to start wiring the amps...
Power and ground to the nine.2x...
Hooked up the remote, connected the battery back up, and tested to make sure it turned on..
Battery disconnected again.. back to wiring. Here is the 12 gauge wire for the sub...
Connected... nine.2x is finished...
Front stage speaker wires with terminals soldered on, and covers with heat shrink.
Left and Right speaker wires all connected to the nine.2.
The power wires were too short to connect to the amps outside the cubby, so I put them in and wired up the nine.2 the rest of the way... then connected the battery for a test before I strap them in.. Green means go!
Strapped in the front...
And in the back... You can see the ground cable too.
Alllll done...
Put the rear speaker cover on.. decided to leave them in there just because I didn't feel like taking them out... They will be faded all the way out though.
Since I have a door on the drivers side now.. I need to connect the latch..
I came in and got it, then realized the guy who sold me this stuff forgot to include the right bolts.. So I went to home depot to get some replacements, but when I got back the rain was worse and it was too dark to continue. More tomorrow! Comments and questions are welcome as always..
 03-14-2008, 09:24 PM
#140
Registered User
iTrader: (11)

Join Date: Apr 2006
Location: SF South Bay area
Posts: 1,145
Likes: 0
Received 0 Likes
on
0 Posts
Wow! This thread blows me away! and is extremely motivating...
I have installed my own systems in every car I have ever owned and have been very proud of them. That's five cars so far. I am in my late-30's and have been putting this off with my z because of less time (stupid career!), too many hobbies (mountian biking, road biking, Photography, z-stuff) all the unknowns of ripping apart another car, adding weight to the car, blah, blah, blah...
This thread has snapped out of it... Getting the car audio bug again... Plus I am a DIY 'till I die kinda guy. THANKS!
A few questions and observations with your install...
1. I like the idea of routing the speaker wire through the door wire moulding. Has anyone thought about getting some extra pins and recepticals - like the larger of the two that are on the wiring harness and having your aftermarket wires become part of the wiring harness ather than running through it? I know the fewer the connections the better, but if your door ever had to be removed... Anyway.
2. Where did you get the inset face/bezel thing that allows you to set the head-unit back? Looks better than the metra kit. Looks very clean.
3. I have not done any fiberglass, but I want to learn - both for speaker enclosures and I also want to make a custom front bumper clip for my z. I don't like any of the after-market ones. What's a good resource for learning?
4. The last system I did was a 97 M3. before that, a 91 CRX. I am very impressed by how well Nissan has sealed off the metal on the inside of the door (when you take the interior off). I am used to gaping holes there that had to be sealed with ABS plastic or wood and sound damping material.
5. Those front midrange speakers have a neodymium magnet structure and a plastic frame - wow! talk about light-weight. Yeah, sucky sound too, but it's cool from an engineering perspective. Is the mounting piece integrated into the speaker frame?
6. What are the exact measurements of the chamber behind the driver's seat? Width-wise anyway? wondering how wide of an amp I can fit in there.
7. No offense, but I hope your RCA's are twisted pair and not coaxial in nature. Coax is FTL when it comes to minimizing inductance noise in a car environment.
8. What kind of camera are you using?
You are doing an awesome job on this install and write-up and I really enjoy the pics and your sense of humor - the beer tools, the "car looks scared - it should be", "you're no child of mine" LOL. This is hands-down one of the top-10 best threads on this entire board
EDIT: Oops, I messed up the more-pics-than-posts mixture... forgive me
Last edited by hiz-n-herz; 03-14-2008 at 09:33 PM.

