My audio setup, the installation begins
 10-07-2008, 04:42 PM
#1

SEPTEMBER 2009 UPDATE, POST 56
so i started ripping apart the 350, getting ready for the new audio setup
I was looking for some more sound than stock but didn’t want to spend a ton doing it. I just bought my car a few months ago and I have a few other plans for it and I would prefer to spread the money out among various mods not just audio, so this is what I came up with.
this is what is going in

and a **** load of wires
i also have to build a box, and iam going to make a custom false floor setup
THEN

NOW

THEN

NOW

and the parts pile


i have 100 sq feet of FATMAT, Similar to dynamat. i working on installing a bunch of it now
so i started ripping apart the 350, getting ready for the new audio setup
I was looking for some more sound than stock but didn’t want to spend a ton doing it. I just bought my car a few months ago and I have a few other plans for it and I would prefer to spread the money out among various mods not just audio, so this is what I came up with.
this is what is going in
and a **** load of wires
i also have to build a box, and iam going to make a custom false floor setup
THEN
NOW
THEN
NOW
and the parts pile
i have 100 sq feet of FATMAT, Similar to dynamat. i working on installing a bunch of it now
Last edited by XERMAN2001; 09-22-2009 at 06:03 PM.


 10-07-2008, 04:45 PM
#3
UPDATE:
This audio install is taking FOR EVER, I�ve already spent over 20 hours on it and I am still not done.
The hatch BEFORE:

And AFTER:

This is 2 pieces, = 50 sq feet of FAT MAT, I ve already used 50 feet in the car already and I just opened the 2nd roll, (shown in pic) so this pic is of half of what i have used this point

Seats coming out, then carpet

Pass floor BEFORE:

And AFTER:

Driver floor BEFORE:

And AFTER:


--------------
----------------
-------------
Getting ready to start on the door and front speakers now

This audio install is taking FOR EVER, I�ve already spent over 20 hours on it and I am still not done.
The hatch BEFORE:
And AFTER:
This is 2 pieces, = 50 sq feet of FAT MAT, I ve already used 50 feet in the car already and I just opened the 2nd roll, (shown in pic) so this pic is of half of what i have used this point
Seats coming out, then carpet
Pass floor BEFORE:
And AFTER:
Driver floor BEFORE:
And AFTER:
--------------
----------------
-------------
Getting ready to start on the door and front speakers now


Trending Topics
10-14-2008, 07:06 PM
#9
UPDATE
so far my 350 had not moved out of my driveway for 23 days. it suck not being able to drive it. i just bought it!!!!!!!!!
Well, I am stilling working on the never ending project here. 30 hours in so far.
Time to work on the doors

Skin off BEFORE

Stock front speaker

FAT MAT TIME -- AFTER

Now time to run the speaker wires. This was a PITA, it was the hardest part of this project so far. I spent like 5 hours just running the 2 wires........ DAM IT
So I ran them through the factory door harnesses. I removed the harness from both sides and carefully drilled out holed in the unused space to run the wires through.
(Not mine but gives a pic)
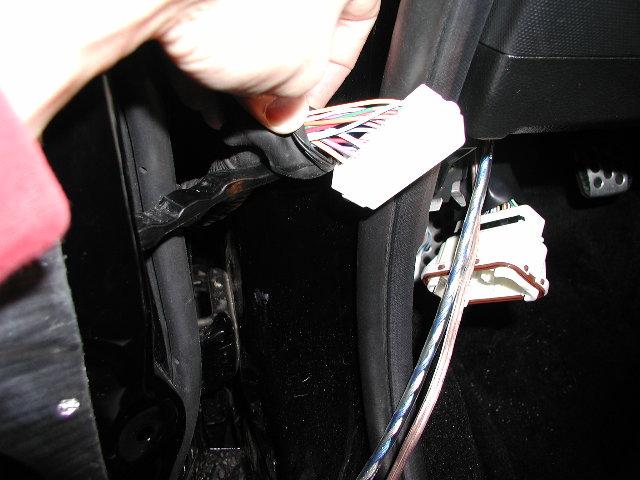

MINE AFTER IS DONE, see the blue wires on both sides. Nice and clean just like from the factory

Now it was time to make an adaptor plate for the aftermarket 6 � speaker. I wanted it to mount in the stock location for a first made a cardboard template of the stock speaker housing. Then I used it to make a bracket out of MDF, then a spacer ring and metal ring to bring the speaker further out to clear the window glass.

Then I applied 2 layers of fiberglass resin to the adaptor and sanded it smooth for extra strength. I drilled all of the holes, attached to door with factory screws, attached wires and the speaker.

door skin back on

Re cap
Stock speaker

Aftermarket speaker -- this barely fit, there is only like a 5mm of clearance between the speaker, door skin and window glass. That�s like 2 coins on each side.

THAT IS ALL FOR NOW
I WILL KEEP YOU UPDATED
so far my 350 had not moved out of my driveway for 23 days. it suck not being able to drive it. i just bought it!!!!!!!!!
Well, I am stilling working on the never ending project here. 30 hours in so far.
Time to work on the doors
Skin off BEFORE
Stock front speaker
FAT MAT TIME -- AFTER
Now time to run the speaker wires. This was a PITA, it was the hardest part of this project so far. I spent like 5 hours just running the 2 wires........ DAM IT
So I ran them through the factory door harnesses. I removed the harness from both sides and carefully drilled out holed in the unused space to run the wires through.
(Not mine but gives a pic)
MINE AFTER IS DONE, see the blue wires on both sides. Nice and clean just like from the factory
Now it was time to make an adaptor plate for the aftermarket 6 � speaker. I wanted it to mount in the stock location for a first made a cardboard template of the stock speaker housing. Then I used it to make a bracket out of MDF, then a spacer ring and metal ring to bring the speaker further out to clear the window glass.
Then I applied 2 layers of fiberglass resin to the adaptor and sanded it smooth for extra strength. I drilled all of the holes, attached to door with factory screws, attached wires and the speaker.
door skin back on
Re cap
Stock speaker
Aftermarket speaker -- this barely fit, there is only like a 5mm of clearance between the speaker, door skin and window glass. That�s like 2 coins on each side.
THAT IS ALL FOR NOW
I WILL KEEP YOU UPDATED
 11-08-2008, 10:24 PM
#13
Registered User
iTrader: (4)

Join Date: Jul 2004
Location: Vancouver, BC
Posts: 515
Likes: 0
Received 0 Likes
on
0 Posts
Wow looks a LOT like my car! I use Hushmat. I am about 2/3's done and I have used about 80 sq. feet so far. I did my ceiling and it made a phenominal difference. I highly recommend the ceiling for road noise and resonance cancellation.

 11-20-2008, 07:24 PM
#15
UPDATE:
Now that it’s all snowy and crappy and I am less busy I finally have time to post an update
I finished installing most of the build but because it was so time consuming I decided to finish the rest in the spring. The car was put back together around the 1st week of October.
This is what I have done so far:
-installed front speakers
-installed rear speakers
-installed deck
-installed 100 sq feet of fat mat
-Installed all audio wiring
What still needs to be done in the spring:
-Build custom sub box
-installed sub
-install amps
-Build custom trim plate/false floor
-----------
After the front speakers were in I finished installing the fat mat in the rear and I ran all of the wiring.
BEFORE:
AFTER:


Then I had to trim the plastic panel covering the rear speakers so the would clear.

All of the wires in the rear ready to go


Tucking the wires away so the spare tire can go back in. (until spring when it will be removed and I can finish the project)

Now that it’s all snowy and crappy and I am less busy I finally have time to post an update
I finished installing most of the build but because it was so time consuming I decided to finish the rest in the spring. The car was put back together around the 1st week of October.
This is what I have done so far:
-installed front speakers
-installed rear speakers
-installed deck
-installed 100 sq feet of fat mat
-Installed all audio wiring
What still needs to be done in the spring:
-Build custom sub box
-installed sub
-install amps
-Build custom trim plate/false floor
-----------
After the front speakers were in I finished installing the fat mat in the rear and I ran all of the wiring.
BEFORE:
AFTER:
Then I had to trim the plastic panel covering the rear speakers so the would clear.
All of the wires in the rear ready to go
Tucking the wires away so the spare tire can go back in. (until spring when it will be removed and I can finish the project)
11-20-2008, 07:25 PM
#16
Deck installed. I had to modify the plastic adaptor plate and the mounting bracket to get the deck to fit correctly but it got it to work.
BEFORE:

AFTER:


The rear back together. While the car was apart I also decided to install a 2nd glove box door since that’s location was not being used anyway.


And just to show how much extra space I have just acquired. I use this bag to carry my cleaning supplies, believe it or not I can get it to fit in the 2nd glove box.


---------------------------------------
Well that’s it for now.
After these pics were taken I was able to enjoy the car for another 4 weeks or so then it went away for the winter.
When I have fully completed the install I will post pics of the final product.
BEFORE:
AFTER:
The rear back together. While the car was apart I also decided to install a 2nd glove box door since that’s location was not being used anyway.
And just to show how much extra space I have just acquired. I use this bag to carry my cleaning supplies, believe it or not I can get it to fit in the 2nd glove box.
---------------------------------------
Well that’s it for now.
After these pics were taken I was able to enjoy the car for another 4 weeks or so then it went away for the winter.
When I have fully completed the install I will post pics of the final product.
04-21-2009, 04:13 PM
#17
UPDATE UPDATE
Well its spring time now, so its time to start working on my 350Z audio project again.
This is what I have done so far:
-installed front speakers
-installed rear speakers
-installed deck
-installed 100 sq feet of fat mat
-Installed all audio wiring
What still needs to be done
-Build custom sub box
-installed sub
-install amps
-Build custom trim plate/false floor
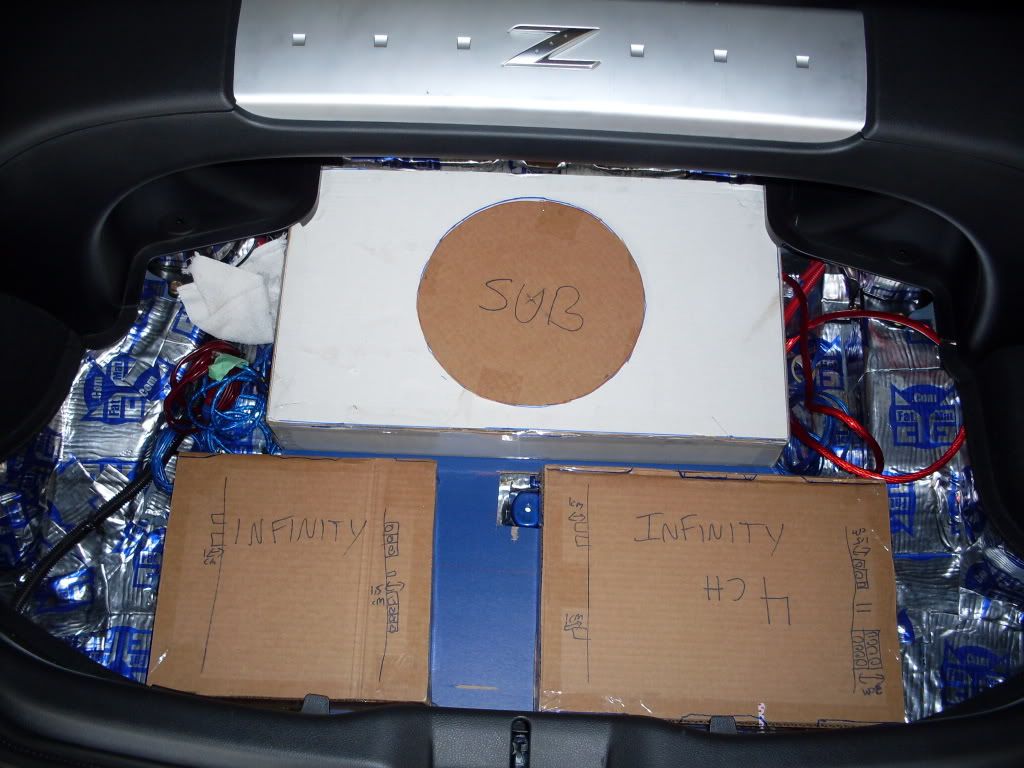
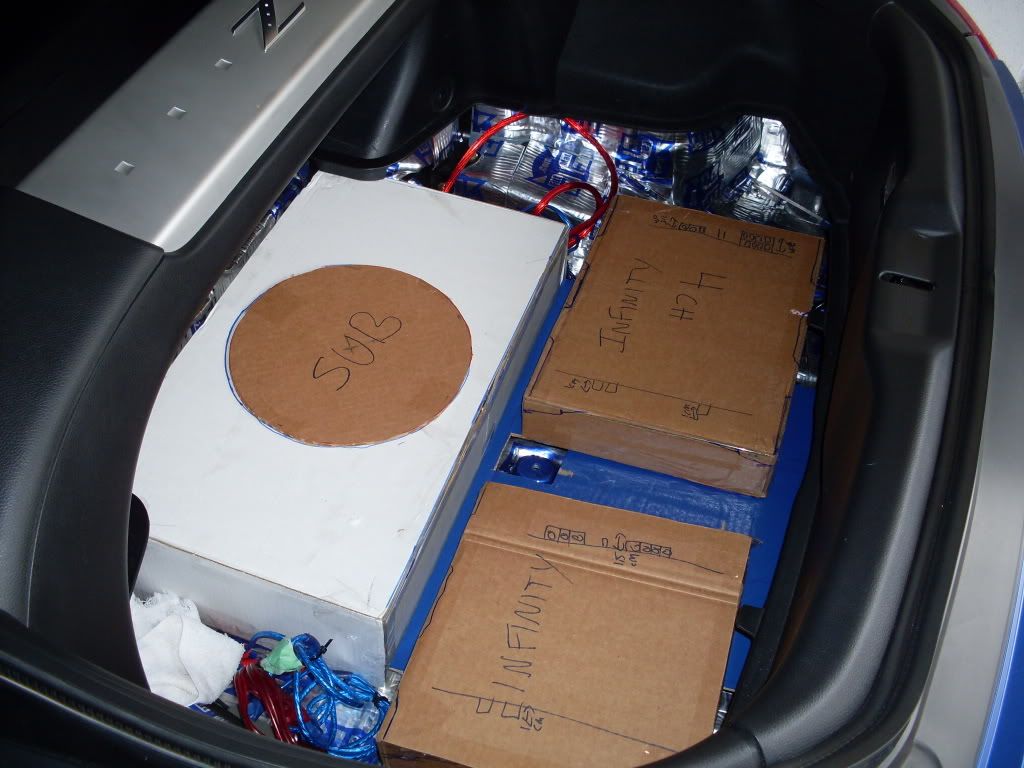
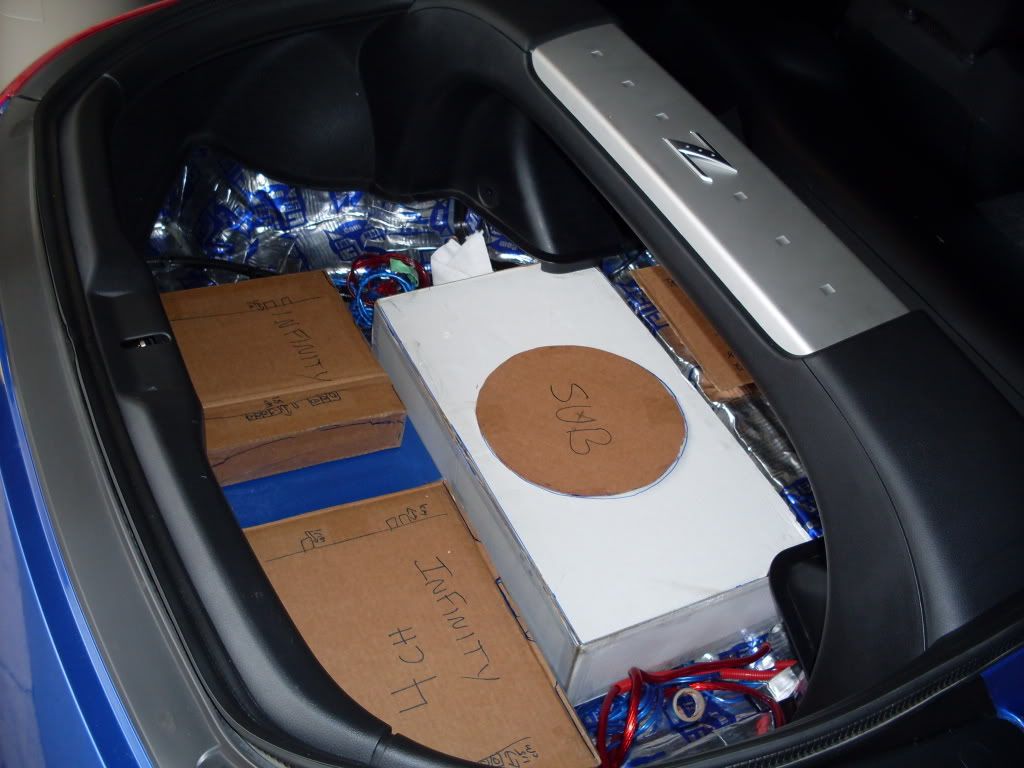
Since I am not a professional audio installer I didn�t want to risk damaging the audio equipment so I made replicas out of cardboard. Pros could probably complete this job in less than a 3rd of the time it�s going to take me but because I am not a pro I wanted to take me time and mock the complete system in cardboard before cutting the MDF.
I started this a few weeks ago and this is what I have so far.
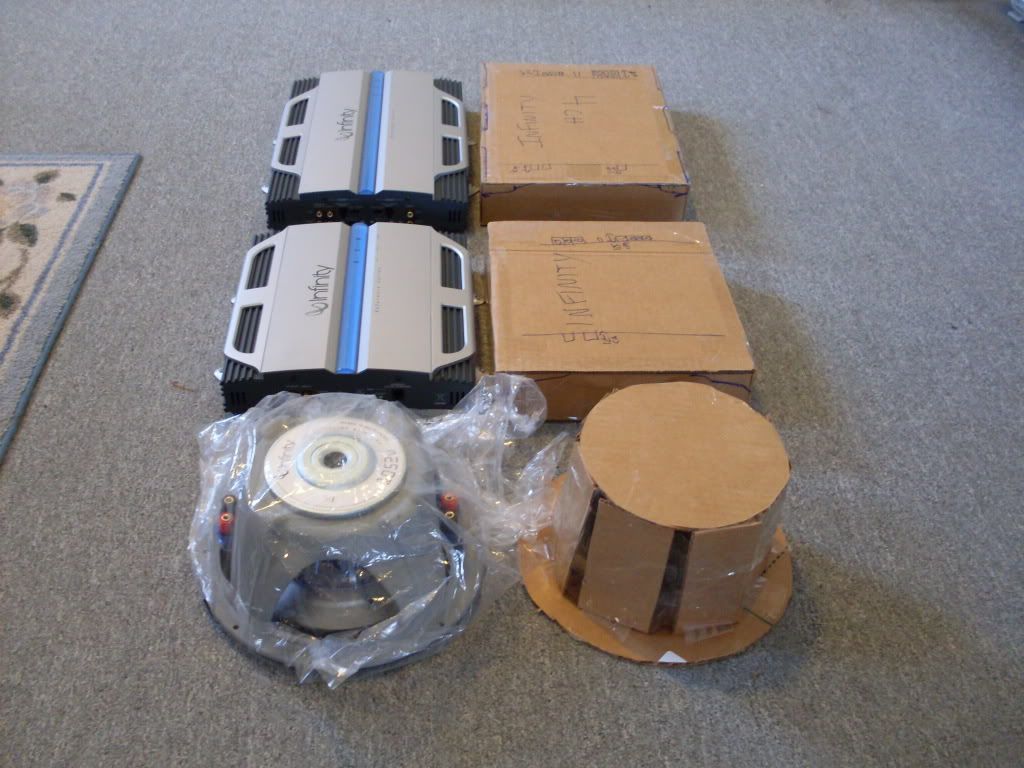
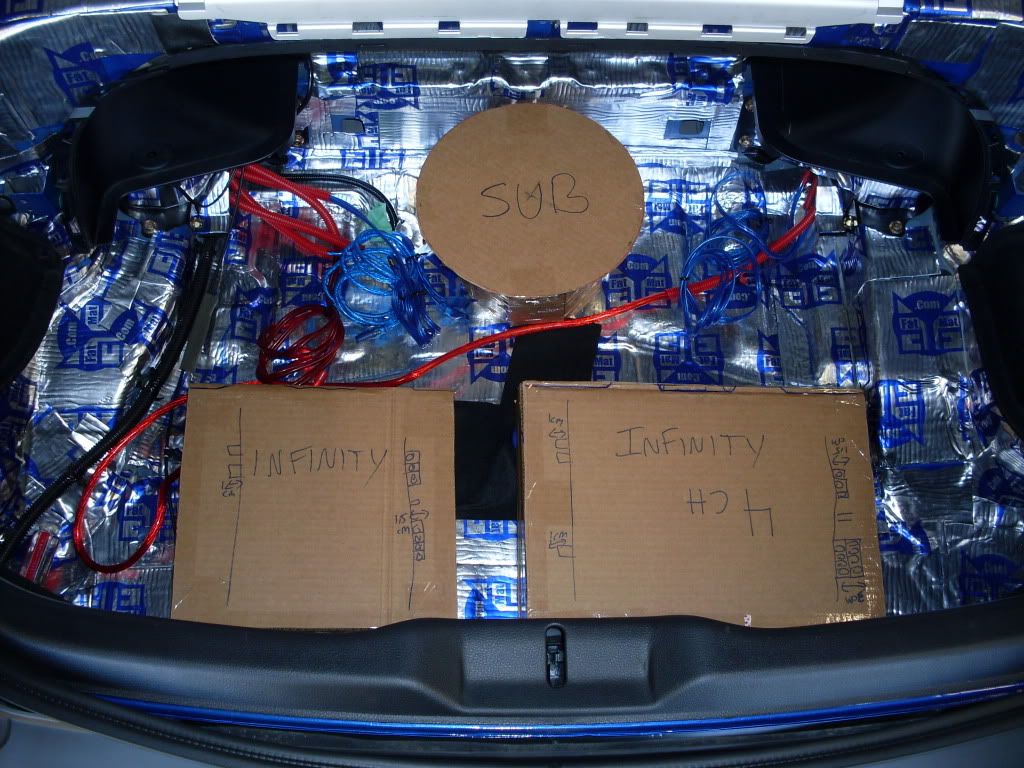
Scale cardboard replicas of the Infinity amps and sub.
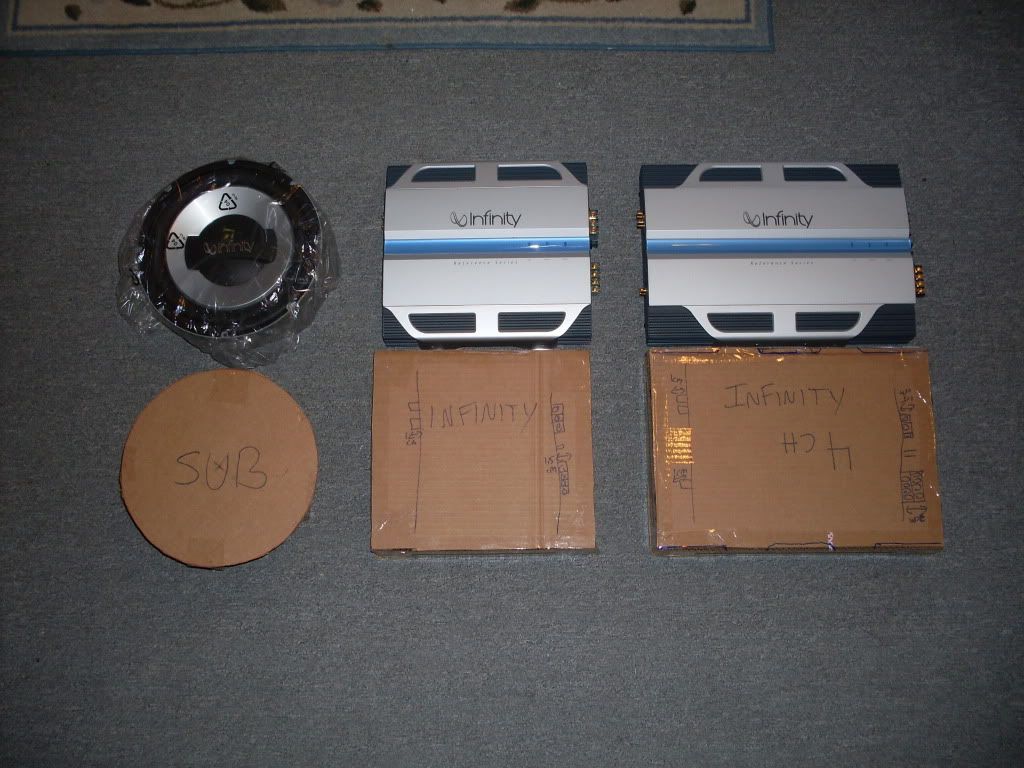
Thinking about placement.
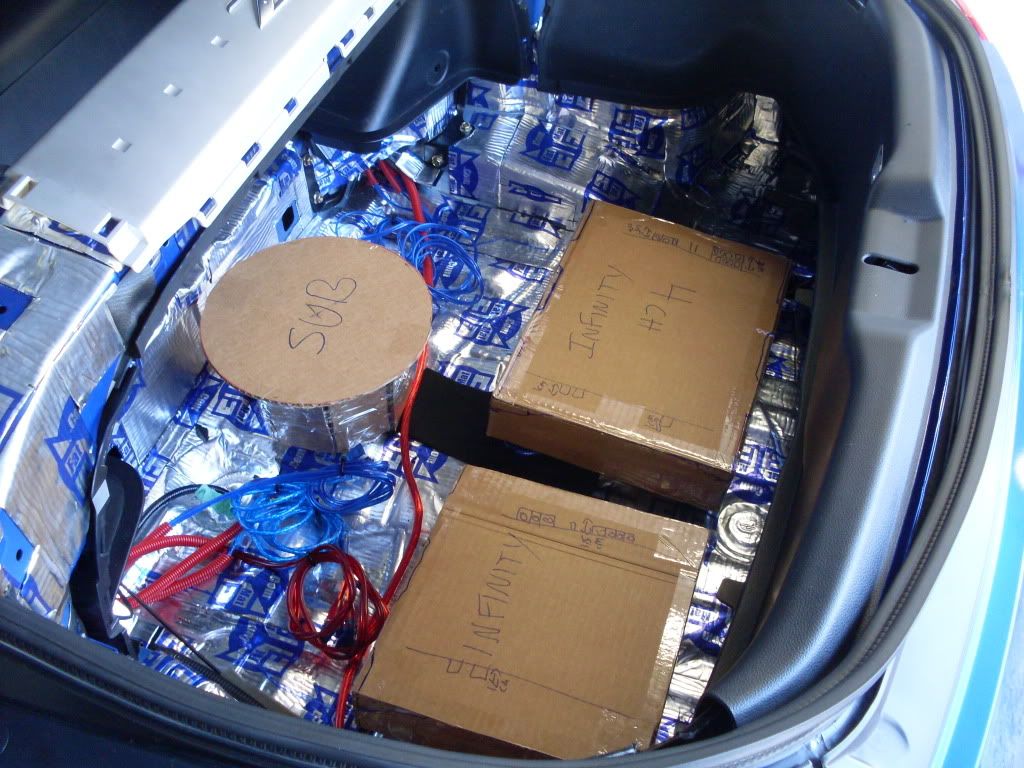
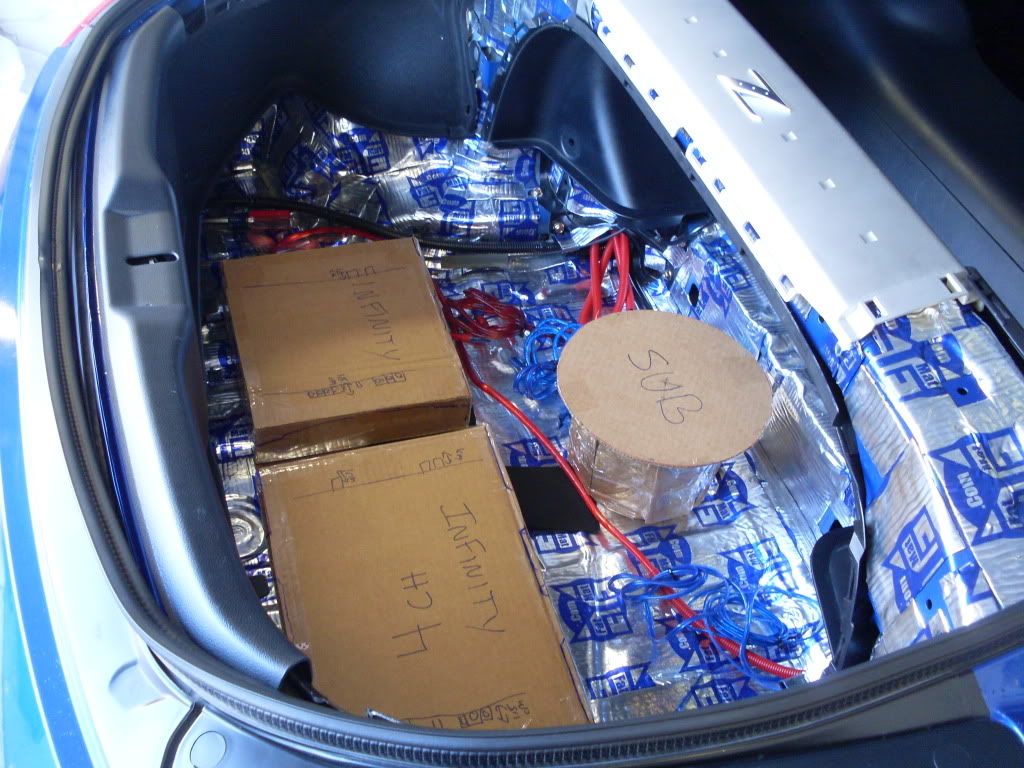
Given the cubic air space requirements of the sub and space available to me I made a scale replica of the box out of cardboard. The recommended air space for the sub is .75 cubic sq feet, the box will measure around 22inch x 6 inch x 13 inch x � think mdf = .72 cubic sq feet.
I also started to make the area that the amps will mount on.
Pics
Well its spring time now, so its time to start working on my 350Z audio project again.
This is what I have done so far:
-installed front speakers
-installed rear speakers
-installed deck
-installed 100 sq feet of fat mat
-Installed all audio wiring
What still needs to be done
-Build custom sub box
-installed sub
-install amps
-Build custom trim plate/false floor
Since I am not a professional audio installer I didn�t want to risk damaging the audio equipment so I made replicas out of cardboard. Pros could probably complete this job in less than a 3rd of the time it�s going to take me but because I am not a pro I wanted to take me time and mock the complete system in cardboard before cutting the MDF.
I started this a few weeks ago and this is what I have so far.
Scale cardboard replicas of the Infinity amps and sub.
Thinking about placement.
Given the cubic air space requirements of the sub and space available to me I made a scale replica of the box out of cardboard. The recommended air space for the sub is .75 cubic sq feet, the box will measure around 22inch x 6 inch x 13 inch x � think mdf = .72 cubic sq feet.
I also started to make the area that the amps will mount on.
Pics
04-22-2009, 07:01 AM
#18
Registered User
iTrader: (7)

Join Date: Feb 2008
Location: Panama City Beach, FL
Posts: 890
Likes: 0
Received 0 Likes
on
0 Posts
you could probably squeeze more space if needed by adding wings to the bottom of the box yo follow the contours of the trunk area
or just load it with poly fill
or just load it with poly fill
04-22-2009, 12:17 PM
#19
I was told that the 1 250 rms sub in a 1/2 inch box of that size reinforced with fiberglass resin should be strong enough. My other option is to lose some air space and go with thicker MDF but i don't know how the sub will respond to it.
i dont want to make the box any taller than 5.75 inchs or this would end up raising the floor level higher than before. So if i make it out of 3/4 inch mdf i would have to make the bottom of the box out of fiberglass to contour to the floor and leave enough room to clear the sub. I would also need to add poly, the box would be around .64 cubic sq feet and i need .75 cubic sq feet. how much poly would i need to add?
Last edited by XERMAN2001; 04-23-2009 at 03:21 PM.