Complete installation Build Log on 2008 350Z
 01-12-2014, 10:37 PM
#1

Well.. you've probably run across one of my posts in the last month or so while I was researching and asking questions.
I've been trying to keep everything in a single thread,.. but since this is the actual build process with pictures I thought it would be appropriate to put this JUST build log into this section,.. could benefit others down the road.
I've been working since Friday on this car,.. don't even know how many hours I've put in now, lost count.
Anyhow,.. Here's some pics of the car:
Car interior stripped 90%:
http://www.flickr.com/photos/111739693@N04/11889851006/
http://www.flickr.com/photos/111739693@N04/11889282053/
http://www.flickr.com/photos/111739693@N04/11889863356/
JL 10" sub wired, and mounted into Custom Box:
http://www.flickr.com/photos/111739693@N04/11889429764/
Factory Mids pulled out (Wow, these are terrible!) -- Had to cut them out of their spacer to reuse it with the new Components I bought.
http://www.flickr.com/photos/111739693@N04/11889999266/
New JBL Components successfully in factory spacers (one heck of a job fabricating those spacers to put these JBL mids!) -- And put the 1" tweeter in stock location (had to cut/fab behind that sail panel quite a bit to get them to fit.. but they fit perfect)
http://www.flickr.com/photos/111739693@N04/11912075985/
I Used Rattle Trap Extreme to deaden doors -- Am running out of deadener, and the doors were A LOT better sealed by factory than I anticipated.
If you have some recommendations of where else to put the deadener on these doors let me know.. I have a little left.
http://www.flickr.com/photos/111739693@N04/11921687595/
http://www.flickr.com/photos/111739693@N04/11922142294/
Slot where the Custom stealth Sub box is going,.. Used a ton of sound deadener in this spot.. picture just shows bottom, but it's done up top, sides , etc. Plus there is a 1" rubber mat that is on top of this material, not shown in pic.
http://www.flickr.com/photos/111739693@N04/11921955843/
Rear 6.5" (Late 90's German) MB Quarts installed with X-overs. [I used 5+ sq ft. of sound deadener just up in this area.. that stuff goes fast!]
http://www.flickr.com/photos/111739693@N04/11922141224/
Yes,.. I opted to wire and install a Bass ****. I KNOW many of you go against the notion of using one,.. but I plan on adjusting it on the fly quite often. So here it is mounted in a discreet "Invisible" location in the center console pop up box (top comes down and covers this). Used Industrial Velcro to mount it (worked fantastic!).. and dremeled below it for the phone cord to come through properly. I think it turned out pretty good:
http://www.flickr.com/photos/111739693@N04/11922558236/
The Custom Sub Box installed (It's downward firing). [This thing was a beast to get installed,.. 3 of the 12 bolts lined up .. So more dremel work with a light sanding bit being very careful with that MDF.] Turned out well though.
http://www.flickr.com/photos/111739693@N04/11922553716/
I'd say I'm 90% done now.
I have (not pictured) a carpeted amp rack built to go in the left "glove box" behind passenger seat (which when closed won't be seen).. that's drying right now.
Tomorrow I wire the amp up,.. plug in the headunit,.. and pray. If all works, I dial in the amp, then start re-assembling the vehicle.
Wish me luck!
I've been trying to keep everything in a single thread,.. but since this is the actual build process with pictures I thought it would be appropriate to put this JUST build log into this section,.. could benefit others down the road.
I've been working since Friday on this car,.. don't even know how many hours I've put in now, lost count.
Anyhow,.. Here's some pics of the car:
Car interior stripped 90%:
http://www.flickr.com/photos/111739693@N04/11889851006/
http://www.flickr.com/photos/111739693@N04/11889282053/
http://www.flickr.com/photos/111739693@N04/11889863356/
JL 10" sub wired, and mounted into Custom Box:
http://www.flickr.com/photos/111739693@N04/11889429764/
Factory Mids pulled out (Wow, these are terrible!) -- Had to cut them out of their spacer to reuse it with the new Components I bought.
http://www.flickr.com/photos/111739693@N04/11889999266/
New JBL Components successfully in factory spacers (one heck of a job fabricating those spacers to put these JBL mids!) -- And put the 1" tweeter in stock location (had to cut/fab behind that sail panel quite a bit to get them to fit.. but they fit perfect)
http://www.flickr.com/photos/111739693@N04/11912075985/
I Used Rattle Trap Extreme to deaden doors -- Am running out of deadener, and the doors were A LOT better sealed by factory than I anticipated.
If you have some recommendations of where else to put the deadener on these doors let me know.. I have a little left.
http://www.flickr.com/photos/111739693@N04/11921687595/
http://www.flickr.com/photos/111739693@N04/11922142294/
Slot where the Custom stealth Sub box is going,.. Used a ton of sound deadener in this spot.. picture just shows bottom, but it's done up top, sides , etc. Plus there is a 1" rubber mat that is on top of this material, not shown in pic.
http://www.flickr.com/photos/111739693@N04/11921955843/
Rear 6.5" (Late 90's German) MB Quarts installed with X-overs. [I used 5+ sq ft. of sound deadener just up in this area.. that stuff goes fast!]
http://www.flickr.com/photos/111739693@N04/11922141224/
Yes,.. I opted to wire and install a Bass ****. I KNOW many of you go against the notion of using one,.. but I plan on adjusting it on the fly quite often. So here it is mounted in a discreet "Invisible" location in the center console pop up box (top comes down and covers this). Used Industrial Velcro to mount it (worked fantastic!).. and dremeled below it for the phone cord to come through properly. I think it turned out pretty good:
http://www.flickr.com/photos/111739693@N04/11922558236/
The Custom Sub Box installed (It's downward firing). [This thing was a beast to get installed,.. 3 of the 12 bolts lined up
.. So more dremel work with a light sanding bit being very careful with that MDF.] Turned out well though.http://www.flickr.com/photos/111739693@N04/11922553716/
I'd say I'm 90% done now.
I have (not pictured) a carpeted amp rack built to go in the left "glove box" behind passenger seat (which when closed won't be seen).. that's drying right now.
Tomorrow I wire the amp up,.. plug in the headunit,.. and pray. If all works, I dial in the amp, then start re-assembling the vehicle.
Wish me luck!
 01-13-2014, 07:59 PM
#2
Today was the big day to see if all my hard work .. well ... worked!
First I decided I should put more sound deadener in the car.. I deadened this entire area and bulk heads.. Plus other areas I didn't bother to take pictures of.
http://www.flickr.com/photos/111739693@N04/11941583574/
And.. it's ALIVE! -- Setting Gains!
http://www.flickr.com/photos/111739693@N04/11941415513/
And.. only other shot I took was of the headunit,.. as I tuned the system in after Gains were set properly.
http://www.flickr.com/photos/111739693@N04/11941981696/
Fired right up! Everything worked flawlessly.. I couldn't believe it
It sounds phenomenal,.. way better than anticipated.
To get proper voltages for speakers,.. I ended up at 50% on gains for front,.. 50% on gains for rear.. and 60% on gain for Sub. Not too bad.
One thing I DID notice was not only did my 90's MB Quarts work,.. but they sounded at least 5 times better than the JBL's. This isn't knocking the JBL components I put up front,.. but Germany did something right with this old set of MB Quarts I have. WOW! To adjust for the MB Quarts being a greater SQ and tone.. I faded to front about 50%.. thus dropping the quarts down about half way,.. this set things up very well for sound positioning.
For ME,.. Putting rears in the car does sound better. I dropped the rears, then added them.. over an over..
The sub is absolutely DEAD on perfect,.. It's not too much.. but if I WANT it to be ridiculous .. It's right there,.. with my Bass **** next to me.
All in all, I couldn't have done a better job myself... oh wait. -- I'm just being a smart a.ss.. Seriously, I'm a very happy guy right now.
Tomorrow is put the interior back in day,.. no more worries of if all my work is going to work! Straight forward job on panels, trim, et al. Wonder what it's going to sound like with the interior back in?
First I decided I should put more sound deadener in the car.. I deadened this entire area and bulk heads.. Plus other areas I didn't bother to take pictures of.
http://www.flickr.com/photos/111739693@N04/11941583574/
And.. it's ALIVE! -- Setting Gains!
http://www.flickr.com/photos/111739693@N04/11941415513/
And.. only other shot I took was of the headunit,.. as I tuned the system in after Gains were set properly.
http://www.flickr.com/photos/111739693@N04/11941981696/
Fired right up! Everything worked flawlessly.. I couldn't believe it
It sounds phenomenal,.. way better than anticipated.
To get proper voltages for speakers,.. I ended up at 50% on gains for front,.. 50% on gains for rear.. and 60% on gain for Sub. Not too bad.
One thing I DID notice was not only did my 90's MB Quarts work,.. but they sounded at least 5 times better than the JBL's. This isn't knocking the JBL components I put up front,.. but Germany did something right with this old set of MB Quarts I have. WOW! To adjust for the MB Quarts being a greater SQ and tone.. I faded to front about 50%.. thus dropping the quarts down about half way,.. this set things up very well for sound positioning.
For ME,.. Putting rears in the car does sound better. I dropped the rears, then added them.. over an over..
The sub is absolutely DEAD on perfect,.. It's not too much.. but if I WANT it to be ridiculous .. It's right there,.. with my Bass **** next to me.
All in all, I couldn't have done a better job myself... oh wait.
-- I'm just being a smart a.ss.. Seriously, I'm a very happy guy right now. Tomorrow is put the interior back in day,.. no more worries of if all my work is going to work! Straight forward job on panels, trim, et al. Wonder what it's going to sound like with the interior back in?
01-14-2014, 09:44 AM
#3
Update on Install Log:
Fabricated an Amp "mount" from Plywood,.. carpeted it,.. put 1/4" spacers under it,.. and screwed amp into the Fabricated amp "rack" if you will. Have industrial velcro around the lip of the "hole" (where that little box goes, that comes out) inside the glove box.. and on bottom of plywood amp rack.. It holds amp in place VERY VERY well,.. And the upside is any adjustments to the amp are a snap.. I just pull up on it and it comes right off to adjust without removing any panels, screws etc. Plus the industrial velcro is so strong that amp isn't moving even if I slammed on my brakes. I like this solution, it's simple. (I'm going to add a carpeted piece on top of it later today to give me roughly half of my glove box space back, and to protect the amp if I put anything in there.
Also got half the car back together.. As you can see from this picture it's very much a "stealth" install.. not one thing shows this has high end speakers, a sub, amp etc..
http://www.flickr.com/photos/111739693@N04/11951148364/
Here is the Amp on the rack I built, carpeted,.. and tidy'd up -- It's simple, but I think it looks great imho. (Under that amp is a HUGE square hole.. I didn't just screw the amp down to that.. I had to make that (First time doing something like this,.. What do you think?)
http://www.flickr.com/photos/111739693@N04/11951544946/
Broke a few clips on the LAST panel I put in .. glad it's in the rear.. so ordered them off Ebay for cheap for a 25 pack.. Will replace those (and have plenty extras for the future) as I will be removing panels again to add more sound deadener/closed cell foam, etc.
Just taking a little break.. Next is the door panels.
01-16-2014, 08:11 PM
#4
Finished! -- Went and bought the Kenwood DDX470 and BestBuy couldn't install today.. So I just brought it home and installed it.
Here she is done:
http://www.flickr.com/photos/111739693@N04/11990754885/
http://www.flickr.com/photos/111739693@N04/11991567776/
I really like this headunit.. It has more features for Audio.. Built in Front, Rear, and Sub crossovers active -- Very handy.
I love the actual volume ****, attenuate button,.. Phone button etc.. Where I don't have to look away from the road. Still a 6.1" touchscreen and DVD player.. best of both worlds.
Bluetooth works excellent,.. It's new for me to have it in my vehicle, so it will get a lot of use.
There is a difference in this HU and the Pioneer one though.
To get the proper voltages when retuning the amp.. I had to bump the gains higher using this Headunit.. Despite it having 4V pre-outs as the Pioneer had.
Particularly the Sub channel.. Sub channel is probably 85% or so now to get it to the level needed. (That's at a 79hz tone.. at 40hz.. the voltage is WAY higher.)
The fronts/rears didn't need much of a bump.. about 10% compared to the Pioneer.
Sounds great though!
And.... she's done! My hands can heal.
01-20-2014, 05:57 PM
#5
Well,.. The amp was getting too hot for my comfort in that Glove Box due to not having any air to circulate. So given the prospect of not being able to really utilize any of the space for anything other than the amp (box is smaller than it seems). I decided to go ahead and drill holes and put an Intake Fan to draw in cool cabin air to rectify the issue.
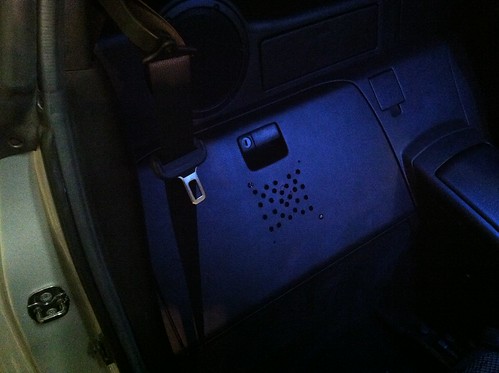
Intake Holes (Not perfection here.. but not finished):
http://www.flickr.com/photos/111739693@N04/12062012894/
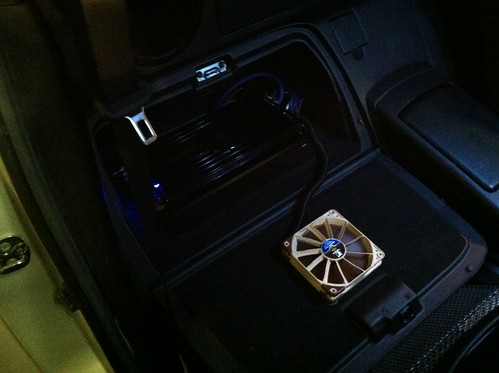
Fan Wired via Relay - mounted on spacers Pulling Cabin Air:
http://www.flickr.com/photos/111739693@N04/12061615715/
The holes aren't perfect,.. but I am not finished with it. I am going to get a vent and essentially cut a box out from the edge of the outer holes,.. and then place a vent so the outside looks better, and the airflow should be a bit better as well. It's not absolutely hideous though,.. Even if it is covered by the passenger seat.
Amp runs considerably cooler now.
I decided to wire the Fan up "properly" so if anything did occur with the electrical system it wouldn't have a chance to mess up the Head unit, as the Remote isn't meant to power anything and is around 250mA give or take. (Yes, I know many people just power stuff off their remote wire,.. but doing things right is worth it in the long run.)
So I wired the fan up off a SPST Relay,.. and Fused the power going to the relay with a 3amp Fuse in-line.
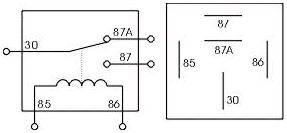
Essentially it's wired,..
Terminal 85 --> Ground.
Terminal 86 --> Remote from Head-unit
Terminal 30 --> In-line 3amp Fuse from Power
Terminal 87 --> To Positive of Fan
The Ground of the fan is wired into the Ground with the other grounds.
Didn't anticipate thermal issues with the amp in that location, and even with the Amp getting hotter than it should being Class D,.. it most likely would have been ok in there without this addition, but might as well do something since it's relatively simple.
Intake Holes (Not perfection here.. but not finished):
http://www.flickr.com/photos/111739693@N04/12062012894/
Fan Wired via Relay - mounted on spacers Pulling Cabin Air:
http://www.flickr.com/photos/111739693@N04/12061615715/
The holes aren't perfect,.. but I am not finished with it. I am going to get a vent and essentially cut a box out from the edge of the outer holes,.. and then place a vent so the outside looks better, and the airflow should be a bit better as well. It's not absolutely hideous though,.. Even if it is covered by the passenger seat.
Amp runs considerably cooler now.
I decided to wire the Fan up "properly" so if anything did occur with the electrical system it wouldn't have a chance to mess up the Head unit, as the Remote isn't meant to power anything and is around 250mA give or take. (Yes, I know many people just power stuff off their remote wire,.. but doing things right is worth it in the long run.)
So I wired the fan up off a SPST Relay,.. and Fused the power going to the relay with a 3amp Fuse in-line.
Essentially it's wired,..
Terminal 85 --> Ground.
Terminal 86 --> Remote from Head-unit
Terminal 30 --> In-line 3amp Fuse from Power
Terminal 87 --> To Positive of Fan
The Ground of the fan is wired into the Ground with the other grounds.
Didn't anticipate thermal issues with the amp in that location, and even with the Amp getting hotter than it should being Class D,.. it most likely would have been ok in there without this addition, but might as well do something since it's relatively simple.
 01-26-2014, 02:22 AM
#7
I made the fan an Intake, not Exhaust fan.
That is to say the fan is pulling air from the Cabin of the car and Pushing it into the Glove box. So the amp gets clean, cool, air constantly.
*edit* -- Also, there is zero difference in temperature in the car with this fan. The fan is 99.999 percent sealed off from the car due to it pushing air from the cabin INTO the glove box not back out.. So the inside of the car where I sit doesn't change temperature at all. All that happens is the Amp receives much needed cool air from the car cabin and air circulation. I cannot tell you how big of a difference this fan made on the Maximum temperature of the amplifier in what was otherwise a "Death box" for amps to go when Summer came around. This amp stays cool tot he touch all the time. How it should be.
Also the Fan I chose to use.. Being the best on the market essentially was not just because I'm some "fan snob" and build computers,.. but was also to make this a One shot deal.. for the life of the vehicle. This fan is made from the best parts from Bearings , etc.. and is rated at a conservative 150,000 Hours of operation. Doing some quick math that allows that fan to run 24 hours a day, 7 days a week, for over 17 years before it would stop working. If I have this car in 17 years,..Well,.. I'll be close to 50yrs old and won't really mind replacing a fan.
I have noticed a dramatic decrease in Amp temperature with this fan. The Amp never gets above mildly lukewarm to the touch no matter how hard I push it, the air from that fan made all the difference in the world.
Last edited by Chromatic; 01-27-2014 at 12:44 PM.
Trending Topics
01-26-2014, 02:25 AM
#8
Added a Reverse Camera to the Vehicle.
Ran a Dedicated ground to the factory wiring harness, so the Headunit would have a proper ground (It was grounding through the Antenna,.. which also had a side effect of giving me a shock randomly when I touched the car (ie: opening the door). )
Plus I removed the Pioneer Sirius XM boxes, magnetic antenna, and all wires - And did a slew of wire cleanup behind the headunit and wired in other things that I didn't do the first go around; to name a few : Ran power to the Antenna Amplifier (so FM signal was clear again),.. Wired in the Illumination Wire, .. and other small things like that.
To keep it brief, here is the Reverse Camera:
Put the Reverse Camera on the Driver side -- It's super "stealth" ... I like it, really no need for brighter tag lights, but I have them on the way anyways.
http://www.flickr.com/photos/111739693@N04/12148949215/
Then here's the image from the $24 Camera -- (Keep in mind it's at night)
http://www.flickr.com/photos/111739693@N04/12149197123/
02-02-2014, 03:05 AM
#9
Well,.. The amp was getting too hot for my comfort in that Glove Box due to not having any air to circulate. So given the prospect of not being able to really utilize any of the space for anything other than the amp (box is smaller than it seems). I decided to go ahead and drill holes and put an Intake Fan to draw in cool cabin air to rectify the issue.
Intake Holes (Not perfection here.. but not finished):
Fan Wired via Relay - mounted on spacers Pulling Cabin Air:
The holes aren't perfect,.. but I am not finished with it. I am going to get a vent and essentially cut a box out from the edge of the outer holes,.. and then place a vent so the outside looks better, and the airflow should be a bit better as well.
http://www.flickr.com/photos/111739693@N04/12267497166/
02-18-2014, 12:58 AM
#10
New Member

Beautiful job man! Love how you took the time on everything and how clean the install turned out. Im considering putting sound dampener on the doors and inside the cavities, did it make much of a difference in terms of decreasing cabin noise?


Thread
Thread Starter
Forum
Replies
Last Post
m_0g
Audio, Video & Electronics (DIY)
12
06-03-2021 10:05 AM