How to mold the Nazar Pods to the door...
 03-22-2007, 05:24 AM
#1
Registered User
Thread Starter
iTrader: (2)

Join Date: Aug 2004
Location: Bronx N.Y.
Posts: 1,055
Likes: 0
Received 0 Likes
on
0 Posts
How to mold the Nazar Pods to the door...
Hard?
nahhh...it was fairly easy...it just takes time....my advice to you is follow a procedure, because you can easily mess up. I'm covering mine in black suede... I'm not sure if you want to paint that much of your door...is VERY VERY hard to maintain a surface like that that's always touched....I recommend that you cover it with quality upholstery material....here is what I did:
1.) First secure the door pods to the doors...three screws and nuts on each door. (the reason for doing this first is because you do not want the pod in the wrong position when you disassemble the door).
2.) Once the pod is secure in it's permanent place....remove it.
3.) Disassemble the door by taking off the window controller, and the leather arm rest part.
4.) Continue to disassemble the door by removing the screws on the back of the door...I believe there are 2 or three screws.
5.) You will notice that the door is still attached after removing the screws. There are little plastic fasteners that have to be either drilled through or grinded through with a dremmel. I used one of those dremmel stone grinders, and it melted the plastic right off and left a clean, perfectly round hole.
6.) Remove A/c Vent as well as the door handle. Also remove the window molding at the top of the door. There are tabs that need to be bent upwards to remove this piece.
7.) Once the door is completely disassembled, it's time to remove the skin. Handle the door with the face down. you will notice that on the back of the door there are tabs from the upholstery...it's easiest to start ripping the skin off from any one of the many tabs on the back...show no mercy...just rip the skin off.
8.) Underneath you will notice a very thin layer of foam...LEAVE THIS ON. Once all the door skin is off, it's now time to fasten the pods to the door once again. Once it is fastened, and in the position you want it to be in...Grab the glue gun or epoxy if you want, but a glue gun is easier and less messy.
9.)This step is not necessary, but does help (see pics 1 and 2)
It might be hard to understand, but you will be sealing the INNER part of the pod to the door. Make sure the pod is secured with the nuts and bolts provided, and glue around the INSIDE of the pod that's touching the door. It�s very important that you do not get any glue on the outside of the door surface...this is to seal the pod to the door on the inside.
10.) Once that step is done it�s now time to begin preparing to fiberglass. Cut 4 or 6 thin strips of fiberglass. Basically the strips need to be able to cover the outer part of the pod where the pod meets the door. This is how the pod and the door will finally become one.
11.) So once the resin is mixed, (one door at a time) place one strip along the edge where the pod meets the door. Do this all the way around the pod. I recommend 4 strips of fiberglass per door�two strips on the outer edge of the pod, and two strips on the opposite side shown in picture number five. Make sure there are no air bubbles along the seam where the door meets the pod� let this dry for a while.
12.) Once dry, use 60 or 80 grit sandpaper and get that fiberglass as smooth as possible without going through it. This is to prepare for the Bondo body filler that you will be using to fill any holes or smooth out any rough areas.
13.) Now that the sanding is done for now (dust everything off really good), go ahead and mix the bondo. Spread it evenly, and pay special attention to where the seams are. You also may want to carry the bondo out to the middle of the door (fan it out) so that there is no seam (picture 3) Even if it looks rough at first once all is done it will come out smooth. Once the bondo is spread�let it dry for a while, before you start sanding. Once dry, sand it until it�s smooth using 60 grit at first to cut all the rough stuff off, and gradually going to 100 grit then to 150. Once you finished sanding, you might need to repeat the entire bondo process again to get the missed areas. You might find however, that you don�t have to do the entire door, but rather just spots that you�ve missed. Whatever the case, do this until everything is smooth like in picture number 4.
14.) Once this is complete, you want to make sure the door will align properly so attach the bottom plastic piece of the door (picture 6) and see if the holes line up ok. If not, then look at where the plastic piece is touching the pod, because you might have too much bondo if fiberglass in that area, and will probably need to be grinded or dremmeled out.
15.) Once everything fits�you are basically done either get the door covered, or prep it for paint. Enjoy the sound and look once it�s complete.
 03-22-2007, 07:09 AM
#5
Registered User
iTrader: (16)

Join Date: Nov 2005
Location: nashville
Posts: 437
Likes: 0
Received 0 Likes
on
0 Posts
Thanks so much for the great write-up. That's exactly what I plan to do. I'm going to go the paint route on the door panels with carbon fiber wrapped switch plates (window controls). The center console is also going to be painted. Any pics of your final product? I'd love to see it. Thanks again.
03-22-2007, 07:18 AM
#6
Registered User
Thread Starter
iTrader: (2)
Join Date: Aug 2004
Location: Bronx N.Y.
Posts: 1,055
Likes: 0
Received 0 Likes
on
0 Posts
lol...I wish I had the final product, but i'm still in the process of covering it with the material...I took a break from it, because I'm too busy concentrating on other parts of the interior. but I covered some of it, and it looks very very stealth, but also very custom. it doen't look like someone just bolted it to the door anymore...you'll love it.
Trending Topics
03-22-2007, 07:39 AM
#8
Registered User
Thread Starter
iTrader: (2)
Join Date: Aug 2004
Location: Bronx N.Y.
Posts: 1,055
Likes: 0
Received 0 Likes
on
0 Posts
a fibergassed ceiling speaker...upholstering the rest of the interior.
and an amprack/sub enclosure/capacitor holder in one, and still retain all the trunk space and the ability to get to the spare tire.
The rear 6.5 speakers are also flush on the outside of the housing...this was difficult to do with the fiberglass, but it looks soooooooo good...here are some "ok" pics.
03-25-2007, 05:23 PM
#12
Registered User
iTrader: (16)
Join Date: Nov 2005
Location: nashville
Posts: 437
Likes: 0
Received 0 Likes
on
0 Posts
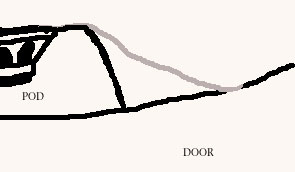
I'm fiberglassing right now and was wondering if you let your fiberglass bridge the gap on the top side of your pods? In that the fiberglass would be hanging in the air between the pod and the door? Like this horrible illustration I devised.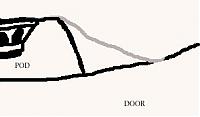
 03-26-2007, 04:29 AM
#13
Registered User
Thread Starter
iTrader: (2)
Join Date: Aug 2004
Location: Bronx N.Y.
Posts: 1,055
Likes: 0
Received 0 Likes
on
0 Posts
no i didn't do that...thats why you use multiple layers....i used 2 layers....you can use 4...but if you do like the illustration you drew ...then it will crack
but if you did it already.....then add more layers so that it will be stronger.
but if you did it already.....then add more layers so that it will be stronger.
03-26-2007, 05:27 AM
#14
Registered User
iTrader: (16)
Join Date: Nov 2005
Location: nashville
Posts: 437
Likes: 0
Received 0 Likes
on
0 Posts
I didnt do it like that actually i figured it would be a structural issue. It jus seems like its not flowing into the door all that well. Did you make that up with the bondo?
03-26-2007, 05:31 AM
#15
Registered User
Thread Starter
iTrader: (2)
Join Date: Aug 2004
Location: Bronx N.Y.
Posts: 1,055
Likes: 0
Received 0 Likes
on
0 Posts
well how many layers of glass did you lay?...and yes you can make alot of it up with the bond if need be...it will be fine....the end result looks absolutely great....don't go regretting what you did now...lol...just stick with it...
I'll be here till 5 so i can answer your questions immediately.
I'll be here till 5 so i can answer your questions immediately.
03-26-2007, 07:41 AM
#16
Registered User
iTrader: (16)
Join Date: Nov 2005
Location: nashville
Posts: 437
Likes: 0
Received 0 Likes
on
0 Posts
I'm not regretting man, I'm still ***** to the wall doing this. I think I'll do another layer of fiberglass. Since I've decided to paint I've sanded the whole door panel to find that there are small little holes and texture that is pretty deep in the plastic. I was thinking of what product would work to handle covering the whole door panel in preperation for paint. Also what exact bondo product did you use for the pods? Thanks
03-26-2007, 07:59 AM
#17
Registered User
Thread Starter
iTrader: (2)
Join Date: Aug 2004
Location: Bronx N.Y.
Posts: 1,055
Likes: 0
Received 0 Likes
on
0 Posts
i'm sooooo against you painting this, but it's up to you...
this is the exact product I used: home depo has alot of this stuff...get the gallon though...
http://www.shop.com/op/~Bondo_262_Qu...889?sourceid=3
this is the exact product I used: home depo has alot of this stuff...get the gallon though...
http://www.shop.com/op/~Bondo_262_Qu...889?sourceid=3
03-26-2007, 08:04 AM
#18
Registered User
iTrader: (16)
Join Date: Nov 2005
Location: nashville
Posts: 437
Likes: 0
Received 0 Likes
on
0 Posts
will that work for the whole door? Will it be flexible enough for the whole door? Why are you soo against me painting it? I know the upkeep is going to suck but ill keep a rag handy. Slap those who cant figure out how to use the door handles. Plus I'll wax em. By the way I've heard of a glaze that's good for paint prep?
03-26-2007, 08:09 AM
#19
Registered User
Thread Starter
iTrader: (2)
Join Date: Aug 2004
Location: Bronx N.Y.
Posts: 1,055
Likes: 0
Received 0 Likes
on
0 Posts
I had my entire interior painted before, and it was impossible to keep from scratching some parts of the car, and it just looked like one of those cheap honda rice boy things....so now it's all covered in black suede and quality vinyl..it's going to look really nice...
the bondo that you are going to use can be used for the entire door, but it must be only to fill in certain parts...then you need primer if you are going to paint... but i recommend you don't...the only thing I have painted on the inside is my center piece with the gauges, and the AC controllers
the bondo that you are going to use can be used for the entire door, but it must be only to fill in certain parts...then you need primer if you are going to paint... but i recommend you don't...the only thing I have painted on the inside is my center piece with the gauges, and the AC controllers