DIY: Rear Bumper Removal (with pictures)


 11-13-2011, 11:46 AM
#64
Registered User
iTrader: (27)

Join Date: Feb 2008
Location: The OC, So Cal
Posts: 390
Likes: 0
Received 0 Likes
on
0 Posts
In the process of removing my bumper. As most, I do not have a 8mm in my wrench set; however, a 5/16 will work on the difficult clip.

Last edited by John H.; 11-13-2011 at 11:50 AM. Reason: Added info.


 05-31-2012, 12:08 AM
#71
Registered User

Join Date: May 2011
Location: Bellingham, WA
Posts: 94
Likes: 0
Received 0 Likes
on
0 Posts
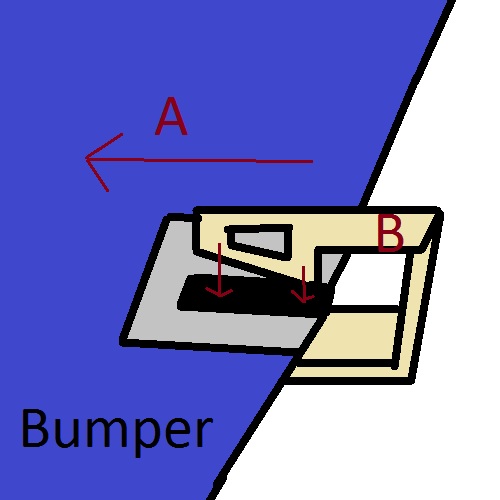
In response to Step 7 - i found that because of how the clips are made, and how they are holding the bumper in, i was afraid of breaking either the bumper or the clip while pulling off. I made a picture exaggerating the distance between the top and bottom of the Clip itself....but did so to show how the bumper is being held on: If you look at part b in this super awesome home made diagram, the end with the downward facing arrows is the problem areas. I ran into this on Both ends.
any advice in getting this off without breaking stuff? A is the direction you pull the bumper off.
any advice in getting this off without breaking stuff? A is the direction you pull the bumper off.
 02-16-2013, 10:45 AM
#73
Registered User
Join Date: May 2011
Location: Bellingham, WA
Posts: 94
Likes: 0
Received 0 Likes
on
0 Posts
At least on the 2003...a 10mm was WAYY too big...an 8mm kept slipping..a 7mm won't even fit over it....i tried a 5/16 too which is pretty close to the 8mm still slips....have to wait until Monday to take it into the shop 
Has anyone else had any luck removing the '03 rear bumper 'fastener'?
Has anyone else had any luck removing the '03 rear bumper 'fastener'?
Last edited by Delta_two-Niner; 02-16-2013 at 10:51 AM.
 05-19-2013, 05:37 PM
#75
Registered User
iTrader: (1)

Join Date: Aug 2010
Location: Toronto
Posts: 49
Likes: 0
Received 0 Likes
on
0 Posts
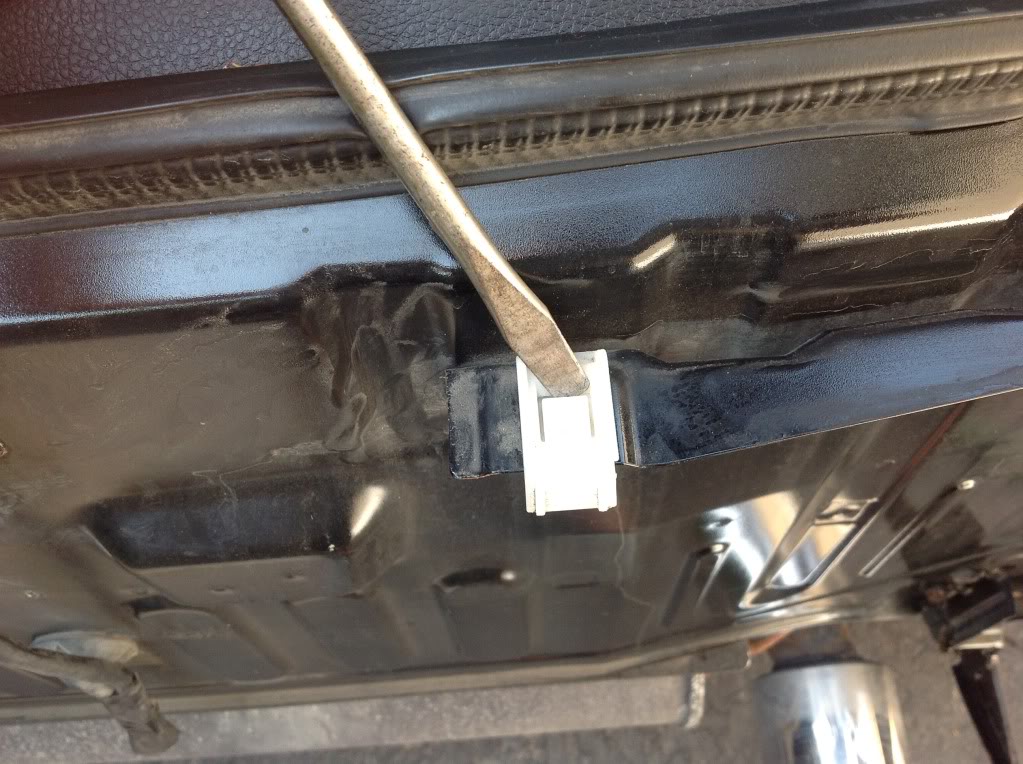
When removing the bumper fascia from the white clips, use a straight edge screwdriver, and gently pry up the tab as pictured. They will separate from the bumper like butter. Start at one end, and lift up the fascia as you go across the back of the car. Don't ream on them, but mine were pretty tough, and this made the job super easy. Pics are from my trailer hitch install this morning, which I bought from JasonZ-YA.
Another tip is when removing the 8mm 90deg twist tabs tie one end of the wrench to your pinkie, as it's pretty much guaranteed you will drop the wrench down into the bumper, and it will be a huge pita to get it back (for me it was anyways). Also when removing the tail lights lift them straight up, or you risk breaking the tabs on the lights where they peg into the body.
Couple more pics, beautiful day to work on the car...
The Mad Max look...I kinda like it...
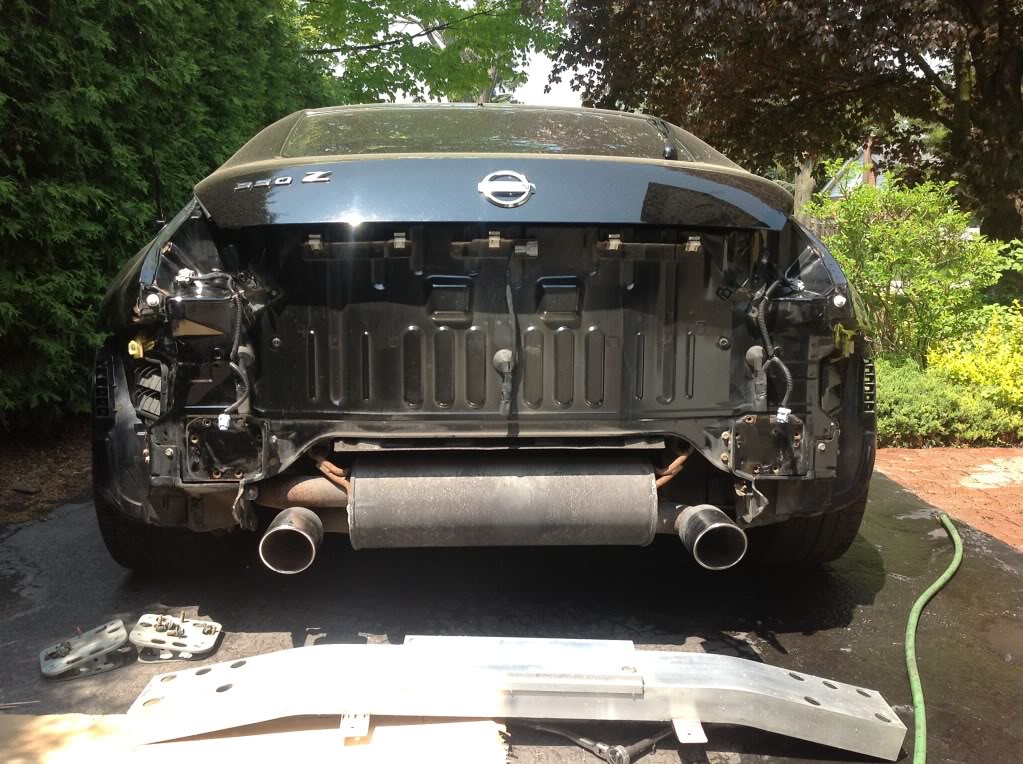
The Corvette/GTR look
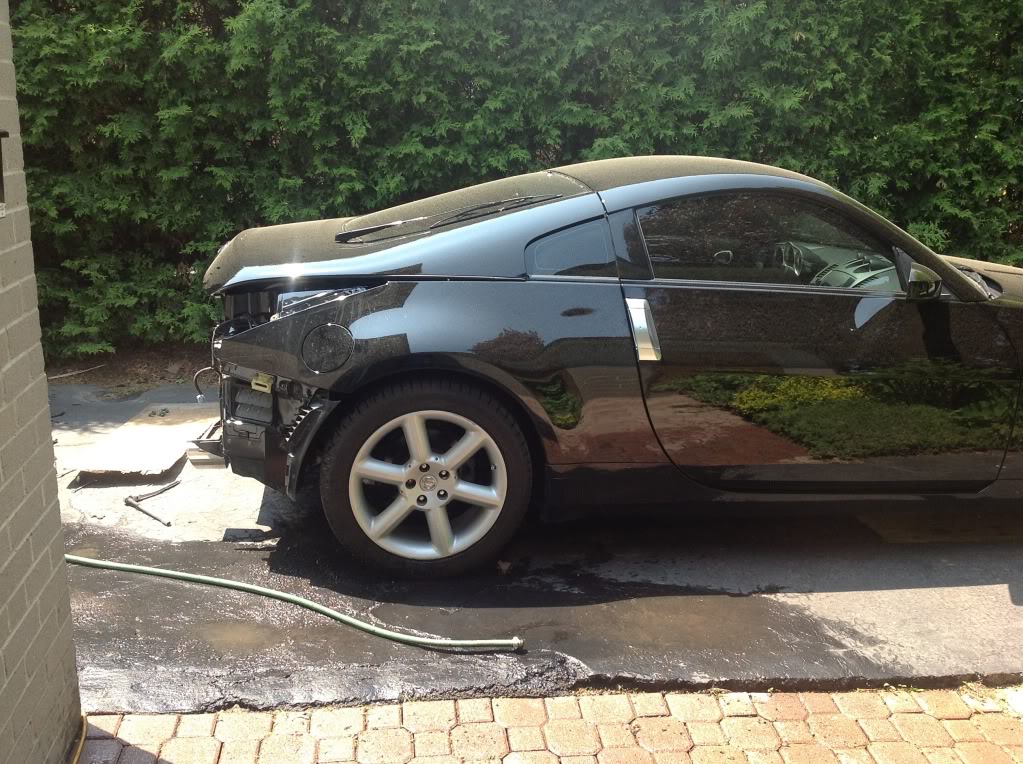
Hopefully that is helpful to anyone thinking about, or in the process of, and provides some visual reference. I'm back at it tomorrow, to get the wiring harness done, and everything bolted back up.
Cheers...
Another tip is when removing the 8mm 90deg twist tabs tie one end of the wrench to your pinkie, as it's pretty much guaranteed you will drop the wrench down into the bumper, and it will be a huge pita to get it back (for me it was anyways). Also when removing the tail lights lift them straight up, or you risk breaking the tabs on the lights where they peg into the body.
Couple more pics, beautiful day to work on the car...
The Mad Max look...I kinda like it...
The Corvette/GTR look
Hopefully that is helpful to anyone thinking about, or in the process of, and provides some visual reference. I'm back at it tomorrow, to get the wiring harness done, and everything bolted back up.
Cheers...
Last edited by bullionz; 05-19-2013 at 05:59 PM.
12-18-2013, 06:09 PM
#76
Registered User

Join Date: Nov 2013
Location: Texas/Ohio
Posts: 78
Likes: 0
Received 0 Likes
on
0 Posts
I know this is old but you don't have turn the clip 90 degree or anything....you can use pliers and pop it out from inside the hatch. I'll post pictures later....
12-19-2013, 01:27 PM
#77
Registered User
Join Date: Nov 2013
Location: Texas/Ohio
Posts: 78
Likes: 0
Received 0 Likes
on
0 Posts
Here are the photos of the clip of promised. I should have look inside of the hatch before starting my reverse camera project.
All you have to do is use the pliers to pinch the clips from inside the trunk. This should help make it pop out without using the 90 degree turn item.
Saves your hand, and from dropping the 8mm wrench. Also turning the plastic clips damages the seal which may lead to water leaking in (the reason why I bought new clips)
Now, when you re-install the bumper back in. It's not going to click when pushed in. You'll need a small/thin flats screwdriver to help it snap in. Good luck! and you are responsible for any damage during the bumper removal process.
This is the clip from inside the left hatch area.


<BR>
Part # 85284-CD000

View from above


All you have to do is use the pliers to pinch the clips from inside the trunk. This should help make it pop out without using the 90 degree turn item.
Saves your hand, and from dropping the 8mm wrench. Also turning the plastic clips damages the seal which may lead to water leaking in (the reason why I bought new clips)
Now, when you re-install the bumper back in. It's not going to click when pushed in. You'll need a small/thin flats screwdriver to help it snap in. Good luck! and you are responsible for any damage during the bumper removal process.
This is the clip from inside the left hatch area.
<BR>
Part # 85284-CD000
View from above
 09-14-2014, 05:20 AM
#79
General & DIY Moderator
MY350Z.COM
MY350Z.COM


iTrader: (64)
To get to "that spot" in the rear, you must remove the inner plastic panels that line the trunk area. Start with pulling out the spare tire cover and carpet insert. You should be able to access the center and left and right trunk panels. There are two clips (cargo hold-downs) on the bottom of the center panel to remove and then you'll need to pry up and out to remove them.
05-09-2016, 10:14 AM
#80

I thought I'd add a tip.
That white nylon clip which must be spun 90˚ to release the bumper in the corners under the tail lights can be dealt with more simply.
Pop the inner trunk liner panels in the corners (quick and easy) and reach the clip from inside the bumper. There is no need to turn them at all - nor should you, because you weaken their grip in so doing.
That's the best way, particularly on reassembly.
HTH
*EDIT*. Oops. Another poster beat me to this information. No matter: good to keep it out there.
Last edited by Heritage; 05-09-2016 at 10:16 AM.

