DIY: Painting '06- Headlights.


 03-28-2010, 10:16 PM
#182

Hello all
I bought a set of 06 lights and will be doing this mod in the next few weeks. I will also be doing the evil eye or demon eye mod.
Questions:
#1 – what type of paint did you people use, high heat paint (like engine or caliper paint), regular automotive paint or krylon plastics paint?
#2 -some people use Krylon plastic paint, will it hold up to the heat?
#3 -when in the oven, I have read to use wet cardboard under the light. Dry cardboard will catch on fire, but if the cardboard is too wet it will leave condensation on the lights.
OR
Use a baking sheet under the lights, would the sheet not get very hot and melt the lights though?
Which method have you people used, and how did it turn out?
Thanks
Kevin
03-29-2010, 04:26 PM
#184

Hello all
#1 � what type of paint did you people use, high heat paint (like engine or caliper paint), regular automotive paint or krylon plastics paint?
#2 -some people use Krylon plastic paint, will it hold up to the heat?
#3 -when in the oven, I have read to use wet cardboard under the light. Dry cardboard will catch on fire, but if the cardboard is too wet it will leave condensation on the lights.
3. I ended up taking a piece of cardboard and covering it up with aluminum foil (front and back). Then I just baked the lights. Worked fine and stopped the condensation.
03-29-2010, 06:06 PM
#185
New Member
iTrader: (16)

Join Date: Apr 2007
Location: Denver
Posts: 399
Likes: 0
Received 0 Likes
on
0 Posts
I 100% agree, forget cardboard. However, if you do lower heat (250) for a longer period of time (15 mins) on a regular cookie sheet, you will have no problems with anything melting.
How exactly is this different than a cookie sheet?
03-29-2010, 07:43 PM
#186
New Member
iTrader: (16)
Join Date: Apr 2007
Location: Denver
Posts: 399
Likes: 0
Received 0 Likes
on
0 Posts
Yeah, I just don't see it as necessary. Have had my lights in the oven a few times now with no problems whatsoever with nothing more than a simple cookie sheet.
If you have an electric oven, you likely have a heating element at the bottom that will get hotter than 250 to heat the entire volume of the oven. To get the whole light in the oven, I had to place my rack on the very bottom. If the light itself rested on the rack with no cookie sheet, I could see how that could get hotter than the 250 desired. The aluminum foil is too thin to otherwise deflect that heat. Plus, chances are the rack stayed in the oven while it pre-heated, being closer to the element and absorbing that heat.
However, a cookie sheet will protect your light from the direct heat of the heating element just fine, as it is thicker. And, I put my cookie sheet and light in the oven at the same time, so they both go in cold.
In short, having the tea towel will certainly not hurt anything, but I have gotten great results with simply a cookie sheet.
I see absolutely no use for cardboard, whatsoever.
03-30-2010, 10:41 AM
#187
I have done a few test in the oven, I bought a remote thermometer to test it with. The oven is a newer electric oven.
When I set the oven at 250f when the oven beeped saying it has hit 250f it was really at 284f.
After 10 mins at 250f it was at 247f
After 20 mins at 250f it was 264f, with a min temp of 256f and max of 304f at some point.
After tuned off for 10 mins it was at 216f
I looked like when the element turns on to maintain the temp that it creates too much heat and does not hold a constant temp. so I tried this.
Pre heat at 250 for 10 mins, then set to 220, after 10 mins the temp was 225 with a min temp of 224f and max of 253f at some point.
After 5 more mins (15 total) the oven element turned back on, the temp was 255 with a min temp of 215f and max of 255f at some point.
I did all of these tests with cardboard in the oven, It didn�t light on fire or brown at all.
----------
---------
So I am thinking when I do the lights i will pre heat the oven at 250 for 10-15mins, turn it down to 225f and bake the lights for 10 mins or so. This should make it retain the most contract temp.
what kind of paint did you use?
When I set the oven at 250f when the oven beeped saying it has hit 250f it was really at 284f.
After 10 mins at 250f it was at 247f
After 20 mins at 250f it was 264f, with a min temp of 256f and max of 304f at some point.
After tuned off for 10 mins it was at 216f
I looked like when the element turns on to maintain the temp that it creates too much heat and does not hold a constant temp. so I tried this.
Pre heat at 250 for 10 mins, then set to 220, after 10 mins the temp was 225 with a min temp of 224f and max of 253f at some point.
After 5 more mins (15 total) the oven element turned back on, the temp was 255 with a min temp of 215f and max of 255f at some point.
I did all of these tests with cardboard in the oven, It didn�t light on fire or brown at all.
----------
---------
So I am thinking when I do the lights i will pre heat the oven at 250 for 10-15mins, turn it down to 225f and bake the lights for 10 mins or so. This should make it retain the most contract temp.
and thats the difference between reading and having done about 20 sets of lights..lol  cardboard falls apart and down near the heating element if you arent careful and can catch fire.. if you fold your towel right and have it inside the baking sheet, itll never catch fire. and as far as the condensation goes, there is a brief time where it will cause some condensation while opening and resealing.. by the time the light has cooled off, the condensation is gone and youd never know it was there.. do as you would like but this is the best way i have found.. you can see some of the pics of my work here
http://www.myspace.com/twistedhouzings
cardboard falls apart and down near the heating element if you arent careful and can catch fire.. if you fold your towel right and have it inside the baking sheet, itll never catch fire. and as far as the condensation goes, there is a brief time where it will cause some condensation while opening and resealing.. by the time the light has cooled off, the condensation is gone and youd never know it was there.. do as you would like but this is the best way i have found.. you can see some of the pics of my work herehttp://www.myspace.com/twistedhouzings
03-30-2010, 09:30 PM
#188
I didn't have a cookie sheet to begin with so I improvised. I'm pretty sure a cookie sheet retains and produces more heat versus cardboard wrapped with aluminum though. However it looks like the cookie sheet works and won't melt the lights according to others.
04-02-2010, 05:59 AM
#189
My lights are open. Iam going to be painting them this weekend, but iam still unsure on paint.
– what type of paint did you people use, high heat paint (like engine or caliper paint), regular automotive paint or krylon plastics paint?
Thanks
Kevin
– what type of paint did you people use, high heat paint (like engine or caliper paint), regular automotive paint or krylon plastics paint?
Thanks
Kevin
 08-17-2010, 02:18 PM
#191

anyone had issues assembling the headlights back together? i couldnt seem to line it up right, i have a gap between the blinker housing and the bottome housing  Even scratched up the sides when i put in the lense. gave up and installed as is. Ended up using some weird sealants i had laying around the house bcs i used all 2tubes of the plastic sealants.
Even scratched up the sides when i put in the lense. gave up and installed as is. Ended up using some weird sealants i had laying around the house bcs i used all 2tubes of the plastic sealants.
08-17-2010, 09:37 PM
#192
Registered User
iTrader: (2)

Join Date: May 2007
Location: Vancouver, Canada
Posts: 542
Likes: 0
Received 0 Likes
on
0 Posts
I dont understand how you guys get away without using high temp resistant paint, I did my buddys lights and the bezel piece directly underneath the projector actually melted the paint slightly and when I redid them I found out that it melted more than the paint, it literally melted a bit of the plastic along with it.
Which tells me the chrome coating on the plastic is already high temp resistant from the factory, so if the geniuses at Nissan thought it would be a good idea to use heat resistant coating, then who are we to question them.
I am currently respraying that particular bezel piece underneath the projector with some high temp engine enamel. As far as the other bezel pieces, I can leave it the way it is.
I would highly recommend everyone else do the same from my experience, and I would also like to hear from the guys who used regular paint and never had any issues.
Because I suspect some HID bulbs run a lot hotter than others making this issue a reality for some of us but not all.
here's the damage I'm talking about, I tried fixing it best I could using heat resistant silicone to fill in the hole then painting over it with high temp engine enamel, but still slightly visible.
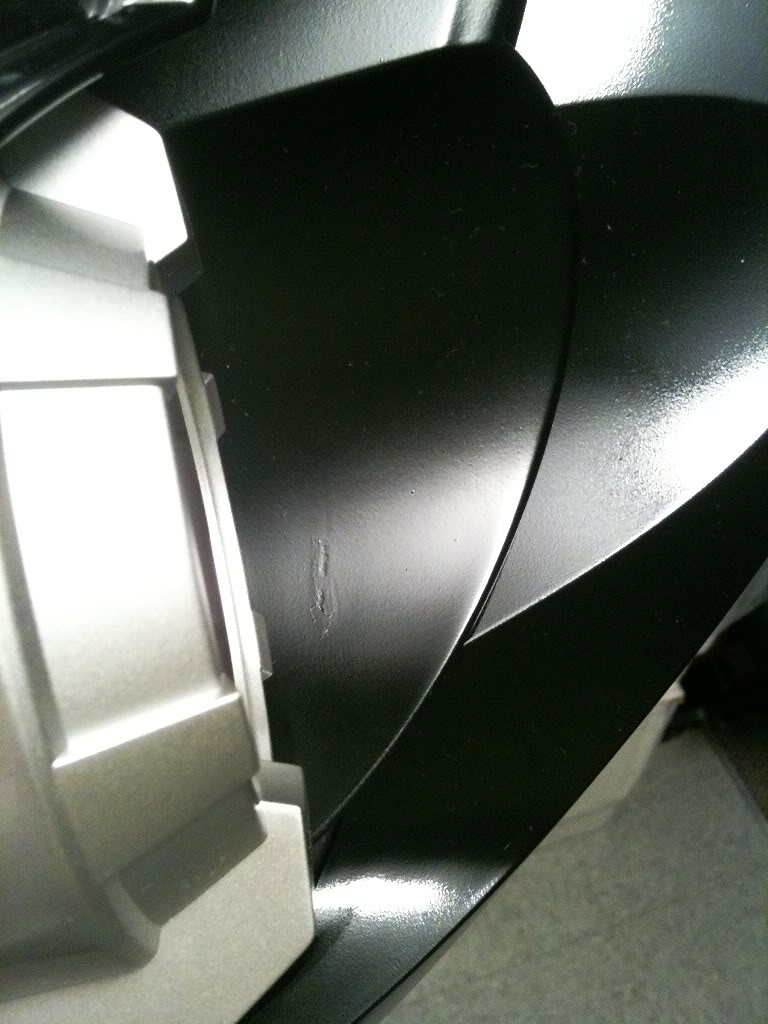
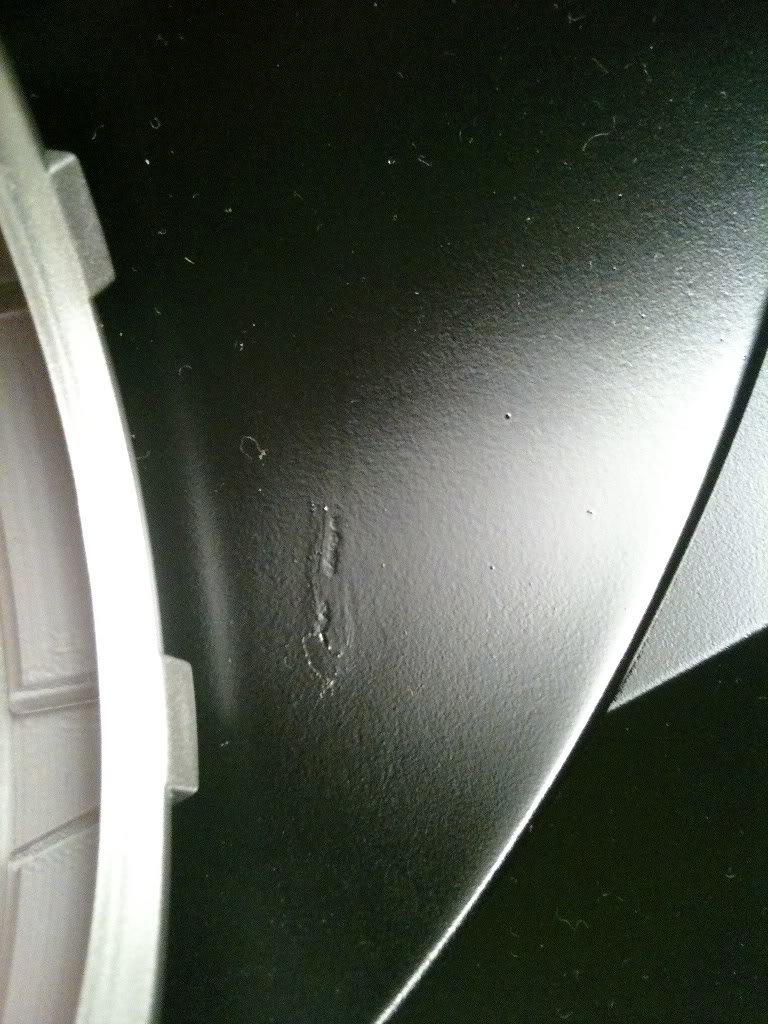
Last edited by Adon; 08-18-2010 at 09:17 AM.
08-20-2010, 06:19 PM
#193
Registered User
iTrader: (2)
Join Date: Feb 2006
Location: Billings, MT
Posts: 190
Likes: 0
Received 0 Likes
on
0 Posts
i have the same thing going, and i used high temp paint... just one of the problems with changing the chrome housing... heat builds up... i even used engine block primer, suposedly it has ceramic in it to disperse heat... not so much... i don't know, maybe i didn't use enough.
but, on the other hand, wouldn't change what i did for anything... love how the black looks in the front of my car... makes my carbon silver that much sexier
but, on the other hand, wouldn't change what i did for anything... love how the black looks in the front of my car... makes my carbon silver that much sexier
 08-27-2010, 04:58 PM
#195
another question for you guys, im having difficulty with this DIY lol. I must have taken apart my lense at least 4x and it sucks. I should have paid someone to do this now my lense are all jacked up...
Anyway i bought some of that nissan sealant and i got one of my headlights to seal up right without condensation. But it looks so messy, the sides and tabs dont even close anymore. Any of you guys have this? This is the last time my dumbass do a DIY mod
Anyway i bought some of that nissan sealant and i got one of my headlights to seal up right without condensation. But it looks so messy, the sides and tabs dont even close anymore. Any of you guys have this? This is the last time my dumbass do a DIY mod
08-27-2010, 06:17 PM
#196
Registered User
iTrader: (40)
Join Date: Jun 2005
Location: Kentucky
Posts: 1,054
Likes: 0
Received 0 Likes
on
0 Posts
another question for you guys, im having difficulty with this DIY lol. I must have taken apart my lense at least 4x and it sucks. I should have paid someone to do this now my lense are all jacked up...
Anyway i bought some of that nissan sealant and i got one of my headlights to seal up right without condensation. But it looks so messy, the sides and tabs dont even close anymore. Any of you guys have this? This is the last time my dumbass do a DIY mod
Anyway i bought some of that nissan sealant and i got one of my headlights to seal up right without condensation. But it looks so messy, the sides and tabs dont even close anymore. Any of you guys have this? This is the last time my dumbass do a DIY mod
My tabs did not want to go back all the way, but I used a heatgun to get them back the best I could.
The sealer will be messy. The best advice I can give is mask off your lenses before appying it. This will keep sealer off them if you touch that area with sealer on ur hands. Using masking tape makes cleanup a lot easier. And wear some latex gloves. Just make sure to get a nice ammount in the cracks. Also pay attention to the visable area when your hood is open, and smooth that area out and clean it up.
I know it sux, but u will get it.
08-27-2010, 06:32 PM
#197
^thanks man
pretty much i have a huge gap where i can see the sealant inside. I think i opened it up so many times that it doesnt line up right anymore. Anyway so far its not letting water in so its good. HOwever my passenger side got a hairline crack right thru the lense. the crack goes right thru the inside part. Its the part in the very bottom that you cannot see once on the car. Seems like im having trouble sealing this one. I just bought some more of that nissan sealant ($45 from dealership! i bought two of them!!!). Im hoping when i buy some water proof windshield sealant and run some on that crack it'll help.
pretty much i have a huge gap where i can see the sealant inside. I think i opened it up so many times that it doesnt line up right anymore. Anyway so far its not letting water in so its good. HOwever my passenger side got a hairline crack right thru the lense. the crack goes right thru the inside part. Its the part in the very bottom that you cannot see once on the car. Seems like im having trouble sealing this one. I just bought some more of that nissan sealant ($45 from dealership! i bought two of them!!!). Im hoping when i buy some water proof windshield sealant and run some on that crack it'll help.
08-27-2010, 06:38 PM
#198
Registered User
iTrader: (40)
Join Date: Jun 2005
Location: Kentucky
Posts: 1,054
Likes: 0
Received 0 Likes
on
0 Posts
Windshield urethane works great, just messy. If you wear the latex gloves you can use your finger to smooth it out. Then use an alcohol wipe to clean your finger and excess on the housing.
09-06-2010, 05:48 PM
#199
New Member
iTrader: (5)

Join Date: May 2007
Location: Canada
Posts: 62
Likes: 0
Received 0 Likes
on
0 Posts
Hey guys... I am slowly starting to accumulate the parts I need to do the blacked out housing/STI Lens/Angel Eye mod and finally went out to pickup some paint. I am a little confused which paint to use, I found a bunch of Duplicolor Automotive paint, and then I came across thing one (see attached). Was worried about the bubbling, and this paint is apparently good up to 1000 Celsius. They only had flat black, but now I am having second thoughts and wondering if I should use Krylon for Plastics and use a Satin Black or a dark gray color.
Also, did a lot of you guy's swap out your turn signal bulbs with clear bulbs/reflective bulbs? If so, which brands are you using/find the best?
Also, did a lot of you guy's swap out your turn signal bulbs with clear bulbs/reflective bulbs? If so, which brands are you using/find the best?
Last edited by EvanV; 09-06-2010 at 05:52 PM.