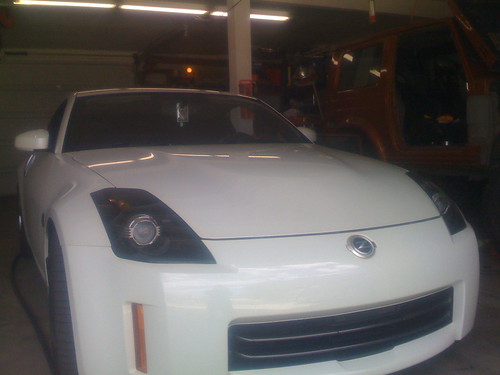
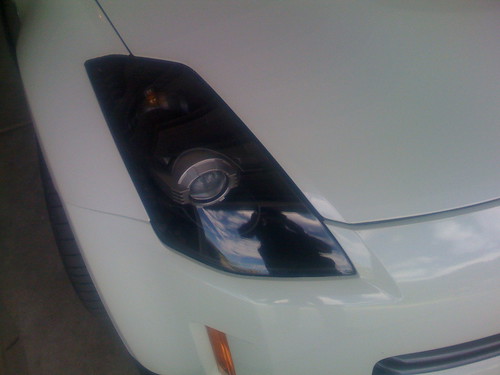
DIY: Painting '06- Headlights.
 07-24-2008, 08:01 AM
#1

I couldn't find a DIY and I was unsuccessful in getting help/info so I decided to try it on my own. I've done my '05 lights a few times so I knew it could be done quite easily.
*Pics uploaded...this camera is about 9 years old 3.1mp ftw*
Time to do:
Give yourself a weekend to do this. Start Friday and finish it on Sat night or Sunday. This is because you will need to wait for the paint to dry.
Difficulty:
3 out of 10. If you have decent knowledge about cars this will not be a problem. The hardest part will be prying apart the front cover. Everything else is very straightforward.
Cost:
Assuming you have all the necessary tools, this project shouldn't cost more than $25.
Things you will need:
2x '06- Head lights (there is a DIY on how to remove your bumper and headlights on this board).
Screwdriver
Oven
4x (2 pairs) thick gloves
Primer/Paint adhesive
Automotive spray paint - don't cheap out on paint.
Silicone sealant - same thing here.
Common sense
Step 1
Remove your headlights from your car. There's a DIY on this board so do that first.
Step 2
Take out all the wiring/ballast/HID bulb and set it aside. There is a thin green wire that goes to the LED parking lights, you can leave that in there. Be careful with the HID bulb. This is pretty straight forward so I won't go into to much detail.

Step 3
There are a few small screws on the outside of the headlight, remove them and set aside.
Step 4
Once you have take out the wiring, fold a glove in half and stuff it into the bigger hole. Seal it with the cover. Stuff the smaller hole with the other glove.


Step 5
Preheat oven to 250F degrees.
Wet cardboard on both sides and set on the bottom of the oven rack.
Place headlight into the oven and close it.
Set timer to 8 minutes.

Step 6
Ding!
The headlight is going to be HOT so wear your gloves. Turn off oven and take out the headlight. Start from the bottom of the light where you can get a good grip and pry open. Yes, PRY it open. There are going to be plastic tabs on the outside of the headlight and since they are hot now you can bend them back a little bit.

Work your way around and you should get two large separate pieces. Watchout for the black goo... don't get it on any of your reflectors because it's a b!tch to get off.
If you're having trouble, you can put the light back for another 5 minutes and try again. I had to do that.

Step 7
Ok, the hard part is over. Once you separate the parts you will see:

Pick out the parts you want to paint, primer them and paint them. I used 2 cans of flat black paint. You may need more if you're planning to paint more parts. I left the reflectors near the projectors unpainted.
*Note: I didn't paint the reflective part near the projector because I didn't want any chances of diminishing light output. However, this is only in "theory"... if anyone has painted theirs, let us know if light output is the same.
Leave them dry for whatever the directions on the can say. If you put a lot of layers on you may want to wait longer. This is because you have to put the light back into the oven later. I waited about 24hrs for mine and didn't have any bubbling problems.
Step 8
Wipe down inside of light with glass cleaner. Put everything back together minus the wiring. Match up the front and the back and give it a good couple of squeezes all around. Stuff the glove in the same way and bake for 8 minutes @ 250F degrees.
Again, wearing your gloves, take out the light and squeeze the clear covering against the backing. Use a good amount of pressure on all sides. Make sure you do this good. Bend the tabs back and let the light cool.
Optional: After it cools you can put all the wiring/bulbs back to test it out on your car. This is because you may have missed something (like a fingerprint or something on the inside) and you may need to open up the light again.
Step 9
Use your sealant and go around the headlight. Spread it evenly into the cracks. This is important because you don't want any condensation inside especially for those who live in humid climates. Let dry for directed time.
Step 10
Put all the wiring/bulbs back and put the head lights back into your car. Put your bumper back and clean up your mess.
Step 11
Take pictures and post them here.
Some crappy pix I took while my bro was changing his oil. I will take more close up pix later...


DONE WOOT!
Before:

After:
Before:

After:
*Pics uploaded...this camera is about 9 years old 3.1mp ftw*
Time to do:
Give yourself a weekend to do this. Start Friday and finish it on Sat night or Sunday. This is because you will need to wait for the paint to dry.
Difficulty:
3 out of 10. If you have decent knowledge about cars this will not be a problem. The hardest part will be prying apart the front cover. Everything else is very straightforward.
Cost:
Assuming you have all the necessary tools, this project shouldn't cost more than $25.
Things you will need:
2x '06- Head lights (there is a DIY on how to remove your bumper and headlights on this board).
Screwdriver
Oven
4x (2 pairs) thick gloves
Primer/Paint adhesive
Automotive spray paint - don't cheap out on paint.
Silicone sealant - same thing here.
Common sense
Step 1
Remove your headlights from your car. There's a DIY on this board so do that first.
Step 2
Take out all the wiring/ballast/HID bulb and set it aside. There is a thin green wire that goes to the LED parking lights, you can leave that in there. Be careful with the HID bulb. This is pretty straight forward so I won't go into to much detail.
Step 3
There are a few small screws on the outside of the headlight, remove them and set aside.
Step 4
Once you have take out the wiring, fold a glove in half and stuff it into the bigger hole. Seal it with the cover. Stuff the smaller hole with the other glove.
Step 5
Preheat oven to 250F degrees.
Wet cardboard on both sides and set on the bottom of the oven rack.
Place headlight into the oven and close it.
Set timer to 8 minutes.
Step 6
Ding!
The headlight is going to be HOT so wear your gloves. Turn off oven and take out the headlight. Start from the bottom of the light where you can get a good grip and pry open. Yes, PRY it open. There are going to be plastic tabs on the outside of the headlight and since they are hot now you can bend them back a little bit.
Work your way around and you should get two large separate pieces. Watchout for the black goo... don't get it on any of your reflectors because it's a b!tch to get off.
If you're having trouble, you can put the light back for another 5 minutes and try again. I had to do that.
Step 7
Ok, the hard part is over. Once you separate the parts you will see:
Pick out the parts you want to paint, primer them and paint them. I used 2 cans of flat black paint. You may need more if you're planning to paint more parts. I left the reflectors near the projectors unpainted.
*Note: I didn't paint the reflective part near the projector because I didn't want any chances of diminishing light output. However, this is only in "theory"... if anyone has painted theirs, let us know if light output is the same.
Leave them dry for whatever the directions on the can say. If you put a lot of layers on you may want to wait longer. This is because you have to put the light back into the oven later. I waited about 24hrs for mine and didn't have any bubbling problems.
Step 8
Wipe down inside of light with glass cleaner. Put everything back together minus the wiring. Match up the front and the back and give it a good couple of squeezes all around. Stuff the glove in the same way and bake for 8 minutes @ 250F degrees.
Again, wearing your gloves, take out the light and squeeze the clear covering against the backing. Use a good amount of pressure on all sides. Make sure you do this good. Bend the tabs back and let the light cool.
Optional: After it cools you can put all the wiring/bulbs back to test it out on your car. This is because you may have missed something (like a fingerprint or something on the inside) and you may need to open up the light again.
Step 9
Use your sealant and go around the headlight. Spread it evenly into the cracks. This is important because you don't want any condensation inside especially for those who live in humid climates. Let dry for directed time.
Step 10
Put all the wiring/bulbs back and put the head lights back into your car. Put your bumper back and clean up your mess.
Step 11
Take pictures and post them here.
Some crappy pix I took while my bro was changing his oil. I will take more close up pix later...
DONE WOOT!
Before:
After:
Before:
After:
Last edited by Mazinger Z; 08-02-2008 at 08:12 AM.

 07-24-2008, 06:41 PM
#3
Registered User

Join Date: Nov 2007
Location: tucson
Posts: 23
Likes: 0
Received 0 Likes
on
0 Posts
good stuff, I actually pulled the headlights out tonight and was coming here to ask about removing the ballast... This answers that question.
What kind of paint did you use also what silicone sealant and which color clear or black?
Thanks for the write up
What kind of paint did you use also what silicone sealant and which color clear or black?
Thanks for the write up
07-25-2008, 06:07 AM
#4
Originally Posted by dctoast
good stuff, I actually pulled the headlights out tonight and was coming here to ask about removing the ballast... This answers that question.
What kind of paint did you use also what silicone sealant and which color clear or black?
Thanks for the write up
What kind of paint did you use also what silicone sealant and which color clear or black?
Thanks for the write up
 07-25-2008, 10:18 AM
#5
Registered User

Join Date: Jul 2007
Location: Sandy, UT
Posts: 191
Likes: 0
Received 0 Likes
on
0 Posts
i just did mine the other day. it looks great! i used krylon fusion paint. its meant for hard to bond to surfaces. i made the mistake of using sheity paint at first and had to open up the headlights for a second time. i will post pics later
07-25-2008, 10:31 AM
#6
Originally Posted by ev0k1ll3r
i just did mine the other day. it looks great! i used krylon fusion paint. its meant for hard to bond to surfaces. i made the mistake of using sheity paint at first and had to open up the headlights for a second time. i will post pics later


Trending Topics

 07-26-2008, 06:55 AM
#13
Originally Posted by dctoast
ev0k1ll3r did you use satin or flat black? looks good. i'll be doing mine today...
Is the glove stuffing really needed?
Is the glove stuffing really needed?
good luck let us know if you have any problems.
07-26-2008, 10:11 AM
#14
Registered User
Join Date: Jul 2007
Location: Sandy, UT
Posts: 191
Likes: 0
Received 0 Likes
on
0 Posts
i used satin black paint. imo it looks better. i didnt even think about using the glove... i guess it wouldnt be a bad idea. when you wet down the cardboard make sure its wet enough not to burn but not so much so that you are giving your headlights a steam bath. this is especially important when putting them in the oven to reseal them. at that point the only way to avoid getting water stains on the inside is to open clean and reseal. you might consider leaving the oven door cracked a little bit. make sure to keep an eye on the cardboard too. if it gets too dry it will burn good luck on your project.
good luck on your project.
07-30-2008, 07:54 AM
#15
Registered User
iTrader: (1)

Join Date: Dec 2003
Location: Bay Area / Penn.
Posts: 407
Likes: 0
Received 0 Likes
on
0 Posts
Nice write up
Opened up my pair of '03s a year ago (posted pics in Laisifu's DIY post) one thing I highly recommend: try to use high temp paint when painting it, i've seen so many '06 paint that have stress or cracks from the heat of the HID projectors.
Did you do all this blindy or read up on the other DIY headlight posts?
- if ya did it all by yourself w/o instructions - bravo
- if other DIY's helped ya, give them at least a shout out =)
07-30-2008, 09:12 AM
#17
Registered User

Join Date: Oct 2007
Location: Nor Cal
Posts: 913
Likes: 0
Received 0 Likes
on
0 Posts
Awesome write-up. Thank you.
Was planning to do this myself. Quick ? if you don't mind:
Did you or not sand the chromed surfaces first for better primer/paint adhesion.
Thanks and love the look of those. Well done!!
Was planning to do this myself. Quick ? if you don't mind:
Did you or not sand the chromed surfaces first for better primer/paint adhesion.
Thanks and love the look of those. Well done!!
Last edited by 06CPV35; 07-30-2008 at 09:28 AM.
08-02-2008, 07:55 AM
#18
Originally Posted by omega6
Nice write up
Opened up my pair of '03s a year ago (posted pics in Laisifu's DIY post) one thing I highly recommend: try to use high temp paint when painting it, i've seen so many '06 paint that have stress or cracks from the heat of the HID projectors.
Did you do all this blindy or read up on the other DIY headlight posts?
- if ya did it all by yourself w/o instructions - bravo
- if other DIY's helped ya, give them at least a shout out =)
Opened up my pair of '03s a year ago (posted pics in Laisifu's DIY post) one thing I highly recommend: try to use high temp paint when painting it, i've seen so many '06 paint that have stress or cracks from the heat of the HID projectors.
Did you do all this blindy or read up on the other DIY headlight posts?
- if ya did it all by yourself w/o instructions - bravo
- if other DIY's helped ya, give them at least a shout out =)
As for the write up, I did my '05 headlights maybe... 3-4 times? I changed the color once, resprayed it, added halos then took out halo...
There are a lot of DIY's out there on the '05's but none I found on the '06s. So yep, I took a leap of faith
 08-02-2008, 07:57 AM
#19
Originally Posted by 06CPV35
Awesome write-up. Thank you.
Was planning to do this myself. Quick ? if you don't mind:
Did you or not sand the chromed surfaces first for better primer/paint adhesion.
Thanks and love the look of those. Well done!!
Was planning to do this myself. Quick ? if you don't mind:
Did you or not sand the chromed surfaces first for better primer/paint adhesion.
Thanks and love the look of those. Well done!!
08-03-2008, 06:11 AM
#20
Registered User
Join Date: Oct 2007
Location: Nor Cal
Posts: 913
Likes: 0
Received 0 Likes
on
0 Posts
Originally Posted by Mazinger Z
It probably would but from experience I found it to be unnecessary. Clean the surface well and use a good primer. Also be careful after you paint it, it's easy to chip the paint if it's not dry enough.