How to remove your headliner
 10-22-2009, 06:39 PM
#1

This is a fairly easy DIY for the person who wants to either replace, paint, or wrap their headliner in different materials(suede, alcantra,vinyl, and so on...)
This is how I did it and it was easy for me, but if anyone wants to add on, please fell free to.
(The following pics are not from my car but are for reference and if asked to take down, I will due to copyright and such...)
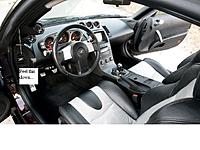
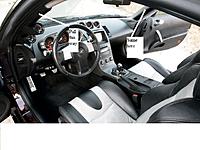
Step 1: Remove the visors... One side of the visors are held by two philips screws, which are covered by plastic covers to hide the screws...(Driver side it's on the left, Passenger is on the right)... Pry off the covers carefully or you WILL have some fugly covers...lol... Then you will see the two(2) philips screws and go to work... The next part was the hardest and took the longest because of my ignorance..lol...
Removing the hanger that holds up the visor on the opposite side: All you have to do is twist it to the right and they will come right off... DO NOT TRY TO PRY THEM OUT, YOU WILL ONLY DAMAGE THE METAL ON THE ROOF OR YOU WILL DAMAGE THE HANGER!!!
This is what the hole for the hangers look like:

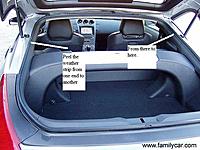
Step 2: Peel weather strip from around door sill... (The reason for that is to get enough grip to pull the A-pillars off of their clips but not stress them enough to break them...)
Step 3: After the weather strip has been peeled, pull off the A-pillars... Pull them towards you and the should pop off..
Step 4: Peel the weather strip from the rear hatch
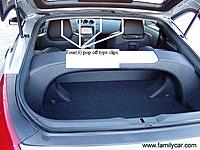
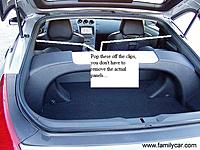
Step 5: There will be four(4) pop off clips in the rear of the actual headliner
This is how I did it and it was easy for me, but if anyone wants to add on, please fell free to.
(The following pics are not from my car but are for reference and if asked to take down, I will due to copyright and such...)
Step 1: Remove the visors... One side of the visors are held by two philips screws, which are covered by plastic covers to hide the screws...(Driver side it's on the left, Passenger is on the right)... Pry off the covers carefully or you WILL have some fugly covers...lol... Then you will see the two(2) philips screws and go to work... The next part was the hardest and took the longest because of my ignorance..lol...
Removing the hanger that holds up the visor on the opposite side: All you have to do is twist it to the right and they will come right off... DO NOT TRY TO PRY THEM OUT, YOU WILL ONLY DAMAGE THE METAL ON THE ROOF OR YOU WILL DAMAGE THE HANGER!!!
This is what the hole for the hangers look like:

Step 2: Peel weather strip from around door sill... (The reason for that is to get enough grip to pull the A-pillars off of their clips but not stress them enough to break them...)

Step 3: After the weather strip has been peeled, pull off the A-pillars... Pull them towards you and the should pop off..

Step 4: Peel the weather strip from the rear hatch

Step 5: There will be four(4) pop off clips in the rear of the actual headliner

Last edited by sdZ33; 10-22-2009 at 07:01 PM. Reason: spell check!

The following users liked this post:
khnitz (07-19-2022)
10-22-2009, 06:55 PM
#2
Step 6: Next loosen the panels in the rear to give the headliner some slack to move around when it's time to take out the headliner...(Just pop them off the clips to loosen them, not remove them)
Step 7: Take the off the dome light...
First: Remove the clear parts of the dome lights: Stick a flat head screw driver and gently pry each one off.
Next: After both clear covers are off, pry the center area where the lights are and it should come right down.
Next: Unplug the harness for lights.
Note: The biggest part of the dome light housing does not come off, it is attached to the headliner with rivets.
Step 8: There are two(2) clips holding the headliner to the roof. Those clips are attached to the dome light housing. You need to kind of tug on the headliner downward to un do the clips and loosen the headliner.
Note: Make sure that the clips come off with headliner, if not when it is off go back and take them off of the roof...
Step 9: Unplug the dome light harness on the driver side A-pillar
Step 10: Now your ready to remove the headliner, work with it and try to slide it forward towards the windshield but try to work around the mirror.
Some people say that they pulled it out through the hatch, well I found it very easy pulling it out of the driver side(YOU decide what's easiest for you!)
The following users liked this post:
khnitz (07-19-2022)


Trending Topics

 08-14-2011, 10:09 PM
#12
Just to add on to this instead of starting another thread, I used the "suedeliner" material from Keyston Bros. This stuff is already foam backed and very easy to use/apply... It works well with V&S 1080 spray adhesive, 3m super 90, Keyston brand spray adhesive, and contact cement... Below is a link to where you can buy this stuff and they might even have a local store near your area...
http://www.keystononline.com/index.p...3&catid2=13811
http://www.keystononline.com/index.p...3&catid2=13811

 09-30-2012, 04:59 PM
#15
Registered User

Join Date: Sep 2012
Location: Oklahoma city
Posts: 1
Likes: 0
Received 0 Likes
on
0 Posts
Very helpful thread. Just pulled mine off. I'm doing mine with leather, kind of like the 300zx look. I'll post pictures. Has anyone done a leather headliner yet??
01-11-2015, 07:30 PM
#16
New Member

Join Date: May 2013
Location: north Dakota
Posts: 4
Likes: 0
Received 0 Likes
on
0 Posts
Bumping an old thread i know, But how the heck did you take the sunglasses holder out of the headliner. I removed the headliner from the car rather easily, but flipping it over to try and take the metal retainer rings off, and i broke the first plastic post that the clips are around. I was being pretty easy on it too, i'm concerned with taking them off and still being able to remount them after wrapping the headliner though. I know i could just clip them with a side cutter, but i have no idea where to get new clips like those.


Thread
Thread Starter
Forum
Replies
Last Post
Gruppe-S
Body Interior
13
05-16-2016 10:42 PM