DIY: Restoring Headlights with New UV coating
 01-23-2012, 05:36 PM
#1

So I guess some guys on a different forum figured out how to apply a new UV coating to the headlights after restoring them
http://www.autogeekonline.net/forum/...lant-idea.html
http://www.autogeekonline.net/forum/...lant-idea.html
Exclamation Headlight Restoration-new UV sealant idea
This is a method that I got from someone from another car related forum. Supposedly the UV protector is the same as what companies are selling for alot of money, but you can run down to home depot/hardware store to pick up everything you need for about $20-$25.
My process is basically already well known:
Wetsand-400, 800, 1000, 1500 and 2000
Buff-System one polish or equivalent with a high speed drill with small wool pad attachment
But here is the "new" part......
UV Sealer-Helmsman Spar Urethane(Indoor/Outdoor)Clear Gloss mixed with Mineral Spirits(1part urethane to 1 part mineral spirits.
After you buff the lights out with your polisher, you wipe down the headlight with denatured alcohol or isopropyl alcohol (to eliminate any compound residue.
Mix the urethane and mineral spirits in a plastic disposable cup. Remember the dilution ration- 1 part to 1 part.
Then, take a blue 'scott' shop rag and fold it up into a 1 inch x 1 inch square. Then dip the rag into the mixture and wipe it on the headlight. Dont use too much or it might run, but start at the top of the light and work side to side. It took me a few times to get my method down, so if you mess up with application, wipe it off with mineral spirits and start over.
This UV sealant dries in 10-20 mins usually and is far superior to any average detail product(paint sealant, wax etc.......)
Its like a clear cote, but you dont spray it, not as messy.
Longevity-The original "creator" of this method told me that he did a headlight restoration with this method about 2 years ago for a customer, and he said it still looks good.
Materials Needed:

Before Pix:
After Pix:

This is a method that I got from someone from another car related forum. Supposedly the UV protector is the same as what companies are selling for alot of money, but you can run down to home depot/hardware store to pick up everything you need for about $20-$25.
My process is basically already well known:
Wetsand-400, 800, 1000, 1500 and 2000
Buff-System one polish or equivalent with a high speed drill with small wool pad attachment
But here is the "new" part......
UV Sealer-Helmsman Spar Urethane(Indoor/Outdoor)Clear Gloss mixed with Mineral Spirits(1part urethane to 1 part mineral spirits.
After you buff the lights out with your polisher, you wipe down the headlight with denatured alcohol or isopropyl alcohol (to eliminate any compound residue.
Mix the urethane and mineral spirits in a plastic disposable cup. Remember the dilution ration- 1 part to 1 part.
Then, take a blue 'scott' shop rag and fold it up into a 1 inch x 1 inch square. Then dip the rag into the mixture and wipe it on the headlight. Dont use too much or it might run, but start at the top of the light and work side to side. It took me a few times to get my method down, so if you mess up with application, wipe it off with mineral spirits and start over.
This UV sealant dries in 10-20 mins usually and is far superior to any average detail product(paint sealant, wax etc.......)
Its like a clear cote, but you dont spray it, not as messy.
Longevity-The original "creator" of this method told me that he did a headlight restoration with this method about 2 years ago for a customer, and he said it still looks good.
Materials Needed:
Before Pix:
After Pix:

The following users liked this post:
BlackHoleCowboy (04-11-2021)
 01-23-2012, 06:39 PM
#4

Great procedure!
I've used Helmsman spar varnish for alot of years on exterior wood.I've never thought about using a reduction of the clear on a headlight.
Thanks,will keep this in mind if I have to restore my lenses.For some reason,the headlights on my 03 Touring look brand new.I have used a polish/sealer that is used
primarily for aircraft windscreens ever since I've had my Z.


Trending Topics
01-30-2012, 05:22 AM
#8

Got an asuka v2 hood from litoflow and test fitted it last weekend. Drove around with it for the week and few buddies of mine commented on how horrible the headlights looked. (guess the hood brings more attention to the front of the car, cause no one has said $#!T till now)
I have been budgeting to get some 06+ headlights along with other aero parts so I wasn't really paying attention to the old ones...but it did make me feel a little ashamed as one of my buddies that made a comment; his car only gets washed when it rains, so I had to do something for the time being.
Came across this thread and decided to give it a try.
Taped off around the headlights
Did the wetsanding with 800 - 1000 - 2000 - 2500
Had a couple foam polishing bits for my cordless drill so I used that with
Meguiar's Mirror Glaze - Plastic Cleaner and Polish
Wiped down with isopropyl alcohol
and then applied the UV Sealer-Helmsman Spar Urethane Clear Gloss mixed with Mineral Spirits(1part urethane to 1 part mineral spirits - as specified)
Applied in a horizontal pattern starting from top and going down so I could catch and smooth out any runs.
Not a lot was needed as I barely dipped the towel into the UV Sealer and it spread and had great coverage.
I mixed about 4-6 oz and probably only really needed 2 oz. if even that much.
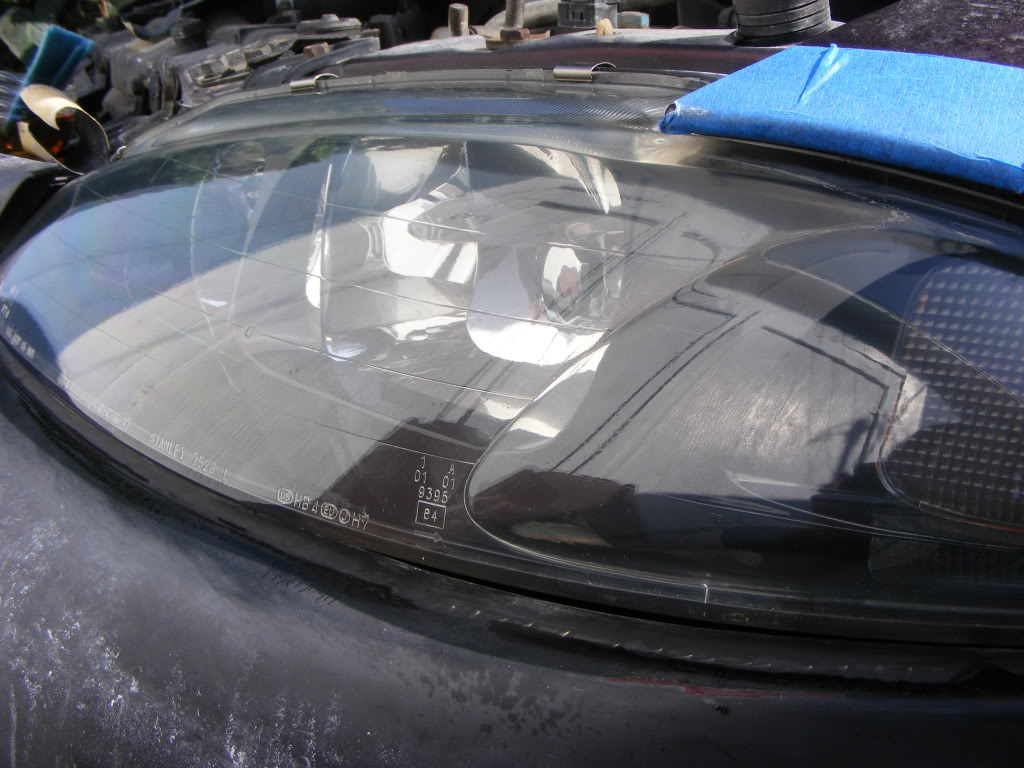
Anyway - here are the before and after.
My passenger light is an older light cause when frontend got hit, insurance only paid to replace the broken divers side so the older one has more yellowing than the drivers side.
BEFORE:

AFTER:

I have been budgeting to get some 06+ headlights along with other aero parts so I wasn't really paying attention to the old ones...but it did make me feel a little ashamed as one of my buddies that made a comment; his car only gets washed when it rains, so I had to do something for the time being.
Came across this thread and decided to give it a try.
Taped off around the headlights
Did the wetsanding with 800 - 1000 - 2000 - 2500
Had a couple foam polishing bits for my cordless drill so I used that with
Meguiar's Mirror Glaze - Plastic Cleaner and Polish
Wiped down with isopropyl alcohol
and then applied the UV Sealer-Helmsman Spar Urethane Clear Gloss mixed with Mineral Spirits(1part urethane to 1 part mineral spirits - as specified)
Applied in a horizontal pattern starting from top and going down so I could catch and smooth out any runs.
Not a lot was needed as I barely dipped the towel into the UV Sealer and it spread and had great coverage.
I mixed about 4-6 oz and probably only really needed 2 oz. if even that much.
Anyway - here are the before and after.
My passenger light is an older light cause when frontend got hit, insurance only paid to replace the broken divers side so the older one has more yellowing than the drivers side.
BEFORE:
AFTER:
Last edited by vex008; 01-30-2012 at 05:23 AM.

 01-30-2012, 06:30 AM
#11
Got an asuka v2 hood from litoflow and test fitted it last weekend. Drove around with it for the week and few buddies of mine commented on how horrible the headlights looked. (guess the hood brings more attention to the front of the car, cause no one has said $#!T till now)
I have been budgeting to get some 06+ headlights along with other aero parts so I wasn't really paying attention to the old ones...but it did make me feel a little ashamed as one of my buddies that made a comment; his car only gets washed when it rains, so I had to do something for the time being.
Came across this thread and decided to give it a try.
Taped off around the headlights
Did the wetsanding with 800 - 1000 - 2000 - 2500
Had a couple foam polishing bits for my cordless drill so I used that with
Meguiar's Mirror Glaze - Plastic Cleaner and Polish
Wiped down with isopropyl alcohol
and then applied the UV Sealer-Helmsman Spar Urethane Clear Gloss mixed with Mineral Spirits(1part urethane to 1 part mineral spirits - as specified)
Applied in a horizontal pattern starting from top and going down so I could catch and smooth out any runs.
Not a lot was needed as I barely dipped the towel into the UV Sealer and it spread and had great coverage.
I mixed about 4-6 oz and probably only really needed 2 oz. if even that much.
Anyway - here are the before and after.
My passenger light is an older light cause when frontend got hit, insurance only paid to replace the broken divers side so the older one has more yellowing than the drivers side.
BEFORE:
AFTER:
01-30-2012, 10:32 AM
#13
Will get some close-ups, gonna borrow a friends camera today as my DSLR has decided to fail on me so the phone pics is what I have been working with for the past month.
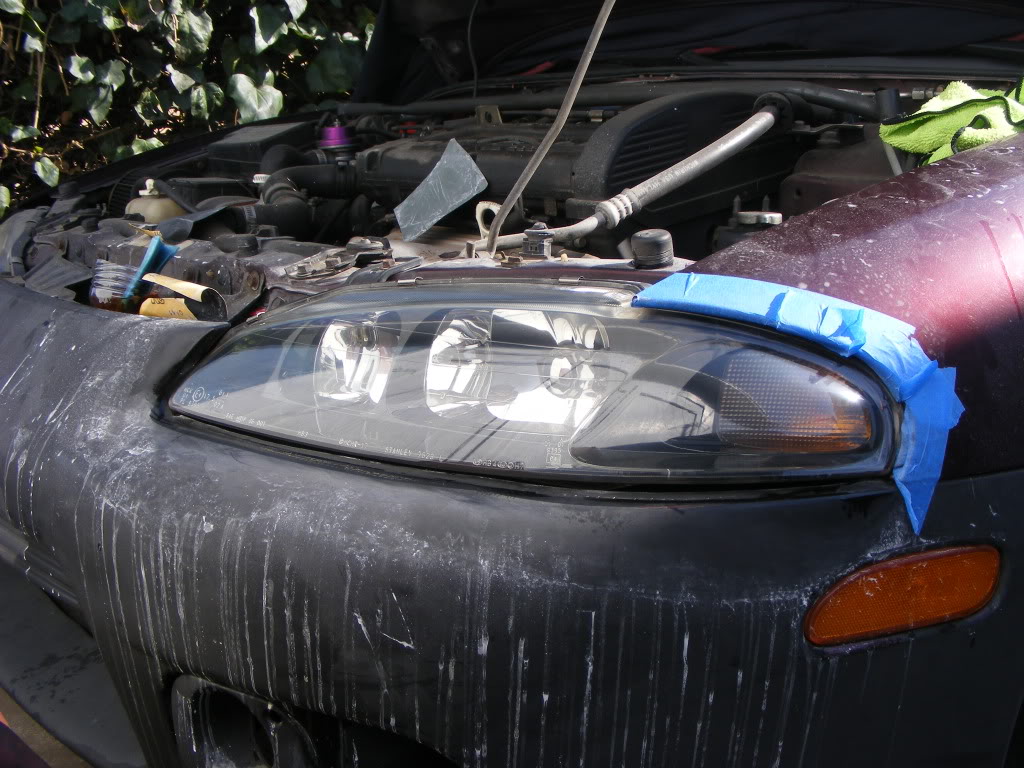
***EDIT***
Forgot i had these pictures when it was taped off drying and picture of the ingredients.


***EDIT***
Forgot i had these pictures when it was taped off drying and picture of the ingredients.
Last edited by vex008; 01-30-2012 at 12:10 PM.
 02-06-2012, 06:17 PM
#17
I live in the cayman islands so everything is 2 times the price of what you would pay for the same thing. for example a gallon of premium gas is about $7-8 USD and our gallon is smaller than the US gallon. So the total cost I would give you would be of no help. For argument sake I probably spent $60.00KYD so about $75.00USD for the Tape, Sandpaper, Plastic Cleaner & Polish, Polishing & Buffing Pads, Mineral Spirits, Urethane, Gloves, Disposable Plastic Cups, Blue Shop Towels. I'd expect your cost to be less than $50USD for the supplies.
40 mins - time to tape off and wet sand
5-10 mins per light - plastic cleaner and polish with the drill and then buff.
5-10 mins - to removed the wet tape and apply fresh dry tape incase the clearcoat mixture ran it wouldnt soak in quickly and I could catch it before getting to the paint. There was no issue with it running as I applied a really light coat.
5 mins to measure, mix and apply the clearcoat mix.
gave it a good 30mins to dry while i cleaned up and packed away my stuff.
keep in mind i wasnt in a rush at all so i could have probably done quicker on the sanding.
Last edited by vex008; 02-07-2012 at 05:07 AM.
02-18-2012, 01:07 PM
#18
Registered User

Join Date: Jan 2012
Location: Los Angeles, CA
Posts: 10
Likes: 0
Received 0 Likes
on
0 Posts
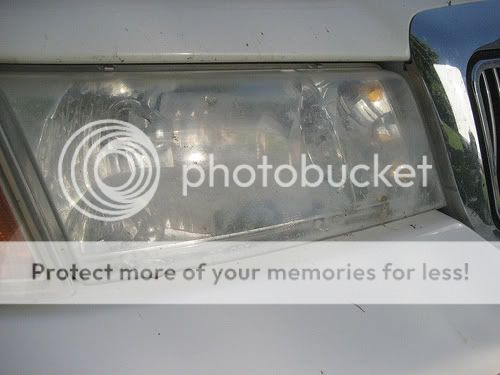
Hey guys, this works great. The only catch for me is that I haven't been able to find the Helmsman sealant, I think it's been removed off the store shelves here in California. I did find something similar at Lowes so I hope it lasts. In any case, I decided to practice on my old Eclipse before I go ahead and work on my Z and Rx8's headlights. Both are bad but not as bad as the Eclipse.
Here are my Eclipse before and after pics,
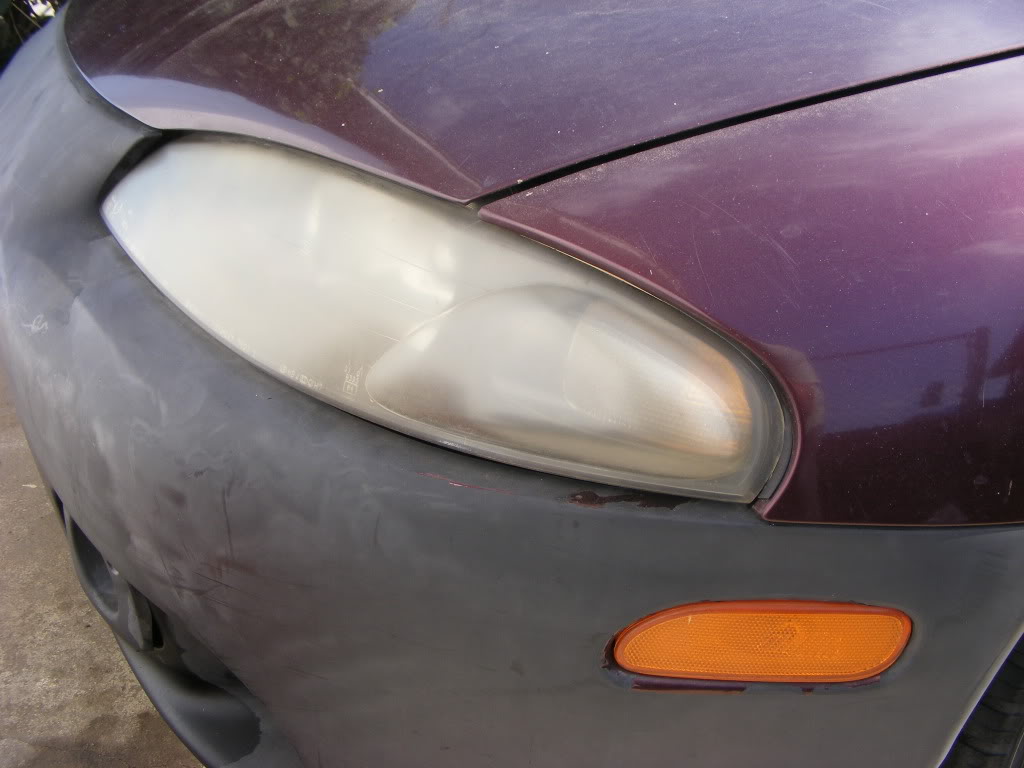
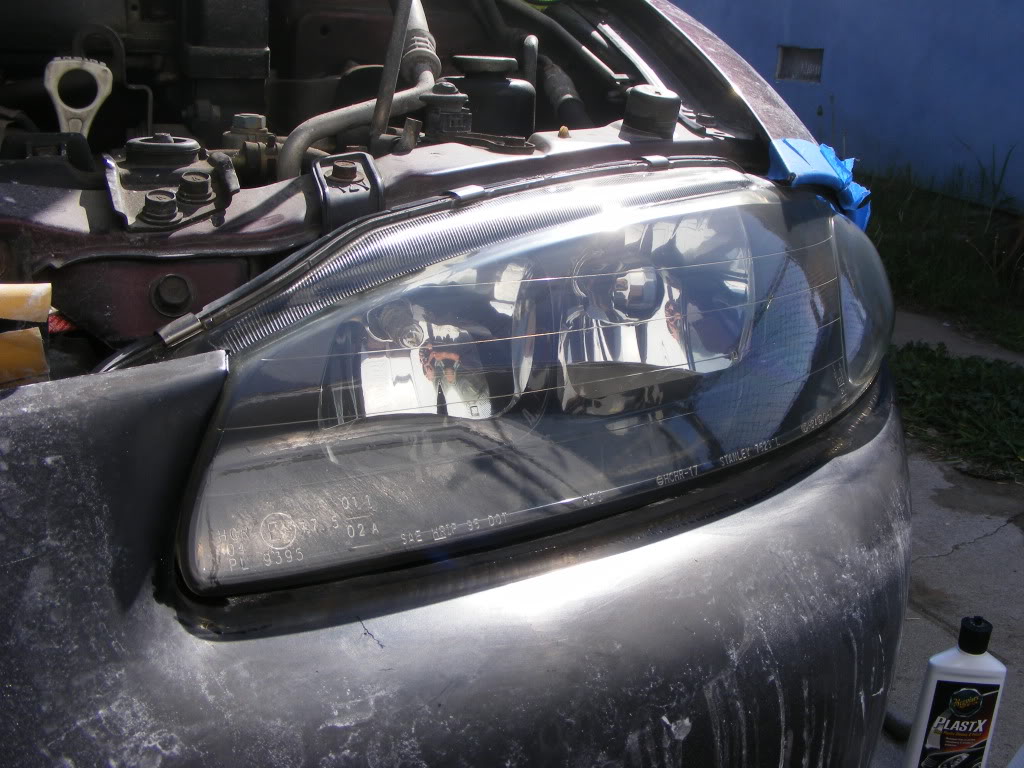

Here are my Eclipse before and after pics,

