LEDs on 350z side markers
 03-08-2012, 09:25 PM
#1
Registered User
Thread Starter

Join Date: Sep 2011
Location: United States
Posts: 4
Likes: 0
Received 0 Likes
on
0 Posts
Since the rise of the Audi's Daylight Running Lights (DRL) LEDs, other car manufacturers are coming out with stock DRL LEDs. I really wanted to put in LEDs to my headlights, lining them up at the bottom just like the Audis.
I started looking around the web and there were barely any good quality guides on how to do this. It seemed pretty simple, get LED strips, put the headlights in the oven, open them up, install LEDs, close them, and wire the LEDs. I also saw couple of ones already made and you can buy, and all you needed to do was swap out your headlights with the ones with LEDs already in them. I'm cheap, didn't want to spend that much $$$.
There was also another thing i wanted to fix. The hideous amber side markers/reflectors. Honestly, i dont think that amber fit in any color that the Zs came in...unless you had some orange accents that matched them.
SO, I've decided to get JDM clear side markers, and install DRL LEDs on them.
Thought i'd share how to do it incase anyone else was interested.
1. Get LED strips (eBay), electrical wires, JDM Clear Side Markers (eBay), and super glue.
2. I blacked out the JDM side markers and followed the instructions by gr8scott_o. THANKS MAN!
https://my350z.com/forum/body-interi...ml#post7953325
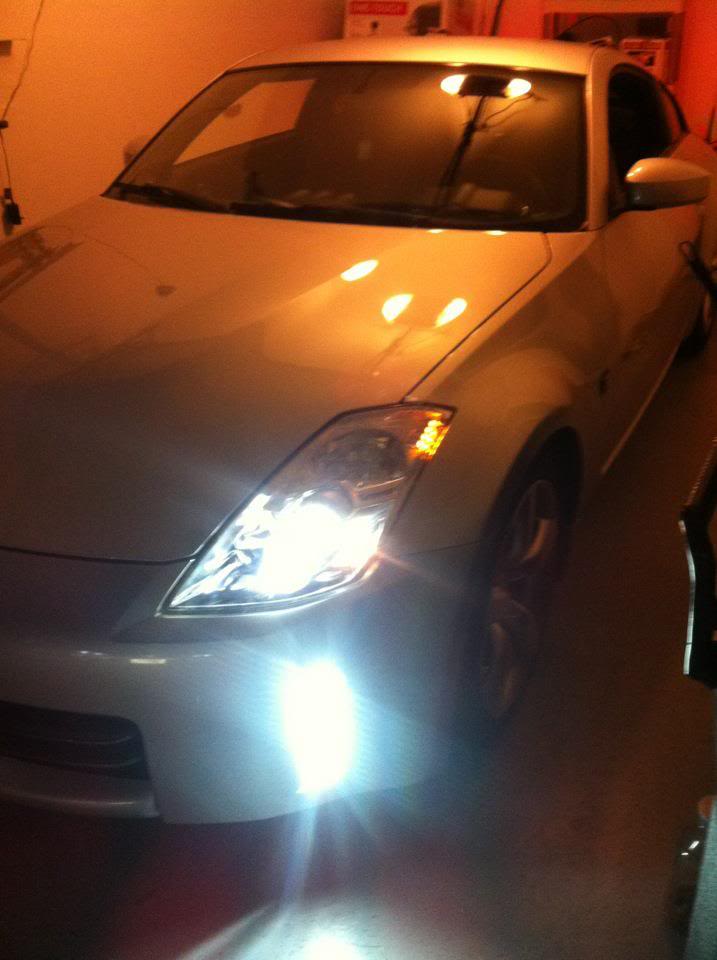
3. Install LEDs. I got two kinds of LEDs. Both white, 5050, but in two different increments. one had 30/meter and the other 60/meter. I used the 30/m ones to face them sideways relative to the car and 60/m for facing them forward.
For the ones facing sideways, i put them under the reflector, when lit up, it's not as bright but it's still pretty slick.
For ones facing forward, I taped the bulbs, spray painted the whole thing black, and put them on the shorter side facing forward of the reflectors. LED strips usually come with a 3M double sided sticker, but I highly recommend super glueing these on. careful on the glue though.
4. Put back the casing with glue, again be careful not to put too much. And incase you're wondering how to get the wires out, I drilled a hole to the back of the clear casing. Replace the completed ones with the amber ones. I jacked the car up and accessed the side markers through the wheels. It's really easy to do it this way on the driver's side. On the passenger side, there's a washer tank in the way, so taking the off the front bumper may be the best (I didn't).
5. Wiring-I wired the side facing ones with the yellow blinker lights. These ones will go on with the key fob as well as when i turn the turn-signal on. If you are going with the blinkers, make sure to hook your LED positive to the GREEN line, not the blue one. You should also be able to access the blinker lights if you're getting to the side markers anyway.
As for the ones facing forward, these are the ones i wanted them to be as DRL. After playing around with couple of fuses, I ended up just bringing the wires to my passenger side and wiring them to my cigarette lighter. These facing forward lights will go on whenever the ignition is in ON mode.
I put up some pics. If you need some help, i'll try to help. GOOD LUCK!
I started looking around the web and there were barely any good quality guides on how to do this. It seemed pretty simple, get LED strips, put the headlights in the oven, open them up, install LEDs, close them, and wire the LEDs. I also saw couple of ones already made and you can buy, and all you needed to do was swap out your headlights with the ones with LEDs already in them. I'm cheap, didn't want to spend that much $$$.
There was also another thing i wanted to fix. The hideous amber side markers/reflectors. Honestly, i dont think that amber fit in any color that the Zs came in...unless you had some orange accents that matched them.
SO, I've decided to get JDM clear side markers, and install DRL LEDs on them.
Thought i'd share how to do it incase anyone else was interested.
1. Get LED strips (eBay), electrical wires, JDM Clear Side Markers (eBay), and super glue.
2. I blacked out the JDM side markers and followed the instructions by gr8scott_o. THANKS MAN!
https://my350z.com/forum/body-interi...ml#post7953325
3. Install LEDs. I got two kinds of LEDs. Both white, 5050, but in two different increments. one had 30/meter and the other 60/meter. I used the 30/m ones to face them sideways relative to the car and 60/m for facing them forward.
For the ones facing sideways, i put them under the reflector, when lit up, it's not as bright but it's still pretty slick.
For ones facing forward, I taped the bulbs, spray painted the whole thing black, and put them on the shorter side facing forward of the reflectors. LED strips usually come with a 3M double sided sticker, but I highly recommend super glueing these on. careful on the glue though.
4. Put back the casing with glue, again be careful not to put too much. And incase you're wondering how to get the wires out, I drilled a hole to the back of the clear casing. Replace the completed ones with the amber ones. I jacked the car up and accessed the side markers through the wheels. It's really easy to do it this way on the driver's side. On the passenger side, there's a washer tank in the way, so taking the off the front bumper may be the best (I didn't).
5. Wiring-I wired the side facing ones with the yellow blinker lights. These ones will go on with the key fob as well as when i turn the turn-signal on. If you are going with the blinkers, make sure to hook your LED positive to the GREEN line, not the blue one. You should also be able to access the blinker lights if you're getting to the side markers anyway.
As for the ones facing forward, these are the ones i wanted them to be as DRL. After playing around with couple of fuses, I ended up just bringing the wires to my passenger side and wiring them to my cigarette lighter. These facing forward lights will go on whenever the ignition is in ON mode.
I put up some pics. If you need some help, i'll try to help. GOOD LUCK!
Last edited by neobleo; 03-08-2012 at 09:39 PM.


 03-11-2012, 09:05 PM
#7
Registered User
Thread Starter
Join Date: Sep 2011
Location: United States
Posts: 4
Likes: 0
Received 0 Likes
on
0 Posts
Trending Topics

 03-24-2012, 07:25 PM
#10
Registered User
Thread Starter
Join Date: Sep 2011
Location: United States
Posts: 4
Likes: 0
Received 0 Likes
on
0 Posts
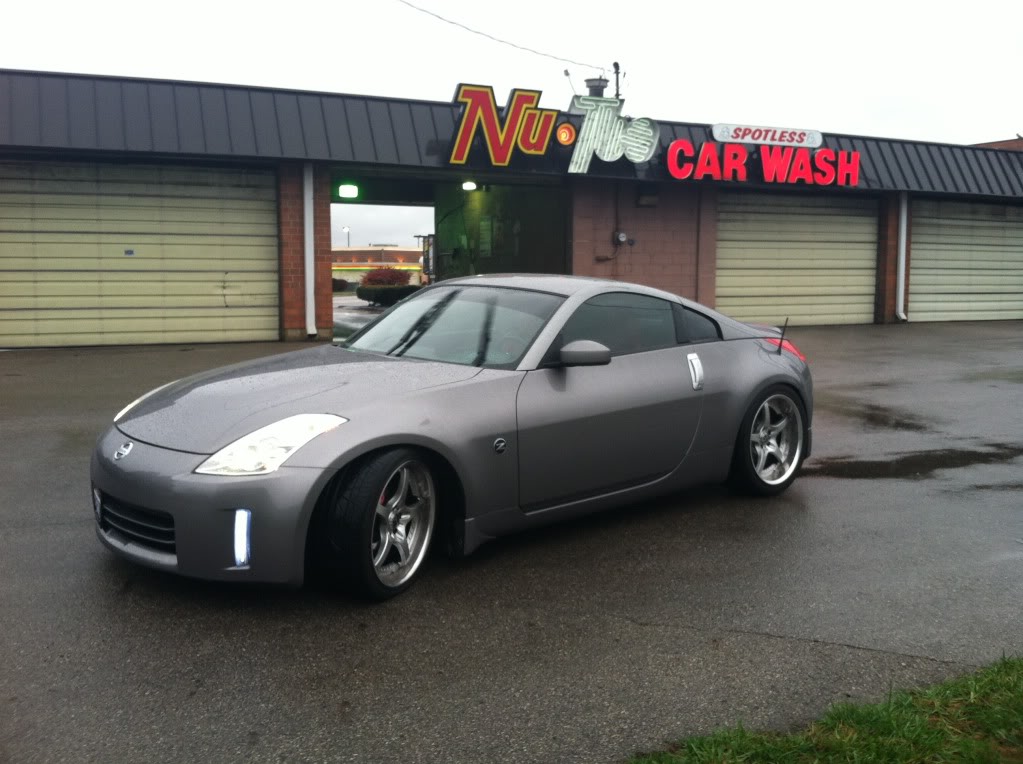
cloudy daylight pic. The headlight and the LEDs look really off in this picture, but it's not as bad in person. I'm still thinking of getting higher temp headlights though.
you can see what i mean by the individual bulbs lighting up.

you can see what i mean by the individual bulbs lighting up.


 12-23-2012, 01:12 PM
#14
Registered User

Brilliant job, better than Audi, i think its probably the light for the camera but one of the shots looks like half of the orange strip in the headlamp casing looks like it has a couple of LED's in it as well.


 07-10-2014, 11:33 AM
#20
Registered User

Join Date: Feb 2013
Location: Charleston, WV
Posts: 14
Likes: 0
Received 0 Likes
on
0 Posts
Hate to revive a dead thread. But I bought an already assembled kit last year and three of the leds have died. I am wanting to take a page out of your book. Can you link me to the LEDs you used. I searched but there are so many options. Also would doing both of them at 60/meter be too bright?

Thread
Thread Starter
Forum
Replies
Last Post
Vigman
Maintenance & Repair
17
11-17-2015 04:34 AM
hardkicks
Zs & Gs For Sale
0
09-20-2015 12:28 PM

