DIY: Burnt Blue Titanium Exhaust Tips (Anodizing Titanium)
 02-08-2013, 10:55 PM
#1

This trick will work for just about any titanium exhaust or just about any titanium part that you have that you wish to turn blue.
So I have had a motordyne dual exhaust for a couple years now and bought it new with the rolled Ti tips that were burnt a purpleish blue color. They looked amazing when I first got them, but after about a year or so they started fading and lost their "vibrant" blue color and turned to a dull purple hue. I read up on how to anodize aluminum and titanium parts, and figured I would have a go at it to try and return my tips to their original color. The results were amazing.
Here's what you need:
-Titanium parts
-4 9volt batteries
-2 wires
-Can of Coke or Pepsi
-Aluminum foil
-A good microfiber rag
-Paper towels
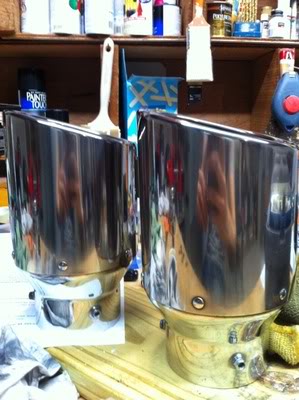
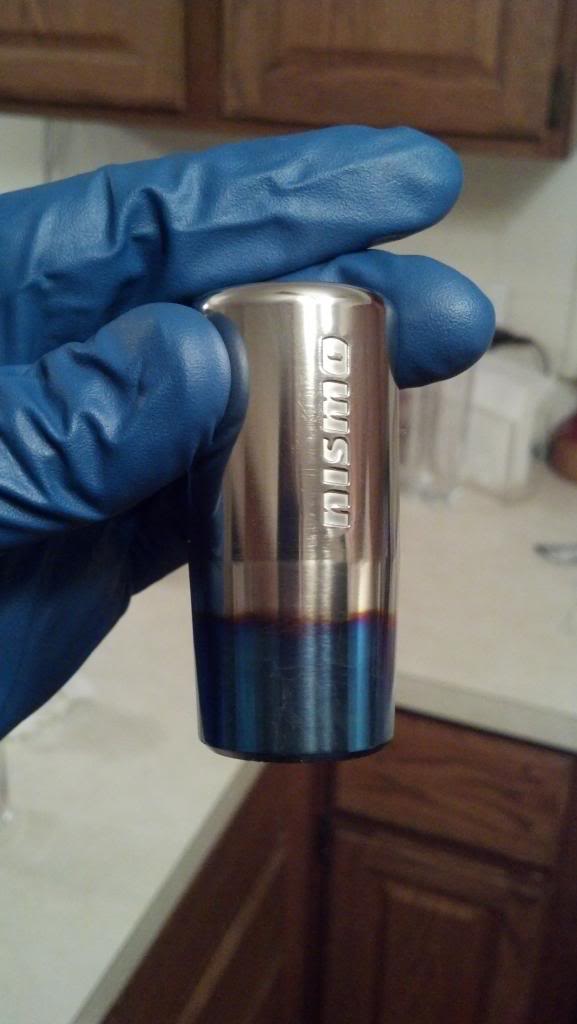
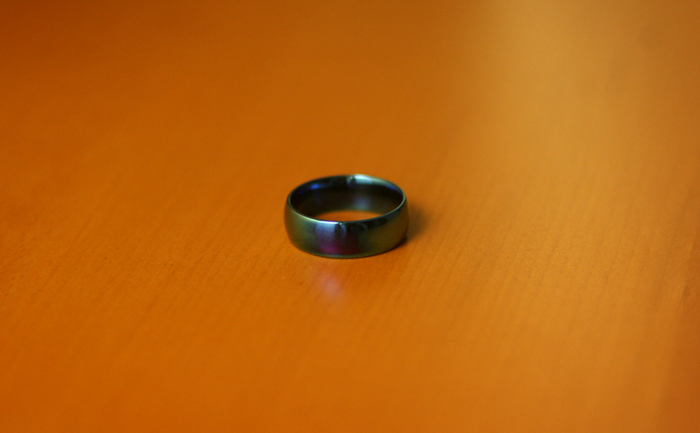
First thing you need to do is remove any existing color from the titanium. I found out that you cannot create any new color unless you have a bare titanium surface to start with. You can remove any burnt blue coloring from the tips by polishing them out with a rag and some good metal polish. I used the mothers aluminum and mag polish and had great results. It takes some time but it will take out any remaining color back down to the bare metal. Here is how mine looked after i took off all of the existing color:
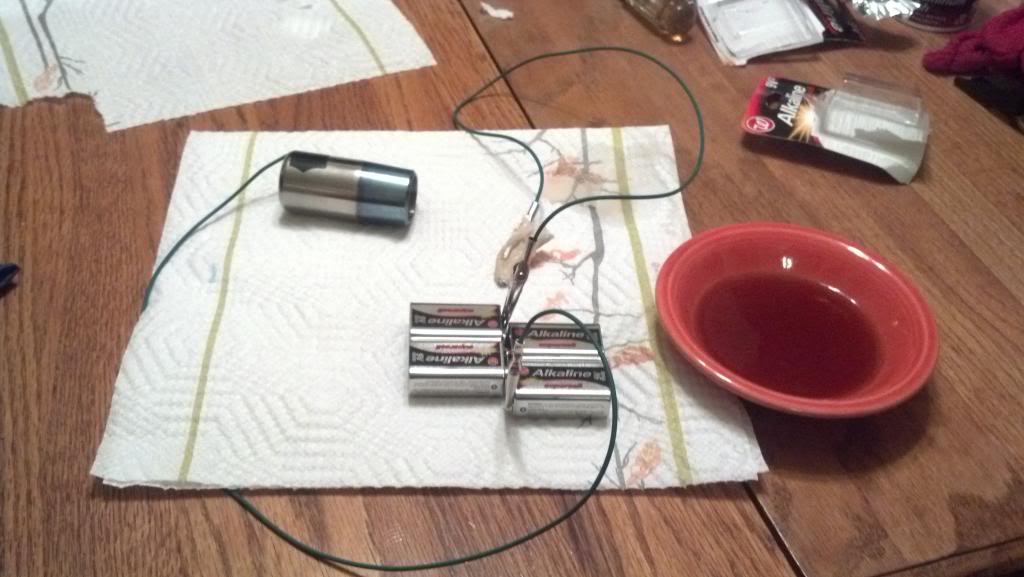
Now that you have some bare titanium, lets start preparing the batteries for the power. You will need to run the four 9v batteries in series to create 36 volts. You can do this by connecting the batteries end to end as shown in the picture below. Clip your wires to the positive and negative terminals of the batteries so you now have a "battery pack" made. Be careful not to let the ends of the wire touch to short out your batteries.
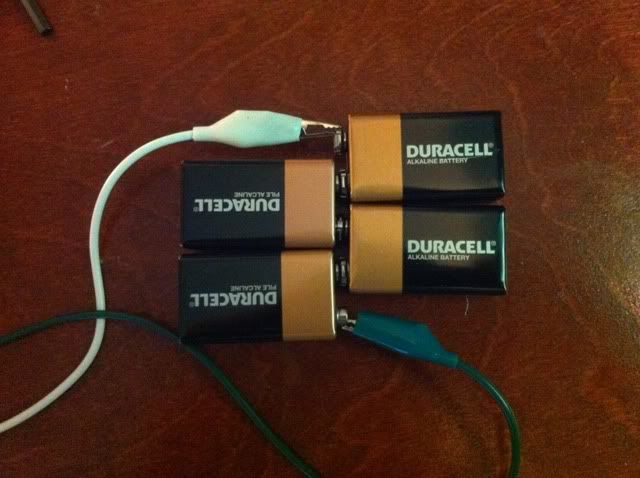
As shown above, the green wire is the positive side of the battery pack, while the white is the negative. The positive side must be connected to the titanium part that we wish to burn. The negative side is what we need to focus on now.
Looking at the end of your negative wire, fold up some aluminum foil and wrap it around your wire (or alligator clip) and make sure it has a good connection.

Now open up your can of coke and pour it into a plate. Not much coke is needed, so you dont need to go crazy. Any soda will work with this, just not diet soda because it needs the sugars. Once you have poured out some soda, take your paper towel and rip off a small 2x3 inch square and dip it into the soda. Let it get completely soaked and keep it in for a few seconds.
Now remove the wet paper towel and wrap it around the aluminum foil. Depending on how thick your paper towel is you may only need to wrap it once. In my case I wrapped it around twice because the paper towel was weak and would rip easily.
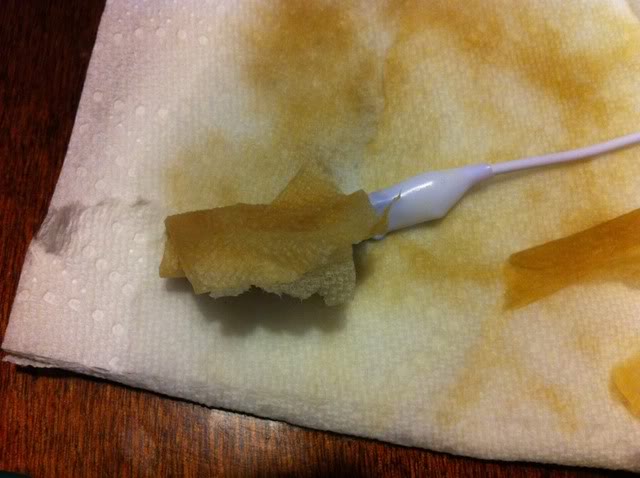
Now here is where the magic happens. Make sure your positive end of your battery pack is connected securely to the titanium piece. With your negative "wet" terminal gently rub the foil and paper towel combination on the area in which you want to turn blue. I suggest moving very slowly with slight pressure as you move around the edge of your exhaust tip. You may have to dip your paper towel in the soda again to re-wet it if it starts going dry. If you hold the foil to the titanium for too long it will turn blue then back to silver, so make sure you move steadily.

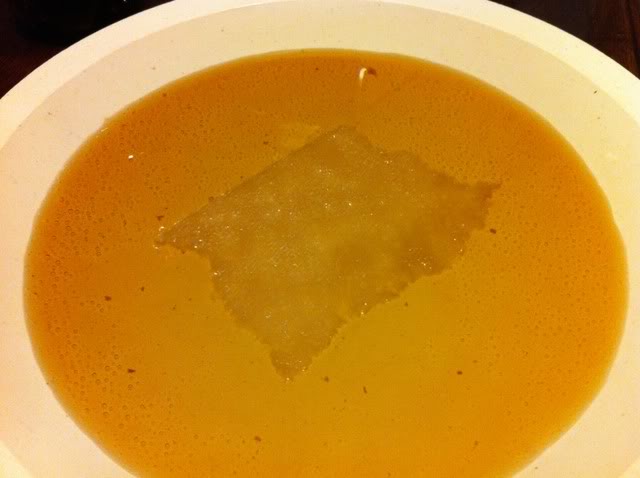
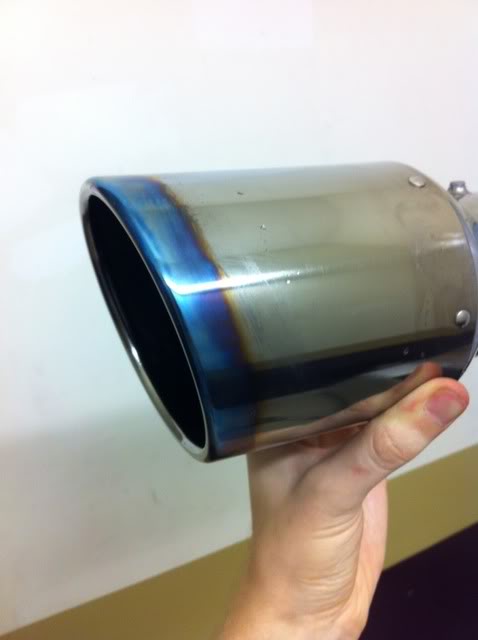
Once you are satisfied with the color you are finished. If you are unhappy with the way it turned out or you want more practice with it, just re-polish the tips and remove the color and start over again its easy. Here is how mine turned out after I finished. I love how they look, better blue color than before and I like the defined line i made. Basically any thickness and color can be achieved depending on how large your paper towel portion is and how long you hold it to the titanium.
Here's how mine turned out:
Give it a shot! I'm very happy with the results, and the color has held up after being on the car for a while. Looks awesome to me!! You can do this to pretty much anything titanium
So I have had a motordyne dual exhaust for a couple years now and bought it new with the rolled Ti tips that were burnt a purpleish blue color. They looked amazing when I first got them, but after about a year or so they started fading and lost their "vibrant" blue color and turned to a dull purple hue. I read up on how to anodize aluminum and titanium parts, and figured I would have a go at it to try and return my tips to their original color. The results were amazing.
Here's what you need:
-Titanium parts
-4 9volt batteries
-2 wires
-Can of Coke or Pepsi
-Aluminum foil
-A good microfiber rag
-Paper towels
First thing you need to do is remove any existing color from the titanium. I found out that you cannot create any new color unless you have a bare titanium surface to start with. You can remove any burnt blue coloring from the tips by polishing them out with a rag and some good metal polish. I used the mothers aluminum and mag polish and had great results. It takes some time but it will take out any remaining color back down to the bare metal. Here is how mine looked after i took off all of the existing color:
Now that you have some bare titanium, lets start preparing the batteries for the power. You will need to run the four 9v batteries in series to create 36 volts. You can do this by connecting the batteries end to end as shown in the picture below. Clip your wires to the positive and negative terminals of the batteries so you now have a "battery pack" made. Be careful not to let the ends of the wire touch to short out your batteries.
As shown above, the green wire is the positive side of the battery pack, while the white is the negative. The positive side must be connected to the titanium part that we wish to burn. The negative side is what we need to focus on now.
Looking at the end of your negative wire, fold up some aluminum foil and wrap it around your wire (or alligator clip) and make sure it has a good connection.
Now open up your can of coke and pour it into a plate. Not much coke is needed, so you dont need to go crazy. Any soda will work with this, just not diet soda because it needs the sugars. Once you have poured out some soda, take your paper towel and rip off a small 2x3 inch square and dip it into the soda. Let it get completely soaked and keep it in for a few seconds.
Now remove the wet paper towel and wrap it around the aluminum foil. Depending on how thick your paper towel is you may only need to wrap it once. In my case I wrapped it around twice because the paper towel was weak and would rip easily.
Now here is where the magic happens. Make sure your positive end of your battery pack is connected securely to the titanium piece. With your negative "wet" terminal gently rub the foil and paper towel combination on the area in which you want to turn blue. I suggest moving very slowly with slight pressure as you move around the edge of your exhaust tip. You may have to dip your paper towel in the soda again to re-wet it if it starts going dry. If you hold the foil to the titanium for too long it will turn blue then back to silver, so make sure you move steadily.
Once you are satisfied with the color you are finished. If you are unhappy with the way it turned out or you want more practice with it, just re-polish the tips and remove the color and start over again
its easy. Here is how mine turned out after I finished. I love how they look, better blue color than before and I like the defined line i made. Basically any thickness and color can be achieved depending on how large your paper towel portion is and how long you hold it to the titanium. Here's how mine turned out:
Give it a shot! I'm very happy with the results, and the color has held up after being on the car for a while. Looks awesome to me!! You can do this to pretty much anything titanium
Last edited by Esser; 02-08-2013 at 10:57 PM.


Trending Topics

 03-04-2013, 09:08 AM
#10
Registered User
iTrader: (2)

Join Date: Jan 2009
Location: Atlanta, GA
Posts: 79
Likes: 0
Received 0 Likes
on
0 Posts
BAD AZZZ!!!!!! I have a knock off HKS true dual with "burnt tips" (i know i sukk) anyway, I wonder if mine is stainless or the tips are titanium. Regardless this is awesome!
03-06-2013, 06:44 PM
#11
Registered User
iTrader: (2)

Join Date: May 2012
Location: Farmington Hills
Posts: 35
Likes: 0
Received 0 Likes
on
0 Posts
Thanks for the awesome write up! Really easy to follow and set up.
I used four 9V batteries at first, but it anodized almost instantly, and I was trying to create more of a transition, to try and capture the gold and violet, as well as the blue. I then switched to three 9V batteries, which helped, but it was still pretty quick. I might repolish it and try again with two 9V batteries, but I am pretty happy with the end product.
Thanks again!


 03-07-2013, 08:12 PM
#19
Damn you, now I have to buy that spork, did you get the matching straw too?
In case anyone else wants to get one, not bad for 8 bucks.
http://www.thinkgeek.com/product/8ace/
In case anyone else wants to get one, not bad for 8 bucks.
http://www.thinkgeek.com/product/8ace/
03-07-2013, 09:02 PM
#20
Damn you, now I have to buy that spork, did you get the matching straw too?
In case anyone else wants to get one, not bad for 8 bucks.
http://www.thinkgeek.com/product/8ace/
In case anyone else wants to get one, not bad for 8 bucks.
http://www.thinkgeek.com/product/8ace/
Snow Peak is actually a completely Japanese company, they make high quality camping supplies. (A little secret is that their titanium is from the same supplier that supplies Amuse, Tommykaira, Tracy Sports, MCR, Mine's etc with their exhaust titanium).

