DIY: How to Install New Hatch Shocks and Remove Existing OEM Brackets -
 01-21-2014, 08:47 PM
#1

[DIY] - How to Remove your Stock OEM Rear Hatch Shocks and Cut and Remove OEM Brackets safely to Re-Use with New Aftermarket Shocks.
Install Time: 15 minutes to 45 minutes.
It's a very common problem, especially in cold weather;... You open your hatch and it slams back down. Or even worse, you open your hatch, and lean in to get something and then it decides to fall back down on your head.
The Stock OEM Hatch Shocks on the 350z just don't last long,.. Aftermarket shocks can be had for well under $100 for a pair that are stronger and last longer. Many of these hatch shocks require you to remove your Brackets and Bolts from the Stock Factory shocks you have to Re-Use to mount the New Shocks onto.
Since I could never find a guide that was detailed enough for me I decided to go ahead and make a fairly detailed one myself when replacing mine.
This guide will show you how to go about doing this step by step with pictures and videos.
Safety First!
 (Seriously, when cutting the metal, I advise some glasses,.. anything is better than nothing.)
http://www.flickr.com/photos/111739693@N04/12080158236/
Start by Propping your Hatch up with A broom, Spade, Rake, whatever you can find - Even if your hatch stays up you will need this at some point. (This also helps take strain off the upper bolts when removing them.)
http://www.flickr.com/photos/111739693@N04/12079532385/
You will Need a 12mm regular Wrench (Or Small Crescent Wrench to remove the Upper Shock Bolt.)
Start by removing Upper Shock Bolts on each side.
http://www.flickr.com/photos/111739693@N04/12079494025/
Remove Lower Shock Brackets with a 10mm Socket.
http://www.flickr.com/photos/111739693@N04/12079929604/
The Shocks will easily come off with the Factory OEM Brackets still Attached at the Bottom, and Factory Bolts Attached at the Top.
http://www.flickr.com/photos/111739693@N04/12079823883/
http://www.flickr.com/photos/111739693@N04/12080167366/
Old Shocks OUT, Next to NEW Aftermarket Shocks (Notice you will have to cut the old Bolts and Brackets off to Re-Use on the New Shocks.) (You can purchase them with OEM Brackets so you don't have to cut the ones you already have out,.. So, if you don't have the tool(s) to cut metal, or don't feel comfortable doing so, then by all means, purchase new shocks with new Bolts/Brackets. That said, it really isn't hard to do.)
http://www.flickr.com/photos/111739693@N04/12080164846/
Grab your Dremel, Tablesaw, or whatever cutting tool you have and put on your Safety Glasses.
Here is a short Clip of using a Dremel with Metal Bit on the Factory Shocks.
Cut Down, then across, then Back up to allow the ball to come out.
http://www.flickr.com/photos/111739693@N04/12080173266/
Here is a good look at how I found it easiest to Cut to remove the Shocks from the Factory Brackets/Bolts.
http://www.flickr.com/photos/111739693@N04/12080161716/
You want to be Careful when doing this so you don't cut INTO the Ball on the Bracket/Bolts you will need to reuse. I found it easiest to Cut ALMOST to the ball joint but not quite, then using pliers to remove the cut piece. This ensures you won't damage the OEM/Factory Brackets/Bolts you will need to reuse.
http://www.flickr.com/photos/111739693@N04/12079830823/
Video of me using the Pliers to remove the piece cut just as described above. (It was a bit of a struggle because I was holding the camera with one hand,.. it won't be this difficult for you.
 )
)Remove Upper Bolt from your Old Shocks.
http://www.flickr.com/photos/111739693@N04/12080155296/
http://www.flickr.com/photos/111739693@N04/12080153346/
Remove Lower Bracket from your Old Shocks.
http://www.flickr.com/photos/111739693@N04/12080170146/
Make sure you Prop up the Hatch *high* enough to give adequate clearance when installing new Shocks.
http://www.flickr.com/photos/111739693@N04/12079519335/
Use a 12mm Wrench (Or long 12mm Socket) to Re-attach Upper Shock Bolts.
http://www.flickr.com/photos/111739693@N04/12080176026/
http://www.flickr.com/photos/111739693@N04/12079537135/
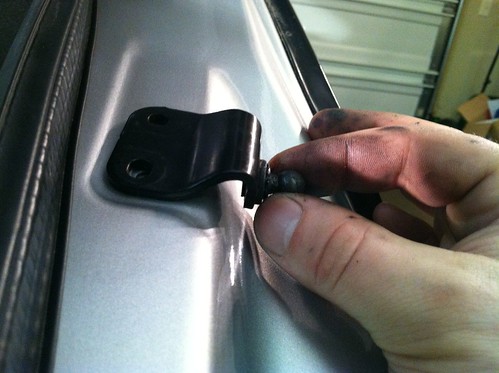
Now Re-Install the Lower Brackets with a 10mm Socket. Note the proper Placement of Lower Brackets.
*Important -- Make sure you Place these lower Brackets EXACTLY as shown in this picture!!
http://www.flickr.com/photos/111739693@N04/12079918004/
http://www.flickr.com/photos/111739693@N04/12079918004/
http://www.flickr.com/photos/111739693@N04/12079846623/
The Upper OEM Bolts and Lower OEM Brackets Re-Installed, should Look like this.
http://www.flickr.com/photos/111739693@N04/12079842863/
First Install Upper End of New Aftermarket Shocks.
http://www.flickr.com/photos/111739693@N04/12079520955/
Second Swing Lower End of New Shocks down to Lower Bracket. (They Easily Pop into place)
http://www.flickr.com/photos/111739693@N04/12079839493/
All Done! -- I used Stage 2 Aftermarket Shocks for a little more Pressure, Here is how your New Shocks should operate to a greater or lesser degree.
That's it. Very easy install that makes a world of difference! I chose to go with Stage 2 just out of preference. If you are deciding on Aftermarket shocks and have a factory spoiler, or no spoiler,.. you do not want Anything above Stage 2,.. and Stage 1 replacements are already stronger than the Factory Shocks were.
The higher stages are stronger/stiffer and are meant for heavier Spoilers/Wings. If you put a Stage 3 or 4 Aftermarket shock on your Hatch with a Stock spoiler it will be VERY difficult to close. Most people will be very happy with the regular Stage 1.
Discount Below:
I purchased my Aftermarket shocks from here: http://www.350zhatchshocksandmore.com/
The owner saw this DIY, and loves it. He said that if anyone from this forum orders,.. to put in the "notes" Section of your order "Chromatic DIY" and you will get a Discount on the price. (I am NOT affiliated with this company/website at all).
I didn't get a discount, but am happy he offered one to you guys!
Hope that helps,
Last edited by Chromatic; 01-23-2014 at 07:33 PM.

The following users liked this post:
PD27 (05-25-2018)
01-22-2014, 04:58 AM
#2
Registered User

A very handy 'how to' guide, I've read a couple of written descriptions of these before and they've not been very clear although if you have a modicum of engineering experience they're not that difficult. If you are short of engineering experience then this how to guide is brilliant, what with the short You Tube videos and the concise explanations it makes for a very easy job. A good job well done Chromatic.
01-22-2014, 10:13 AM
#3

By far one of the best DIY's that I've seen. Thanks for posting it! Looking to do this soon, but I think I'll stick with shocks that come with new brackets and studs. :P
01-23-2014, 05:13 PM
#4
A very handy 'how to' guide, I've read a couple of written descriptions of these before and they've not been very clear although if you have a modicum of engineering experience they're not that difficult. If you are short of engineering experience then this how to guide is brilliant, what with the short You Tube videos and the concise explanations it makes for a very easy job. A good job well done Chromatic.
) -- I thought a proper step by step guide including a good number of pictures and short video clips on the CUTTING of the OEM brackets and bolts would help some others who were a little on the fence about taking a power tool to their old shock's and brackets.I am long worded by default in text,.. but I did my best to keep this short and to the point.
While I've done a fair amount of "Fabrication work" which is what I call any of the work I do to cut up factory plastic, metal, wood, carpet, etc to make things work -- Many people will be doing this work for the first time (especially the cutting of the OEM shocks to get the brackets/bolts out to use on the new ones.)
Personally, I would say it is 100% worth it to go out and buy a a Dremel (name brand or knock off) and if it didn't come with a metal attachment, grab one for $5-$7. Now this Dremel and attachment(s) may set you back $30-$50 depending on brand and where you buy it (online, vs. store) -- But a Dremel is the BEST universal tool I have .. hands down. I didn't start using one until about a year ago,.. and it has paid for itself 100 times over right now.. It's like 100+ tools in one!
But Life,.. Don't be scared to cut off the OEM bracket/bolts which as in my video/DIY it shows exactly who to cut .. and I don't even cut all the way to the ball that's inside.. I get close.. then as in my shaky "hold camera in left hand.. try to use pliers with right hand video.." you saw how easy it was to pull that piece off and get the bracket out. Very little effort involved.
If you don't have a Dremel (as I said, it' SO handy from cutting plastic, metal, wood, sanding, drilling, it's the best tool I have imo) It wouldn't be a "one use" purchase.. I promise you'd be doing things later on and think.. oh YEAH I have that dremel and so on.
But, I totally understand if you just don't want to hassle with the cutting.. and can find a good deal on one WITH brackets/bolts included.
I bought my aftermarket (stronger) shocks from here: http://www.350zhatchshocksandmore.com/
They have Stage 1, 2, 3, and 4. I recommend Stage 1 for regular factory spoilers, or no spoiler. I used Stage 2, and have a factory spoiler.. it's a little tougher to close,... but not a big deal for me being tall. But I know Stage 1 would have been just as good (it's already something like 30-40% stronger than the factory even at stage 1).
I mention that place because he also has a "program" where he will send you brackets and bolts.. then you cut yours off your old ones and send yours back to him at no extra cost. It's an option, and if happen to mess yours up (which you shouldn't with this guide).. it's no big deal.
If anyone has any questions about this Install.. don't hesitate to ask.
Take care,
01-23-2014, 06:03 PM
#5

Only thing I would emphasize is the placement of the lower strut mounts on the quarter panels. Make sure that they go as pictured. I put mine on upside down on accident and it caused the top of my hatch to not line up with the roof and left small dents (extremely unnoticeable to anyone but me) on the inside of my hatch.
01-23-2014, 07:16 PM
#6
Only thing I would emphasize is the placement of the lower strut mounts on the quarter panels. Make sure that they go as pictured. I put mine on upside down on accident and it caused the top of my hatch to not line up with the roof and left small dents (extremely unnoticeable to anyone but me) on the inside of my hatch.
This is the picture I used in the DIY, just showing the placement of the lower Brackets "strut mounts" with my dirty fingers.. The upper bolts I didn't do this as they only go in one way and are universal (work on both sides).
I'll go back and edit it.. to emphasize that a little more "in your face"


Trending Topics
01-23-2014, 07:56 PM
#8
The shocks on my 2008 350Z with 26k miles would hold after I pumped the hatch up and down 10 times or so from anywhere from 5 seconds to 5 minutes on a good day.. After the hatch fell on my head 3 times.. this was on my list, and on my list to do fast lol. I had and have more work that requires that hatch to be up (will be installing a reverse camera tomorrow afternoon after work.. so am glad I don't have to worry about the hatch falling on me now
 ).
).Hopefully this will benefit many Z owners in the future if they run across it.
01-23-2014, 08:49 PM
#10
Thanks Waizzz! It's such a common "mod" or fix that plagues most 350Z's eventually (Mine only had 26k miles and the shocks were dead.. and that was a 2008 350Z.. So I don't think Nissan "fixed" it in the 350Z's anyway..) So Pretty much every owner will have , oh I dunno, a 75% chance of needing to do this at some point if it wasn't done before or their factory shocks are in the minority that never get weak.
The shocks on my 2008 350Z with 26k miles would hold after I pumped the hatch up and down 10 times or so from anywhere from 5 seconds to 5 minutes on a good day.. After the hatch fell on my head 3 times.. this was on my list, and on my list to do fast lol. I had and have more work that requires that hatch to be up (will be installing a reverse camera tomorrow afternoon after work.. so am glad I don't have to worry about the hatch falling on me now ).
Hopefully this will benefit many Z owners in the future if they run across it.
The shocks on my 2008 350Z with 26k miles would hold after I pumped the hatch up and down 10 times or so from anywhere from 5 seconds to 5 minutes on a good day.. After the hatch fell on my head 3 times.. this was on my list, and on my list to do fast lol. I had and have more work that requires that hatch to be up (will be installing a reverse camera tomorrow afternoon after work.. so am glad I don't have to worry about the hatch falling on me now
).Hopefully this will benefit many Z owners in the future if they run across it.

I only made the issue worse by installing my NISMO V1 wing on the hatch
 01-23-2014, 11:09 PM
#11
But, once you do it ,.. it's forever in the "interwebs" on this site for people to find when searching. DIY's have saved me a ton of money, and on other cars.. I've used info from DIY's and such on forums to fix problems with cars I've had that master mechanics couldn't figure out, as on these types of forums people get to REALLY know every nut and bolt of the particular car -- where it's just not possible to do that with every make and model and year of car of the past 40+ years as a general master mechanic.
Thanks for the skimmed compliment.

Just a few weeks/month ago when I had the whole interior (literally) every panel.. out of the car .. I'd have the hatch up for more light inside with the tinted windows I have,.. and I'd go work on something else to the side,.. or browse the net for a part, wiring diagram etc... and the hatch would randomly SLAM down.. and scare the bejesus out of me every single time!
Yah, putting a heavy wing/spoiler makes it much much worse. But, with the higher stage shocks like I linked in the original post take care of that. You have the stronger aftermarket shocks on yours I assume? I know the stage 3 or stage 4 shocks would more than keep that hatch up with any spoiler out there -- The stage 4 holds something like 50-75lbs+ (in addition to the hatch weight). These stage 2 I have on mine are ridiculously strong,.. if I wasn't 6ft and fairly strong I could see where even these could be an issue for a small woman, or small man even trying to get their hatch down. lol..
I decided to go Stage 2 just to give it more life.. but Stage 1 is 30-50% stronger than OEM,.. so if I went stage 1 I doubt I'd have any issues.
I just went and priced out those 2 springs that pop the hatch.. cause mine catches sometimes,.. and WOW,.. $30 a piece. These little pieces are nickle and diming me to death. I went ahead and ordered it, cause I don't like to "rig" up my car to be honest.. A car is like your body, your house, or anything else -- You have to maintain it for it to stay in good shape.. You start rigging everything half-*** and down the road you end up with a car that is a POS, at least everything but the drive-train. I know, I've seen plenty of friends and people who've done that.
My philosophy is to do it right the first time (of course money allowing...) -- If I didn't have the funds to cover some parts, I'd just save up a little while until I did to buy them instead of spending say 1/4th or 1/2th the money on a rig.
Now I know the Penny "mod" is literally 4 cents lol.. but I've read enough to see it wears out as well,.. I'm really surprised no company has made some stronger/stiffer springs and sells them for say $50 a pair.. (which is still cheaper than the OEM for 2 springs). I may hunt around for some better proper springs.. and break out the welder and fabricate my own. If they turn out well I'll sell them here for cheap, because there just aren't any others out there but the OEM ones. Would really help with those, like you, with the heavier spoilers.
01-25-2014, 10:25 PM
#12
Very good point. I tried to make an emphasis on this in the DIY -- Maybe I need to make it stand out a little more.
This is the picture I used in the DIY, just showing the placement of the lower Brackets "strut mounts" with my dirty fingers.. The upper bolts I didn't do this as they only go in one way and are universal (work on both sides).
I'll go back and edit it.. to emphasize that a little more "in your face"
props for an extremely good write up and for being open minded for suggestions
01-26-2014, 02:13 AM
#13
I'm not the stubborn "know-it-all" some people think I am because I ask so many questions then reply with some of my own thoughts as well. I take peoples advice and use it. If you run through all I've done to this car in about 6 weeks since I bought it,.. I think I've taken advice and ran with it!
I've just about exhausted every Stereo/System/Electrical type modification inside.. So I'm getting that "Performance" mod itch.. So here we go down that path..


Thread
Thread Starter
Forum
Replies
Last Post