DIY - Lower Control Arm Bushing Replacement - Translink
 09-24-2011, 07:08 PM
#121

Now I get to do this....
Just found this today while changing my oil. (Both sides!!)
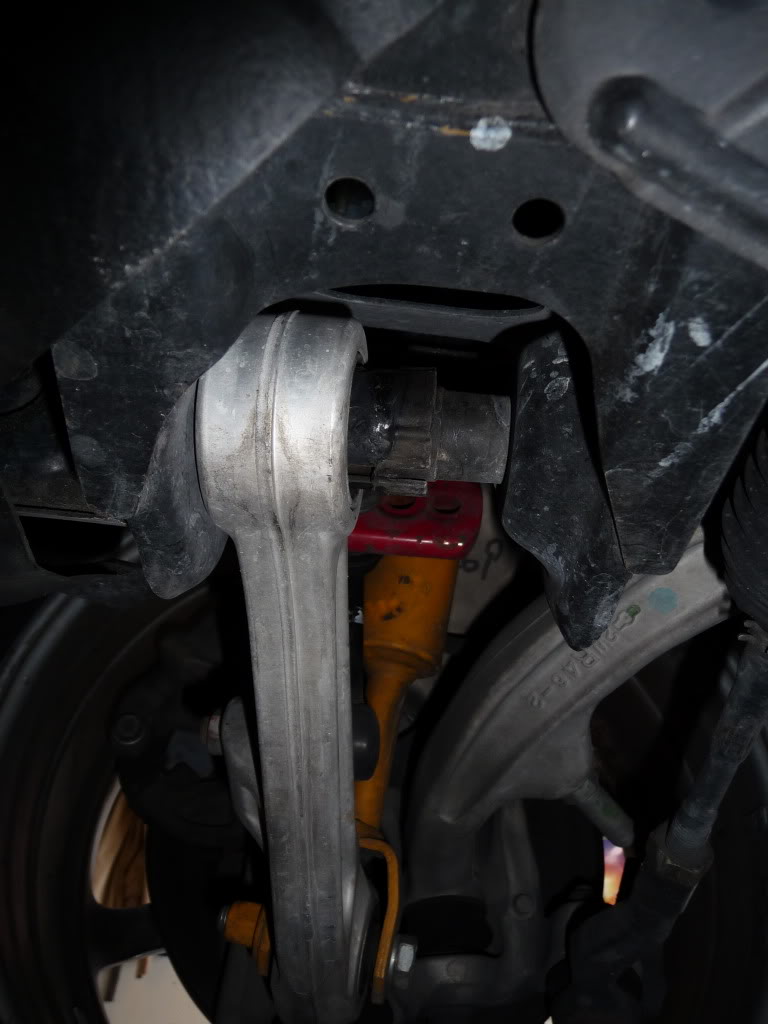
I'm considering SPL. Do they now come with a "bushing tool" like the kit for the diff does? Or do I need to get a 29mm socket?
I think I might just buy a press too....
Grrrr. I have an event in a week and I can't see this getting fixed by then.
Just found this today while changing my oil. (Both sides!!)
I'm considering SPL. Do they now come with a "bushing tool" like the kit for the diff does? Or do I need to get a 29mm socket?
I think I might just buy a press too....
Grrrr. I have an event in a week and I can't see this getting fixed by then.
Last edited by Z1NONLY; 09-24-2011 at 07:09 PM.
 09-24-2011, 07:22 PM
#122
350Z-holic

Thread Starter
iTrader: (60)
Join Date: Jan 2006
Location: San Antonio/I miss DFW, TX
Posts: 11,204
Likes: 0
Received 28 Likes
on
19 Posts
^ The SPL inner bushings are super super easy to install...
see, the spl cone ends simply come off, so you can get any flat piece of metal and press them into the arm. then once the spl bushing is in the arm you then just slide the two cone ends - one on each side - into the bushing and your done!.
- Remember, in order to remove the oem bushing race out of the arm your gonna need the solid 1.50 inch piece to press it out.
This piece: - found at any metal supply store - call around.

-J
see, the spl cone ends simply come off, so you can get any flat piece of metal and press them into the arm. then once the spl bushing is in the arm you then just slide the two cone ends - one on each side - into the bushing and your done!.
- Remember, in order to remove the oem bushing race out of the arm your gonna need the solid 1.50 inch piece to press it out.
This piece: - found at any metal supply store - call around.
-J
09-25-2011, 09:53 AM
#123
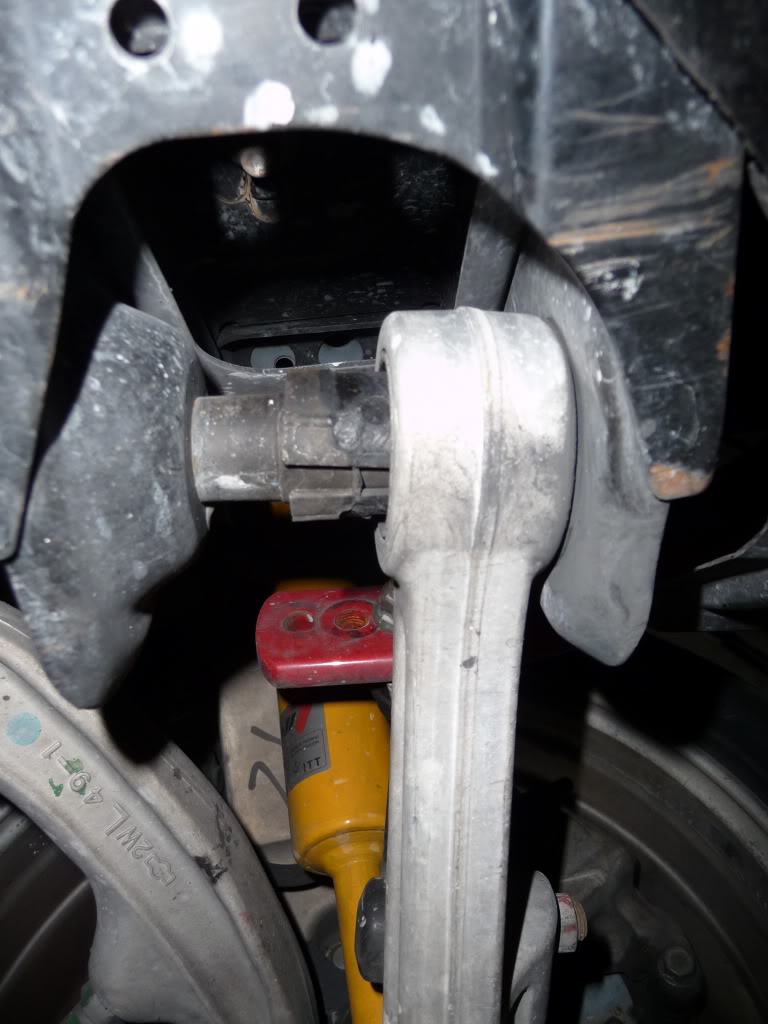
Thanks. I just removed both of the arms. I'm thinking I might be able to get the new bushings on during the week sometime.
I'll call a few vendors tomorrow and see who has what, and at what price.
The Whitelines are a good bit cheaper from what I can find online, but maybe someone will give me a good deal on the SPL's. (I already have the A-arms and diff set.)
Do I need to torque Whitelines after I drop the car so I don't "twist" them?
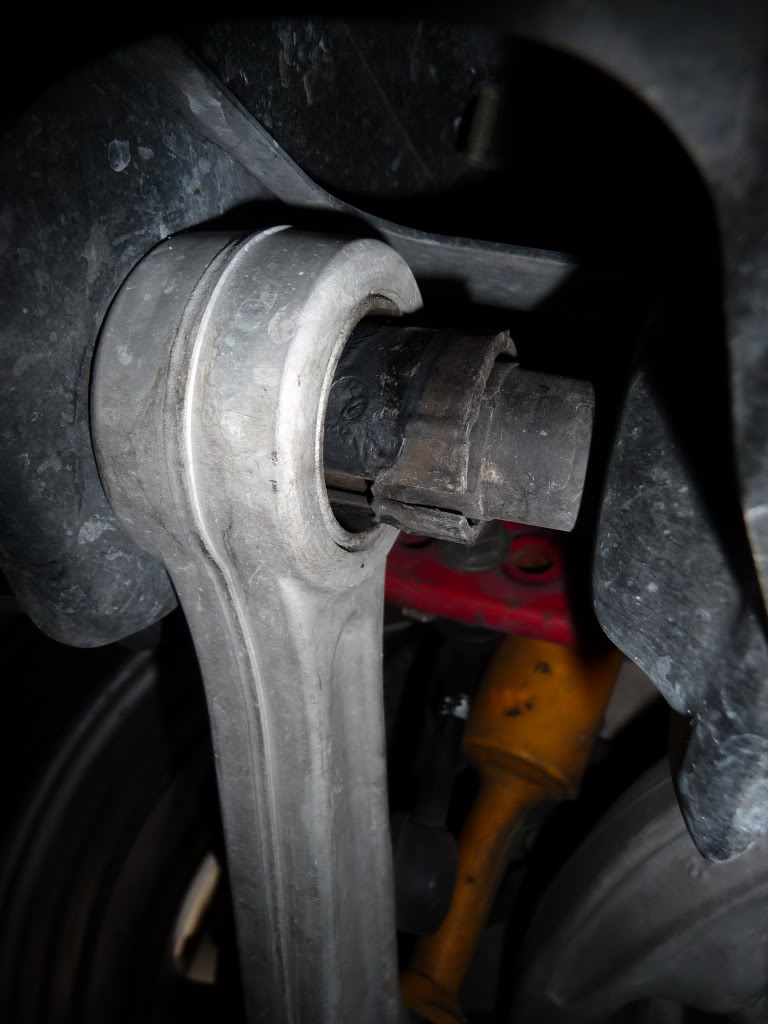
BTW, that inner bolt was on there TIGHT...on both sides! Wow. There was some metal-on-metal too.
I'll call a few vendors tomorrow and see who has what, and at what price.
The Whitelines are a good bit cheaper from what I can find online, but maybe someone will give me a good deal on the SPL's. (I already have the A-arms and diff set.)
Do I need to torque Whitelines after I drop the car so I don't "twist" them?
BTW, that inner bolt was on there TIGHT...on both sides! Wow. There was some metal-on-metal too.
Last edited by Z1NONLY; 09-25-2011 at 09:55 AM.
09-26-2011, 08:24 AM
#125
350Z-holic
Thread Starter
iTrader: (60)
Join Date: Jan 2006
Location: San Antonio/I miss DFW, TX
Posts: 11,204
Likes: 0
Received 28 Likes
on
19 Posts
sure DOM tubing can be used, but then you need something to bridge the top...notice how the solid cylinder in the picture has the press pushing directly onto it.....
so yes, if you choose to get DOM "tubing" then you need 1.5 outter, but must have a plate or something to go over top to use it as a press tool..since its hollow centered.
-J
09-26-2011, 08:34 AM
#126
350Z-holic
Thread Starter
iTrader: (60)
Join Date: Jan 2006
Location: San Antonio/I miss DFW, TX
Posts: 11,204
Likes: 0
Received 28 Likes
on
19 Posts
See here again......
PICS:
This later install for a friend was by far the easiest white line install due to using the aluminum press tool:
Aluminum Solid 1.5 diameter rod ~ about 1.5 inch tall:


There it goes:

Get r done:

Now the end one:
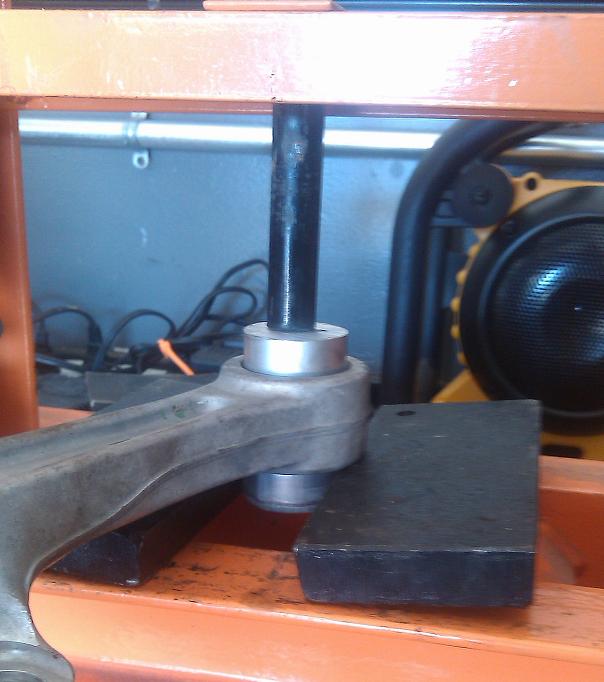
With this sharp edge (band saw cut) 1.5" diameter SOLID rod of aluminum the removal process took 5 minutes tops for all 4 locations!
-J
PICS:
This later install for a friend was by far the easiest white line install due to using the aluminum press tool:
Aluminum Solid 1.5 diameter rod ~ about 1.5 inch tall:
There it goes:
Get r done:
Now the end one:
With this sharp edge (band saw cut) 1.5" diameter SOLID rod of aluminum the removal process took 5 minutes tops for all 4 locations!
-J
09-26-2011, 08:57 AM
#127
Thanks but I'm now looking at getting the whiteline's and I would like to fabricate a single tool to do extraction as well as pressing the new bushings in.
The whitelines will need something like your franken socket, so that's what I'm trying to fabricate.
BTW, Do I need to drop the car first. Then torque the bolts on the bushings? I know the SPL's don't care, but I don't want to "twist" the whitelines by getting them tight with the suspension fully extended and then twist them once I put the car back on the floor.
09-26-2011, 10:08 AM
#128
350Z-holic
Thread Starter
iTrader: (60)
Join Date: Jan 2006
Location: San Antonio/I miss DFW, TX
Posts: 11,204
Likes: 0
Received 28 Likes
on
19 Posts
but that same tool, will be too big to use as the removal too....to remove you need 1.5 Outter diameter or again like i mentioned a solid 1.5 cylinder piece to press out the old race.
again, you need two. please read post 5, 6 and7 again.
Post 5 talks about removing the old bushings
post 6 talks about fabricating the frank socket.
Post 7 Talks about installing the whiteline bushing - with franksocket.
it will be fine..
-J
09-26-2011, 10:46 AM
#129
OKAY, NOW TAKE A LOOK AT THE NEW BUSHING! IN MY CASE I PURCHASED THE WHITELINE BUSHINGS FROM A VENDOR ON OUR SITE.
AS YOU CAN SEE YOU CANT USE THE 29MM SOCKET TO NOW PRESS IN THE NEW BUSHINGS MAINLY BECAUSE THE THICKER RUBBER BUSHING WONT SLIP INSIDE THE 29MM SOCKET........
CRAP! FK, SHEIT, DAMMN IT!!!
WELL, AFTER HAVING TAKEN THE MEASUREMENTS EARLIER I WENT TO MY LOCAL STEEL SUPPLY AND PURCHASED A $5 BUCK - 6 INCH PIECE OF DOM STEEL HOLLOW BAR WITH AN INSIDE DIAMETER OF 1.5 INCH.
IF YOU RECALL:
See the translink bushing race i measured with my digital calipers as inner diameter 1.44 inch and outer diameter 1.57 inch.
(1.44/1.57)inch
or
35.5/39.8)mm
SO 1.5 INCH INNER DIAMETER DOM WOULD WORK PERFECT!
SO IN ORDER TO USE THE HOLLOW BAR AS A PRESS JIG TOOL I DECIDED TO MAKE WHAT I CALL MY "FRANKENSTEIN SOCKET"
LOL......
read my post again - I am recommending a SOLID piece of aluminum ROD (cylindrical piece) that is 1.5" diameter.
sure DOM tubing can be used, but then you need something to bridge the top...notice how the solid cylinder in the picture has the press pushing directly onto it.....
so yes, if you choose to get DOM "tubing" then you need 1.5 outter, but must have a plate or something to go over top to use it as a press tool..since its hollow centered.
-J
Your original post mentioned 1.5" inner. I'm being told DOM is measured by outer diameter rather than inner diameter.
So my hunt for Bigfoot continues.

Last edited by Z1NONLY; 09-26-2011 at 03:21 PM.
09-26-2011, 06:38 PM
#130
350Z-holic
Thread Starter
iTrader: (60)
Join Date: Jan 2006
Location: San Antonio/I miss DFW, TX
Posts: 11,204
Likes: 0
Received 28 Likes
on
19 Posts
ok, go buy a 2 inch outter diameter DOM steel tube, and ask for .25 inch wall.
they may also call that 11 gauge, but usually 11 gauge is .120" so i would do your best to find .25 inch wall on a 2.0 inch outter dia DOM.
happy trails....
-J
they may also call that 11 gauge, but usually 11 gauge is .120" so i would do your best to find .25 inch wall on a 2.0 inch outter dia DOM.
happy trails....
-J
09-29-2011, 03:11 PM
#132
Done!
Thanks again Jason. Without a helpful DIY thread like this one, I probably would have spent hundreds paying someone else to do the work.
I do have something to add that Sean at Precision Z Service mentioned.
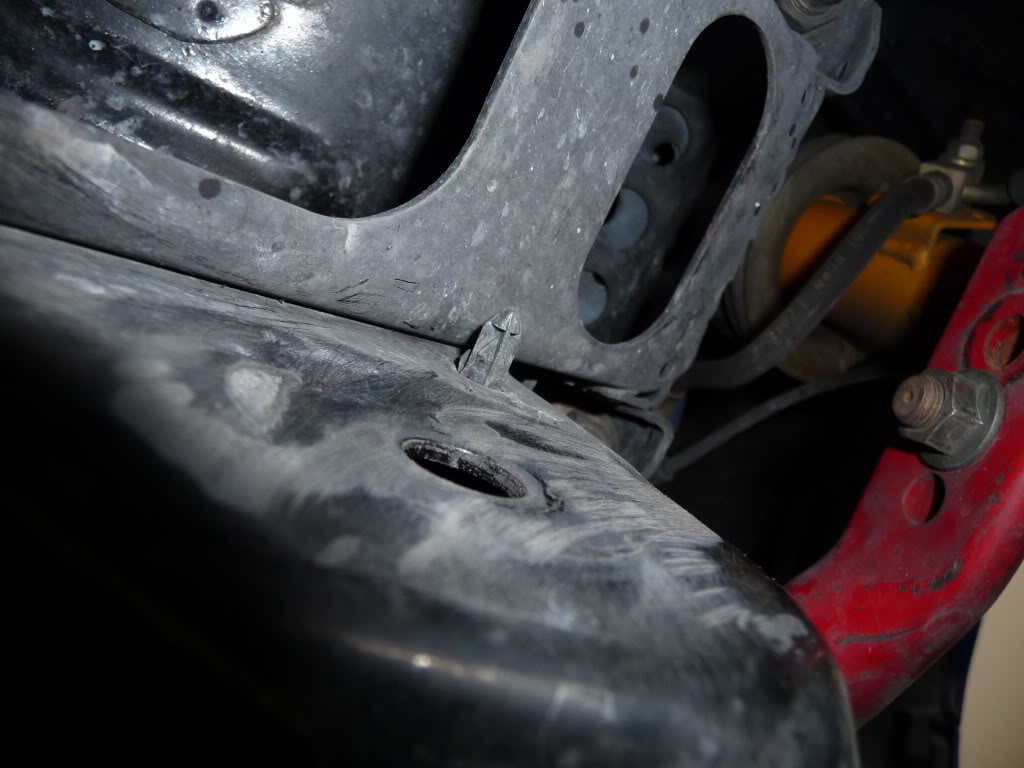
The inner mounting points on my 05 have these "nubs" two on each side of each mounting point for a total of 8.
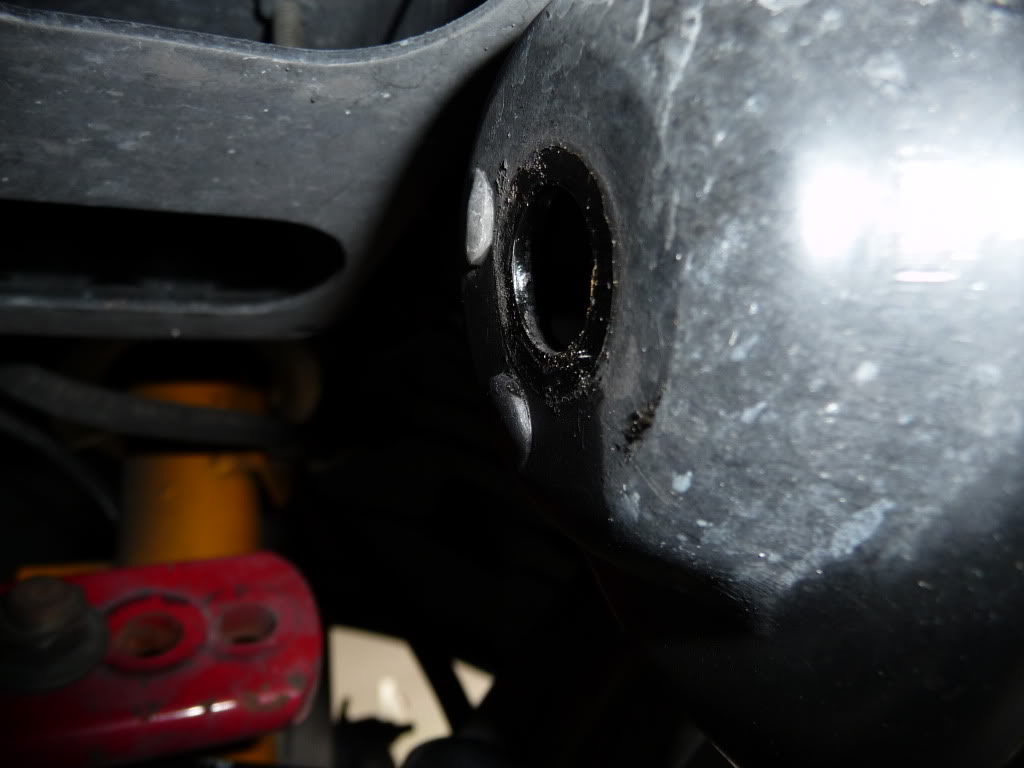
He recommended that I grind these smooth so the bushing movement won't be impeded. He said the stock shocks have something like these and he recommended grinding those smooth too, but my Koni's didn't have them.
So...
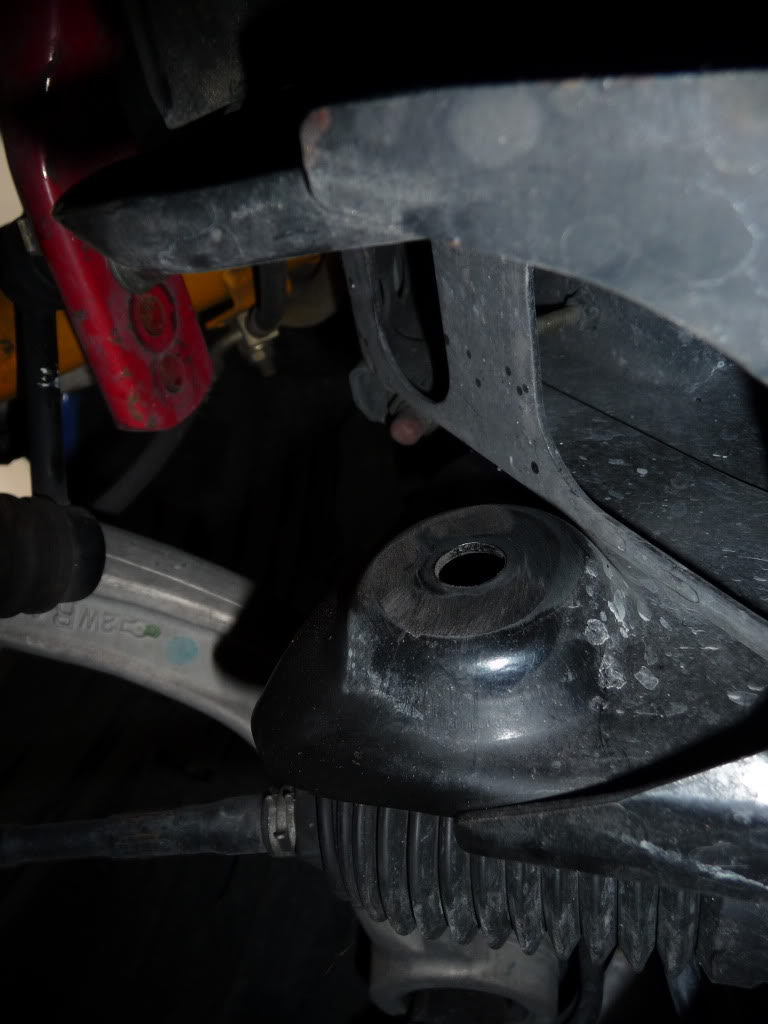
And of course I used the included grease to lube all metal to bushing contact.
Ta Da!


Thanks again Jason. Without a helpful DIY thread like this one, I probably would have spent hundreds paying someone else to do the work.
I do have something to add that Sean at Precision Z Service mentioned.
The inner mounting points on my 05 have these "nubs" two on each side of each mounting point for a total of 8.
He recommended that I grind these smooth so the bushing movement won't be impeded. He said the stock shocks have something like these and he recommended grinding those smooth too, but my Koni's didn't have them.
So...
And of course I used the included grease to lube all metal to bushing contact.
Ta Da!
 10-20-2011, 11:29 AM
#134
Registered User
iTrader: (3)

Join Date: Jan 2006
Location: OC
Posts: 356
Likes: 0
Received 0 Likes
on
0 Posts
Hey dudes,
I had an alignment done today on my 2005 Z, and upon inspection, the tech told me that my front lower control arm bushings are starting to show cracks. I've only got 38k miles on my Z, but time wise, it is 6 years old so that might be the reason why so soon (I think?) It's a daily driver and garaged every night though.
Anyway, so I'm planning on following your DIY and replacing my bushings soon with some good aftermarket ones. What I wanted to know is: if and when I replace the bushings, will I need another alignment?
The guy who did my alignment said that if I go to him for my bushing install (which he'll charge me $120) he will do another front alignment for free if I do it soon. So I figured I'll just do my own bushing replacement, but wondered if I'll need another alignment.
Thanks guys!
10-20-2011, 12:38 PM
#135
yes, you should re-align you car after major work like this
Hey dudes,
I had an alignment done today on my 2005 Z, and upon inspection, the tech told me that my front lower control arm bushings are starting to show cracks. I've only got 38k miles on my Z, but time wise, it is 6 years old so that might be the reason why so soon (I think?) It's a daily driver and garaged every night though.
Anyway, so I'm planning on following your DIY and replacing my bushings soon with some good aftermarket ones. What I wanted to know is: if and when I replace the bushings, will I need another alignment?
The guy who did my alignment said that if I go to him for my bushing install (which he'll charge me $120) he will do another front alignment for free if I do it soon. So I figured I'll just do my own bushing replacement, but wondered if I'll need another alignment.
Thanks guys!
I had an alignment done today on my 2005 Z, and upon inspection, the tech told me that my front lower control arm bushings are starting to show cracks. I've only got 38k miles on my Z, but time wise, it is 6 years old so that might be the reason why so soon (I think?) It's a daily driver and garaged every night though.
Anyway, so I'm planning on following your DIY and replacing my bushings soon with some good aftermarket ones. What I wanted to know is: if and when I replace the bushings, will I need another alignment?
The guy who did my alignment said that if I go to him for my bushing install (which he'll charge me $120) he will do another front alignment for free if I do it soon. So I figured I'll just do my own bushing replacement, but wondered if I'll need another alignment.
Thanks guys!

 01-09-2012, 08:17 AM
#140
Registered User

Join Date: Jan 2012
Location: Denton, TX
Posts: 3
Likes: 0
Received 0 Likes
on
0 Posts