DIY - Lower Control Arm Bushing Replacement - Translink
 10-19-2009, 07:22 PM
#1
350Z-holic

Thread Starter
iTrader: (60)
Join Date: Jan 2006
Location: San Antonio/I miss DFW, TX
Posts: 11,204
Likes: 0
Received 28 Likes
on
19 Posts
Okay boys and girls today we are going to replace the very common LOWER CONTROL ARM inner bushing, which is a typical failure at the lower control arm (aka Translink).
Nissan manual calls this lower control arm the "Transverse link" so we will too.
It's a known thing that the 350z will eventually have this inner bushing failure most common once mileage hits about 75K and up. Mine went at 80k and was driver side - passenger side was tearing but not torn and gone like my driver side was.
UPDATE:
I have had people ask me: If you want, you can send me your arms and I can press them out! So long as you can let the front of your car sit on jack stands. I don't mind as I already have all the right pieces of steel, press, etc...PM me as I'm a busy person.
QUESTION: UH OH, I never heard of this?? how do i check this? oh crap, wow wow, what do i do...??
Answer: Raise car or poke head under your car and look for this:

^not my car, but posted so peeps know what to look for!
The Translink is supposed to be centered. Now, you dont want to wait long to replace this bushing as the metal to metal contact will wear your soft cast aluminum translink and you will see wear indcations that can lead to failure at some point.
Here is a pic of a turbo install on a Z where you can see the translink installed really well for reference:

Factory Service manual inspection criteria for Translink:

See how for nissan dealerships its a remove and replace item in WHOLE, not a replace bushing, luckily we have whiteline and spl, etc that make this bushing for us to avoid having to purchase a complete new TRANSLINK with more crappy oem bushings.
Factory service manual showing Torque specs:

FSM LINK - http://www.nicoclub.com/FSM/350Z/
Pics attached below in case image hosting ever dies!........
-J
Nissan manual calls this lower control arm the "Transverse link" so we will too.
It's a known thing that the 350z will eventually have this inner bushing failure most common once mileage hits about 75K and up. Mine went at 80k and was driver side - passenger side was tearing but not torn and gone like my driver side was.
UPDATE:
I have had people ask me: If you want, you can send me your arms and I can press them out! So long as you can let the front of your car sit on jack stands. I don't mind as I already have all the right pieces of steel, press, etc...PM me as I'm a busy person.
QUESTION: UH OH, I never heard of this?? how do i check this? oh crap, wow wow, what do i do...??
Answer: Raise car or poke head under your car and look for this:
^not my car, but posted so peeps know what to look for!
The Translink is supposed to be centered. Now, you dont want to wait long to replace this bushing as the metal to metal contact will wear your soft cast aluminum translink and you will see wear indcations that can lead to failure at some point.
Here is a pic of a turbo install on a Z where you can see the translink installed really well for reference:
Factory Service manual inspection criteria for Translink:
See how for nissan dealerships its a remove and replace item in WHOLE, not a replace bushing, luckily we have whiteline and spl, etc that make this bushing for us to avoid having to purchase a complete new TRANSLINK with more crappy oem bushings.
Factory service manual showing Torque specs:
FSM LINK - http://www.nicoclub.com/FSM/350Z/
Pics attached below in case image hosting ever dies!........
-J
Last edited by JasonZ-YA; 09-07-2010 at 06:55 PM.
 10-19-2009, 07:23 PM
#2
350Z-holic
Thread Starter
iTrader: (60)
Join Date: Jan 2006
Location: San Antonio/I miss DFW, TX
Posts: 11,204
Likes: 0
Received 28 Likes
on
19 Posts
Okay this pic shows the translink and the positions we can later refer to if needed.

Position 1 - Transverse link to steering knuckle - Ball joint in knuckle here - :See this thread:
Position 2 - Transverse link to suspension lower lug (Whiteline p/n W52992)
Position 3 - Transverse link and sway bar endlink - no bushing here, just endlink mount point M12x1.25 bolt on endlink.
Position 4 - Transverse link and K-member (inner bushing failure point) (Whiteline p/n W52991)
ITS BEST TO JACK THE FRONT OF THE CAR UP AS HIGH AS POSSIBLE IN ORDER TO HAVE SOME BREAKERBAR PUSH/PULL ROOM VERSUS HITTING THE GROUND WITH YOUR BREAKER BAR WHEN YOUR CRANKING DOWN ON BOLTS/NUTS TO REMOVE THEM. 12 POINT SOCKETS ARE HELPFUL TOO OF COURSE.
PB BLASTER IS RECOMMENDED PRIOR TO STARTING THE JOB, BUT MAY NOT BE NEEDED.......I USED SOME, MADE IT EASY BREEZY...
For all bolts, nuts, i only loosed them all and then once all 4 positions were loose, then i removed them. Remember the suspension is a moving/dynamic portion of your car, if you remove say position 4 first, then try with all your might to fight the others your gonna have mega movement and be finding yourself putting the bolt back through position 4 just to get some elbow grease on the other positions. get it?
either way, remove all hardware at all positions to get the Translink out....
I started with position 2, coilover to translink position.


As you can see, i used a ratcheting breaker bar on the nut(front) and a goose neck/offset wrench on the (aft/back) side.
Then i did the end link, I used an adjustable wrench just cause it was there, but a 19mm open ended wrench will work and is needed to keep the end link internals from spinning while you torque on the nut with the breaker bar.

Of course and impact could probably do this as well...
-J
Position 1 - Transverse link to steering knuckle - Ball joint in knuckle here - :See this thread:
Position 2 - Transverse link to suspension lower lug (Whiteline p/n W52992)
Position 3 - Transverse link and sway bar endlink - no bushing here, just endlink mount point M12x1.25 bolt on endlink.
Position 4 - Transverse link and K-member (inner bushing failure point) (Whiteline p/n W52991)
ITS BEST TO JACK THE FRONT OF THE CAR UP AS HIGH AS POSSIBLE IN ORDER TO HAVE SOME BREAKERBAR PUSH/PULL ROOM VERSUS HITTING THE GROUND WITH YOUR BREAKER BAR WHEN YOUR CRANKING DOWN ON BOLTS/NUTS TO REMOVE THEM. 12 POINT SOCKETS ARE HELPFUL TOO OF COURSE.
PB BLASTER IS RECOMMENDED PRIOR TO STARTING THE JOB, BUT MAY NOT BE NEEDED.......I USED SOME, MADE IT EASY BREEZY...
For all bolts, nuts, i only loosed them all and then once all 4 positions were loose, then i removed them. Remember the suspension is a moving/dynamic portion of your car, if you remove say position 4 first, then try with all your might to fight the others your gonna have mega movement and be finding yourself putting the bolt back through position 4 just to get some elbow grease on the other positions. get it?
either way, remove all hardware at all positions to get the Translink out....
I started with position 2, coilover to translink position.
As you can see, i used a ratcheting breaker bar on the nut(front) and a goose neck/offset wrench on the (aft/back) side.
Then i did the end link, I used an adjustable wrench just cause it was there, but a 19mm open ended wrench will work and is needed to keep the end link internals from spinning while you torque on the nut with the breaker bar.
Of course and impact could probably do this as well...
-J
Last edited by JasonZ-YA; 12-05-2010 at 04:21 PM.
10-19-2009, 07:27 PM
#3
350Z-holic
Thread Starter
iTrader: (60)
Join Date: Jan 2006
Location: San Antonio/I miss DFW, TX
Posts: 11,204
Likes: 0
Received 28 Likes
on
19 Posts
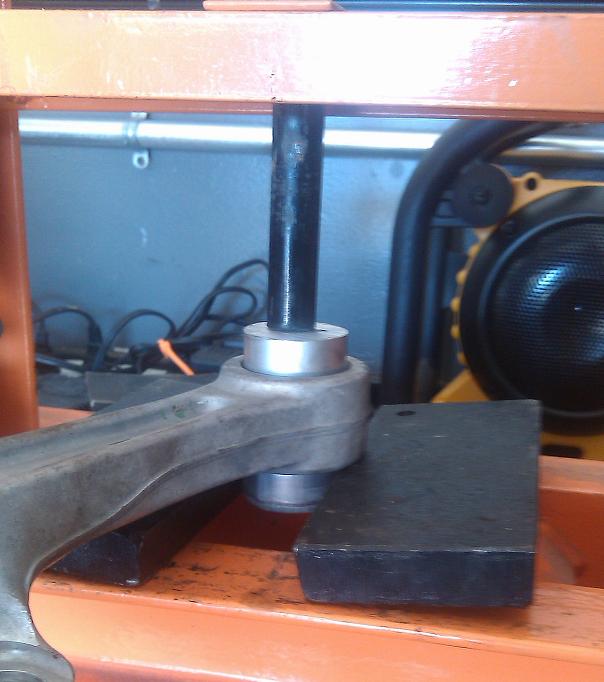
Next i went to position 4 and loosened the inner bushing bolt and nut.


As you can see its really nice to have gooseneck/offset wrenches as the steel stamped flanges of the lug off the K-member get in the way. Now you can use a breaker bar, but you need to use a short stack up one, or a 3/8 inch breaker bar with a short 19mm socket. see the steering rack is in the way for anything bigger!
Lastly i went to position 1 - Translink to steering knuckle position.
As you can see you must remove a cotter pin (Discard and replace later with a new one).

Then I used a typical ratchet with a 8 inch extension and 19mm socket:
EDIT - I did this install on an Automatic Roadster and position 1 nut with cotter pin was a 22mm hex socket was needed... just some FYI.

AFTER ALL OF THAT, THEN I REMOVED ALL THE BOLTS BY HAND. since i only loosened and had not removed anything yet to make the loosening process easiest on me.
EDIT - I did this install on an Automatic Roadster and position 1 nut with cotter pin was a 22mm hex socket was needed... just some FYI.
As you can see its really nice to have gooseneck/offset wrenches as the steel stamped flanges of the lug off the K-member get in the way. Now you can use a breaker bar, but you need to use a short stack up one, or a 3/8 inch breaker bar with a short 19mm socket. see the steering rack is in the way for anything bigger!
Lastly i went to position 1 - Translink to steering knuckle position.
As you can see you must remove a cotter pin (Discard and replace later with a new one).
Then I used a typical ratchet with a 8 inch extension and 19mm socket:
EDIT - I did this install on an Automatic Roadster and position 1 nut with cotter pin was a 22mm hex socket was needed... just some FYI.
AFTER ALL OF THAT, THEN I REMOVED ALL THE BOLTS BY HAND. since i only loosened and had not removed anything yet to make the loosening process easiest on me.
EDIT - I did this install on an Automatic Roadster and position 1 nut with cotter pin was a 22mm hex socket was needed... just some FYI.
Last edited by JasonZ-YA; 01-26-2011 at 11:57 AM.
10-19-2009, 07:31 PM
#4
350Z-holic
Thread Starter
iTrader: (60)
Join Date: Jan 2006
Location: San Antonio/I miss DFW, TX
Posts: 11,204
Likes: 0
Received 28 Likes
on
19 Posts
Now its press time!
I have a inexpensive hobby press from harbor freight:

Mine I believe is Harbor Freight ITEM NUMBER - 1666-4VGA
http://www.harborfreight.com/cpi/cta...temnumber=1666
You can find them on sale there for $24.99 quite often.
Next:
Since the bushing was torn and looked like the pic in post #1, I simply grabbed the bushing and yanked it out.

However the bushing race was still in the TRANSLINK, so i got a 29mm socket from sears and was able to use that as my press tool.
See the translink bushing race i measured with my digital calipers as inner diameter 1.44 inch and outter diameter 1.57 inch.
(1.44/1.57)inch
or
35.5/39.8)mm
approximately....
So since my 28mm socket was too small and didnt work and my 30mm socket was too big, i went to sears for a 29mm SOCKET and sure enough it was sized just right to be used as the press tool to get the oem bushing out......
Sears 29mm Socket:
http://www.sears.com/shc/s/p_10153_1...0070921x00003a
UPDATE:
I have recently gone to my local metal supply warehouse and purchased a 1.5" diameter solid aluminum rod that was band saw cut to a height of about 1.5" as well.
This has been by far the best press (removal) tool since it has a sharp edge and not a rounded tip edge like a socket.
PICS:
This later install for a friend was by far the easiest white line install due to using the aluminum press tool:
Aluminum Solid 1.5 diameter rod ~ about 1.5 inch tall:


There it goes:

Get r done:

Now the end one:
With this sharp edge (band saw cut) 1.5" diameter SOLID rod of aluminum the removal process took 5 minutes tops for all 4 locations!
-J
I have a inexpensive hobby press from harbor freight:
Mine I believe is Harbor Freight ITEM NUMBER - 1666-4VGA
http://www.harborfreight.com/cpi/cta...temnumber=1666
You can find them on sale there for $24.99 quite often.
Next:
Since the bushing was torn and looked like the pic in post #1, I simply grabbed the bushing and yanked it out.
However the bushing race was still in the TRANSLINK, so i got a 29mm socket from sears and was able to use that as my press tool.
See the translink bushing race i measured with my digital calipers as inner diameter 1.44 inch and outter diameter 1.57 inch.
(1.44/1.57)inch
or
35.5/39.8)mm
approximately....
So since my 28mm socket was too small and didnt work and my 30mm socket was too big, i went to sears for a 29mm SOCKET and sure enough it was sized just right to be used as the press tool to get the oem bushing out......
Sears 29mm Socket:
http://www.sears.com/shc/s/p_10153_1...0070921x00003a
UPDATE:
I have recently gone to my local metal supply warehouse and purchased a 1.5" diameter solid aluminum rod that was band saw cut to a height of about 1.5" as well.
This has been by far the best press (removal) tool since it has a sharp edge and not a rounded tip edge like a socket.
PICS:
This later install for a friend was by far the easiest white line install due to using the aluminum press tool:
Aluminum Solid 1.5 diameter rod ~ about 1.5 inch tall:
There it goes:
Get r done:
Now the end one:
With this sharp edge (band saw cut) 1.5" diameter SOLID rod of aluminum the removal process took 5 minutes tops for all 4 locations!
-J
Last edited by JasonZ-YA; 08-04-2010 at 04:53 AM.
10-19-2009, 07:32 PM
#5
350Z-holic
Thread Starter
iTrader: (60)
Join Date: Jan 2006
Location: San Antonio/I miss DFW, TX
Posts: 11,204
Likes: 0
Received 28 Likes
on
19 Posts
OPTION #2: caution!!!!
NOW YOU CAN GET A TYPICAL hack saw and remove the blade and run it through the translink inner bushing location and cut the bushing race, but you MUST take your time and not damage the cast aluminum translink, DONT cut into it on accident.

**** This should be a last resort before trying to press out the bushing yourself, or going to a near by local shop and paying $20 cash for them to do it for you....etc..
OEM bushing race being pressed out with 29mm socket - yeah bad pic, but still.

TRANSLINK with oem bushing and bushing race pressed out.

NOW, REPEAT THE PROCESS FOR THE SUSPENSION BUSHING ALSO. THEY ARE THE SAME SIZE IN DIAMETER AND CAN BE PRESSED OUT WITH THE SAME 29MM SOCKET.
NOW YOU CAN GET A TYPICAL hack saw and remove the blade and run it through the translink inner bushing location and cut the bushing race, but you MUST take your time and not damage the cast aluminum translink, DONT cut into it on accident.
**** This should be a last resort before trying to press out the bushing yourself, or going to a near by local shop and paying $20 cash for them to do it for you....etc..
OEM bushing race being pressed out with 29mm socket - yeah bad pic, but still.
TRANSLINK with oem bushing and bushing race pressed out.
NOW, REPEAT THE PROCESS FOR THE SUSPENSION BUSHING ALSO. THEY ARE THE SAME SIZE IN DIAMETER AND CAN BE PRESSED OUT WITH THE SAME 29MM SOCKET.
Last edited by JasonZ-YA; 10-19-2009 at 07:44 PM.
10-19-2009, 07:35 PM
#6
350Z-holic
Thread Starter
iTrader: (60)
Join Date: Jan 2006
Location: San Antonio/I miss DFW, TX
Posts: 11,204
Likes: 0
Received 28 Likes
on
19 Posts
OKAY, NOW TAKE A LOOK AT THE NEW BUSHING! IN MY CASE I PURCHASED THE WHITELINE BUSHINGS FROM A VENDOR ON OUR SITE.
AS YOU CAN SEE YOU CANT USE THE 29MM SOCKET TO NOW PRESS IN THE NEW BUSHINGS MAINLY BECAUSE THE THICKER RUBBER BUSHING WONT SLIP INSIDE THE 29MM SOCKET........
CRAP! FK, SHEIT, DAMMN IT!!!
WELL, AFTER HAVING TAKEN THE MEASUREMENTS EARLIER I WENT TO MY LOCAL STEEL SUPPLY AND PURCHASED A $5 BUCK - 6 INCH PIECE OF DOM STEEL HOLLOW BAR WITH AN INSIDE DIAMETER OF 1.5 INCH.
IF YOU RECALL:
See the translink bushing race i measured with my digital calipers as inner diameter 1.44 inch and outer diameter 1.57 inch.
(1.44/1.57)inch
or
35.5/39.8)mm
SO 1.5 INCH INNER DIAMETER DOM WOULD WORK PERFECT!
SO IN ORDER TO USE THE HOLLOW BAR AS A PRESS JIG TOOL I DECIDED TO MAKE WHAT I CALL MY "FRANKENSTEIN SOCKET"
LOL......
CHOP SAW CUT .25INCH THICK PLATE - TOP PIECE:

ABOUT A 2 INCH PIECE OF MY 1.5 DOM STEEL HOLLOW BAR AND THE .25 INCH PLATE I CUT LAID ON TOP OF EACH OTHER.

NEXT I BUSTED OUT MY CRAPTASTIC MIG WELDER AND WENT TO TOWN:

ITS ALIVE BEATCHES!!!
HERE IS THE FRANKENSTEIN SOCKET JUST CHILL'N ON MY DRIVEWAY FOR ABOUT AN HOUR CAUSE IT WAS HOT AS HELL AFTER WELDING THAT HOE BAG...

***EDIT***
Per Kuah at SPL post #39 - NO Frankenstein bushing is needed to install SPL bushings as the end races are removable.
AS YOU CAN SEE YOU CANT USE THE 29MM SOCKET TO NOW PRESS IN THE NEW BUSHINGS MAINLY BECAUSE THE THICKER RUBBER BUSHING WONT SLIP INSIDE THE 29MM SOCKET........
CRAP! FK, SHEIT, DAMMN IT!!!
WELL, AFTER HAVING TAKEN THE MEASUREMENTS EARLIER I WENT TO MY LOCAL STEEL SUPPLY AND PURCHASED A $5 BUCK - 6 INCH PIECE OF DOM STEEL HOLLOW BAR WITH AN INSIDE DIAMETER OF 1.5 INCH.
IF YOU RECALL:
See the translink bushing race i measured with my digital calipers as inner diameter 1.44 inch and outer diameter 1.57 inch.
(1.44/1.57)inch
or
35.5/39.8)mm
SO 1.5 INCH INNER DIAMETER DOM WOULD WORK PERFECT!
SO IN ORDER TO USE THE HOLLOW BAR AS A PRESS JIG TOOL I DECIDED TO MAKE WHAT I CALL MY "FRANKENSTEIN SOCKET"
LOL......
CHOP SAW CUT .25INCH THICK PLATE - TOP PIECE:
ABOUT A 2 INCH PIECE OF MY 1.5 DOM STEEL HOLLOW BAR AND THE .25 INCH PLATE I CUT LAID ON TOP OF EACH OTHER.
NEXT I BUSTED OUT MY CRAPTASTIC MIG WELDER AND WENT TO TOWN:
ITS ALIVE BEATCHES!!!
HERE IS THE FRANKENSTEIN SOCKET JUST CHILL'N ON MY DRIVEWAY FOR ABOUT AN HOUR CAUSE IT WAS HOT AS HELL AFTER WELDING THAT HOE BAG...
***EDIT***
Per Kuah at SPL post #39 - NO Frankenstein bushing is needed to install SPL bushings as the end races are removable.
Last edited by JasonZ-YA; 11-11-2009 at 05:54 AM.
10-19-2009, 07:38 PM
#7
350Z-holic
Thread Starter
iTrader: (60)
Join Date: Jan 2006
Location: San Antonio/I miss DFW, TX
Posts: 11,204
Likes: 0
Received 28 Likes
on
19 Posts
Now here is the new bushing, Frankenstein socket all set up in my press.
I started with a press plate just under the trankslink for ease and to get bushing started......
EDIT** ALSO - NOTE THE TRANSLINK orientation - I didn't get a good pic of this, but the new bushing can be pressed in on one side only! it has a slight taper at the end for ease of bushing press operation/installation.
It's the side of the trans link OPPOSITE the part number!!!


Of course you cant finish this way, so then once partially in. You can split the press plates and brige the bushing hole on the translink and complete your press job..see the whiteline bushing popping down.

Pressed completely in:

All four bushings removed:
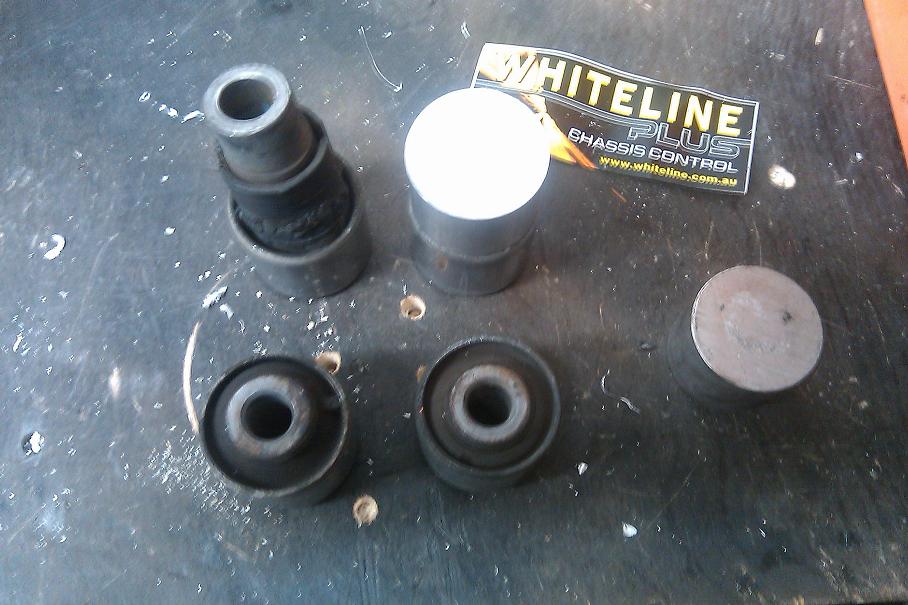
TADA! - shown with (Whiteline p/n W52991) at position 4.

This pic is the front translink with both whitelines installed! the end one at the end is the Kmember to translink position 4 - Whiteline p/n W52991. The other shown mid way in the translink is position 2 - Whiteline p/n W52992.

-J
I started with a press plate just under the trankslink for ease and to get bushing started......
EDIT** ALSO - NOTE THE TRANSLINK orientation - I didn't get a good pic of this, but the new bushing can be pressed in on one side only! it has a slight taper at the end for ease of bushing press operation/installation.
It's the side of the trans link OPPOSITE the part number!!!
Of course you cant finish this way, so then once partially in. You can split the press plates and brige the bushing hole on the translink and complete your press job..see the whiteline bushing popping down.
Pressed completely in:
All four bushings removed:
TADA! - shown with (Whiteline p/n W52991) at position 4.
This pic is the front translink with both whitelines installed! the end one at the end is the Kmember to translink position 4 - Whiteline p/n W52991. The other shown mid way in the translink is position 2 - Whiteline p/n W52992.
-J
Last edited by JasonZ-YA; 12-05-2010 at 04:19 PM.
Trending Topics
10-19-2009, 07:42 PM
#8
350Z-holic
Thread Starter
iTrader: (60)
Join Date: Jan 2006
Location: San Antonio/I miss DFW, TX
Posts: 11,204
Likes: 0
Received 28 Likes
on
19 Posts
Put the translink with the new bushing back on the car, use the torque specs from the fsm posted above on post #1.
Done!
- J
Done!
- J
Last edited by JasonZ-YA; 10-20-2009 at 11:54 AM.
10-19-2009, 07:56 PM
#9
New Member
iTrader: (5)

Join Date: Jul 2009
Location: at home
Posts: 352
Likes: 0
Received 0 Likes
on
0 Posts
thanks for this thread/write up, i checked my car last week and my passenger side looks exactly like yours in the first pic
how does the whiteline bushings feel compared to stock? im sure less sloppy, but is it noticeable?
how does the whiteline bushings feel compared to stock? im sure less sloppy, but is it noticeable?
10-19-2009, 08:07 PM
#10
350Z-holic
Thread Starter
iTrader: (60)
Join Date: Jan 2006
Location: San Antonio/I miss DFW, TX
Posts: 11,204
Likes: 0
Received 28 Likes
on
19 Posts
-J
Last edited by JasonZ-YA; 10-19-2009 at 08:08 PM.
10-19-2009, 08:10 PM
#11
350Z-holic
Thread Starter
iTrader: (60)
Join Date: Jan 2006
Location: San Antonio/I miss DFW, TX
Posts: 11,204
Likes: 0
Received 28 Likes
on
19 Posts
Ktran, what suspension are you running? stock? coilovers? springs etc?
Reason I ask is, I have read numerous threads on this bushing failure, and some post that they didnt even notice it, and only found it due to having the car serviced........those that did notice the car being squirly were those with much more sensitive suspension versus stock.
My car has coilovers and the torn bushing was a NIGHT and DAY difference! i knew EXACTLY what it was driving down the road.....
since my car has the coilovers, i was able to feel it as, squirly, spontaneous and car wouldnt track straight...car would give minor sudden movements with any waves or bumps in the road......
I quickly got home, jacked the car up and sure enough.......the Z sat on jack stands for a week till the bushings came in and even longer till i had time to get around to installing them....
-J
Last edited by JasonZ-YA; 10-19-2009 at 08:14 PM.
 10-19-2009, 09:51 PM
#14
New Member
iTrader: (5)
Join Date: Jul 2009
Location: at home
Posts: 352
Likes: 0
Received 0 Likes
on
0 Posts
im not sure how long mine has been like that, but last week, i caught it while i was working on the car adding some parts to get ready for the LSB drift event in mineral wells, tx...
after seeing that, i was worried, so i consulted one of my close friends;bradly(blowmys14 on here), who regularly autox, roadrace, and daily his z and he told me both his lca arms slid off of thier bushings. His has been like that for a while, so i felt a little better and drove my car 600 miles, drifted it, and drove it home...
the car drove straight before and after the drift event, but i kno i shouldn't ignore it much longer; i only did it because I didnt have time to order new bushings and replace them.
where did you get your bushings from? where they in stock?
thanks
10-20-2009, 04:12 AM
#15
350Z-holic
Thread Starter
iTrader: (60)
Join Date: Jan 2006
Location: San Antonio/I miss DFW, TX
Posts: 11,204
Likes: 0
Received 28 Likes
on
19 Posts
I got mine from:
Z1 Performance
www.z1auto.com
631-863-3820
They had one left in stock, but told me they were getting more that week, so they should have some in stock...
To be fair, other vendors also carry them just so you know:
Z1's thread:
https://my350z.com/forum/suspension/...-bushings.html
OakosAutomotive:
https://my350z.com/forum/suspension/...ngs-oakos.html
http://www.oakos.com/Merchant2/merch...ory_Code=10850
SPL's version:
https://my350z.com/forum/brakes-and-...-bushings.html
Along with:
http://www.jscspeed.com/350z/suspens...p_bushings.htm
If i forgot a vendor, pm me to add your thread link to this post...
Ktran, at a bare minimum i would tell ya to jack your car up and use a pry bar to move your arm away from the metal lug of the K member and check out your aluminum translink........as like i mentioned, mine was wearing away at the aluminum casting just from the metal to metal contact.......and i can imagine with enough of that there will be a point where swapping translinks for a new one would be in order...
MINERAL WELLS - you going to the NOV 22 event!?!? ill be there!!!
-J
Last edited by JasonZ-YA; 10-20-2009 at 08:52 AM.

 10-20-2009, 04:55 AM
#18
Former Sponsor
iTrader: (564)
Join Date: Feb 2003
Location: Long Island, New York
Posts: 19,266
Likes: 0
Received 5 Likes
on
5 Posts
Great write up Jason and glad you got it in the car- good innovation on the socket! Hmmmm....got me thinking, I wonder if we could fab a nice tool to install these. I'll give it some thought and see if we can come up with something simple/inexpensive.
For those doing more track oriented stuff, we also carry the SPL ones too, so we got ya covered whichever way you decide to go. For most of us out there doing street or street and track use, the Whiteline urethane ones are the way to go. For those going for broke, the SPL ones are a sweet piece
For those doing more track oriented stuff, we also carry the SPL ones too, so we got ya covered whichever way you decide to go. For most of us out there doing street or street and track use, the Whiteline urethane ones are the way to go. For those going for broke, the SPL ones are a sweet piece
10-20-2009, 05:18 AM
#19
350Z-holic
Thread Starter
iTrader: (60)
Join Date: Jan 2006
Location: San Antonio/I miss DFW, TX
Posts: 11,204
Likes: 0
Received 28 Likes
on
19 Posts
Thanks so much!
yeah, i dont know why i didnt think of the DOM before....it was cheap and easy to make....
Till you make something, anyone wanting my Frankenstein socket let me know........but as a pay it forward only......if i ship to you, then you ship back to me, so i can ship it to the next dude! I wouldnt mind that..
but ya, i never understood why a tool was never sold with bushings! many people steer away from doing bushing work because they dont own the press themselves or if they have the bushing, and go to a shop with a press, but then the shop will charge them more money for having to fab up a press jig tool.........so ive seen many of my friends just suck it up and buy higher dollar parts or look for the same oem junk at a junk yard or new at a dealership.....
if you guys sold the whitelines with a simple slip on tool...that would be baller!.....would be awesome with any bushing really!
-J


