DIY - SPL Upper Control Arm Install - Extra shims made!
 03-29-2010, 05:20 AM
#21
350Z-holic

Thread Starter
iTrader: (60)
Join Date: Jan 2006
Location: San Antonio/I miss DFW, TX
Posts: 11,204
Likes: 0
Received 28 Likes
on
19 Posts
DO NOT LUBRICATE THE TAPERED PART. This part is not supposed to move, all movement is supposed to happen at the bearing only; there has to be sufficient friction between the upright and the ball joint adapter to ensure all movement happens at the bearing. There also has to be sufficient friction so that the retaining nut will not loosen.
-J
 03-29-2010, 12:30 PM
#24
Registered User
iTrader: (4)

Join Date: Jul 2008
Location: cincinnati
Posts: 383
Likes: 0
Received 0 Likes
on
0 Posts
question- for the shims is it possible to tell you how thick we want the shims and make one big block?
My thought was have a monster solid aluminum block to put in to drive stock. Get to the track instead of taking out a small shim just put another solid aluminum block in thats a predetermined size to give you the camber you desire.
Good idea? Bad idea? You'll always have the other shims to play with but i think it would be easier and not as easy to lose (knowing me).
03-29-2010, 12:50 PM
#25
350Z-holic
Thread Starter
iTrader: (60)
Join Date: Jan 2006
Location: San Antonio/I miss DFW, TX
Posts: 11,204
Likes: 0
Received 28 Likes
on
19 Posts
^ I see what your saying, but i say thats a bad idea and this is why..... with height, adjustment camber , if your a track guy like me and your constantly adjusting coil overs and altering height, etc your gonna be changing camber with changing height.
What about settled springs over time? if you dont have coilovers??
Plus its not like the smaller shims fly out or anything....... I think good practice would be to tape them together if anything! wrap them one time with masking tape or that thin strong aluminum tape or something.
OR,
I figured if anything you can drill a small hole in them and screw them together with a counter bore in the thick one for a small nut, and a shallow countersink head in the thin one for the head of the screw, but not too thin to have it crack....
-J
Last edited by JasonZ-YA; 03-29-2010 at 12:52 PM.
03-30-2010, 04:16 AM
#26
Registered User
iTrader: (4)
Join Date: Jul 2008
Location: cincinnati
Posts: 383
Likes: 0
Received 0 Likes
on
0 Posts
I totally get what you're saying and agree. I like the tape idea. Not bad. Thats why this board is so great, bounce ideas off others and come up with even better ideas!


 04-20-2010, 05:23 PM
#29

What an outstanding write up. If you dial in -2 deg camber do you know roughly how much the toe will change? The adjustability of the camber from home to track sounds great. Does the toe change so much that you need to adjust toe at the track? (stock ride height...03 350Z)
Thanks!
Thanks!
04-23-2010, 04:07 AM
#30
350Z-holic
Thread Starter
iTrader: (60)
Join Date: Jan 2006
Location: San Antonio/I miss DFW, TX
Posts: 11,204
Likes: 0
Received 28 Likes
on
19 Posts
What an outstanding write up. If you dial in -2 deg camber do you know roughly how much the toe will change? The adjustability of the camber from home to track sounds great. Does the toe change so much that you need to adjust toe at the track? (stock ride height...03 350Z)
Thanks!
Thanks!
About 0.009" of toe change for every 0.5deg of camber change.
https://my350z.com/forum/7913758-post41.html
So you essentially you would dial in your daily driving toe in spec, but at the bottom of the range to where when you change it at the track your at a toe you want to be.....
EITHER WAY
1. --- While getting an alignment you should have them align the car into factory specs or whatever you want for daily...
THEN
2. Before they remove the car from the rack - jack the car up, remove the wheels and adjust the camber to -2.0 degree's, put everything back and then have them RE-SHOOT the lazer alignment and see where your at on both toe and camber?!?!
This will ensure your where you want to be for either case...........or adjust accordingly...
-J
Last edited by JasonZ-YA; 04-23-2010 at 04:17 AM.
 10-26-2010, 04:35 AM
#32
350Z-holic
Thread Starter
iTrader: (60)
Join Date: Jan 2006
Location: San Antonio/I miss DFW, TX
Posts: 11,204
Likes: 0
Received 28 Likes
on
19 Posts
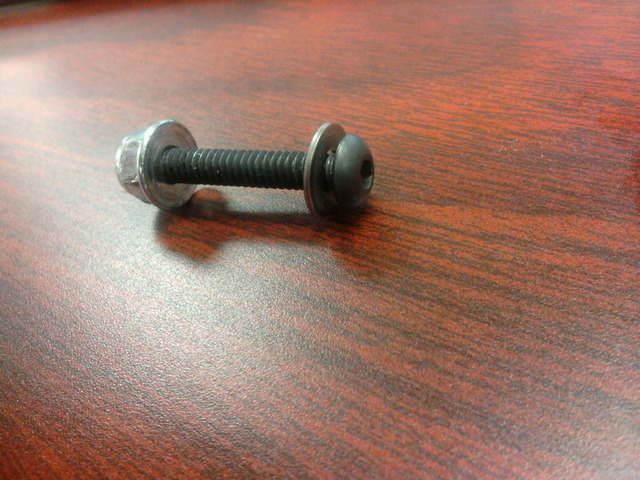
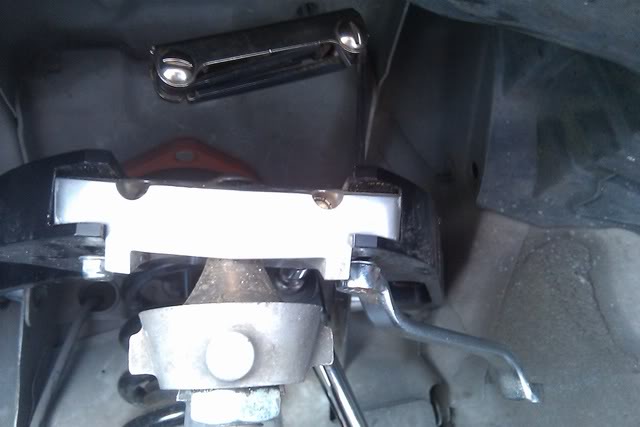
I snapped this lil bolt that I'm removing here track side this past weekend:
caacc2ab.jpg?t=1282160204
.........I only snapped one, so I figured I would rock on..... and I did.
FYI:
The bolt is a machine screw pan head allen that is a #10-24 x 1.25" long.
nut is a nylon lock nut that uses a 3/8 wrench/hex.
I just purchased spares and keep them in my trackside tool box.
This is the oem bolt for reference:
I'm replacing with aerospace 12 point bolt:
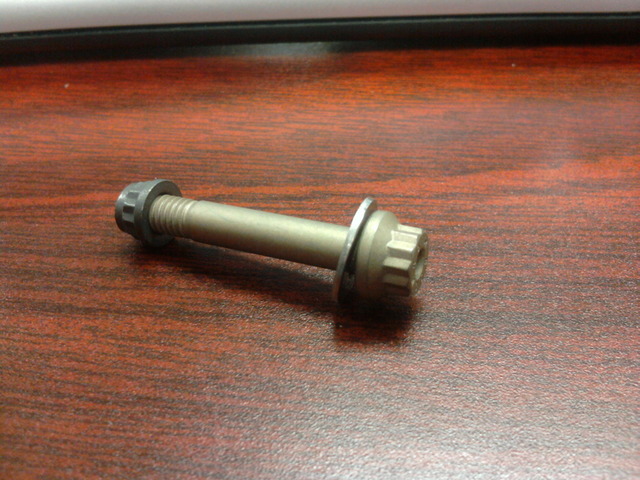
If anyone wants some, pm me....(head height is a non issue as im set up to where i clear and don't hit....hi-loks can be used as well as they have allen key hole in shaft if you want a lower head height.)
-J
caacc2ab.jpg?t=1282160204
.........I only snapped one, so I figured I would rock on..... and I did.
FYI:
The bolt is a machine screw pan head allen that is a #10-24 x 1.25" long.
nut is a nylon lock nut that uses a 3/8 wrench/hex.
I just purchased spares and keep them in my trackside tool box.
This is the oem bolt for reference:
I'm replacing with aerospace 12 point bolt:
If anyone wants some, pm me....(head height is a non issue as im set up to where i clear and don't hit....hi-loks can be used as well as they have allen key hole in shaft if you want a lower head height.)
-J
Last edited by JasonZ-YA; 10-27-2010 at 10:01 AM.
11-19-2010, 11:20 AM
#33
350Z-holic
Thread Starter
iTrader: (60)
Join Date: Jan 2006
Location: San Antonio/I miss DFW, TX
Posts: 11,204
Likes: 0
Received 28 Likes
on
19 Posts
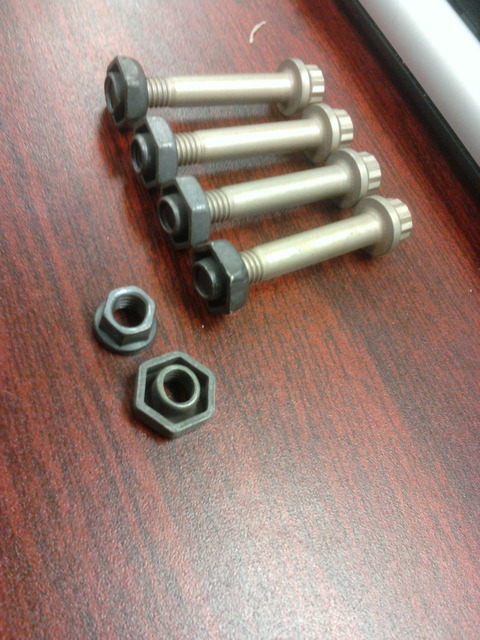
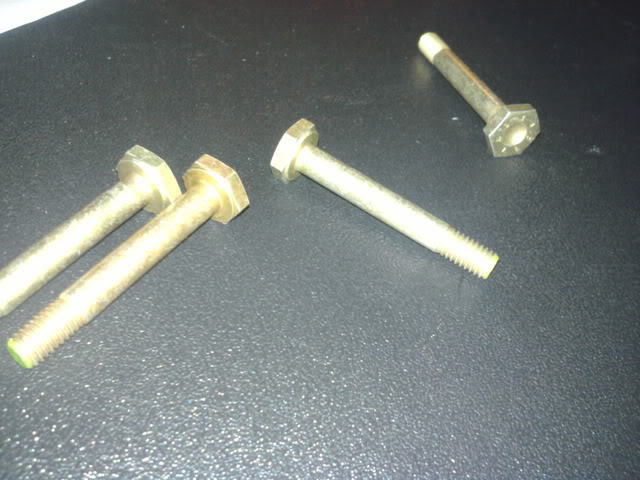
also found these:
2010-11-18183526.jpg?t=1290197928
3/8 hex head #10-32 pitch 160ksi bolt - aerospace spec
-J
2010-11-18183526.jpg?t=1290197928
3/8 hex head #10-32 pitch 160ksi bolt - aerospace spec
-J
Last edited by JasonZ-YA; 11-22-2010 at 11:18 AM.
03-18-2011, 08:27 AM
#34
So, just take all 3-shims out when you get to the track, so there will be no shims in the arm? Then on the ride home, I am just thinking about using the one large shim for daily driving, which should be alittle less than stock camber.
How do you have your caster set on your arms?
Thanks Jason, as always
How do you have your caster set on your arms?
Thanks Jason, as always
Last edited by mw9; 03-18-2011 at 08:39 AM.
04-01-2011, 12:31 PM
#35
The retard that I am, I broke the same bolt today. I'm glad I remembered you doing this so now I know what to replace with.
The bolts included seem brittle or I'm just a beast.
The bolts included seem brittle or I'm just a beast.
I snapped this lil bolt that I'm removing here track side this past weekend:
.........I only snapped one, so I figured I would rock on..... and I did.
FYI:
The bolt is a machine screw pan head allen that is a #10-24 x 1.25" long.
nut is a nylon lock nut that uses a 3/8 wrench/hex.
I just purchased spares and keep them in my trackside tool box.
This is the oem bolt for reference:
I'm replacing with aerospace 12 point bolt:
If anyone wants some, pm me....(head height is a non issue as im set up to where i clear and don't hit....hi-loks can be used as well as they have allen key hole in shaft if you want a lower head height.)
-J
04-01-2011, 12:58 PM
#36

Rather than remove the strut bar. and loosen the shock mount, I found it easier to put the front on jack stands, then use my hydraulic jack to compress the spring to get the coils out of the way.
(Just put the jack under the point where the lower part of the shock mounts to the arm.)
I have done this job quite a few times now and found this technique very helpful.
(Just put the jack under the point where the lower part of the shock mounts to the arm.)
I have done this job quite a few times now and found this technique very helpful.
Last edited by Z1NONLY; 04-01-2011 at 01:00 PM.
10-25-2011, 03:38 PM
#37

Another add if I may. A buddy of mine and I were discussing the SPL arms about 4 months ago and lamenting the fact they didn't offer more positive camber adjustment. I've had mine on a G for almost 2 years and I'm dropped 3" but the best front camber I could get with all the shims was -2.2*. So he called Kuah and was told that by rotating the heim joints at the end of each arm equi-distant to each other another 1.5* positive camber adjustment was possible. You pull them out 1" to achieve this and Kuah said that leaves plenty of the bolt seated in the arm to be safe, even for tracking and heavy driving.
So I tried it and glory halleluja, it freaking worked like a charm. So now I'm running stock camber and toe and sitting pretty. Life is good and so is tire wear.
BTW I'm local to SPL in Austin and the last time I was at the shop Kuah gave me a free upgrade kit with the V3 heads, heim joints, and bushings to replace my V2 parts. I believe he's still offering that to original V2 owners that can prove purchase from an authorized vendor. You guys might want to hit him up if you have the V2s and see if he's still offering that. Great guy IMO.
Last edited by BlueDream7; 10-25-2011 at 03:42 PM.
 03-17-2012, 01:35 PM
#39

Got myself a 6' stick of 1/8 6061 bar stock and a 7/16 endmill. Gonna use a bridgeport at work to make me some 0.100" shims Monday. I'll likely make a bunch more in inbetween sizes like 0.150, .175, 0.225, 0.250 so I can really dial things in.
Can't wait to get my suspension all done....
Can't wait to get my suspension all done....
01-30-2013, 06:04 AM
#40
New Member
iTrader: (1)

Join Date: Jul 2011
Location: Houston
Posts: 174
Likes: 0
Received 0 Likes
on
0 Posts
Thanks for this write up. I was seriously considering buying the SPL arms to fix the caster.
However you made me aware of the fact that some of the bushings might be torn, and that's whats giving me the caster differences.
FL is 8.3
FR is 7.8
That's .5 difference. Do you think this is caused only by bushings or could it be a compound effect by damaged body control arm mounts? (was in a small curbing incident where most of the right side arms were replaced)
As far as the camber goes, it is also off.
FL is -2.0
FR is -1.52
So if I want to have symmetrical camber, do I need adjustable camber arms? I would like symmetrical numbers whether in spec or not.
Last edited by ehaalandtluk; 01-30-2013 at 06:07 AM.