My Kinetex 350z / G35 Front Upper Camber Arms Install
 08-03-2010, 05:23 PM
#1
Registered User
Thread Starter

Join Date: Aug 2010
Location: California
Posts: 3
Likes: 0
Received 0 Likes
on
0 Posts
DISCLAIMER: I Am Not Responsible For Any Damages Or Injury That May Occur To You, Others, Pets/Animals or property from Improper Installation. Professional Installation is always suggested on any automotive item.
This will be my first post on this forum. I decided I would try and contribute to the community as it has for me.
This post will cover my Kinetix G35/350z front upper control arm finalized installation. This will not be a step by step
guide but will show what I did during my installation. I hope this helps some people out when making a control arm decision.
Kinetex has always picked up the phone and answered my questions with no hassle so far. I know in the early design they got some bad reviews but I think all those problems have been sorted out. I have put about 2,000 miles on these so far and they have not failed. Adjusting these things isn't so hard it just takes more time to dial them in, each thread turn is supposed to give .2 degress of camber either + or - depending if you turn in or outward. You should contact them for the proper number. Your alignment shop will figure it out if you dont need to..but at the added hourly expense. Once these things are set thy aren't going anywhere, that's why I got them.
Kinetex Front Upper Control Arms Pros & Cons:
Pros: Low price, lightweight, new tubular design with built in urethane bushings and grease fittings for easy maintenence.
Cons: No instructions, alignment shop needs to do a bit more work to dial it in, exposed ball joints on top.
Completed Install Picture:
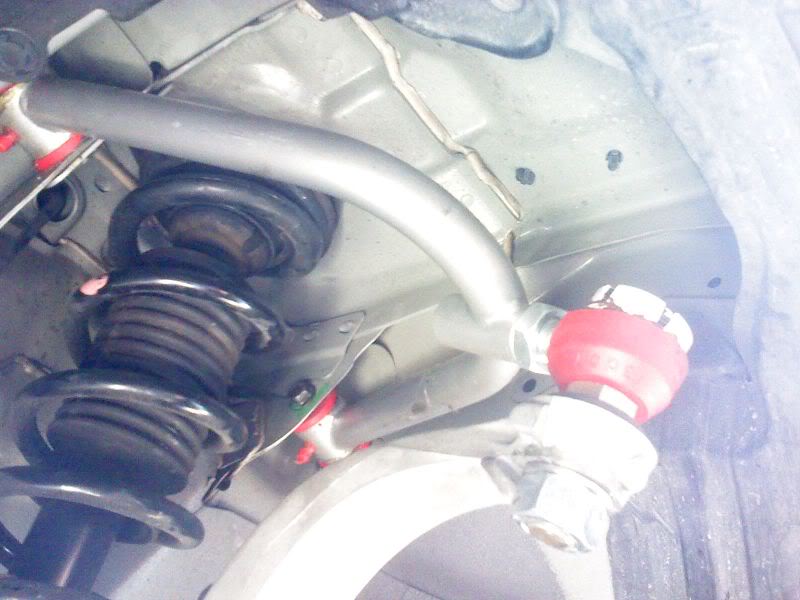
The above photo Shows the Kinetex control arm installed. You will notice the lower castle nut and cotter pin have been replaced by a massive Stop Nut that Kinetex provides with their kit. The grease nipples should be facing the bottom aka pointed down.
Custom Dust Cap:

The Kinetex Control Arms only come with a urethane dust boot that covers the lower half of the ball joint. I have read of some people making dust covers out of condoms and other various materials but I feel my method is best, but I wish the caps were metal instead of plastic.
How I made the dust caps:
I used a CVS medicine bottle cap on each side and modified them. Makes me think my control arms are on "steroids" if you think about it..
1) I had to dremel and file the tabs in the inner of the caps so they sit flush on the ball joints.
2) The caps have holes in them so if you look in the gaps you see that i fitted O rings inside.
3) I put grease inside the cap so that the ball joint doesn't get dry or bind from heat.
4) Once I had it all in place I sealed it with gasket maker RTV (brown type) around the cap and ball joint and let it set. I let them set for about a day before driving around with them.
2,000 Miles so far and they are still on the car.
I hope you all enjoyed this. I have some other low budget and great mods that I will be sharing as soon as I have time to get some pictures up.
MAZ350
05 G35 Coupe 6MT/ 05 G35 Sedan AT & 03 350z Touring 6MT
This will be my first post on this forum. I decided I would try and contribute to the community as it has for me.
This post will cover my Kinetix G35/350z front upper control arm finalized installation. This will not be a step by step
guide but will show what I did during my installation. I hope this helps some people out when making a control arm decision.
Kinetex has always picked up the phone and answered my questions with no hassle so far. I know in the early design they got some bad reviews but I think all those problems have been sorted out. I have put about 2,000 miles on these so far and they have not failed. Adjusting these things isn't so hard it just takes more time to dial them in, each thread turn is supposed to give .2 degress of camber either + or - depending if you turn in or outward. You should contact them for the proper number. Your alignment shop will figure it out if you dont need to..but at the added hourly expense. Once these things are set thy aren't going anywhere, that's why I got them.
Kinetex Front Upper Control Arms Pros & Cons:
Pros: Low price, lightweight, new tubular design with built in urethane bushings and grease fittings for easy maintenence.
Cons: No instructions, alignment shop needs to do a bit more work to dial it in, exposed ball joints on top.
Completed Install Picture:
The above photo Shows the Kinetex control arm installed. You will notice the lower castle nut and cotter pin have been replaced by a massive Stop Nut that Kinetex provides with their kit. The grease nipples should be facing the bottom aka pointed down.
Custom Dust Cap:
The Kinetex Control Arms only come with a urethane dust boot that covers the lower half of the ball joint. I have read of some people making dust covers out of condoms and other various materials but I feel my method is best, but I wish the caps were metal instead of plastic.
How I made the dust caps:
I used a CVS medicine bottle cap on each side and modified them. Makes me think my control arms are on "steroids" if you think about it..
1) I had to dremel and file the tabs in the inner of the caps so they sit flush on the ball joints.
2) The caps have holes in them so if you look in the gaps you see that i fitted O rings inside.
3) I put grease inside the cap so that the ball joint doesn't get dry or bind from heat.
4) Once I had it all in place I sealed it with gasket maker RTV (brown type) around the cap and ball joint and let it set. I let them set for about a day before driving around with them.
2,000 Miles so far and they are still on the car.
I hope you all enjoyed this. I have some other low budget and great mods that I will be sharing as soon as I have time to get some pictures up.
MAZ350
05 G35 Coupe 6MT/ 05 G35 Sedan AT & 03 350z Touring 6MT


 09-02-2010, 08:50 PM
#4
Registered User

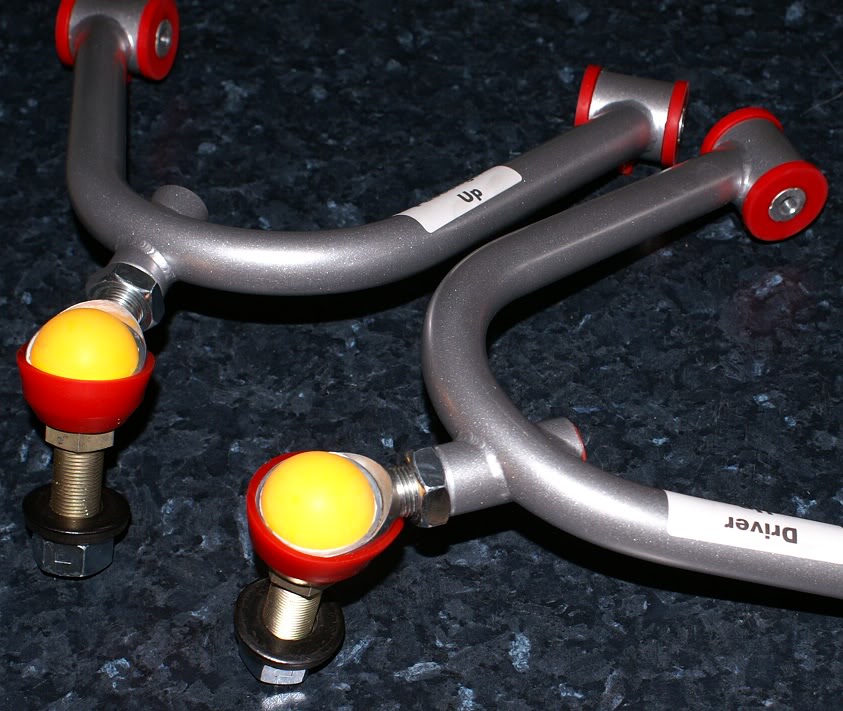
Following on this theme. One table tennis ball cut in half and then trimmed and tidied up.
Small ammount of silicon sealer applied to the inside edge of the ball and then popped on.
Small ammount of silicon sealer applied to the inside edge of the ball and then popped on.
09-02-2010, 09:05 PM
#5
350Z-holic

iTrader: (60)
Join Date: Jan 2006
Location: San Antonio/I miss DFW, TX
Posts: 11,204
Likes: 0
Received 28 Likes
on
19 Posts
good job on the upper dust cap guys.........
Just more FYI:
The lower lock(pinch) nut:
is 1-1/8 inch or u can use a 28mm.
I recommend buying a wrench that can be used to remove the nut as a socket that size with a ratchet will not fit with the wheel on (if you don't remove the wheel).
An good adjustable wrench will work but thought i would mention....
Ratcheting wrenches can be found online:
http://www.google.com/products/catal...d=0CF0Q8wIwAA#
Upper hex:
Common to threaded stud is 25mm or a 1" wrench will work.
A long handle wrench is amazing here to hold the stud from spinning when removing/tightening the lower 28mm nut.
You can buy this set just so you can get the 1 inch wrench:
HF Item #44718 $24 - on sale at times for $15 (1'' x 16-7/8'' L) Or buy a large 25mm wrench.
I found this site to have them in stock all the time: $239!!
http://www.importpartspro.com/kifradcoar03.html
-J
Last edited by JasonZ-YA; 02-14-2011 at 09:31 AM.
09-03-2010, 03:47 AM
#6
350Z-holic
iTrader: (60)
Join Date: Jan 2006
Location: San Antonio/I miss DFW, TX
Posts: 11,204
Likes: 0
Received 28 Likes
on
19 Posts
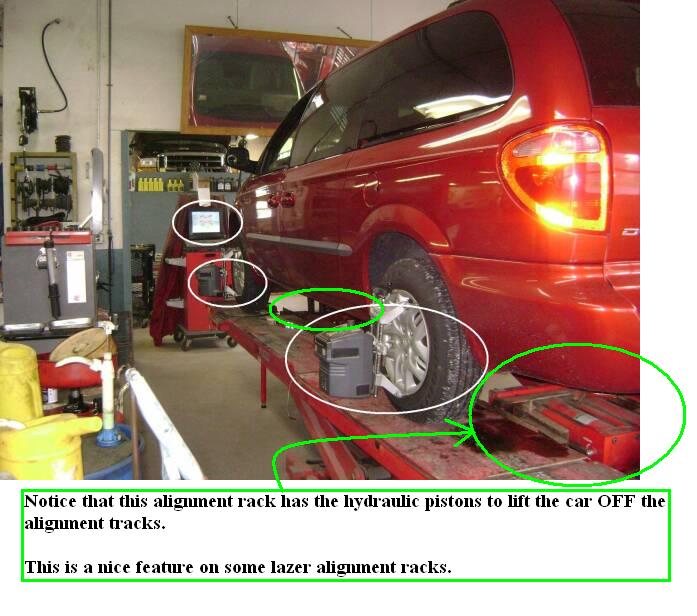
if their machine can do this feature - adjustment on these arms is super easy with a 1-1/8" wrench.
NTB's now use JIM BEAN alignment racks - which allow this. You can tell if a rack has this feature if it has the bottle jack lifts in between the ramps...
like shown here circled in green:
-J
02-11-2011, 04:38 AM
#7
350Z-holic
iTrader: (60)
Join Date: Jan 2006
Location: San Antonio/I miss DFW, TX
Posts: 11,204
Likes: 0
Received 28 Likes
on
19 Posts
Hi,
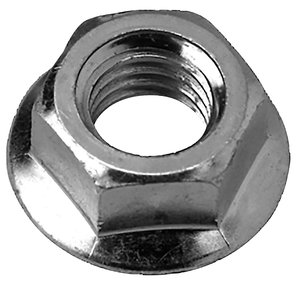
If anyone has these arms and hasn't installed them yet, can you please tell me the thread pitch of this stud? OR just take the nut to a hardware store and check what bolt it fits onto??
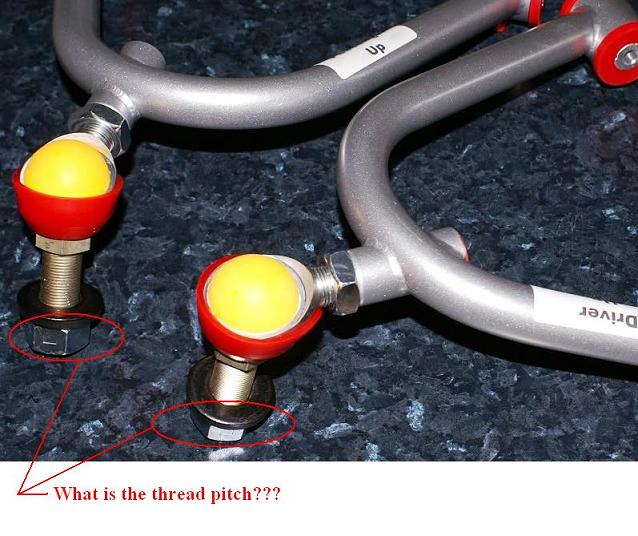
I'm guessing its like 3/4-18 or something like that??!??!
please let me know if anyone has the time to do so.......
Thanks...
-J
If anyone has these arms and hasn't installed them yet, can you please tell me the thread pitch of this stud? OR just take the nut to a hardware store and check what bolt it fits onto??
I'm guessing its like 3/4-18 or something like that??!??!
please let me know if anyone has the time to do so.......
Thanks...
-J
Trending Topics
02-13-2011, 07:14 PM
#8
Registered User
Hi,
If anyone has these arms and hasn't installed them yet, can you please tell me the thread pitch of this stud? OR just take the nut to a hardware store and check what bolt it fits onto??
I'm guessing its like 3/4-18 or something like that??!??!
please let me know if anyone has the time to do so.......
Thanks...
-J
I chose not to lube the ball joint at all because it was my understanding there was teflon lining or something in there and nothing was required.
2000km since installation and where the grease nipples are is still fine and quiet, but I think the ball joint could do with some grease as well. I'm getting a slight squeek and I think it is comming from this ball joint. Anyone have thoughts on this.
02-14-2011, 05:57 AM
#9
350Z-holic
iTrader: (60)
Join Date: Jan 2006
Location: San Antonio/I miss DFW, TX
Posts: 11,204
Likes: 0
Received 28 Likes
on
19 Posts
I was changing wheels over today so took a look at one. Just measured with a steel rule I make it 3/4" diameter and 16TPI.
I chose not to lube the ball joint at all because it was my understanding there was teflon lining or something in there and nothing was required.
2000km since installation and where the grease nipples are is still fine and quiet, but I think the ball joint could do with some grease as well. I'm getting a slight squeek and I think it is comming from this ball joint. Anyone have thoughts on this.
I have others that i have installed these for.....A few of them are hard core track peeps and we have been contemplating getting another nut...using a flanged hex head (maybe top lock/prevailing torque/stover nut) and having a machine shop drill a hole for a cotter pin in the stud.
As for the noise/grease, you can use white lithium spray lube...on teflon lined rod end pressed stud joint.., its not a ball joint..its a rod end with a pressed stud...
One like this: $10.04 each
http://www.fastenal.com/web/products...l.ex?sku=37381
Then use this:
http://www.google.com/products/catal...6267865885386#
-J
Last edited by JasonZ-YA; 02-14-2011 at 09:30 AM.
07-28-2011, 10:42 AM
#10
Registered User

Join Date: Jan 2008
Location: Dallas
Posts: 1
Likes: 0
Received 0 Likes
on
0 Posts
I recently bought the Kinetix upper control arms to address inner tire wear on my 2003 G35 Coupe. I also did not like the fact that the joint was not protected or greased. Using the ping pong ball idea I went to Home depot and picked up two Yardgard 1-5/8 inch Aluminum Post Caps - Model #328560B for 0.86 cents each.
http://www.homedepot.com/h_d1/N-5yc1...1&ddkey=Search
Using a caliper I measured a diameter of 33m and cut the tops off. I filed each of them smooth and applied a small amount of "Goop" plumbers glue-rated 5 stars to adhere to aluminum :-). Being there is no pressure on the caps as they are simply to keep dirt/dust out should be fine. If one falls off I'll make another one and use liquid metal. I also pulled back the rubber boot and injected some HD grease.
I spoke to the folks at Kinetix who said they are working on a boot. You may want to check back with them in a few months to see what they come up with.
Cheers.
08-07-2011, 12:08 PM
#11
Registered User

Join Date: Apr 2011
Location: Richmond, TX
Posts: 2
Likes: 0
Received 0 Likes
on
0 Posts
I just installed a set of these on my '07 350, and while the overall quality seems pretty high it is a shame they skimped on a couple of significant details.  My biggest complaint is the fact that you have to eliminate the conical spacers where the ball joint bolts to the knuckle. That is just kind of lame in my opinion. I intend to have the stock spacers bored out to fit the new ball joints and then reinstall. I think I will try the ping pong ball trick for a dust cap also. It will be interesting to see how long the ball joints last before they get sloppy.
Other than that, I am pleased so far. I was a little worried about an increase in NVH with the urethane bushings but haven't noticed any difference at all.
My biggest complaint is the fact that you have to eliminate the conical spacers where the ball joint bolts to the knuckle. That is just kind of lame in my opinion. I intend to have the stock spacers bored out to fit the new ball joints and then reinstall. I think I will try the ping pong ball trick for a dust cap also. It will be interesting to see how long the ball joints last before they get sloppy.Other than that, I am pleased so far. I was a little worried about an increase in NVH with the urethane bushings but haven't noticed any difference at all.
12-14-2011, 07:59 PM
#12
350Z-holic
iTrader: (60)
Join Date: Jan 2006
Location: San Antonio/I miss DFW, TX
Posts: 11,204
Likes: 0
Received 28 Likes
on
19 Posts
I just installed a set of these on my '07 350, and while the overall quality seems pretty high it is a shame they skimped on a couple of significant details. My biggest complaint is the fact that you have to eliminate the conical spacers where the ball joint bolts to the knuckle. That is just kind of lame in my opinion. I intend to have the stock spacers bored out to fit the new ball joints and then reinstall. I think I will try the ping pong ball trick for a dust cap also. It will be interesting to see how long the ball joints last before they get sloppy.
Other than that, I am pleased so far. I was a little worried about an increase in NVH with the urethane bushings but haven't noticed any difference at all.
My biggest complaint is the fact that you have to eliminate the conical spacers where the ball joint bolts to the knuckle. That is just kind of lame in my opinion. I intend to have the stock spacers bored out to fit the new ball joints and then reinstall. I think I will try the ping pong ball trick for a dust cap also. It will be interesting to see how long the ball joints last before they get sloppy.Other than that, I am pleased so far. I was a little worried about an increase in NVH with the urethane bushings but haven't noticed any difference at all.
the tapered spindle isnt a "bearing" loaded joint definition. the kinetix method is just fine.
boring out spacer will result in a thin wall tapered spacer thats gonna bear on threads of the kinetics stud....whats the point..?
also, its not a ball joint - its a rod end with a pressed stud in the eye.
kinetix website sells replacements for 29 bucks....so far ive seen a set daily drive for 2+ years and be fine..
-J
03-11-2012, 06:41 PM
#13

Did these this weekend along with changing all the front end bushings to whitelines. Still need to take it in for an alignment but I put both sides at 20 full turns in and visually my front and rear camber look very close now (I'm still on stock suspension btw). I'm wanting to end up somewhere in the -1.5 range. Couldn't fit my torque wrench in with the coils still in place so I just hand torqued em, hopefully it won't be an issue.
03-12-2012, 11:32 AM
#14
Just left the alignment shop and he had to back both sides out 2 turns to get in the range I wanted. Ended up at about -1.3. So just to clarify for other DIYers I threaded both sides in 20 turns to start and backed it off 2 at the shop for an ending value of 18 full turns in.
Last edited by TrueBlueZ; 03-12-2012 at 01:00 PM.
03-28-2012, 02:56 PM
#15
Registered User
iTrader: (3)

Join Date: Feb 2005
Location: San Diego
Posts: 1,351
Likes: 0
Received 0 Likes
on
0 Posts
I'm thinking of attempting this install since I have the same Kinetix UCA. It is the revised version with the dust boot already fitted. It also has the Zerk grease fittings but I was told they're not lubed out-of-the box and it's best to lube it before you install it.
Some questions:
1. Is it necessary to remove the strut assembly to gain access to the arm bolts on the chassis side? I've seen this mechanic do it on youtube to a G35 w/out doing so.
2. What do I use to tighten the huge nut and torque it to spec? the nut is slightly 'crushed' at three points so it's not perfectly circular... does that mean it won't back out and need a cotter pin? do I still need a flanged nut in addition to the huge nut supplied by Kinetix?
3. After removing the strut brace do I need a wobble/swivel socket extension since I'm removing the 3 strut bolts at an angle? I don't want to rupture the thin-walled tubes next to it.
4. Anyone have trouble separating the OEM Upper Link from the spindle since the tapered rod end gets seized up?
On a scale of 1-10 how is this DIY for someone with no suspension install experience?
thx
Last edited by dkorr; 03-28-2012 at 03:17 PM.
04-02-2012, 09:47 AM
#16

I'm thinking of attempting this install since I have the same Kinetix UCA. It is the revised version with the dust boot already fitted. It also has the Zerk grease fittings but I was told they're not lubed out-of-the box and it's best to lube it before you install it.
Some questions:
1. Is it necessary to remove the strut assembly to gain access to the arm bolts on the chassis side? I've seen this mechanic do it on youtube to a G35 w/out doing so.
2. What do I use to tighten the huge nut and torque it to spec? the nut is slightly 'crushed' at three points so it's not perfectly circular... does that mean it won't back out and need a cotter pin? do I still need a flanged nut in addition to the huge nut supplied by Kinetix?
3. After removing the strut brace do I need a wobble/swivel socket extension since I'm removing the 3 strut bolts at an angle? I don't want to rupture the thin-walled tubes next to it.
4. Anyone have trouble separating the OEM Upper Link from the spindle since the tapered rod end gets seized up?
On a scale of 1-10 how is this DIY for someone with no suspension install experience?
thx
Some questions:
1. Is it necessary to remove the strut assembly to gain access to the arm bolts on the chassis side? I've seen this mechanic do it on youtube to a G35 w/out doing so.
2. What do I use to tighten the huge nut and torque it to spec? the nut is slightly 'crushed' at three points so it's not perfectly circular... does that mean it won't back out and need a cotter pin? do I still need a flanged nut in addition to the huge nut supplied by Kinetix?
3. After removing the strut brace do I need a wobble/swivel socket extension since I'm removing the 3 strut bolts at an angle? I don't want to rupture the thin-walled tubes next to it.
4. Anyone have trouble separating the OEM Upper Link from the spindle since the tapered rod end gets seized up?
On a scale of 1-10 how is this DIY for someone with no suspension install experience?
thx
04-05-2012, 10:41 AM
#17

I've never done a UCA installation, but have lower cars before; additionally I just did a DIY Wilwood F/R rotor and caliper installation. Would you say a UCA is more or less involved installation than the above two DIY's? I'm thinking of doing the install this weekend.
04-05-2012, 11:48 AM
#18
I've never done a UCA installation, but have lower cars before; additionally I just did a DIY Wilwood F/R rotor and caliper installation. Would you say a UCA is more or less involved installation than the above two DIY's? I'm thinking of doing the install this weekend.
 04-06-2012, 09:46 AM
#20
Registered User

Join Date: Apr 2012
Location: califonia
Posts: 2
Likes: 0
Received 0 Likes
on
0 Posts
I just put a set of the kinetix upper Front A arms on my 03 G35 sport coupe. Super easy job. You can do it without taking the wheels off; this is the way you will adjust the camber once the arms are installed. Here is what you do:
1. Just jack the car at the typical front jack point; until the front tire just comes off the ground.
2. remove the cotter pin and nut from the upper ball joint. My ball joint followed the nut off and the tire rested on the ground when the arm was separated from the spindle link.
3. remove the two A arm bushing bolts. They will hit the rubber boot of the shock but if you work them back and forth a bit, then they can be extracted without removing the upper shock mount.
4. Vula...pull the upper A arm out.
Kinetix upper A arm impression:
1. new design has the ball joint completely covered with a rubber boot,
2. New design includes an aluminum cone spacer for a better fit of the ball joint to the upper spindle link.
3. Well built and labeled for Driver/passenger side up
4. Perfect fit and very easy to install.
5. Perfect camber adjustment for my stock height G35
6. Ride quality is the same as stock but poly bushing give more precise steering.
I do my own four wheel alignment..anyone can, just search the internet.
I was able to easily got 0 degree camber with the Kinetix. This is within spec and I'm running 0 to get the most life out of my tires. However, since I do my own alignment, I will adjust camber as I assess future tire wear. BTW, one turn of the ball joint makes about a 1/16" change to camber measurement on an 18" (19" rim) wheel or about .2 degree camber.
You will not get the camber perfect with the install. You will have to guess at the appropriate place to thread the ball joint for install. I started by threading the ball joint and jam nut all the way in. I then backed out 5 complete turns.
Once I installed, lowered the car and rolled it back and forth in the garage, I then measured my camber. I was about -.2 right side and -.6 degrees left. I jacked the car back up, removed the big nut on the ball joint, pulled it from the link, and turned the joint one turn out on the rt and three on the left. Tightened the ball joint nuts on the link, lower the car and test drove. It rode GREAT and I remeasured the camber....perfect O camber which my "moderately inside edge worn front tires liked". i will easily get another year out of these front tires. without camber adjustment I was looking at $400+ for fronts in the next 3 months. At about $260 (evil bay) the Kinetix A arms were a good value.