How about another?! LSx Build Inside!
 05-28-2014, 12:05 PM
#1
New Member
Thread Starter

Hey all,
First "build" thread, so cut me some slack!
Never posted much on the site, but have always "lurked" and searched. I've always wanted to do a build of any sorts since I was old enough to even think about driving. Always have had a car with some sort of minor league bolt ons, but never had the chance to do anything extreme.
Fast forward some time until 2011. Bought the Z with no end goal but to own a Z. Thought it cool to finally have RWD (previous cars have all been FWD), and some "decent" power. Did some bolt on's to ease the modding itch I've always had but was never fully satisfied.
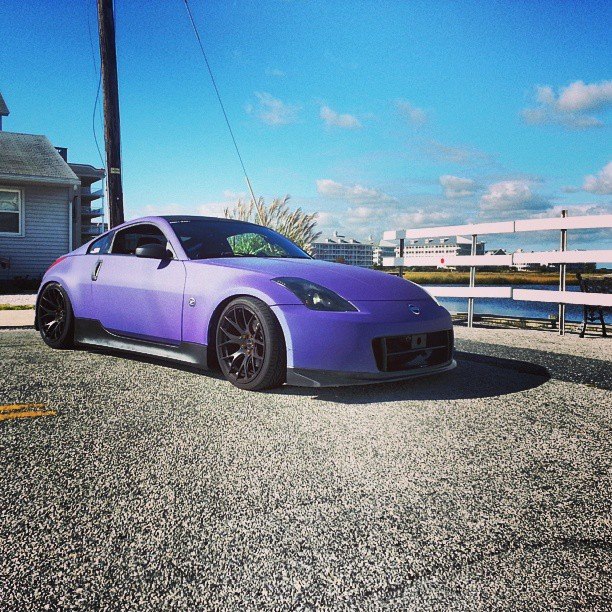
Here is how it sat as of last year:

Finally said eff it and dove head first putting a V8 into the Z without prior cross-platform experience. As of today, swap is done. Car runs and makes some good power (at least that's what the butt dyno tells me). I figure I can use this thread to show improvements made to the car post swap and others can use it for their knowledge as well. Please send me a PM or post here if you have any questions with your own swap and I'll be glad to share any knowledge that I have.
Spec list....
Swap Stuff:
-Fueled Racing Mount kit (Headers, Clutch MC kit, Drive shaft, misc lines)
-LQ9 from a 2005 Escalade (PCM, Pedal, TAC Module) (Car is DBW)
-T56 from a GTO (Stock GTO Clutch and Flywheel)
-Stock fuel rail
-Corvette Fuel Filter with -an lines
-Modified eBay Intake
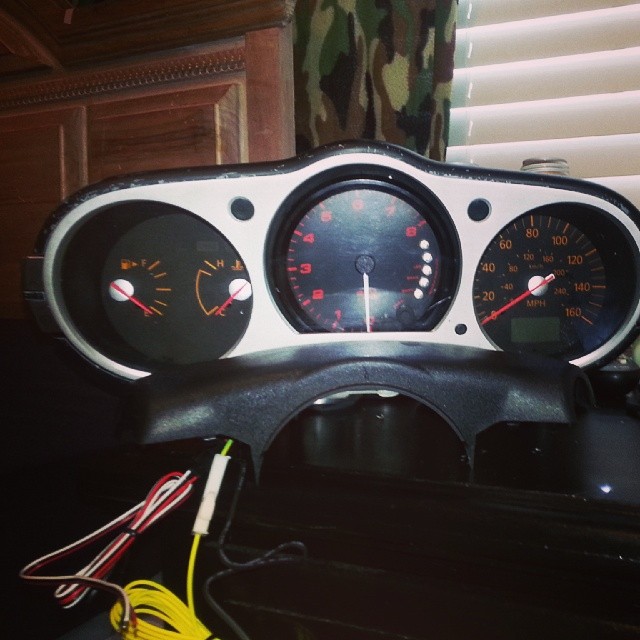
-Speedhut Tach
-Self modified harness (this really wasn't that hard, do it yourself! lt1swap.com will be your hero)
-No Nissan ECU at all
-Defi gauges (Oil pressure, Coolant temp)
-Innovate Wideband
-Chasebay Tucked Radiator (small core)
-Chasebay Fans (2 slim 8") and coolant overflow bottle
-Lots of random Home Depot bits
Suspension/Brakes/etc.:
-BC Coilovers BR Type
-SPL F/R Endlinks
-SPL Solid Diff Bushings
-Hotchkis F/R Sways
-SPC F/T Camber Arms
-Slotted/Drilled Rotors with Hawk pads
-Linea Corse LC818 19x9.5 and 19x11
-Cusco 1.5way LSD with 3.5 gears
-Stillen Catback
That's all I can think of off the top of my head, but if I think of more I'll add to it. But enough rambling, here are some pics. Thanks for looking!!
CL: Lurked. Bought Z. Bought bolt ons. Got bored. Insert V8 here.
Goodies!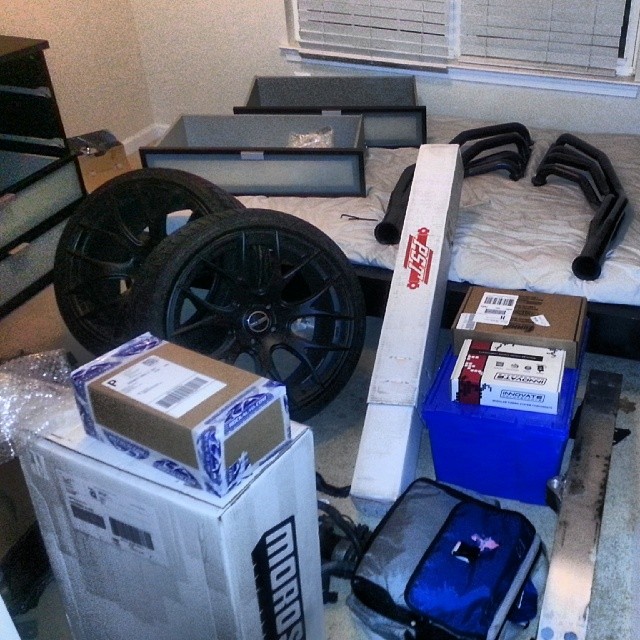
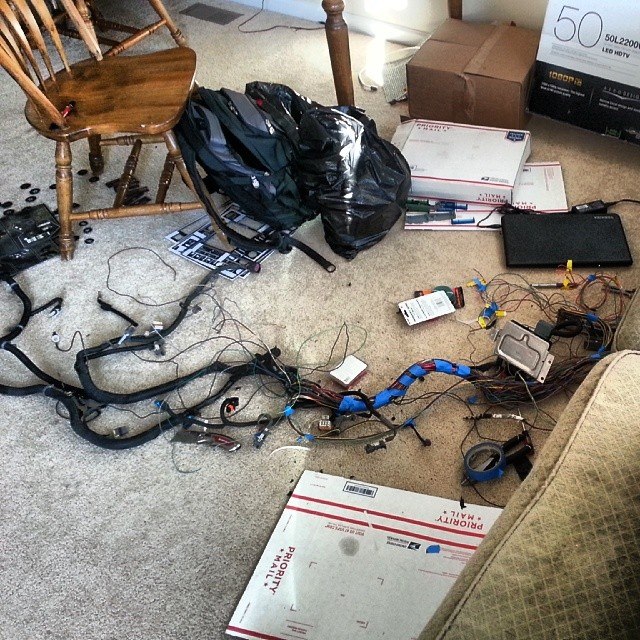
Wiring harness
Tach installed
All installed

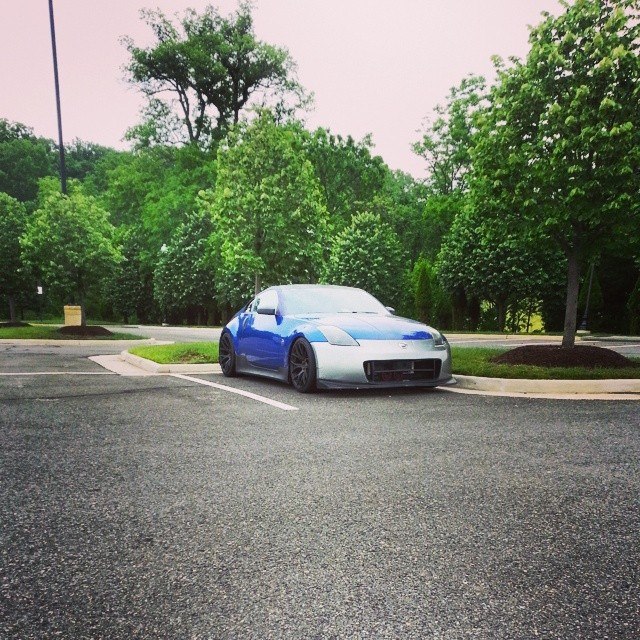
Here is how it sits as of today. (please excuse the multi-color. It's a project car, right? )
)
Teaser vid...
https://www.youtube.com/watch?v=aYmf...ature=youtu.be
First "build" thread, so cut me some slack!
Never posted much on the site, but have always "lurked" and searched. I've always wanted to do a build of any sorts since I was old enough to even think about driving. Always have had a car with some sort of minor league bolt ons, but never had the chance to do anything extreme.
Fast forward some time until 2011. Bought the Z with no end goal but to own a Z. Thought it cool to finally have RWD (previous cars have all been FWD), and some "decent" power. Did some bolt on's to ease the modding itch I've always had but was never fully satisfied.
Here is how it sat as of last year:


Finally said eff it and dove head first putting a V8 into the Z without prior cross-platform experience. As of today, swap is done. Car runs and makes some good power (at least that's what the butt dyno tells me). I figure I can use this thread to show improvements made to the car post swap and others can use it for their knowledge as well. Please send me a PM or post here if you have any questions with your own swap and I'll be glad to share any knowledge that I have.
Spec list....
Swap Stuff:
-Fueled Racing Mount kit (Headers, Clutch MC kit, Drive shaft, misc lines)
-LQ9 from a 2005 Escalade (PCM, Pedal, TAC Module) (Car is DBW)
-T56 from a GTO (Stock GTO Clutch and Flywheel)
-Stock fuel rail
-Corvette Fuel Filter with -an lines
-Modified eBay Intake
-Speedhut Tach
-Self modified harness (this really wasn't that hard, do it yourself! lt1swap.com will be your hero)
-No Nissan ECU at all
-Defi gauges (Oil pressure, Coolant temp)
-Innovate Wideband
-Chasebay Tucked Radiator (small core)
-Chasebay Fans (2 slim 8") and coolant overflow bottle
-Lots of random Home Depot bits
Suspension/Brakes/etc.:
-BC Coilovers BR Type
-SPL F/R Endlinks
-SPL Solid Diff Bushings
-Hotchkis F/R Sways
-SPC F/T Camber Arms
-Slotted/Drilled Rotors with Hawk pads
-Linea Corse LC818 19x9.5 and 19x11
-Cusco 1.5way LSD with 3.5 gears
-Stillen Catback
That's all I can think of off the top of my head, but if I think of more I'll add to it. But enough rambling, here are some pics. Thanks for looking!!
CL: Lurked. Bought Z. Bought bolt ons. Got bored. Insert V8 here.
Goodies!

Wiring harness

Tach installed

All installed

Here is how it sits as of today. (please excuse the multi-color. It's a project car, right?
)
Teaser vid...
https://www.youtube.com/watch?v=aYmf...ature=youtu.be
Last edited by mkiv20vt; 07-14-2014 at 07:32 AM. Reason: added parts


 05-28-2014, 04:40 PM
#4
New Member
Thread Starter
99% of it myself, with some help from a few local buddies. The last 1% that wasn't me was mating the headers to the existing Stillen cat-back.
I'll take some more videos here soon. It passed VA State Inspection today with no issues. I'll take that as sweet success.
I'll take some more videos here soon. It passed VA State Inspection today with no issues. I'll take that as sweet success.

 I would agree! congrats man

Trending Topics
05-29-2014, 07:08 AM
#8
New Member
Thread Starter
I started in December collecting parts, pulling the VQ, etc. It started for the first time in March, and I spent basically weekends and some week nights on it. Not too bad for my first!
Thanks for all the kind words!

 05-29-2014, 01:43 PM
#12
New Member
Thread Starter
A few things I would recommend based on my experience...
-Remove the "sub" firewall that shrouds the battery and brake MC. The rear bit of the passenger head will hit this sub firewall when lowering in the motor. I didn't do this so there was a bit of Dremel action that went on
 . If this isn't done, the last coilpack and wire will NOT fit as it will be pressed up against the sub firewall. I broke that coilpack when trying to get around without editing the sub firewall.
-When installing the headers, the steering shaft needs to be removed from the Rack. I suggest removing the knuckle that connects the shaft and rack while the motor is out of the car. The knuckle needs to be grinded down to be able to make a full rotation when turning the wheel. Again, found this out the hard way. Once grinded down, it doesn't hit the header.
-"Massage" the transmission tunnel a bit, if you know what I mean. I didn't do this, but when I pull the motor again to do a head swap I will. As of now, the t56 is STUFFED in the tunnel. There is 0 room for clearance.
-(Not a Fueled Racing specific tip) With the GTO shifter block, buy this shifter (http://www.afterthoughtsauto.com/lousshortstick1.html). If you don't, the stock gto shifter will hit the Z shifter shroud in 1st, 5th, and reverse...and it's quite annoying. The "short stick" not only fixed this, but makes shifts feel much better. It's got a cool bend towards the driver too. Here's a pic of it...


I figured I had to do something with the plate, so I made a vanity plate one night while indulging one too many beers...

Thanks for looking!
Last edited by mkiv20vt; 05-29-2014 at 01:46 PM.
05-29-2014, 01:44 PM
#13
New Member
Thread Starter
05-29-2014, 03:37 PM
#14
Registered User
iTrader: (2)
Join Date: Sep 2005
Location: Sterling, VA/WinterGarden, FL
Posts: 2,368
Likes: 0
Received 0 Likes
on
0 Posts
As someone who has personally seen and rode in the car, I can vouce for it's awesomeness. The owner is far too modest, car is a beast and the work is impressive. I think his next mod should be the " clean the oil and fluids off the walls and floors of his garage" mod.
05-29-2014, 05:34 PM
#15
Registered User
iTrader: (2)
Join Date: Oct 2005
Location: Work
Posts: 1,494
Likes: 0
Received 0 Likes
on
0 Posts
I didn't notice the youtube link the first time I looked at this thread. It made me laugh out loud (in the best way, watched it 3X). Great project you have going here man. Very excited to see more. I would love if you went into detail on various aspects of it such as the wiring/ECU/exhaust stuff.
 05-30-2014, 04:37 AM
#17
New Member
Thread Starter
I didn't notice the youtube link the first time I looked at this thread. It made me laugh out loud (in the best way, watched it 3X). Great project you have going here man. Very excited to see more. I would love if you went into detail on various aspects of it such as the wiring/ECU/exhaust stuff.
Thanks! The video was literally the first thing I did when I got it all together. Ya have to, ya know?
I will go into more detail about the little things here when I get some time.
05-30-2014, 06:29 AM
#18
New Member
Thread Starter
05-30-2014, 07:31 AM
#20
New Member
Thread Starter
Yup! I didn't care about retaining the factory Tach, Oil Pressure gauge and Coolant Temp gauge in the cluster since I had the DEFI gauges and Speedhut tach. The GM PCM had to be reflashed to remove VATs (Vehicle anti-theft system) and is controlling only the engine. All factory lights, wipers, radio, etc is still functional like normal.
Last edited by mkiv20vt; 05-30-2014 at 07:32 AM. Reason: added info

