Notices
Engine & Drivetrain VQ Power and Delivery

Cold Air Induction Box Build (Fabbed From Scratch)

Thread Tools
 
Search this Thread
 
Old 09-13-2014, 03:40 PM
  #1  
DarkRain0660
Registered User
Thread Starter
 
DarkRain0660's Avatar
 
Join Date: Jun 2013
Location: Fort Drum NY
Posts: 55
Likes: 0
Received 0 Likes on 0 Posts
Default Cold Air Induction Box Build (Fabbed From Scratch)

Hey guys been around for a while now watching the daily threads come and go and finally decided to leave my other projects alone in order to start on my Z. So first thing on my list after seeing the ARC intake box was to have something similar for much cheaper. So here is my first fab part for my Z. Only concern is possible heat soak but i will use insulation material later to fix that. You may like or you may hate but opinions are welcome all the same. Made for less than 100$ and start to finish in around 4-5 hours list of materials as follows

List of Materials

Sheet metal - 50$
Cardboard ( To make template ) - Free (had lying around)
Cut off wheel - 24$ harbor Freight
Assorted nutz and boltz - 6$ Lowes
Vice - Use somebodys if you dont have one
Any color marker to draw out template - 2$
tape measure - You should already have one ( shame on you if you dont )

process show below
Attached Thumbnails Cold Air Induction Box Build (Fabbed From Scratch)-20140722_200931.jpg   Cold Air Induction Box Build (Fabbed From Scratch)-20140722_200951.jpg   Cold Air Induction Box Build (Fabbed From Scratch)-20140725_181321.jpg   Cold Air Induction Box Build (Fabbed From Scratch)-20140722_201139.jpg   Cold Air Induction Box Build (Fabbed From Scratch)-20140722_201157.jpg  

Cold Air Induction Box Build (Fabbed From Scratch)-20140722_201050.jpg   Cold Air Induction Box Build (Fabbed From Scratch)-20140725_181403.jpg   Cold Air Induction Box Build (Fabbed From Scratch)-20140725_181329.jpg   Cold Air Induction Box Build (Fabbed From Scratch)-20140726_135421.jpg   Cold Air Induction Box Build (Fabbed From Scratch)-20140725_200623.jpg  

Old 09-13-2014, 03:47 PM
  #2  
DarkRain0660
Registered User
Thread Starter
 
DarkRain0660's Avatar
 
Join Date: Jun 2013
Location: Fort Drum NY
Posts: 55
Likes: 0
Received 0 Likes on 0 Posts
Default Continue...

2nd Part
Attached Thumbnails Cold Air Induction Box Build (Fabbed From Scratch)-20140726_135429.jpg   Cold Air Induction Box Build (Fabbed From Scratch)-20140726_152235.jpg   Cold Air Induction Box Build (Fabbed From Scratch)-20140726_152243.jpg   Cold Air Induction Box Build (Fabbed From Scratch)-20140726_152252.jpg   Cold Air Induction Box Build (Fabbed From Scratch)-20140727_132529.jpg  

Cold Air Induction Box Build (Fabbed From Scratch)-20140727_175520.jpg   Cold Air Induction Box Build (Fabbed From Scratch)-20140727_175447.jpg   Cold Air Induction Box Build (Fabbed From Scratch)-20140727_175506.jpg   Cold Air Induction Box Build (Fabbed From Scratch)-20140727_194329.jpg   Cold Air Induction Box Build (Fabbed From Scratch)-20140727_194358.jpg  

Old 09-13-2014, 03:52 PM
  #3  
DarkRain0660
Registered User
Thread Starter
 
DarkRain0660's Avatar
 
Join Date: Jun 2013
Location: Fort Drum NY
Posts: 55
Likes: 0
Received 0 Likes on 0 Posts
Default Continue

3rd Part
Attached Thumbnails Cold Air Induction Box Build (Fabbed From Scratch)-20140727_180232.jpg   Cold Air Induction Box Build (Fabbed From Scratch)-20140727_180242.jpg   Cold Air Induction Box Build (Fabbed From Scratch)-20140727_180247.jpg  
Old 09-13-2014, 03:56 PM
  #4  
DarkRain0660
Registered User
Thread Starter
 
DarkRain0660's Avatar
 
Join Date: Jun 2013
Location: Fort Drum NY
Posts: 55
Likes: 0
Received 0 Likes on 0 Posts
Default Aftermath

So since i finished it i have cleaned up the entire box as well as shaved all the bolts down, shaped up all the ugly metal overlaps and fixed all the rough edges and dents from me banging it around the first go around. Color change on the way soon ( dont like the burnt orange but it was on my shelf in my garage at the time so ). But i will make a better one as soon as i perfect every detail of it on this one first.
Old 09-14-2014, 11:25 AM
  #5  
mkiv20vt
New Member
 
mkiv20vt's Avatar
 
Join Date: Jan 2011
Location: Northern FL
Posts: 190
Likes: 0
Received 4 Likes on 3 Posts
Default

Looks cool. Any before dynos?
Old 09-14-2014, 12:00 PM
  #6  
92K1500
Registered User
iTrader: (1)
 
92K1500's Avatar
 
Join Date: Jan 2010
Location: Sapulpa, OK
Posts: 1,458
Likes: 0
Received 14 Likes on 13 Posts
Default

Did intake temps change any?
Old 09-14-2014, 02:48 PM
  #7  
DarkRain0660
Registered User
Thread Starter
 
DarkRain0660's Avatar
 
Join Date: Jun 2013
Location: Fort Drum NY
Posts: 55
Likes: 0
Received 0 Likes on 0 Posts
Default ...

I wish I could have done a before an after pull to see the results but the nearest dyno is 3 hrs away so that didn't seem worth it until i have more data.

I'll know the air temp change later this week as i ordered the Scantool MX link to monitor the changes through the engine while i mod the vehicle. UPS should be dropping it off tomorrow afternoon then i can do some real time logging and see the difference.

But in all honestly I thought that riding around for an hour or so would make it extremely hot to the touch due to head soak but popping the hood after a good "spirited" run i discovered it was barely warm to the touch. Which makes me believe that the front bumper is doing a great job of diffusing sufficient air up to the intake. More info on this later after i log a few drives with it on and off
Old 09-14-2014, 04:04 PM
  #8  
mr. sparco
New Member
iTrader: (13)
 
mr. sparco's Avatar
 
Join Date: Dec 2005
Location: Sunny Beaches
Posts: 7,086
Received 454 Likes on 318 Posts
Default


Should use the box as a negative mold for a composite one. Will block out the heat much better.
Old 09-14-2014, 04:15 PM
  #9  
DarkRain0660
Registered User
Thread Starter
 
DarkRain0660's Avatar
 
Join Date: Jun 2013
Location: Fort Drum NY
Posts: 55
Likes: 0
Received 0 Likes on 0 Posts
Default ...

You read my mind. Seen that video a while back and bought everything needed to do most of the car so I will be attempting that as well as a OEM style hood and a few other parts as soon as this winter comes and goes. For now it's all air flow. As soon as I'm pleased with some decent results I'll move onto exhaust flow ( also to be fabbed from scratch ) then suspension and wheels. So I have my work cut out for me over the next few months. Never plan on selling this car so I can take my time and do it right.
Old 09-15-2014, 10:14 PM
  #10  
waldo36
Registered User
iTrader: (2)
 
waldo36's Avatar
 
Join Date: Sep 2011
Location: Murfreesboro, TN
Posts: 309
Received 2 Likes on 2 Posts
Default

Originally Posted by mkiv20vt
Looks cool. Any before dynos?
I don't think that gains/losses would be noticeable on a dyno by just putting a box around the filter. The air may flow a little better to the filter, but not enough to affect the curves or A/F ratio to matter.
Old 09-17-2014, 06:43 PM
  #11  
DarkRain0660
Registered User
Thread Starter
 
DarkRain0660's Avatar
 
Join Date: Jun 2013
Location: Fort Drum NY
Posts: 55
Likes: 0
Received 0 Likes on 0 Posts
Default

He's right now that I've had a chance to look at some data from the ecu. So far my intake temps are only down a few degrees. I need to do some more with and without rides on a day with steady outside temperatures before I can confirm and post pics so I will try and have that done by the end of the weekend. I can say throttle response is slightly better around 60 to 70 mph and on up but no improvement at any lower speeds unfortunately. So I may try to inclose the box further and work on better channeling the air from the front bumper directly to the induction box somehow. Updates will follow soon
Old 09-18-2014, 04:47 PM
  #12  
mr. sparco
New Member
iTrader: (13)
 
mr. sparco's Avatar
 
Join Date: Dec 2005
Location: Sunny Beaches
Posts: 7,086
Received 454 Likes on 318 Posts
Default

Name:  4intaketube.jpg
Views: 26
Size:  315.0 KB
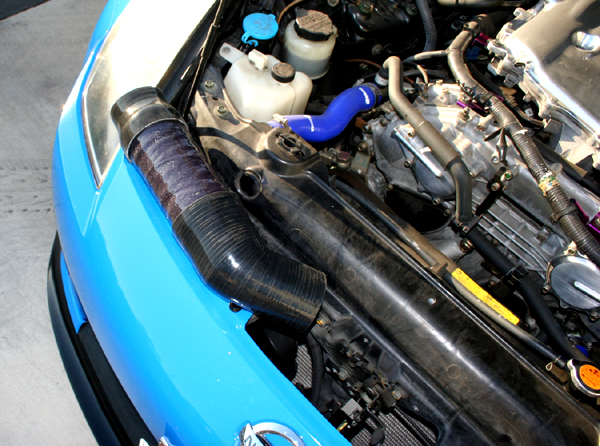
You inspired me to make a 4" ID composite intake tube. Now I'm going to need a tune.

Last edited by mr. sparco; 09-19-2014 at 07:47 PM.
Old 09-18-2014, 06:11 PM
  #13  
saywat?
Registered User
 
saywat?'s Avatar
 
Join Date: May 2008
Location: my350z
Posts: 2,481
Received 4 Likes on 3 Posts
Default

so wats the difference between oem airbox and this one? jus for fun?
Old 09-19-2014, 06:00 AM
  #14  
waldo36
Registered User
iTrader: (2)
 
waldo36's Avatar
 
Join Date: Sep 2011
Location: Murfreesboro, TN
Posts: 309
Received 2 Likes on 2 Posts
Default

Originally Posted by DarkRain0660
He's right now that I've had a chance to look at some data from the ecu. So far my intake temps are only down a few degrees. I need to do some more with and without rides on a day with steady outside temperatures before I can confirm and post pics so I will try and have that done by the end of the weekend. I can say throttle response is slightly better around 60 to 70 mph and on up but no improvement at any lower speeds unfortunately. So I may try to inclose the box further and work on better channeling the air from the front bumper directly to the induction box somehow. Updates will follow soon
Ya I just now saw where you have a second hole on facing towards the radiator. Definitely close that hole up because the air you have coming in from the front could swirl around and right back out of that side.

Maybe leave a small hole on that side, but fully enclose the rest of it. It just seems to me with that other side hole, your good air is coming in and then back out.
Old 09-19-2014, 09:24 AM
  #15  
DarkRain0660
Registered User
Thread Starter
 
DarkRain0660's Avatar
 
Join Date: Jun 2013
Location: Fort Drum NY
Posts: 55
Likes: 0
Received 0 Likes on 0 Posts
Default

That's the plan. Definitely gotta enclose the back of the box where the intake tube comes down too
Old 09-20-2014, 04:05 PM
  #16  
DarkRain0660
Registered User
Thread Starter
 
DarkRain0660's Avatar
 
Join Date: Jun 2013
Location: Fort Drum NY
Posts: 55
Likes: 0
Received 0 Likes on 0 Posts
Default

I want to see a pic of that composite tube installed btw !!!!! But the difference between mine and the OEM is nil right now until I data log some more and make enough changes to possibly see gains...so it's trial and error right now and I never have to look at anyone else's car and see the same intake
Old 09-20-2014, 05:01 PM
  #17  
mr. sparco
New Member
iTrader: (13)
 
mr. sparco's Avatar
 
Join Date: Dec 2005
Location: Sunny Beaches
Posts: 7,086
Received 454 Likes on 318 Posts
Default

Name:  5-1.jpg
Views: 29
Size:  45.8 KB
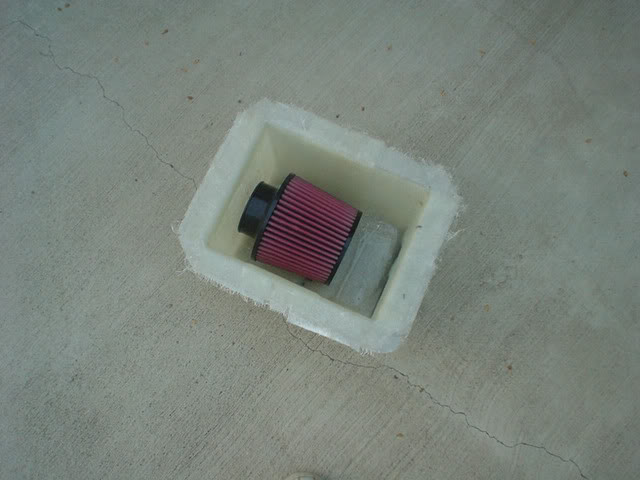
Working on a matching fg box before install.

Last edited by mr. sparco; 09-20-2014 at 06:11 PM.
Old 09-21-2014, 02:06 PM
  #18  
DarkRain0660
Registered User
Thread Starter
 
DarkRain0660's Avatar
 
Join Date: Jun 2013
Location: Fort Drum NY
Posts: 55
Likes: 0
Received 0 Likes on 0 Posts
Default

Looks like it's coming along , any picks of the other half yet or are you leaving it open?
Old 09-21-2014, 02:10 PM
  #19  
DarkRain0660
Registered User
Thread Starter
 
DarkRain0660's Avatar
 
Join Date: Jun 2013
Location: Fort Drum NY
Posts: 55
Likes: 0
Received 0 Likes on 0 Posts
Default

I've been busy cleaning up my exhaust and cutting out my rad diffuser plate
Attached Thumbnails Cold Air Induction Box Build (Fabbed From Scratch)-20140920_170700.jpg   Cold Air Induction Box Build (Fabbed From Scratch)-20140920_170620.jpg  
Old 09-21-2014, 06:15 PM
  #20  
mr. sparco
New Member
iTrader: (13)
 
mr. sparco's Avatar
 
Join Date: Dec 2005
Location: Sunny Beaches
Posts: 7,086
Received 454 Likes on 318 Posts
Default

I simplified it so it would just be a flat lid on top.


Quick Reply: Cold Air Induction Box Build (Fabbed From Scratch)


All times are GMT -8. The time now is 06:05 PM.