DIY plenum porting
 12-09-2012, 07:25 PM
#641
Registered User

started work on mine. plan to remove a lot of material around the out side of the ports and shape it.
[URL="[ame=http://www.flickr.com/photos/72945596@N08/8258955897/]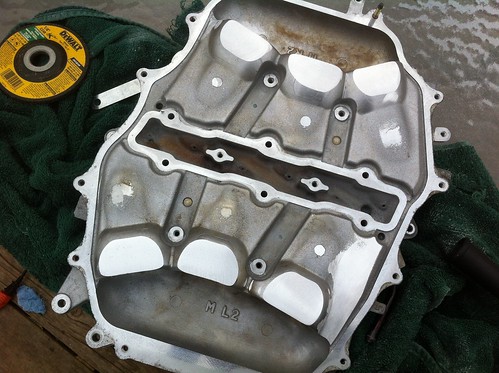 [/ame]
[ame=http://www.flickr.com/photos/72945596@N08/8258955897/]photo-35[/ame] by [ame=http://www.flickr.com/people/72945596@N08/]freddy 350z[/ame], on Flickr"]http://www.flickr.com/photos/72945596@N08/8258955897/http://www.flickr.com/photos/72945596@N08/8258955897/ by http://www.flickr.com/people/72945596@N08/, on Flickr[/ame]
[URL="[ame=http://www.flickr.com/photos/72945596@N08/8258955897/]
[/ame][ame=http://www.flickr.com/photos/72945596@N08/8258955897/]photo-35[/ame] by [ame=http://www.flickr.com/people/72945596@N08/]freddy 350z[/ame], on Flickr"]http://www.flickr.com/photos/72945596@N08/8258955897/http://www.flickr.com/photos/72945596@N08/8258955897/ by http://www.flickr.com/people/72945596@N08/, on Flickr[/ame]
 12-12-2012, 05:59 PM
#642
Registered User
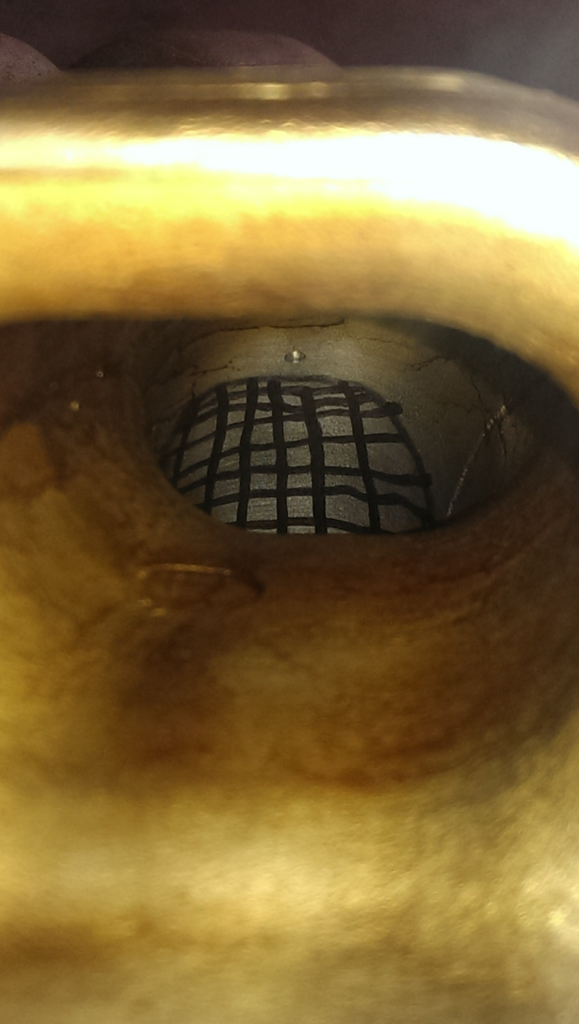
got the outer port shape roughed out. i took it down to the casting mark, which is about 5-6 mm of material. my grinder died, so i gotta pick up another one.
[URL="[ame=http://www.flickr.com/photos/72945596@N08/8267822909/]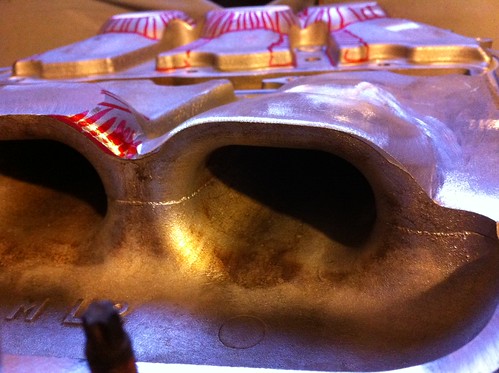 [/ame]
[ame=http://www.flickr.com/photos/72945596@N08/8267822909/]photo-36[/ame] by [ame=http://www.flickr.com/people/72945596@N08/]freddy 350z[/ame], on Flickr"]http://www.flickr.com/photos/72945596@N08/8267822909/http://www.flickr.com/photos/72945596@N08/8267822909/ by http://www.flickr.com/people/72945596@N08/, on Flickr[/ame]
those holes in the runners, the drain holes for the oil you get from the pcv valve. would it be a good ideal to weld those shut and just run a good air/oil separator instead. i cant hope but think these holes mess with the air flow.
[URL="[ame=http://www.flickr.com/photos/72945596@N08/8267822909/]
[/ame][ame=http://www.flickr.com/photos/72945596@N08/8267822909/]photo-36[/ame] by [ame=http://www.flickr.com/people/72945596@N08/]freddy 350z[/ame], on Flickr"]http://www.flickr.com/photos/72945596@N08/8267822909/http://www.flickr.com/photos/72945596@N08/8267822909/ by http://www.flickr.com/people/72945596@N08/, on Flickr[/ame]
those holes in the runners, the drain holes for the oil you get from the pcv valve. would it be a good ideal to weld those shut and just run a good air/oil separator instead. i cant hope but think these holes mess with the air flow.
Last edited by freddys 350z; 12-12-2012 at 06:02 PM.
 02-05-2013, 07:46 PM
#645
Registered User
update. finally bought a new grinder and did a little more roughing out. ive probably remove 1/2 lbs of aluminum. a lot of material was removed around and on top of the ports.
[URL="[ame=http://www.flickr.com/photos/72945596@N08/8448820733/]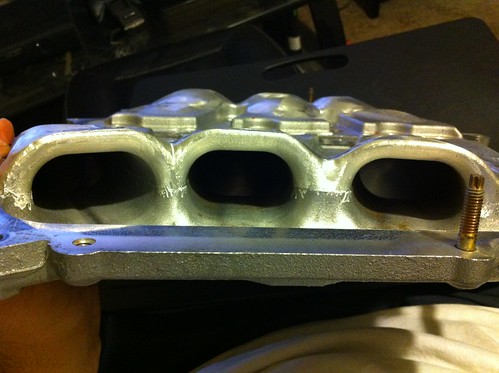 [/ame]
[ame=http://www.flickr.com/photos/72945596@N08/8448820733/]photo 2[/ame] by [ame=http://www.flickr.com/people/72945596@N08/]freddy 350z[/ame], on Flickr"]http://www.flickr.com/photos/72945596@N08/8448820733/http://www.flickr.com/photos/72945596@N08/8448820733/ by http://www.flickr.com/people/72945596@N08/, on Flickr[/ame]
[URL="[ame=http://www.flickr.com/photos/72945596@N08/8449905028/] [/ame]
[ame=http://www.flickr.com/photos/72945596@N08/8449905028/]photo 1[/ame] by [ame=http://www.flickr.com/people/72945596@N08/]freddy 350z[/ame], on Flickr"]http://www.flickr.com/photos/72945596@N08/8449905028/http://www.flickr.com/photos/72945596@N08/8449905028/ by http://www.flickr.com/people/72945596@N08/, on Flickr[/ame]
[URL="[ame=http://www.flickr.com/photos/72945596@N08/8448820733/]
[/ame][ame=http://www.flickr.com/photos/72945596@N08/8448820733/]photo 2[/ame] by [ame=http://www.flickr.com/people/72945596@N08/]freddy 350z[/ame], on Flickr"]http://www.flickr.com/photos/72945596@N08/8448820733/http://www.flickr.com/photos/72945596@N08/8448820733/ by http://www.flickr.com/people/72945596@N08/, on Flickr[/ame]
[URL="[ame=http://www.flickr.com/photos/72945596@N08/8449905028/]
[/ame][ame=http://www.flickr.com/photos/72945596@N08/8449905028/]photo 1[/ame] by [ame=http://www.flickr.com/people/72945596@N08/]freddy 350z[/ame], on Flickr"]http://www.flickr.com/photos/72945596@N08/8449905028/http://www.flickr.com/photos/72945596@N08/8449905028/ by http://www.flickr.com/people/72945596@N08/, on Flickr[/ame]


 04-08-2013, 03:50 AM
#647

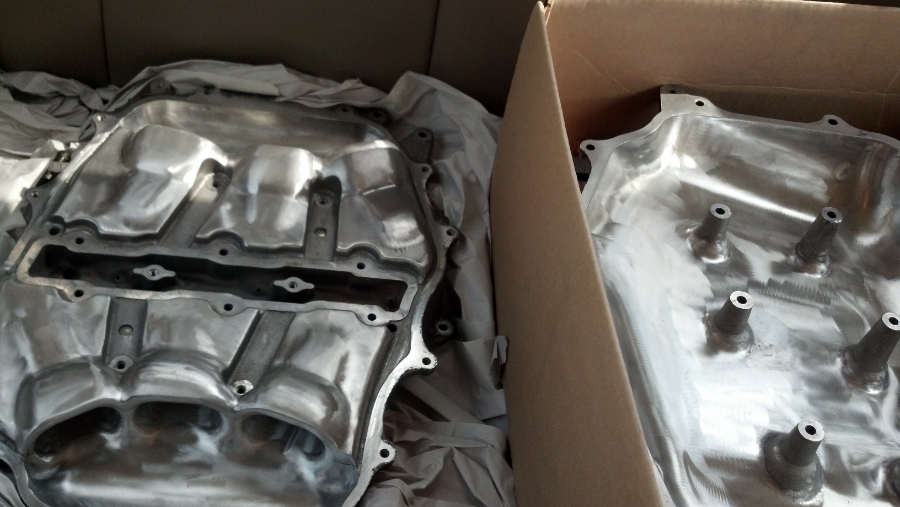
Been a while since I posted in this thread. I have kinda taken it to an extreme with my manifold. Polished inside, lowered the top of the front and middle runners a bit and eliminated all the bolts that are in the center. Also welded in the PCV area and then welded the entire manifold shut. Large NPT plugs (which sit perfectly flush on the inside) provide access to the six main bolts that bolt the manifold to the collector.
All powder coated and ready to install:

On the car:

The center has a plate welded on top in order to add rigidity for high boost and provide better thread contact for the plugs.
All powder coated and ready to install:
On the car:
The center has a plate welded on top in order to add rigidity for high boost and provide better thread contact for the plugs.
04-08-2013, 04:10 AM
#648

Was wondering,whats the real power gain that you can feel after all the
labor to port&polish the insides of a plenum?I can see it maybe if this was done
on a FI converted car.Adding a spacer itself would should give the same results.
Years ago,had a Lincoln LSC.Did a lot of mods on the engine which essentially
is a Mustang motor.After adding a Paxton SC,I had the plenum polished and ported.
I would'nt have done the plenum if I had not done the SC.
04-08-2013, 09:09 AM
#649
Registered User

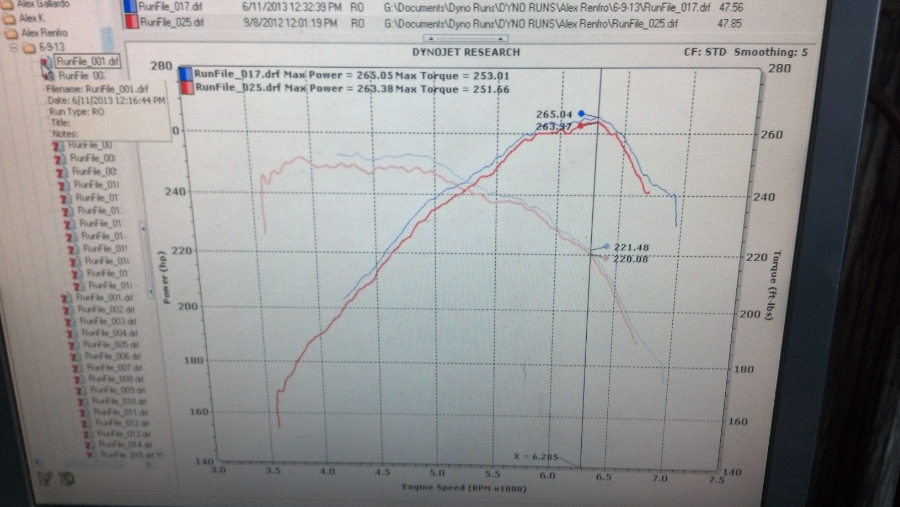
I gained 8hp as you can see in my dyno plot without any tuning of the ecu.
The engine is running quite lean until 4500rpm.
There is more to gain with a proper tuning.
The engine is running quite lean until 4500rpm.
There is more to gain with a proper tuning.
04-08-2013, 05:22 PM
#650
Was wondering,whats the real power gain that you can feel after all the
labor to port&polish the insides of a plenum?I can see it maybe if this was done
on a FI converted car.Adding a spacer itself would should give the same results.
Years ago,had a Lincoln LSC.Did a lot of mods on the engine which essentially
is a Mustang motor.After adding a Paxton SC,I had the plenum polished and ported.
I would'nt have done the plenum if I had not done the SC.
labor to port&polish the insides of a plenum?I can see it maybe if this was done
on a FI converted car.Adding a spacer itself would should give the same results.
Years ago,had a Lincoln LSC.Did a lot of mods on the engine which essentially
is a Mustang motor.After adding a Paxton SC,I had the plenum polished and ported.
I would'nt have done the plenum if I had not done the SC.
07-20-2013, 05:46 AM
#651

Decided to do this little project for my 03 DE after snatching up a used lower for a good price. Took 5mm off of the front two runners and cleaned up every casting line visible and down through the runners.
The finished product (Also cleaned up the upper)
Closeup
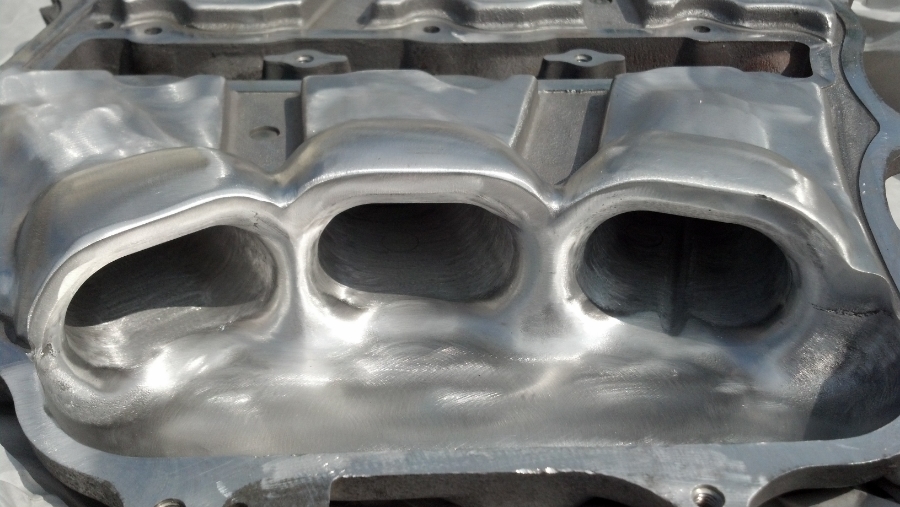
Compared to my stock lower
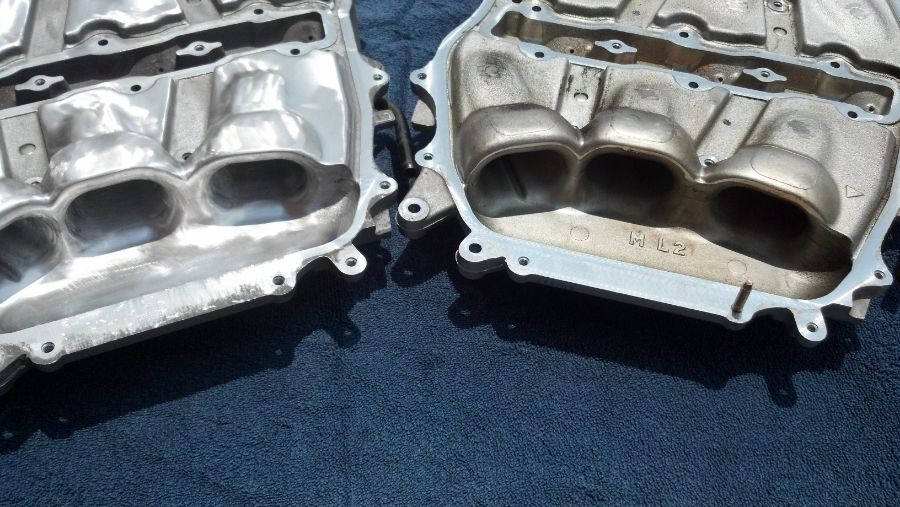
Dyno Results are about what I expected since mine is just the DE. However, it did prove a nice gain throughout my entire powerband so I was able to do something right. This was paired with a spacer as well. I'd be interested to see what this plenum setup would do on a REVUP.
Sounds pretty good! I noticed a bit more of a growl from it. Doing headers next week with art pipes so I'm hoping this little mod will compliment it well.

The finished product (Also cleaned up the upper)

Closeup

Compared to my stock lower

Dyno Results are about what I expected since mine is just the DE. However, it did prove a nice gain throughout my entire powerband so I was able to do something right. This was paired with a spacer as well. I'd be interested to see what this plenum setup would do on a REVUP.

Sounds pretty good! I noticed a bit more of a growl from it. Doing headers next week with art pipes so I'm hoping this little mod will compliment it well.
06-22-2014, 11:58 AM
#652
Registered User

Join Date: Mar 2014
Location: Norcal
Posts: 11
Likes: 0
Received 0 Likes
on
0 Posts
I bought a used lower plenum from a guy who did the Mrev2. I did a fairly fast modification of reducing the front two tops and then cleaned up the casting lines on the other four. Did it all with an angle grinder, Dremel, and finished with 100 grit sandpaper. Took about 90 minutes. Comments?
I am also installing a 5/16 Motordyne spacer and (hopefully) solving a minor #6 oil leak all at the same time.
I am also installing a 5/16 Motordyne spacer and (hopefully) solving a minor #6 oil leak all at the same time.
Last edited by audiophil350z; 06-22-2014 at 12:03 PM.
06-23-2014, 09:55 AM
#654

I wonder what would happen if that whole top was cut off so the air didn't have to travel around the bend and just went straight down to the head instead. (I'm F/I)
EDITTT Realized that kinetix pretty much did this with their aftermarket plenum and didn't really see gains unless over 500whp??, but not sure if anyone tried this with a stock plenum
EDITTT Realized that kinetix pretty much did this with their aftermarket plenum and didn't really see gains unless over 500whp??, but not sure if anyone tried this with a stock plenum
Last edited by iideadeyeii; 06-23-2014 at 09:56 AM.
 06-25-2014, 11:40 PM
#656
Registered User
Join Date: Mar 2014
Location: Norcal
Posts: 11
Likes: 0
Received 0 Likes
on
0 Posts
The basic thought was to polish the tops of the back four and cut down the front two. I am assuming the lines in the casting are parting versus a design to impact the airflow, so removing them in polishing is a good thing. Seems to me that the tops are the only place where the air flow is impacted as that is the restriction to the plenum top. At that point you have a restriction, therefore the flow velocity is the highest. Polishing the remaining lower areas on the plenum seems like a waste of time and effort as those will be low pressure and flow. If the height is doubled, the velocity is halved for the same volume of air moved, so the finish is much less important My point was that it is a reasonably short job then. No reason to spend 10 hours polishing areas that are not going to impact flow.
pfregeolle What more would you do?
pfregeolle What more would you do?
Last edited by audiophil350z; 06-25-2014 at 11:44 PM.
 10-10-2014, 05:05 PM
#658

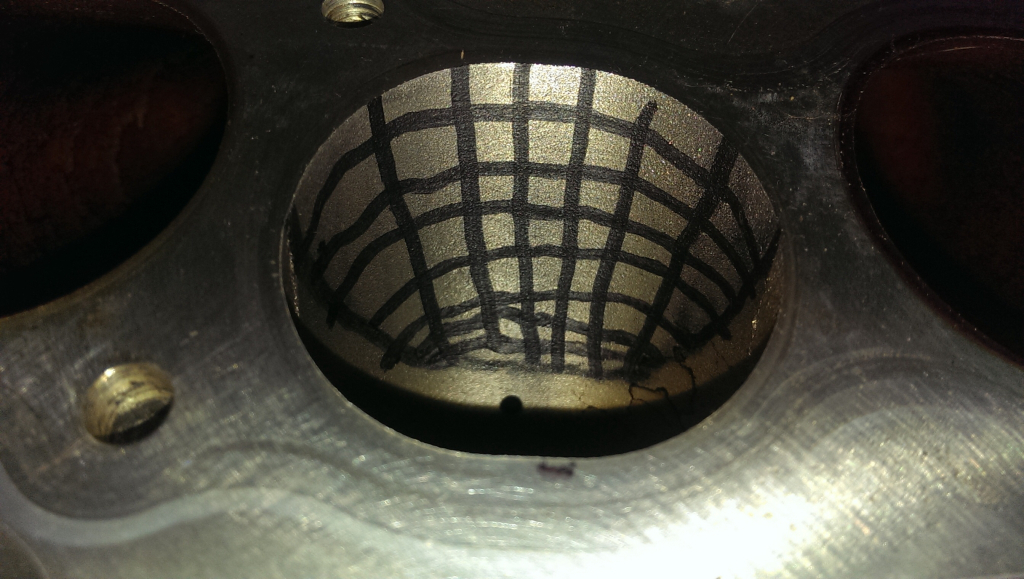
So I know that the thing to do is shave the top of the runners. But I haven't seen hardly anybody widen the inside the mouth of the runner. What is the difference widening the mouth of the runners vs shaving the top?
To me it seems to make more sense to leave the runners the same height and remove material from the inside. Or is there something about that that I'm not understanding?
To me it seems to make more sense to leave the runners the same height and remove material from the inside. Or is there something about that that I'm not understanding?
10-10-2014, 09:50 PM
#659

One thing to also consider is the shape of the entrance of the runners. If you shave off material on the inside, the velocity stack shape may be altered and you risk reducing air velocity.
10-11-2014, 06:56 AM
#660
Upper plenum is at an angle, air is channeled through the center from the rear. The top of the front two runners is restricting the airflow. Your freeing up the restriction and increasing volume near those runners improving air flow. This has been tried and proven since way back when.
One thing to also consider is the shape of the entrance of the runners. If you shave off material on the inside, the velocity stack shape may be altered and you risk reducing air velocity.
One thing to also consider is the shape of the entrance of the runners. If you shave off material on the inside, the velocity stack shape may be altered and you risk reducing air velocity.
Well I have the V+ paired with a 1/2" spacer. So my angle level isn't as severe as the factory upper.
Ok, that makes sense. I will not be cutting the top of the runners.
So now this leads to my next question. I haven't seen anyone remove material from bottom of the runners. Where the bottom of the plenum matches up to the actual runners. The turn is narrow, so what if you removed the shaded area to keep the same diameter down to the oil blow by hole? Effectively widening the turn and allowing more air to flow down.


Last edited by waldo36; 10-11-2014 at 07:01 AM.