Oil Cooler Install With Pictures
 06-15-2006, 04:05 AM
#1
Registered User
Thread Starter
iTrader: (1)

Join Date: May 2005
Location: Tyler, Tx
Posts: 172
Likes: 0
Received 0 Likes
on
0 Posts
In the continued preperation for up coming track days, I decided to install an oil cooler. I figured an oil cooler would be cheap insurance at extending engine life. I looked at all the oil coolers that were available and decided to put my own setup together. The problem I found with the ones that came ready for the 350Z were that they were small, expensive, and with the intercooler, they were hard to mount in an area in the grill that would receive air flow. Here are the parts:
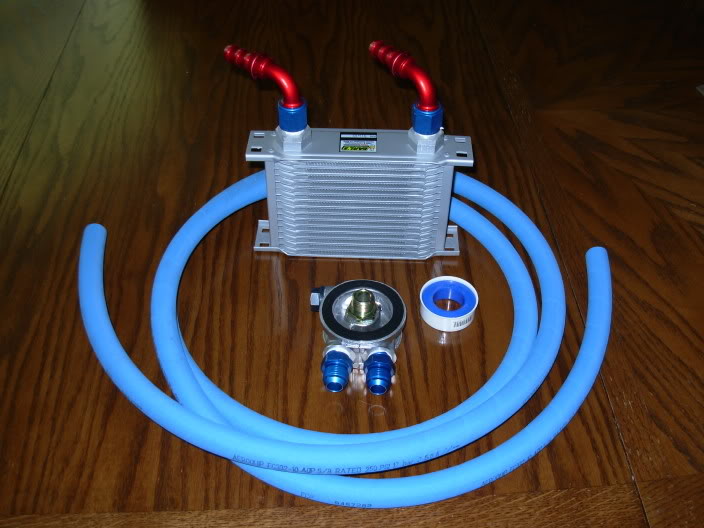
1. Earls 16 Row oil Cooler-#21610ERL
2. Mocal Thermostatically controlled sandwhich plate-#SP1FT
3. 10' of -10an Aeroquip Socketless Hose-#FCV1010 (Only used 5ft)
4. -10an to 1/2" fitting x2-#220047 (These are the blue fittings in the Sandwhich plate.)
5. 90 degree -10an socketless fitting x4-FBM1534 (2 on the oil cooler, 2 connected to the fittings on the sandwhich plate)
6. Teflon tape at all connections.
I bought all of this from Summit Racing except for the sandwhich plate. I found it at Racer Parts Wholesale.
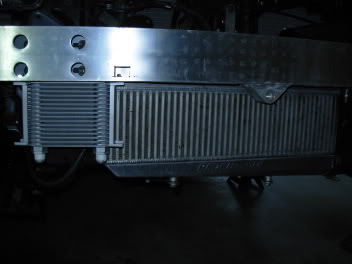
Here's a picture of where I mounted the oil cooler. I wasn't able to mount it the way I wanted to, so here was my second choice. Working around the intercooler makes options tough. It is mounted at an angle to hopefully catch air coming in through our small grill and direct it over the majority of the cooler.
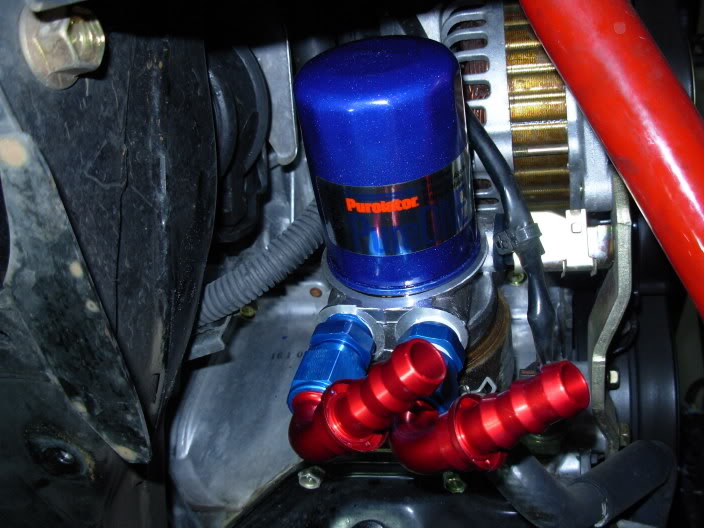
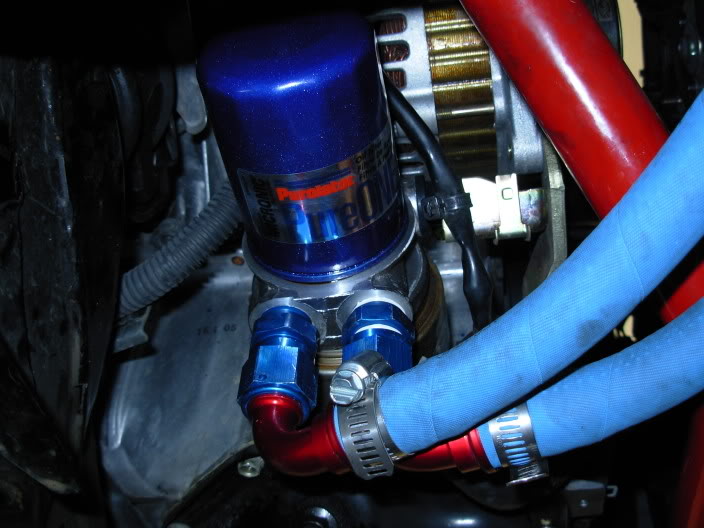
Here's a picture of the Mocal sandwich plate with the necessary fittings.
The finished product. 90% of the oil cooler gets direct airflow through the grill. Earls oil cooler installed using (2) 90 degree fittings. -10an Aeroquip hose connected. Although you don't have to use hose clamps on socketless hose, I did anyways since I had them laying around. Call it peace of mind.
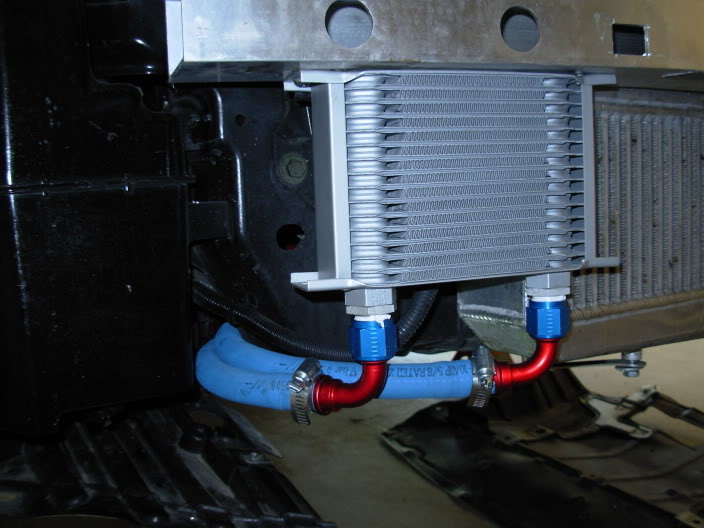
Mocal sandwhich plate with hose connected. Once again I added hose clamps. I routed both hoses through the plastic shield near the winshield wiper fluid container.
Before this install took place, a friend and I getto rigged an oil temperature gauge to my car. We went for some VERY spirited driving and noted oil temperatures of 230 degrees. This was last weekend when the temperatures outside were 90 degrees. 10w-40 Synthetic oil used.
After install, same getto rigged oil temperature gauge installed, we took the car for the same drive. Outside temperature were about 95 today. New 10w-40 synthetic oil. Oil temperatures were in the 200-205 range, max. Seems like the oil cooler works well. I did have to add an extra 1/2 quart of oil and will check it again later. More may be needed. I'll just have to watch and see.
I wish I could take credit for an original idea, but I had a lot of help from 350Zteve. I PM'd him numerous times in regards to the install. He was extremely helpful. You can find his post here:
https://my350z.com/forum/showthread....cooler+install
1. Earls 16 Row oil Cooler-#21610ERL
2. Mocal Thermostatically controlled sandwhich plate-#SP1FT
3. 10' of -10an Aeroquip Socketless Hose-#FCV1010 (Only used 5ft)
4. -10an to 1/2" fitting x2-#220047 (These are the blue fittings in the Sandwhich plate.)
5. 90 degree -10an socketless fitting x4-FBM1534 (2 on the oil cooler, 2 connected to the fittings on the sandwhich plate)
6. Teflon tape at all connections.
I bought all of this from Summit Racing except for the sandwhich plate. I found it at Racer Parts Wholesale.
Here's a picture of where I mounted the oil cooler. I wasn't able to mount it the way I wanted to, so here was my second choice. Working around the intercooler makes options tough. It is mounted at an angle to hopefully catch air coming in through our small grill and direct it over the majority of the cooler.
Here's a picture of the Mocal sandwich plate with the necessary fittings.
The finished product. 90% of the oil cooler gets direct airflow through the grill. Earls oil cooler installed using (2) 90 degree fittings. -10an Aeroquip hose connected. Although you don't have to use hose clamps on socketless hose, I did anyways since I had them laying around. Call it peace of mind.
Mocal sandwhich plate with hose connected. Once again I added hose clamps. I routed both hoses through the plastic shield near the winshield wiper fluid container.
Before this install took place, a friend and I getto rigged an oil temperature gauge to my car. We went for some VERY spirited driving and noted oil temperatures of 230 degrees. This was last weekend when the temperatures outside were 90 degrees. 10w-40 Synthetic oil used.
After install, same getto rigged oil temperature gauge installed, we took the car for the same drive. Outside temperature were about 95 today. New 10w-40 synthetic oil. Oil temperatures were in the 200-205 range, max. Seems like the oil cooler works well. I did have to add an extra 1/2 quart of oil and will check it again later. More may be needed. I'll just have to watch and see.
I wish I could take credit for an original idea, but I had a lot of help from 350Zteve. I PM'd him numerous times in regards to the install. He was extremely helpful. You can find his post here:
https://my350z.com/forum/showthread....cooler+install
Last edited by RBALDINELLII; 06-15-2006 at 09:00 AM.
 06-15-2006, 08:56 AM
#3
Registered User
Thread Starter
iTrader: (1)
Join Date: May 2005
Location: Tyler, Tx
Posts: 172
Likes: 0
Received 0 Likes
on
0 Posts
My power stock power steering cooler is on the left side of the intercooler. I still haven't figured out where to put the Earls cooler yet for it.
06-15-2006, 09:21 AM
#4
Originally Posted by RBALDINELLII
My power stock power steering cooler is on the left side of the intercooler. I still haven't figured out where to put the Earls cooler yet for it.
just to let you know, there is an Ebay vendor that puts together a nice setup for a relatively good price:
Remote mount oil cooler setup for 289
or
Filter plate installed oil cooler setup for 249
I have one of these on order. Unfortunately FedEx lost the package a couple weeks ago, so I have yet to get this inhand. I have bought from this vendor before and he has been more than helpful resolving the shipping issue I have on my current purchase. The core he uses looks to be the same as the earls 19 row core. I had attempted to price everything out, and found the ebay package to be a good price for a complete setup.
Good luck - happy boosting
06-15-2006, 10:20 AM
#5

I have the nismo power steering cooler and my installer mounted it basically on top of the intercooler behind the bumper brace. It's not in direct contact with outside air, but air gets sucked up into that area. I haven't had a chance to test if I'd lose power steering on the track yet - too damn hot for tracking - 110 degrees outside here
I have my vortech air filter relocated to be in that area as well just like the ATI and TN kit
I have my vortech air filter relocated to be in that area as well just like the ATI and TN kit
06-15-2006, 10:24 AM
#6
Originally Posted by Zivman
That looks like nice install.
just to let you know, there is an Ebay vendor that puts together a nice setup for a relatively good price:
Remote mount oil cooler setup for 289
or
Filter plate installed oil cooler setup for 249
I have one of these on order. Unfortunately FedEx lost the package a couple weeks ago, so I have yet to get this inhand. I have bought from this vendor before and he has been more than helpful resolving the shipping issue I have on my current purchase. The core he uses looks to be the same as the earls 19 row core. I had attempted to price everything out, and found the ebay package to be a good price for a complete setup.
Good luck - happy boosting
those kits look nice, but I'm not sure if the cooler being 10 inches wide instead of 8 would fit as well if you have an ATI or vortech
06-15-2006, 10:51 AM
#7
Registered User
Thread Starter
iTrader: (1)
Join Date: May 2005
Location: Tyler, Tx
Posts: 172
Likes: 0
Received 0 Likes
on
0 Posts
Picking the right size oil cooler was hard to determine because I wasn't sure just how big everything would be assembled. Where I mounted mine, it couldn't be any taller. I could have gone a few inches wider for sure.
Trending Topics
10-17-2006, 03:18 PM
#8
Registered User
iTrader: (6)

Join Date: Aug 2006
Location: CA
Posts: 875
Likes: 0
Received 0 Likes
on
0 Posts
Originally Posted by Zivman
That looks like nice install.
just to let you know, there is an Ebay vendor that puts together a nice setup for a relatively good price:
Remote mount oil cooler setup for 289
or
Filter plate installed oil cooler setup for 249
I have one of these on order. Unfortunately FedEx lost the package a couple weeks ago, so I have yet to get this inhand. I have bought from this vendor before and he has been more than helpful resolving the shipping issue I have on my current purchase. The core he uses looks to be the same as the earls 19 row core. I had attempted to price everything out, and found the ebay package to be a good price for a complete setup.
Good luck - happy boosting
just to let you know, there is an Ebay vendor that puts together a nice setup for a relatively good price:
Remote mount oil cooler setup for 289
or
Filter plate installed oil cooler setup for 249
I have one of these on order. Unfortunately FedEx lost the package a couple weeks ago, so I have yet to get this inhand. I have bought from this vendor before and he has been more than helpful resolving the shipping issue I have on my current purchase. The core he uses looks to be the same as the earls 19 row core. I had attempted to price everything out, and found the ebay package to be a good price for a complete setup.
Good luck - happy boosting
10-17-2006, 03:39 PM
#9
Registered User

Join Date: Nov 2004
Location: tennessee
Posts: 376
Likes: 0
Received 0 Likes
on
0 Posts
Just a slight clarification for the uninitiated: The teflon tape was used on the pipe thread mating surfaces only, not on the flare connections.
Sweet installation, by the way!
Sweet installation, by the way!
10-17-2006, 05:05 PM
#10
Registered User
iTrader: (6)
Join Date: Aug 2006
Location: CA
Posts: 875
Likes: 0
Received 0 Likes
on
0 Posts
One other observation: How come the one on ebay has extra lines and a engine block adapter for engine oil coming directly from the engine? Does your method work just as well?
10-20-2006, 10:37 AM
#11
Registered User
Thread Starter
iTrader: (1)
Join Date: May 2005
Location: Tyler, Tx
Posts: 172
Likes: 0
Received 0 Likes
on
0 Posts
Originally Posted by bullseye
Just a slight clarification for the uninitiated: The teflon tape was used on the pipe thread mating surfaces only, not on the flare connections.
Sweet installation, by the way!
Sweet installation, by the way!
05-11-2007, 11:01 AM
#12
Registered User

Join Date: May 2007
Location: yes
Posts: 1
Likes: 0
Received 0 Likes
on
0 Posts
Originally Posted by DMK
One other observation: How come the one on ebay has extra lines and a engine block adapter for engine oil coming directly from the engine? Does your method work just as well?
The oil filter is mounted remotely and easier to get to when changing, but the major problem with this setup is getting the right engine mount, as they tend to loosen up overtime and you get an oil leak. The one used in this write up screws on to the stock filter mount with an extension so the leaks are eliminated and you don't relocate the filter. which also saves you from running an extra line.
07-08-2007, 03:57 PM
#15
Registered User
iTrader: (18)
Join Date: Jun 2004
Location: New Mexico
Posts: 3,285
Likes: 0
Received 0 Likes
on
0 Posts
Thanks for this. Have the Stillen oil cooler in my garage waiting for install. Im going to try to do it myself with a friend. How long did the install take?
07-09-2007, 12:45 AM
#17
Registered User
iTrader: (18)
Join Date: Jun 2004
Location: New Mexico
Posts: 3,285
Likes: 0
Received 0 Likes
on
0 Posts
Well took us a couple hours but it came out nice. Not much room with the intercooler piping and intercooler for the Vortech kit. Gunna go give it a spin now and see if we cant spring any leaks.
Last edited by Barzten1; 07-09-2007 at 01:57 AM.
07-13-2007, 06:17 AM
#18
Registered User
Thread Starter
iTrader: (1)
Join Date: May 2005
Location: Tyler, Tx
Posts: 172
Likes: 0
Received 0 Likes
on
0 Posts
Congrats. You'll be surprised how well it works. Over all, I probably spent two hours putting it on and checking it, and re-checking, and then triple checking. The first few days I was under the car constantly. It never leaked. Hope your happy with it.
Over all, I probably spent two hours putting it on and checking it, and re-checking, and then triple checking. The first few days I was under the car constantly. It never leaked. Hope your happy with it.
Last edited by RBALDINELLII; 07-13-2007 at 06:21 AM.
