Assembly of my new Built Short Block
 02-26-2008, 06:16 PM
#181
The baby is up and running. Very intimidating growl. Greddy TT exhaust is much more intimidating sounding straight thru, rather than thru the turbo's.
Idling well even though she has cams.
I have to flush out the power steering fluid, since the stuff in there is foaming up. Any ideas on proper draining techniques. I could just pull a hose and let it drain, but how can I ensure that I get all of the funky old stuff out???
Need some ideas.
Idling well even though she has cams.
I have to flush out the power steering fluid, since the stuff in there is foaming up. Any ideas on proper draining techniques. I could just pull a hose and let it drain, but how can I ensure that I get all of the funky old stuff out???
Need some ideas.
 03-11-2008, 05:41 AM
#182
500 miles into the break-in. Not enough time in a day to drive around.
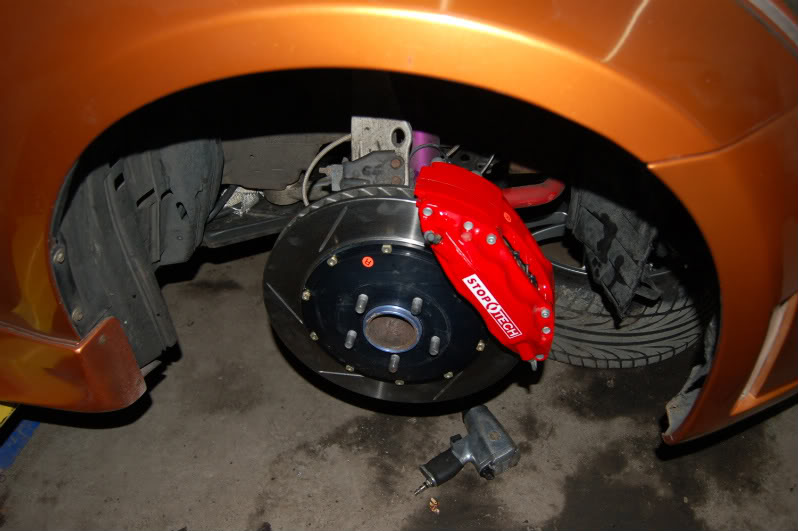
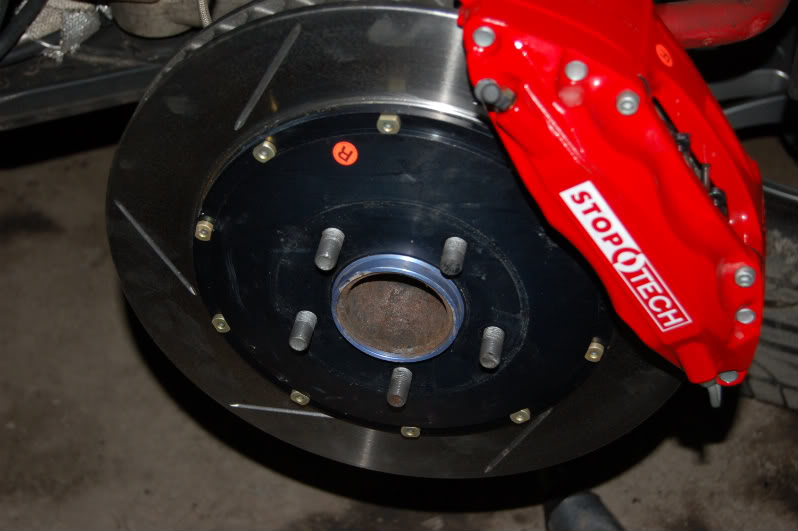
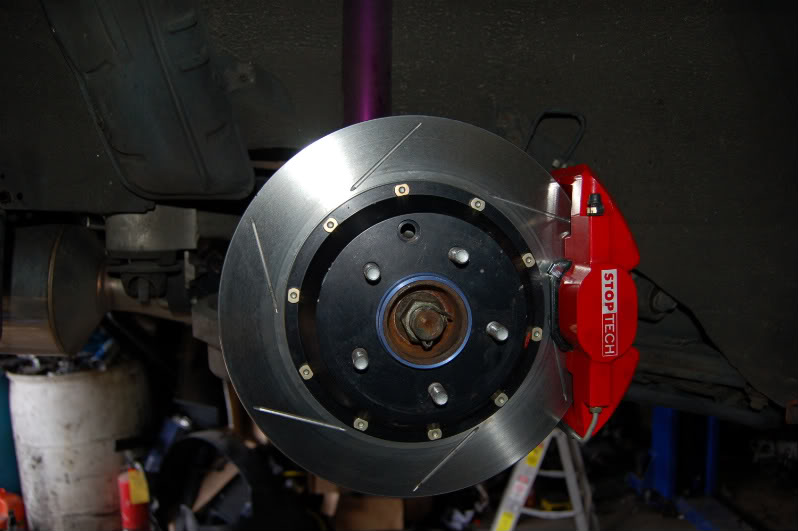
I just picked up a sweet set of Stoptech BBK and now I need to wait for a brake bleeder I ordered to arrive to finish the job. I thought I could use the Mightvac to pull the fluid out, but apparently the calipers are a bit stubborn and I will have to try another technique. I'll let you know in a day or two.
Old Brakes:
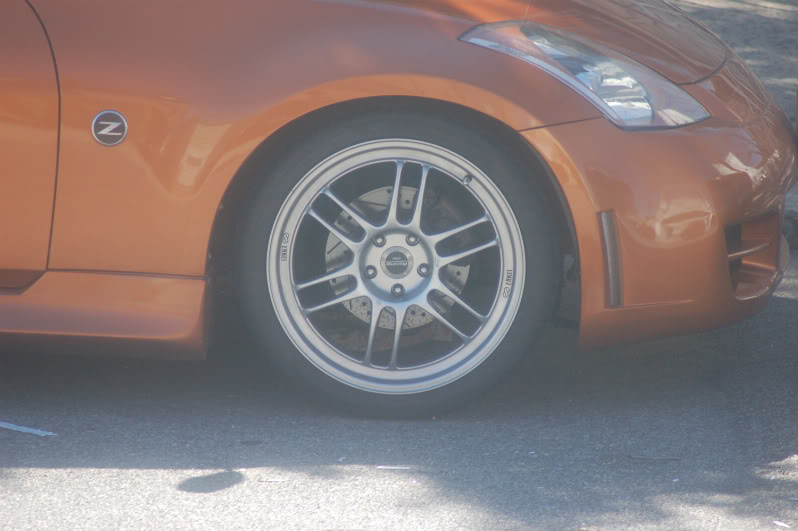

New Sweetness:
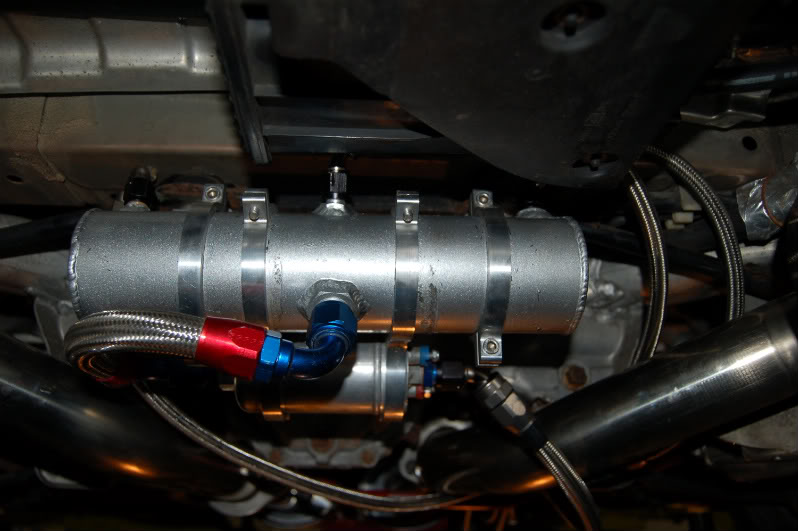
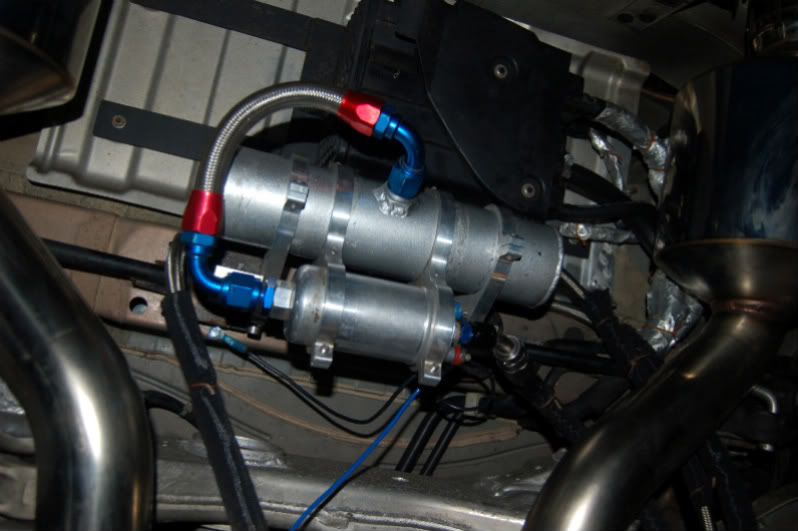
Also just finished installing the new AAM Surge Tank and pump for my second fuel pump to provide enough fuel to support 700rwhp.
First pic was prior to completion...mocking it up for fitness. I re-routed a couple of lines to help keep away from the exhaust.
I just picked up a sweet set of Stoptech BBK and now I need to wait for a brake bleeder I ordered to arrive to finish the job. I thought I could use the Mightvac to pull the fluid out, but apparently the calipers are a bit stubborn and I will have to try another technique. I'll let you know in a day or two.
Old Brakes:
New Sweetness:
Also just finished installing the new AAM Surge Tank and pump for my second fuel pump to provide enough fuel to support 700rwhp.
First pic was prior to completion...mocking it up for fitness. I re-routed a couple of lines to help keep away from the exhaust.
Last edited by rrmedicx; 03-11-2008 at 05:48 AM.
03-11-2008, 10:32 AM
#183
Thanks guys & gals...The new motor is silk and I am just trying to be proactive. Its almost fate that brought me to this point...I get a chance to do things over a little better than before.
Fluidamper, new EMS - ProEFI, Oil cooler, Power steering cooler, Stoptech brakes so I can stop this thing, and a few other little odds and ends.
All in all it should be great.
Fluidamper, new EMS - ProEFI, Oil cooler, Power steering cooler, Stoptech brakes so I can stop this thing, and a few other little odds and ends.
All in all it should be great.
03-15-2008, 03:47 PM
#184
Just about 200 miles to go before tear down again...Ah hell, I'll probably tear it down next week...I can't wait any more...the suspense is killing me.
"Driving in a world without boost...leaves me yearning"....Almost sounds like a Geico commercial with the announcer voice-over. LOL
"Driving in a world without boost...leaves me yearning"....Almost sounds like a Geico commercial with the announcer voice-over. LOL
 03-16-2008, 03:17 PM
#186
Engine failure was caused by an oil starvation problem that lead to detonation that killed some engine bearings that blew bearing metal everywhere, including into the turbos. So everything had to get rebuilt...engine and turbos. That brings us up to speed.
Thanks to Julian an MRC, I got the help I needed to get the turbos rebuilt and I purchased a replacement engine from Kyle at IPP, Junior helped me to get my hands on a primo EMS (ProEFI). So I owe a lot of people thanks for there help in getting me back on my feet.
I am almost ready to give it another go. Its just about time to pull out the engine and build it back up to TT mode. Bigger and better than before.
I'll probably start a new thread once its all up and running.
03-17-2008, 05:33 AM
#188
oil starvation = not enough oil. Doesn't matter where, its just not enough. Engines don't like that very much.
If you want more detail on this just PM me. This is an old issue, I have long since moved on to bigger and better things.
Thanks.
If you want more detail on this just PM me. This is an old issue, I have long since moved on to bigger and better things.
Thanks.
04-01-2008, 10:36 AM
#189
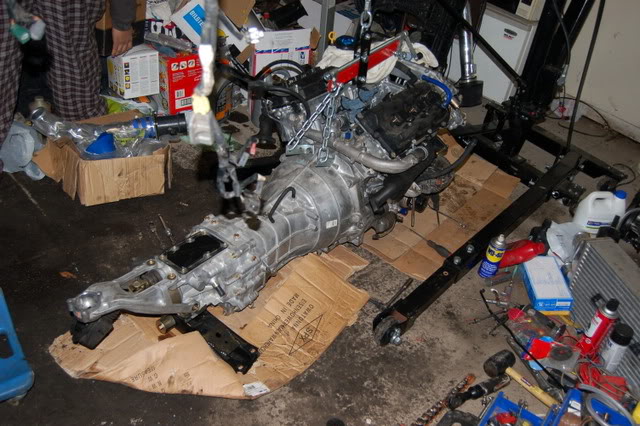
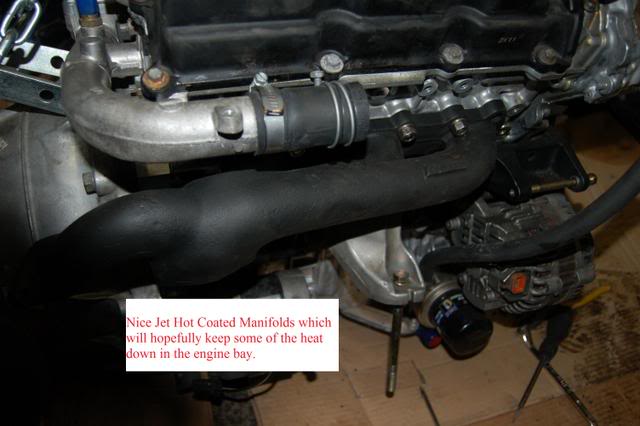
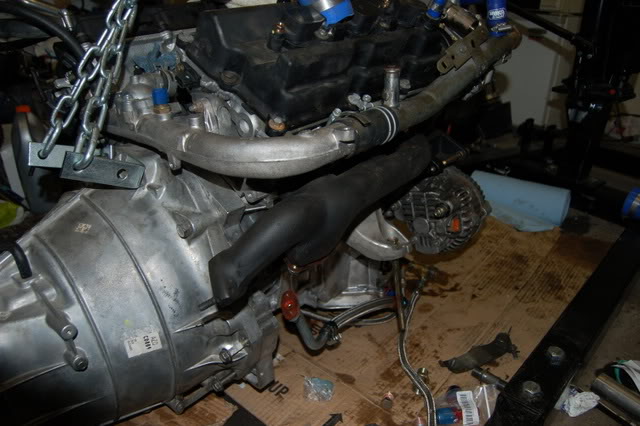
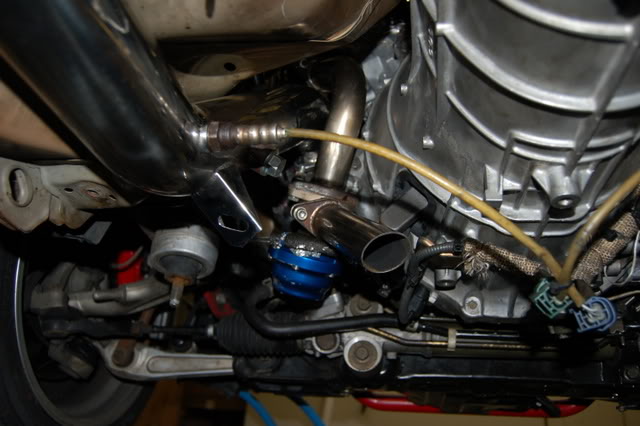
Well I achieved my 1000 miles for proper break in and I have successfully removed the engine (& tranny) on Thursday 3/27 removed the stock exhaust manifolds (for sale) replaced them with Jet Hot Coated Greddy Turbo Manifolds, installed the rebuilt turbos (Thanks Julian) along with SS return lines from AAM. Put the engine back in on Friday 3/28.
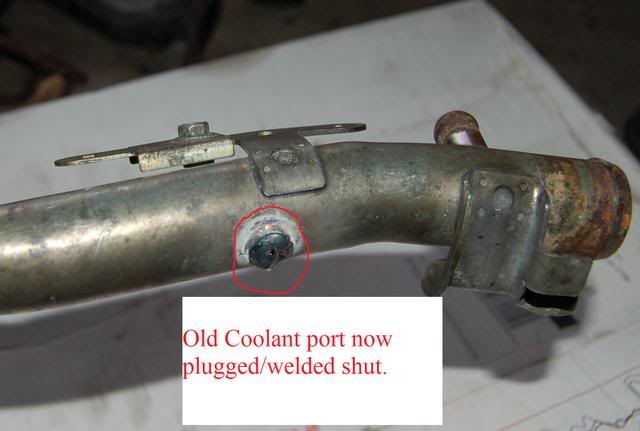
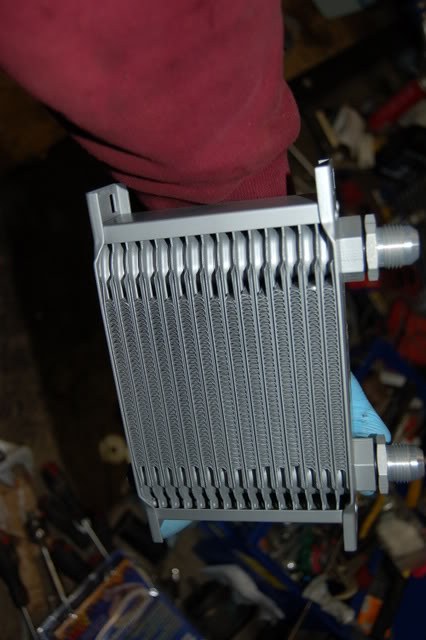
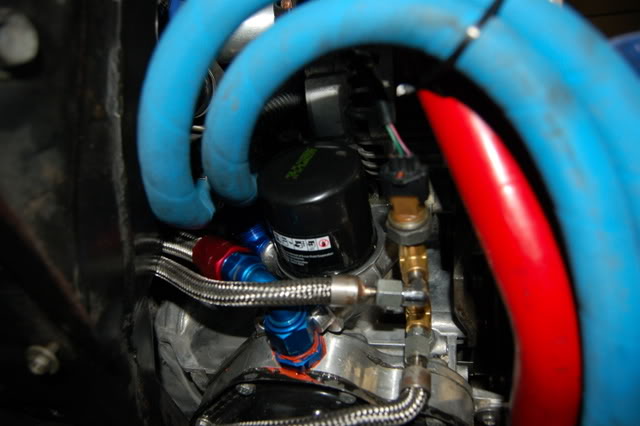
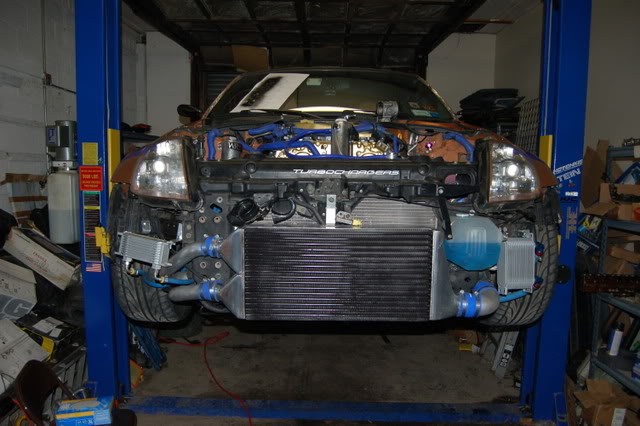
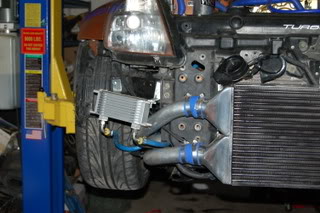
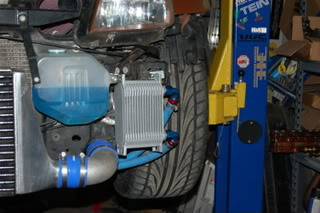
I also decided to weld shut the coolant port coming down the passenger side to the oil cooler/warmer and go with a "standalone" oil cooler. I now use a custom mounted oil cooler on the driver side of the inter-cooler. I also installed an upgraded Stillen Power Steering cooler to the Passenger side of the inter-cooler.
I have completed 99% of the re-assembly. All that is left is to install the ProEFI and connect the sensors I purchased (Fuel & Air pressure sensors).
Once that is done the final Piece is the exhaust.
For some reason, the Greddy TT exhaust does not mate well with the SGP Downpipes. I guess I may have to clock the turbo housing just a bit to make it fit right. It apparently is only a problem on the driver side. The passenger exhaust mates up OK.
This new issue is a result of having had the turbos rebuilt. Apparently Greddy did not set them up 100% perfectly before shipping back to me. So now, I have to play around with the alignment of the compressor housing until it is perfect and the exhaust lines up.
Now that I figured that one out, I guess its just a matter of getting to it.
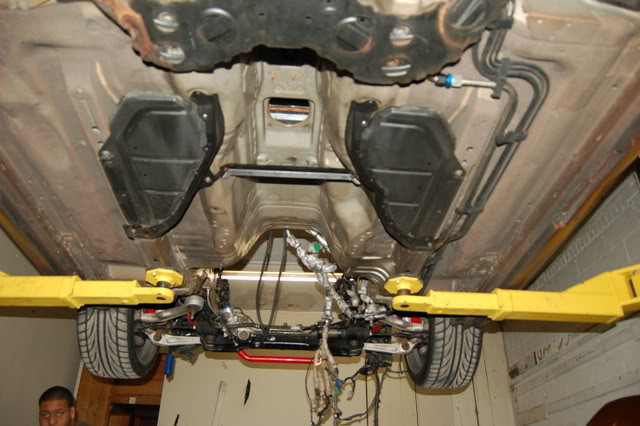
I managed to sell off my suspension (D2's) because my wife couldn't take the harsh ride. (great for the track or auto-X) And now that she is PREGNANT!! I have to comply by downgrading to something more forgiving. I opted for a set of BC coilovers which I hope will cure the comfort bug and allow her to ride with me...comfortably.
I also decided to weld shut the coolant port coming down the passenger side to the oil cooler/warmer and go with a "standalone" oil cooler. I now use a custom mounted oil cooler on the driver side of the inter-cooler. I also installed an upgraded Stillen Power Steering cooler to the Passenger side of the inter-cooler.
I have completed 99% of the re-assembly. All that is left is to install the ProEFI and connect the sensors I purchased (Fuel & Air pressure sensors).
Once that is done the final Piece is the exhaust.
For some reason, the Greddy TT exhaust does not mate well with the SGP Downpipes. I guess I may have to clock the turbo housing just a bit to make it fit right. It apparently is only a problem on the driver side. The passenger exhaust mates up OK.
This new issue is a result of having had the turbos rebuilt. Apparently Greddy did not set them up 100% perfectly before shipping back to me. So now, I have to play around with the alignment of the compressor housing until it is perfect and the exhaust lines up.
Now that I figured that one out, I guess its just a matter of getting to it.
I managed to sell off my suspension (D2's) because my wife couldn't take the harsh ride. (great for the track or auto-X) And now that she is PREGNANT!! I have to comply by downgrading to something more forgiving. I opted for a set of BC coilovers which I hope will cure the comfort bug and allow her to ride with me...comfortably.
Last edited by rrmedicx; 04-01-2008 at 10:49 AM.
 04-01-2008, 01:09 PM
#191
Here are some shots of the project:
I think I'm starting to get the hang of this. LOL
Gutted:
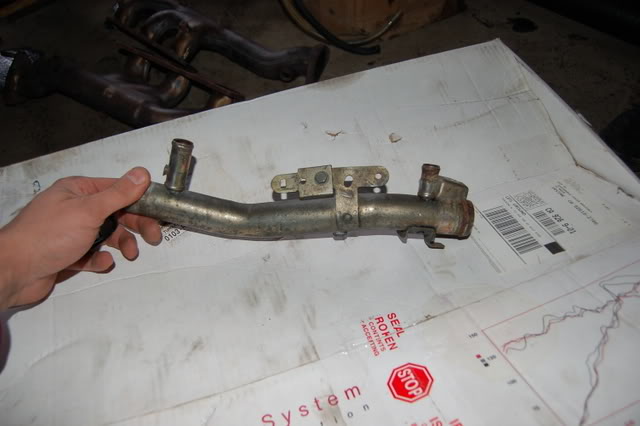
Coolant pipe modification for oil warmer delete:
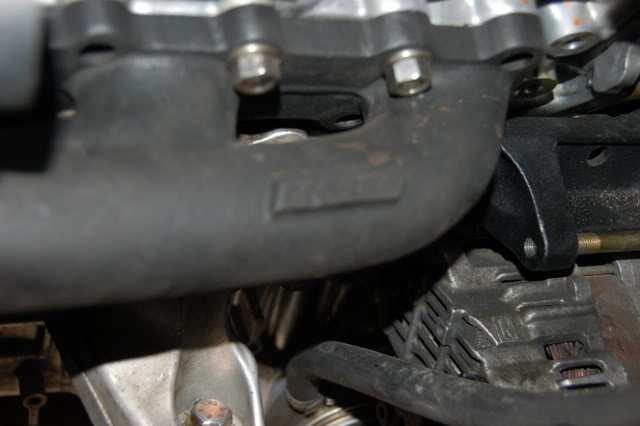
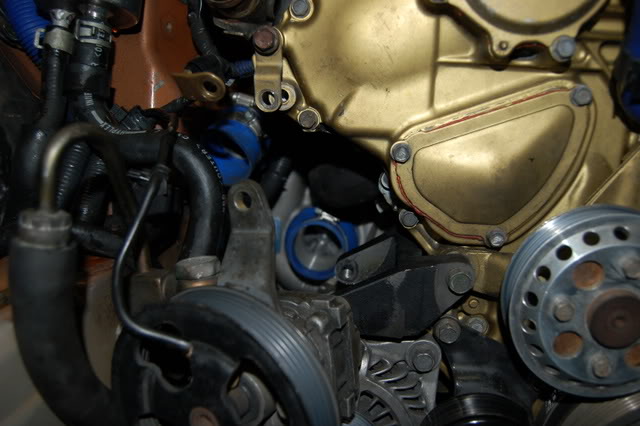
Jet Hot coated manifolds;
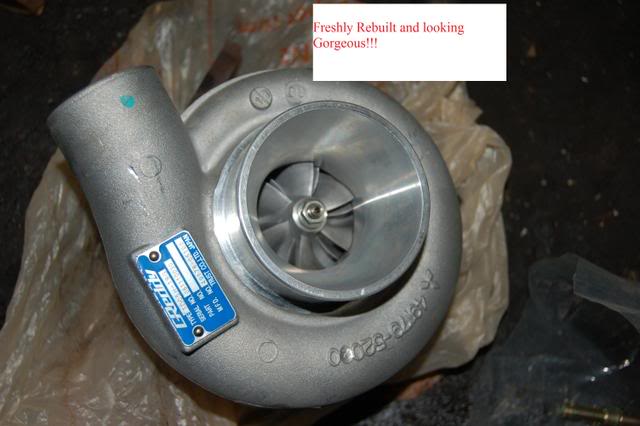
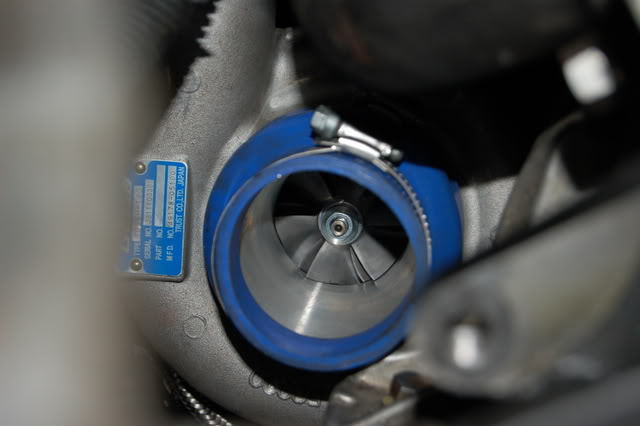
Rebuilt Turbos:
Caught thgis on someone else's thread (maybe Joe Kenefic) I spotted a slightly burnt Coupler for the turbo on the passenger side. Even though I wrapped it in double layers of heat wrap.
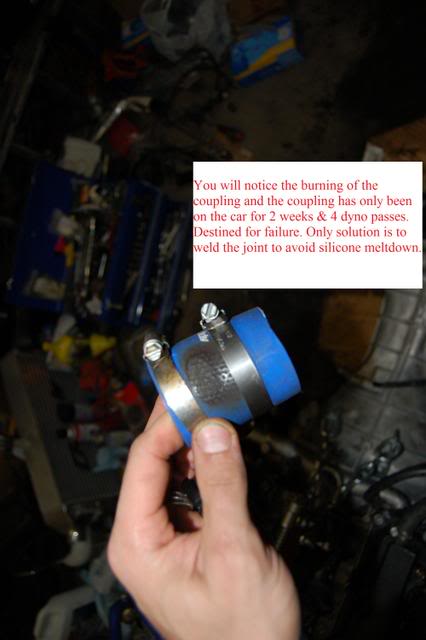
Probably got burnt from the exhaust manifold getting too hot;
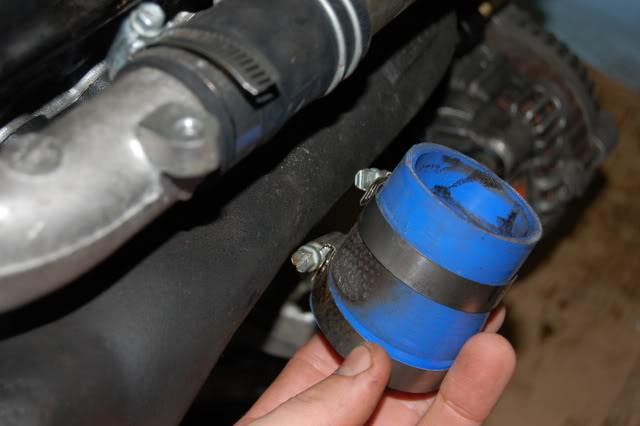
This should fix that:
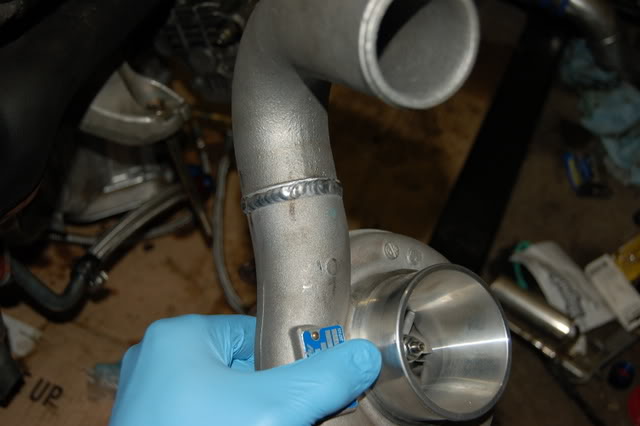
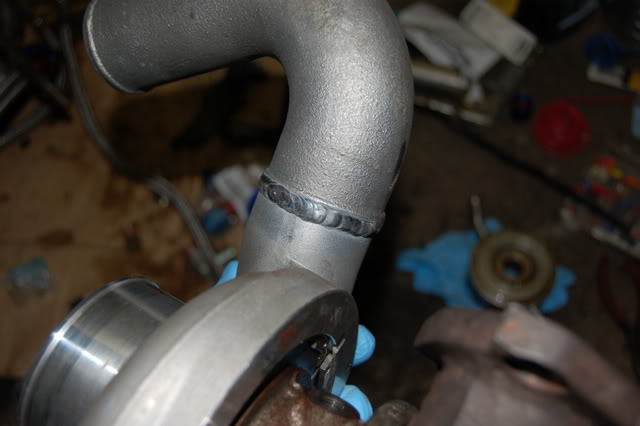
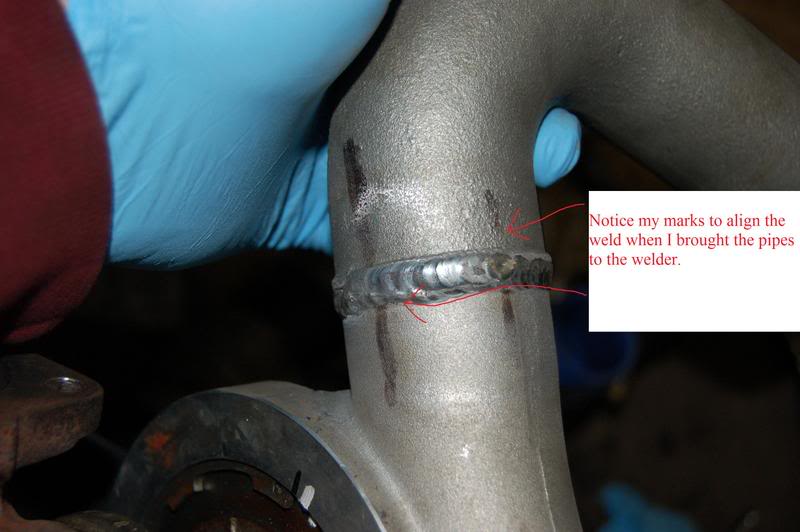
Nice Welding job by Crazy Don in Long Island:
New Cooler
I think it is my PS Cooler
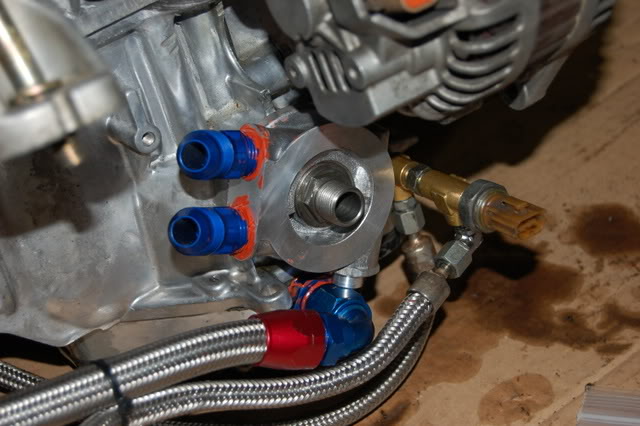
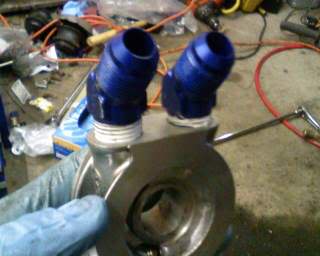
Mocal sandwich plate installed:

Attempted Re-Entry:
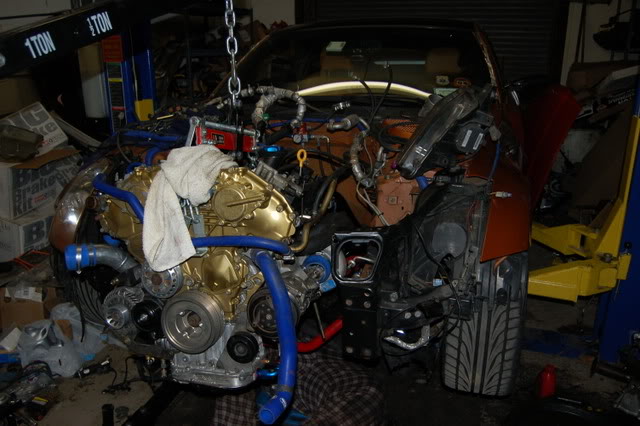
Is that a turbo hiding back there:
It is:
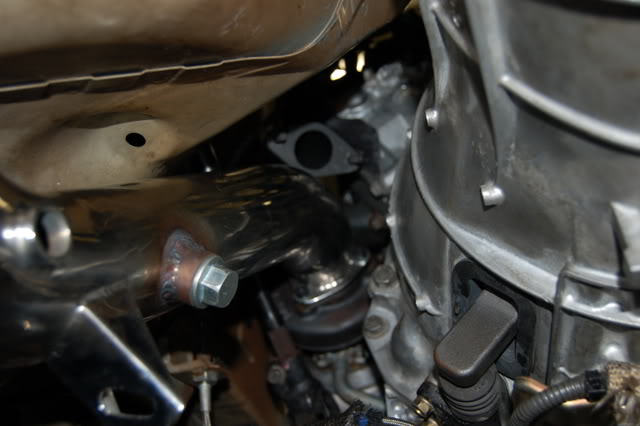
New SGP 3" downpipe and exhaust port for wastegate hiding up top:
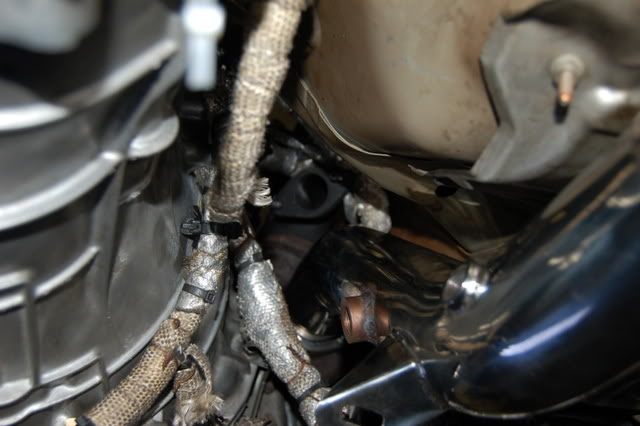
And driver side:
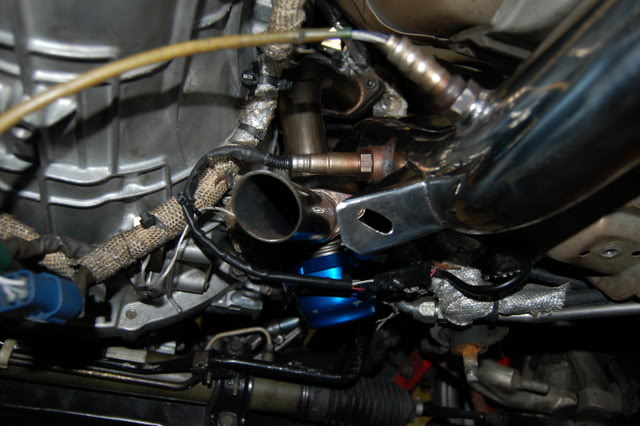
Now with Open Dump in place...Man that was a B$tch to install:
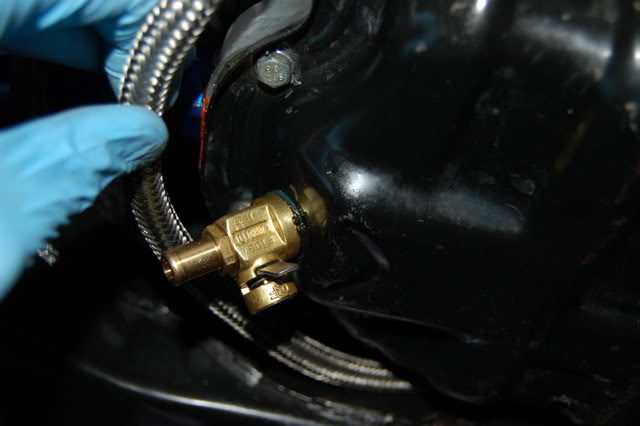
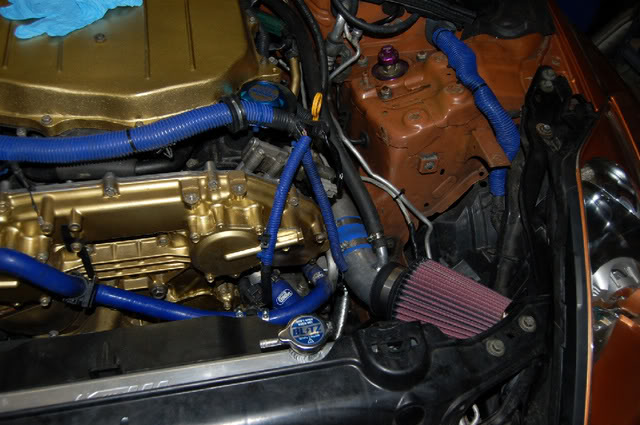
Oil Cooler Lines:
New oil Drain Plug...makes oil changes a snap:
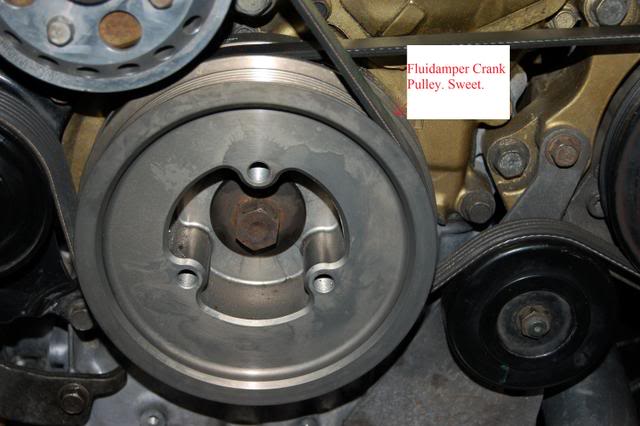
Got rid of the UR crank pulley and replaced it with Fluidamper crank pulley:
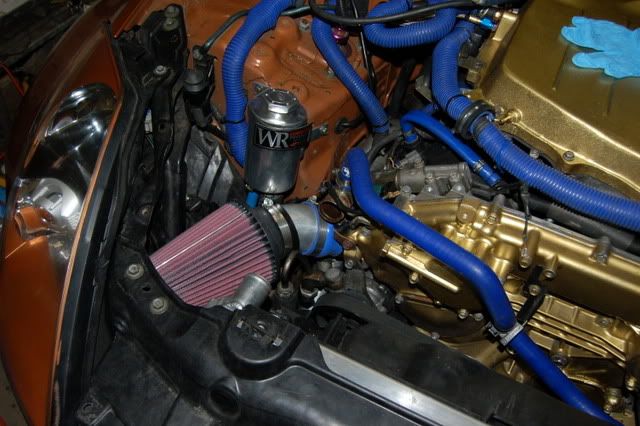
Had to cut off about 3 inches of thin aluminum piping to make the K&N filters fit:
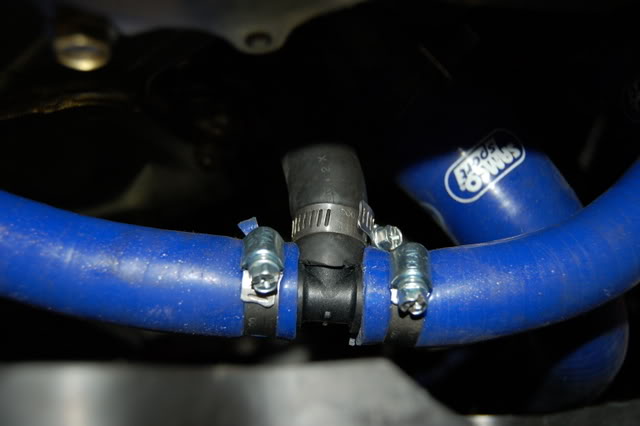
With the OEM Oil cooler lines now gone, I couldn't well leave the front port open, so I 'T' the coolant lines up front as shown below:
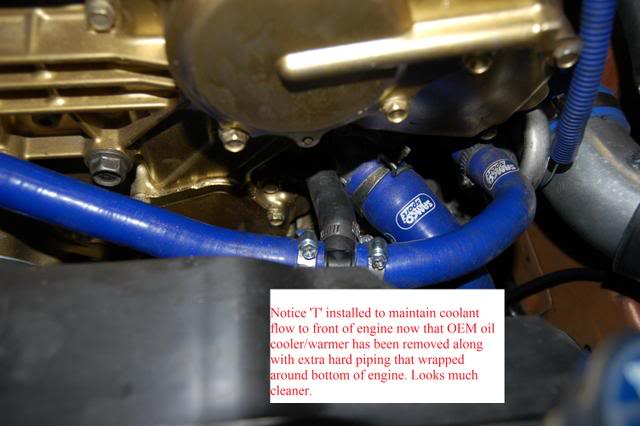
Thanks WestPak for the Idea.
Intercooler mounted - I had to adjust both external coolers to make it fit:

Thats it for now.
I think I'm starting to get the hang of this. LOL
Gutted:
Coolant pipe modification for oil warmer delete:
Jet Hot coated manifolds;
Rebuilt Turbos:
Caught thgis on someone else's thread (maybe Joe Kenefic) I spotted a slightly burnt Coupler for the turbo on the passenger side. Even though I wrapped it in double layers of heat wrap.
Probably got burnt from the exhaust manifold getting too hot;
This should fix that:
Nice Welding job by Crazy Don in Long Island:
New Cooler
I think it is my PS Cooler
Mocal sandwich plate installed:
Attempted Re-Entry:
Is that a turbo hiding back there:
It is:
New SGP 3" downpipe and exhaust port for wastegate hiding up top:
And driver side:
Now with Open Dump in place...Man that was a B$tch to install:
Oil Cooler Lines:
New oil Drain Plug...makes oil changes a snap:
Got rid of the UR crank pulley and replaced it with Fluidamper crank pulley:
Had to cut off about 3 inches of thin aluminum piping to make the K&N filters fit:
With the OEM Oil cooler lines now gone, I couldn't well leave the front port open, so I 'T' the coolant lines up front as shown below:
Thanks WestPak for the Idea.
Intercooler mounted - I had to adjust both external coolers to make it fit:
Thats it for now.
Last edited by rrmedicx; 04-04-2008 at 10:59 PM.
04-01-2008, 03:10 PM
#192
Former Sponsor
iTrader: (564)
Join Date: Feb 2003
Location: Long Island, New York
Posts: 19,266
Likes: 0
Received 5 Likes
on
5 Posts
Randy - not at all a good idea to use rtv on the fittings for the oil cooler...you run the risk of the same problem you had last time. Connections like that need teflon tape around the male fittings
 04-01-2008, 03:56 PM
#194
Originally Posted by Z1 Performance
Randy - not at all a good idea to use rtv on the fittings for the oil cooler...you run the risk of the same problem you had last time. Connections like that need teflon tape around the male fittings
And I do have teflon tape. I thought the RTV looked ugly there anyway, but I definitely wanted something there to minimize any risk of oil leak.
Thanks Adam.
04-02-2008, 06:17 PM
#196
Hey Adam, I took some time to clean things up and replaced the RTV with Teflon.
There is one less worry.
Everything looks good.
I clocked the turbos just a bit and the exhaust lined up well. I would ultimately like to eliminate the bottleneck at the junction behind the SGP downpipes...It looks horrible...from 3" down to like almost 2.5" and then 1" later back up to 2.75". I gotta get that fixed after I get this up and running.
Now all I have left to do is plug in the ProEFI (done). I already have a base map loaded by Turbo Trix. I have the MAP sensor connected (done). I have to get the wiring schematics for the fuel pressure sensor though. Its a Green wire with Blue striping, another Green wire with Black striping and a brown wire.
Looks like I need to reach out to Jason at ProEFI to figure this one out.
99.9% done and I'm ready to turn the key and fire her up.
04-04-2008, 11:18 PM
#198
I got the answers to my question about the proEFI wiring so it looks like my next day off will be starting the car. WOOOHOOO!!!!
I just hope the Base Map will allow me to still rev the motor a bit. I am not too concerned about boosting it as I have been so very patient, I wouldn't want to chance damaging anything. I'll let Turbo Trix do there thing and I will wait to get my car boosting the measly 8psi for now.
Keep in mind I may want to also test out the Boost solenoid I hooked up. MuHahahaha, Muhahaha.
But I will still be nice and keep the boost low for now. At least for a couple of weeks...Then I go back for the big tune with Meth.
Muhahahaha, Muhahaha
04-07-2008, 02:57 PM
#199
All wired up and ready to go. Just gotta load up the fluids, check for leaks and run it around a bit.
With the last go around of installing the upper plenum, I stripped on of the bolts on the outer edge of the plenum. Thinking about drilling it out and tapping it a bit larger, or maybe using a heli-coil...
Any suggestions?
Once that gets taken care of I need to go get 'er tuned. Looking at this Friday possibly...for the low boost tune. Hopefully.
04-09-2008, 12:14 PM
#200
Pissed off because it would appear that I am experiencing the same clutch bleeding problems as Dil. I attempted to use a vacuum hand-held device to draw the fluid out of the bleed valve as I have done so many times in the past, but for some reason, I am experiencing some resistance. Not sure why, but without a clutch, I cannot start the car. So I will be persistent and try to bleed that out as best as I can.
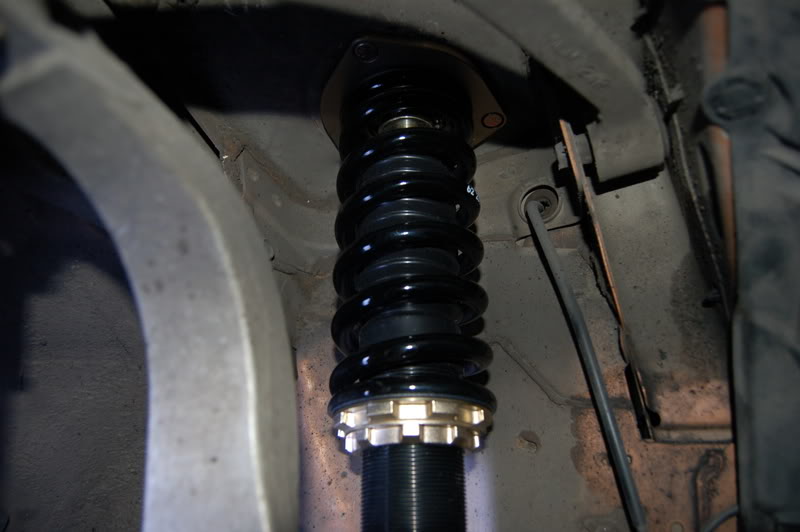
Meanwhile I am waiting for my trusty assistant Boogie to help me out, I took advantage of replacing the coilovers with a new fresh set of BC Coilovers. I hope this will cure the wifey comfort bug without sacrificing too much in terms of performance.
They look beautiful and come ready to drop in. Out of the 30 settings, 30 being the softest, the factory sets it to 8/30 so for now I will have to try it out and see how the car responds.
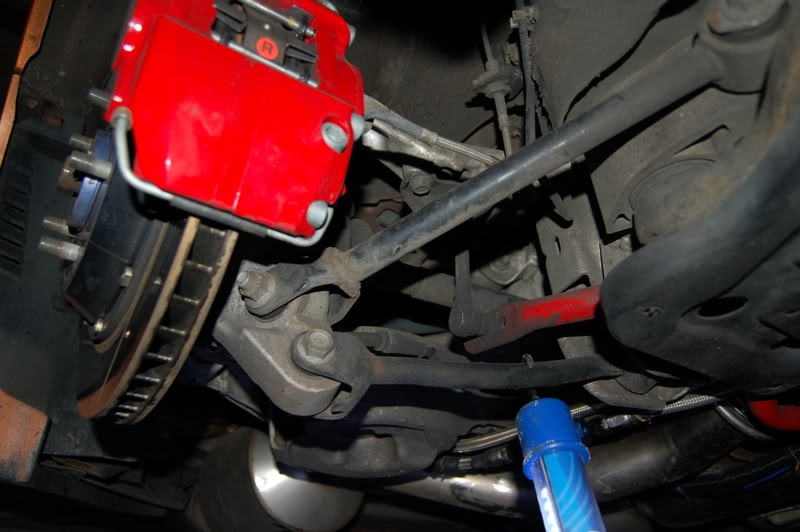
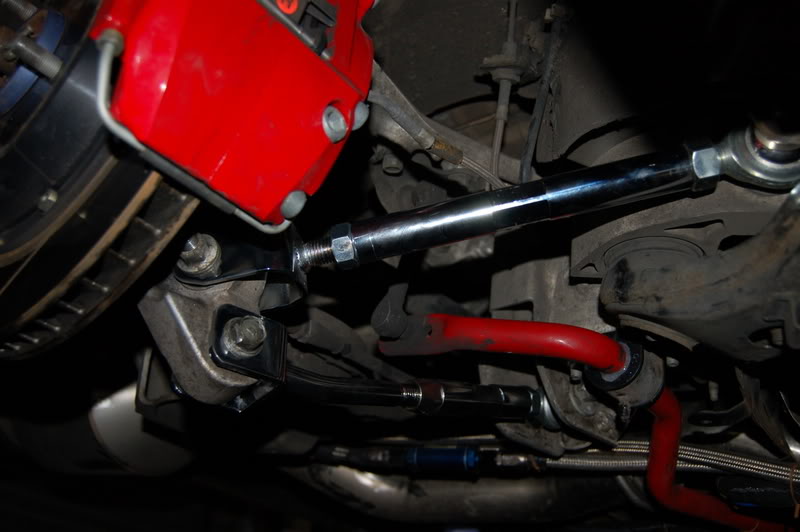
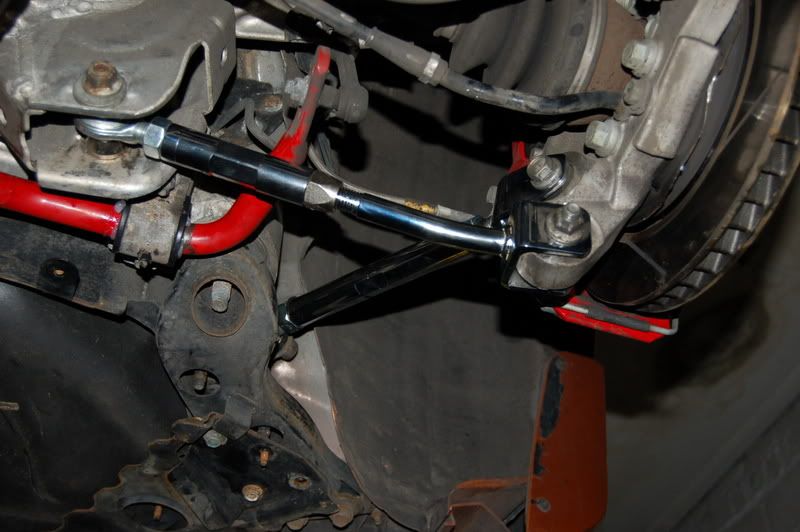
I also took the liberty of installing the new SPL traction bars and rear upper control arms. While I was in there I also threw in some replacement bushings for the sway bars. You can see a little of the 'lube' squeezing out of the edges...Ewww...See below.
Here is the right Rear: BEFORE:
and AFTER:
Left Side...AFTER:
The BC Coilovers come with all of the necessary attachments for the brake lines and sensor lines...Very Nice:
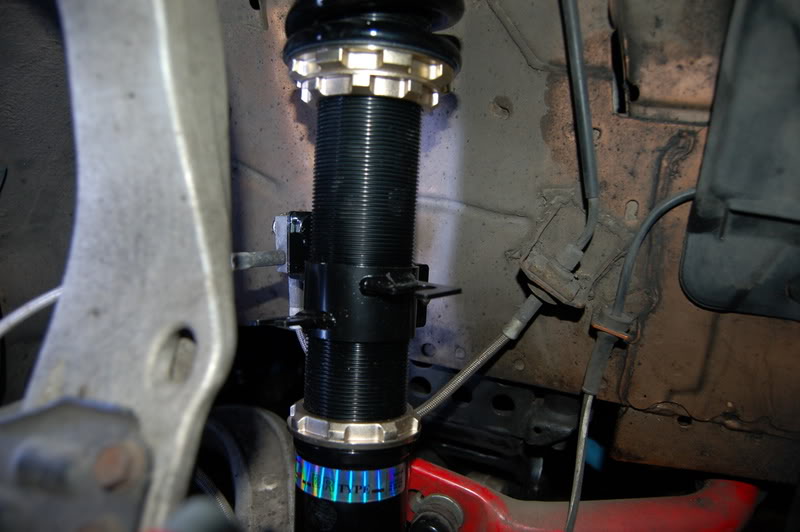
Very Nice Set up. Took me all but an hour to install the coilovers.
Meanwhile I am waiting for my trusty assistant Boogie to help me out, I took advantage of replacing the coilovers with a new fresh set of BC Coilovers. I hope this will cure the wifey comfort bug without sacrificing too much in terms of performance.
They look beautiful and come ready to drop in. Out of the 30 settings, 30 being the softest, the factory sets it to 8/30 so for now I will have to try it out and see how the car responds.
I also took the liberty of installing the new SPL traction bars and rear upper control arms. While I was in there I also threw in some replacement bushings for the sway bars. You can see a little of the 'lube' squeezing out of the edges...Ewww...See below.
Here is the right Rear: BEFORE:
and AFTER:
Left Side...AFTER:
The BC Coilovers come with all of the necessary attachments for the brake lines and sensor lines...Very Nice:
Very Nice Set up. Took me all but an hour to install the coilovers.
Last edited by rrmedicx; 04-09-2008 at 02:53 PM.

