DIY: Powerbleed clutch w/ Wilwood Reservoir swap.
 07-17-2009, 06:15 AM
#1
350Z-holic

Thread Starter
iTrader: (60)
Join Date: Jan 2006
Location: San Antonio/I miss DFW, TX
Posts: 11,204
Likes: 0
Received 28 Likes
on
19 Posts
Hello Boys and girls...
Today on shade tree mechanic we will be swapping the oem clutch reservoir with a Wilwood reservoir.
Why you ask? To be able to easily bleed the clutch system with the Motive Power Bleeder in 5 minutes tops.
Bleeding the z clutch is a pain!!! first time i did mine took hours!!!!.......
**This is for 03-06 cars only** since HR motor cars have a different set up and a vacumme assist pump can be used!
plus, if you are a drifter like i am, and if you ever blow the clutch slave at an event......you can swap out to a spare and continue drifting at the track quite easily with this mod...
MOTIVE POWER BLEEDER: http://www.motiveproducts.com/
http://www.jscspeed.com/catalog/Univ...vo___350z__942
The motive power bleeder can be purchased with an array of fittings and universal fittings. However, the ease of use is there when you have a "screw cap" style reservoir just like the brake reservoir on the Z. I hate universal fittings, one size fits all, etc type crap....not for my Z.....and not worth breaking seal and brake fluid everywhere........soo umm here goes.......
Existing OEM 350Z Brake reservoir - uses Motive Adapter 1107
Motive 1107 Adapter:

WILWOOD: http://www.wilwood.com/
Wilwood reservoir - uses Motive Adapter 1100
Motive 1100 Adapter:

Wilwood 7 Ounce Reservoir:

I have bleed all 4 brakes using the Motive power bleeder in 10 minutes when i installed ss brake lines....(thats having the car on jack stands, and a bottle and vynil tube at every bleed opening at each wheel)
It takes longer to jack the car and set up then it takes to actually bleed.....no pumping the pedal, etc...
I wanted the same with the clutch system! Now with this little maintenance mod its easy breezy with the MPB.
-J
Note: pics are attached below in order in case urls ever get lost.
Today on shade tree mechanic we will be swapping the oem clutch reservoir with a Wilwood reservoir.
Why you ask? To be able to easily bleed the clutch system with the Motive Power Bleeder in 5 minutes tops.
Bleeding the z clutch is a pain!!! first time i did mine took hours!!!!.......
**This is for 03-06 cars only** since HR motor cars have a different set up and a vacumme assist pump can be used!
plus, if you are a drifter like i am, and if you ever blow the clutch slave at an event......you can swap out to a spare and continue drifting at the track quite easily with this mod...
MOTIVE POWER BLEEDER: http://www.motiveproducts.com/
http://www.jscspeed.com/catalog/Univ...vo___350z__942
The motive power bleeder can be purchased with an array of fittings and universal fittings. However, the ease of use is there when you have a "screw cap" style reservoir just like the brake reservoir on the Z. I hate universal fittings, one size fits all, etc type crap....not for my Z.....and not worth breaking seal and brake fluid everywhere........soo umm here goes.......
Existing OEM 350Z Brake reservoir - uses Motive Adapter 1107
Motive 1107 Adapter:
WILWOOD: http://www.wilwood.com/
Wilwood reservoir - uses Motive Adapter 1100
Motive 1100 Adapter:
Wilwood 7 Ounce Reservoir:
I have bleed all 4 brakes using the Motive power bleeder in 10 minutes when i installed ss brake lines....(thats having the car on jack stands, and a bottle and vynil tube at every bleed opening at each wheel)
It takes longer to jack the car and set up then it takes to actually bleed.....no pumping the pedal, etc...
I wanted the same with the clutch system! Now with this little maintenance mod its easy breezy with the MPB.
-J
Note: pics are attached below in order in case urls ever get lost.
Last edited by JasonZ-YA; 04-20-2010 at 05:48 AM.
 07-17-2009, 06:19 AM
#2
350Z-holic
Thread Starter
iTrader: (60)
Join Date: Jan 2006
Location: San Antonio/I miss DFW, TX
Posts: 11,204
Likes: 0
Received 28 Likes
on
19 Posts
Okay, here is the oem configuration:

Notice that the OEM Configuration is a "screw cap" style brake reservoir, but the clutch reservoir is a cheesy push on cap with no locking feature of any kind - thus the reason for this mod....
Disconnect the oem reservoir:
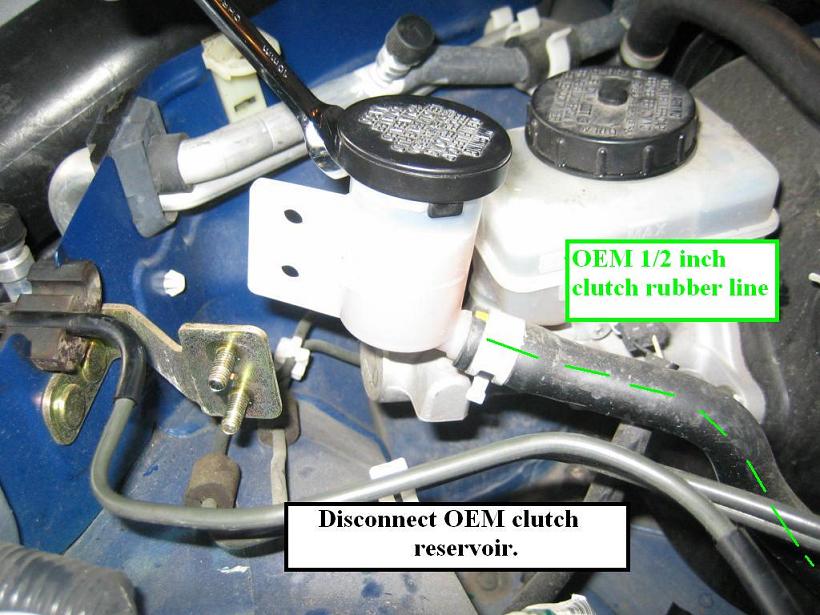
10mm nuts with washers and lock washers are located there.
-J
Note: pics are attached below in order in case urls ever get lost.
Notice that the OEM Configuration is a "screw cap" style brake reservoir, but the clutch reservoir is a cheesy push on cap with no locking feature of any kind - thus the reason for this mod....
Disconnect the oem reservoir:
10mm nuts with washers and lock washers are located there.
-J
Note: pics are attached below in order in case urls ever get lost.
Last edited by JasonZ-YA; 02-02-2016 at 06:55 PM.
07-17-2009, 06:24 AM
#3
350Z-holic
Thread Starter
iTrader: (60)
Join Date: Jan 2006
Location: San Antonio/I miss DFW, TX
Posts: 11,204
Likes: 0
Received 28 Likes
on
19 Posts
I purchased a Wilwood reservoir, mount and cap then called motive and ordered the correct "adapter" for their power bleeder.
Wilwood reservoir p/n 260-10204 ($8.63)
Cap for that reservoir p/n 330-7641 ($10.67)
Base Mount 250-10263 ($7.43)
Total: approx $27 bucks plus some shipping.
Wilwood Assembly:
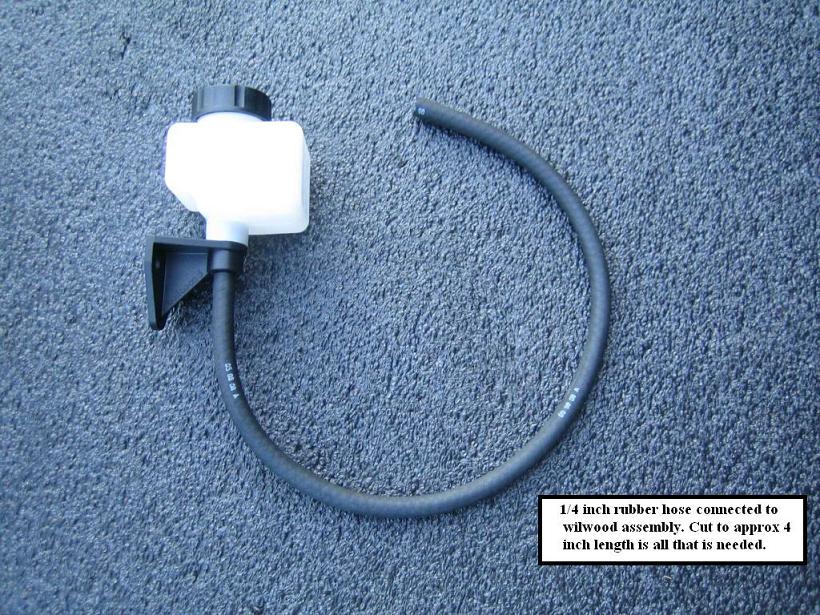
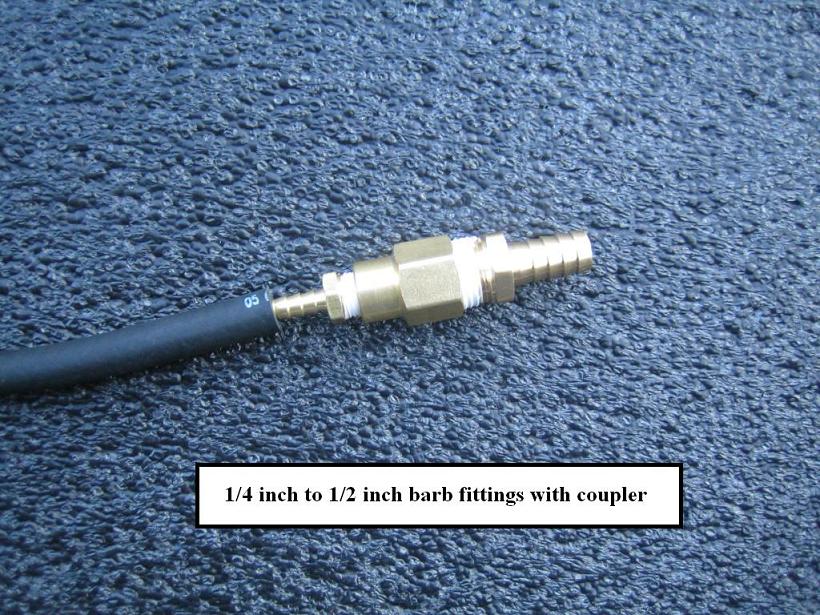
I then went to home depot, etc and purchased 1/4 to 1/2 barb fittings with a coupler to be able to connect between the 1/4 hose that is needed on the Wilwood mount - to - the 1/2 inch line on the OEM hose to the clutch master.
1/4 to 1/2 rubber connection:
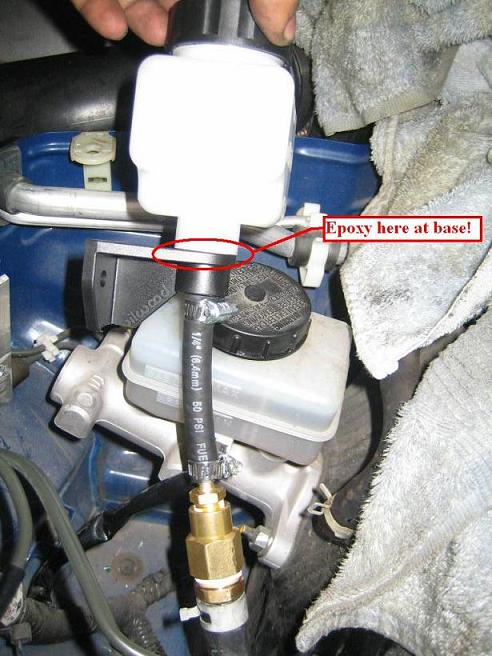
Next, I got some basic plastic epoxy and glued the base to the reservoir because with the motive power bleeder you are going to pressurize the system.....that being said, you dont want to do this and the reservoir pop up off the base. - get it?
Now, epoxy IS NOT needed, as we have done quite a few and not used it and been fine, but its a precaution measure.........one guy put a rubber band around the entire assembly and said "that should be more than fine" and i agree............to each their own.........up to you!
Epoxy used:

All Assembled and connected to the OEM 1/2 existing rubber line:
-J
Wilwood reservoir p/n 260-10204 ($8.63)
Cap for that reservoir p/n 330-7641 ($10.67)
Base Mount 250-10263 ($7.43)
Total: approx $27 bucks plus some shipping.
Wilwood Assembly:
I then went to home depot, etc and purchased 1/4 to 1/2 barb fittings with a coupler to be able to connect between the 1/4 hose that is needed on the Wilwood mount - to - the 1/2 inch line on the OEM hose to the clutch master.
1/4 to 1/2 rubber connection:
Next, I got some basic plastic epoxy and glued the base to the reservoir because with the motive power bleeder you are going to pressurize the system.....that being said, you dont want to do this and the reservoir pop up off the base. - get it?
Now, epoxy IS NOT needed, as we have done quite a few and not used it and been fine, but its a precaution measure.........one guy put a rubber band around the entire assembly and said "that should be more than fine" and i agree............to each their own.........up to you!
Epoxy used:
All Assembled and connected to the OEM 1/2 existing rubber line:
-J
Last edited by JasonZ-YA; 02-02-2016 at 06:54 PM.
07-17-2009, 06:32 AM
#4
350Z-holic
Thread Starter
iTrader: (60)
Join Date: Jan 2006
Location: San Antonio/I miss DFW, TX
Posts: 11,204
Likes: 0
Received 28 Likes
on
19 Posts
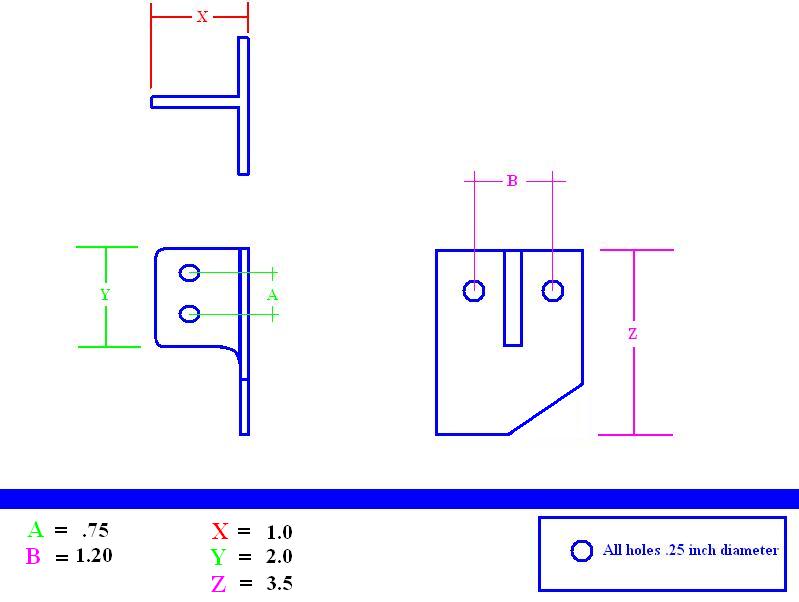
I recommend going to your my nearby local steel/aluminum sale warehouse and purchased some 1x1, approx .100 - .125 thick aluminum "Tee" angle. you can also use up to 1.5 x 1.5 tee easily as well.
EDIT - UPDATE:
Found that ebay sells aluminum TEE angle under user - "discount_steel"
6/25/10 - LINK - http://cgi.ebay.com/ws/eBayISAPI.dll?ViewItem&item=220389059937&ssPageName=STRK:MEWAX:ITobviously 48 inches is not needed but for the price its not bad. split it with a few buds and knock this install out!
That ebay seller also sells by the inch here:
http://www.onlinemetalstore.com/item...ieceLength=Cut
but shipping gets close to the ebay price....so up to you.
Now, i had some spare L angle, so for pictures sake your gonna see L angle and only "one" mount hole on the Wilwood base holding up the reservoir - that works, but of course using a "Tee" angle and mounting with both bolts would be ideal.....i plan on switching it out later and spray painting it with etching primer and them some flat black....
Of course, if you cant find Tee angle, then you can easily use two L angles mounted to the oem clutch mount.
Dimensions for the mount:
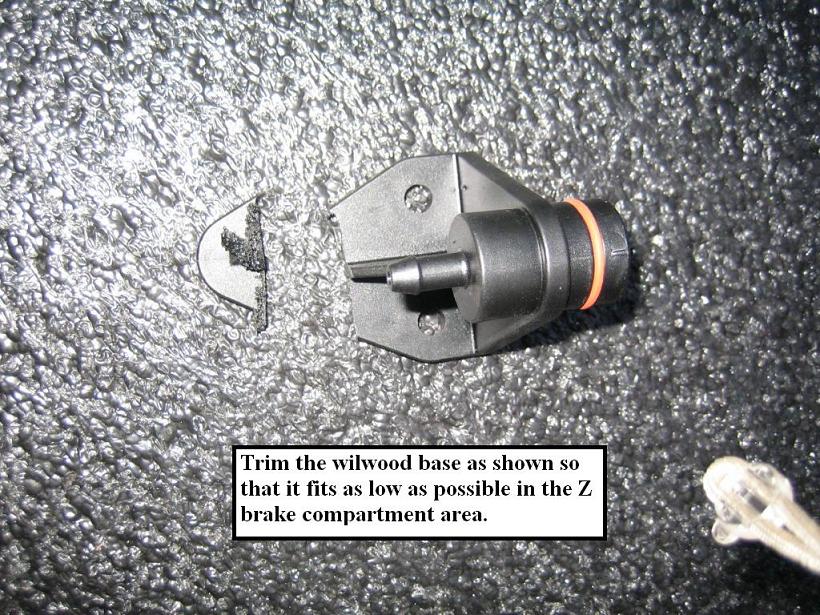
Now, you have to trim the Wilwood base mount in order to install the assembly to fit under the plastic brake cover.
Chopped off about 3/4 of an inch:
-J
EDIT - UPDATE:
Found that ebay sells aluminum TEE angle under user - "discount_steel"
6/25/10 - LINK - http://cgi.ebay.com/ws/eBayISAPI.dll?ViewItem&item=220389059937&ssPageName=STRK:MEWAX:ITobviously 48 inches is not needed but for the price its not bad. split it with a few buds and knock this install out!
That ebay seller also sells by the inch here:
http://www.onlinemetalstore.com/item...ieceLength=Cut
but shipping gets close to the ebay price....so up to you.
Now, i had some spare L angle, so for pictures sake your gonna see L angle and only "one" mount hole on the Wilwood base holding up the reservoir - that works, but of course using a "Tee" angle and mounting with both bolts would be ideal.....i plan on switching it out later and spray painting it with etching primer and them some flat black....
Of course, if you cant find Tee angle, then you can easily use two L angles mounted to the oem clutch mount.
Dimensions for the mount:
Now, you have to trim the Wilwood base mount in order to install the assembly to fit under the plastic brake cover.
Chopped off about 3/4 of an inch:
-J
Last edited by JasonZ-YA; 02-02-2016 at 06:56 PM.
07-17-2009, 06:37 AM
#5
350Z-holic
Thread Starter
iTrader: (60)
Join Date: Jan 2006
Location: San Antonio/I miss DFW, TX
Posts: 11,204
Likes: 0
Received 28 Likes
on
19 Posts
Take a look:

Notice the orientation so that the larger Wilwood reservoir fits in the small space that is available:
Wilwood:

-J
Notice the orientation so that the larger Wilwood reservoir fits in the small space that is available:
Wilwood:
-J
Last edited by JasonZ-YA; 02-02-2016 at 06:57 PM.
07-17-2009, 06:44 AM
#6
350Z-holic
Thread Starter
iTrader: (60)
Join Date: Jan 2006
Location: San Antonio/I miss DFW, TX
Posts: 11,204
Likes: 0
Received 28 Likes
on
19 Posts
Now,
We did a complete clutch/flywheel install this day. So we also did a SS clutch line install with Motul RBF600 fluid.
So, I thought i would like to add that i purchased this flex head 10mm/12mm combo wrench. Now you need a 10mm to remove the SS line. sure you can use an open 10mm but it has to be a small wrench and be careful not to strip the inline nut. shown below.
Thought i would share:

All set up ready to use the Motive power bleeder:

Bleed procedure i used:
Attach adapter to Wilwood reservoir.
Pour fluid in the MPB.
Pump to 8 - 13 psi max.
climb below the car and attach vinyl hose to clutch slave bleed nipple.
connect vinyl hose to catch bottle
open bleed nozzle and let bubbles and fluid pour. (8mm wrench)
pump the clutch pedal a few times to ensure pressure and no air bubbles left.
close bleed nozzle when no more bubbles are present......
THEN.
UNSCREW pump assembly from the top of the Motive power bleeder handle slowly to relieve the pressure.
Disconnect everything and reinstall Cap on Wilwood reservoir
DONE
We did a complete clutch/flywheel install this day. So we also did a SS clutch line install with Motul RBF600 fluid.
So, I thought i would like to add that i purchased this flex head 10mm/12mm combo wrench. Now you need a 10mm to remove the SS line. sure you can use an open 10mm but it has to be a small wrench and be careful not to strip the inline nut. shown below.
Thought i would share:
All set up ready to use the Motive power bleeder:
Bleed procedure i used:
Attach adapter to Wilwood reservoir.
Pour fluid in the MPB.
Pump to 8 - 13 psi max.
climb below the car and attach vinyl hose to clutch slave bleed nipple.
connect vinyl hose to catch bottle
open bleed nozzle and let bubbles and fluid pour. (8mm wrench)
pump the clutch pedal a few times to ensure pressure and no air bubbles left.
close bleed nozzle when no more bubbles are present......
THEN.
UNSCREW pump assembly from the top of the Motive power bleeder handle slowly to relieve the pressure.
Disconnect everything and reinstall Cap on Wilwood reservoir
DONE
Last edited by JasonZ-YA; 02-02-2016 at 06:58 PM.
07-17-2009, 06:46 AM
#7
350Z-holic
Thread Starter
iTrader: (60)
Join Date: Jan 2006
Location: San Antonio/I miss DFW, TX
Posts: 11,204
Likes: 0
Received 28 Likes
on
19 Posts
Notice by cutting the Wilwood base mount and installing the Wilwood reservoir as low as possible we are now able to close the brake plastic cover for that oh so nice finished look.
Closing:

Closed:

-J
Closing:
Closed:
-J
Last edited by JasonZ-YA; 02-02-2016 at 06:59 PM.
Trending Topics
07-17-2009, 06:47 AM
#8
350Z-holic
Thread Starter
iTrader: (60)
Join Date: Jan 2006
Location: San Antonio/I miss DFW, TX
Posts: 11,204
Likes: 0
Received 28 Likes
on
19 Posts
LIST OF ITEMS:
Wilwood items:
Wilwood reservoir p/n 260-10204 ($8.63)
Cap for that reservoir p/n 330-7641 ($10.67)
Base Mount p/n 250-10263 ($7.43)
O-ring for base mount p/n 210-10402 ($?.??)
Home depot/local plumbing supply/ace hardware/etc - Fittings:
1/4 barbed fitting ($2.00)
1/2 barbed fitting ($2.00)
Coupler to connect barbed fittings ($2.00)
Teflon tape ($.99)
BOLTS - used to mount wilwood base to aluminum mount:
2 bolts - 1/4" diameter x 1" length
2 nuts - 1/4"
2 lockwashers - 1/4"
AutoZone:
1/4 rubber hose - 4" length ($1.00)
Epoxy ($4.99) - not required - but highly recommended....when you bleed it can pop off!!
Universal O-ring kit ($3.99) O-ring needed for Wilwood base/res OR buy Wilwood o-ring p/n 210-10402
2 - "small" hose clamps for 1/4" heater hose($2.00)
Metal Supply Warehouse:
Aluminum Tee angle - sold in 1 ft length min - ($8.00)
1x1 tee, .050 - .125 thick. Anything will work as a mount, plastic, etc...doesn't need to be super thick either.
OR
EBAY STEEL SUPPLY SELLER:
http://cgi.ebay.com/ws/eBayISAPI.dll...=STRK:MEWAX:IT
or his site:
http://www.onlinemetalstore.com/item...ieceLength=Cut
Motive Power Bleeder:
Bleeder with two attachments, 1 for brake res and 1 for wilwood(clutch res)
Approx ($75.00) bucks with two attachments.
I didn't count this one as the MPB is a shop tool for me on all my cars.
************************************************************ ***************************************
OPTION:
Now, im a big junk yard rat........i love rummaging through junk yards looking for parts.......I did try looking for a small reservoir with a cap and 1/2 sized hose nipple that would have worked instead of buying the Wilwood pieces, but i was unsuccessfully in finding one.
A random small power steering reservoir would have been ideal as power steering reservoirs typically have a bigger 1/2 sized nipple/hose connection due to needing more fluid going to a power steering pump........of course Power steering reservoir systems would have two connections, one supply and one return, but you can cap one (most likely the supply one) up easily with a universal plug and clamp.
If anyone happens to stumble across either a power steering res or similar from another car, post it up.........as I'm sure picking up a power steering res assembly from a junk yard would be cheap and quick, or even if you ordered it from the nearby dealer from whatever "make" car you find works as well....
Also, finding one like that (having existing 1/2 hose connection) will eliminate the need for the barb fittings used on this how to.
ALSO, a motorcycle brake fluid reservoir would also have worked pretty well as they also have the ability to be universally mounted....probably still need the barb fitting adapters as motorcycle res. typically have about 1/4 inch line coming off of them.
-J
Last edited by JasonZ-YA; 02-16-2011 at 12:03 PM.
 07-17-2009, 07:07 AM
#11
350Z-holic
Thread Starter
iTrader: (60)
Join Date: Jan 2006
Location: San Antonio/I miss DFW, TX
Posts: 11,204
Likes: 0
Received 28 Likes
on
19 Posts
^ exactly.......bleeding the oem clutch system is such a pain in the butt on the Z......
Takes forever pumping the clutch pedal......plus, I drift my car........blowing a clutch slave at a drift event is not uncommon by any means.......
Now i can swap clutch slaves and bleed and be done in a jiffy...
-J --- takes an extra clutch slave with him to events, cause thats how i roll......
Takes forever pumping the clutch pedal......plus, I drift my car........blowing a clutch slave at a drift event is not uncommon by any means.......
Now i can swap clutch slaves and bleed and be done in a jiffy...
-J --- takes an extra clutch slave with him to events, cause thats how i roll......
Last edited by JasonZ-YA; 07-17-2009 at 07:32 AM.
07-17-2009, 07:32 AM
#12
Fantastic DIY Jason! Ur DIY's are always simple and self explanatory. Im glad I had your help on this setup and I must say I love how easy it was to bleed the system. After the clutch install I was REALLY nervous about the time it would take to bleed because of last time when we did your SS clutch line. That was SUCH a PAIN in the A$$ and BEYOND time consuming, not to mention tiring as hell for something that shouldnt take any time at all. For a little less than 80 bucks Im sure that others will certainly appreciate this DIY (especially if they have already tried to bleed the system) knowing how long it really takes.
5 mins > HRS and HRS
Thank you Jason, mad props to you sir...
5 mins > HRS and HRS
Thank you Jason, mad props to you sir...

 02-25-2010, 09:32 AM
#19
350Z-holic
Thread Starter
iTrader: (60)
Join Date: Jan 2006
Location: San Antonio/I miss DFW, TX
Posts: 11,204
Likes: 0
Received 28 Likes
on
19 Posts
if you ask for the smaller 4oz......they will tell you it wont fit on the base p/n 250-10263 ($7.43) i mention above.
Yes the res is 4 oz, but the base for it is ridiculously huge!
-J
02-25-2010, 10:23 AM
#20
Registered User
iTrader: (1)

Join Date: Dec 2009
Location: Houston, Texas
Posts: 185
Likes: 0
Received 0 Likes
on
0 Posts
Thanks. I'm ordering this today.
Thanks for the help on the clutch line awhile back. I ended up taking it to Kwik Kar one snowy day while I was bored. However, they failed to properly flush and bleed my clutch fluid. It's almost black.
I might be able to come to the tech day on the March 6. I'll just be doing the clutch bleed, but I recently did a full brake job and can help anybody else with theirs.