DIY - Urethane Transmission Mount


 10-29-2011, 11:21 AM
#45
Registered User
iTrader: (3)

Join Date: Feb 2010
Location: Toronto
Posts: 109
Likes: 0
Received 0 Likes
on
0 Posts
So I installed the Momentum Performance solid trans mount just now and I'm not sure if I like it.
The inside of my car feels and sounds like I'm sitting on a big block V8 with open headers, everything vibrates! Is this normal?
The inside of my car feels and sounds like I'm sitting on a big block V8 with open headers, everything vibrates! Is this normal?
 02-03-2013, 07:44 PM
#48

Just installed my Torque Solutions tranny mount and wow.. Right when you turn the car on you can hear and feel the difference.. I love all the sounds my Z makes now and this just adds to it. The play in the shifter is pretty much gone.
Also another note to add.. I have the Ichiba Y-Pipe and I did not have to remove it in order to get the cross member out.. Install took 30 mins..
Everyone loves pictures..


Also another note to add.. I have the Ichiba Y-Pipe and I did not have to remove it in order to get the cross member out.. Install took 30 mins..
Everyone loves pictures..
09-29-2013, 09:27 AM
#49
Registered User

Hope this helps
05-07-2014, 07:17 AM
#50

Besides the brand name, what are the differences? Has anyone driven with more than one brand or stiffness rating?
OK, so someone mentioned they wish they had used 60 instead of 75. Is there anyone that actually used the 60? If so, did you wish you went stiffer? Would stiffer be better for a Roadster?
- Torque Solution -75A durometer
- Avid Racing - ___?
- Z1 Motorsports - 60, 75, 90 ?
OK, so someone mentioned they wish they had used 60 instead of 75. Is there anyone that actually used the 60? If so, did you wish you went stiffer? Would stiffer be better for a Roadster?
Last edited by goracerx; 05-07-2014 at 10:05 AM.
08-06-2014, 04:10 PM
#51

FWIW, I've been looking for a couple of days now and can't find any 60's on the market. Z1 Motorsports sells a 90a, Z1 Performance (srsly guys, names) sells a 75a, and the rest I've seen sell Avid's 75a.
It's a bummer, I really wanted a 60a.
It's a bummer, I really wanted a 60a.
Last edited by jjaujou; 11-04-2014 at 02:28 PM.
11-06-2014, 09:20 AM
#52
Registered User
iTrader: (1)

Join Date: Mar 2014
Location: LA
Posts: 46
Likes: 0
Received 0 Likes
on
0 Posts
I read this thread about the 60a mounts you were making/selling some time ago. I currently have the transmission out for new act clutch and act fly so this would be a good time. Can I get pricing shipped to 93550 please?
interested in the transmission mount as well as pricing on other motor mounts you may carry, I think I have a bad one in the engine bay somewhere.
Thank you!
Tanya
PS
your PM inbox if maxed out
interested in the transmission mount as well as pricing on other motor mounts you may carry, I think I have a bad one in the engine bay somewhere.
Thank you!
Tanya
PS
your PM inbox if maxed out
04-19-2017, 05:59 AM
#53

Kwame and I had some time today to do some more stuff to my Z. Even though it's getting colder, I still like doing little stuff to the car here and there. Today we got a chance to install and test a new urethane transmission mount.
I did a how-to write up on our blog, but figured I'd post it here too:
http://cornerbalance.wordpress.com/2...mount-350zg35/
It was straight forward, and can easily be done at home for all you DIY'ers
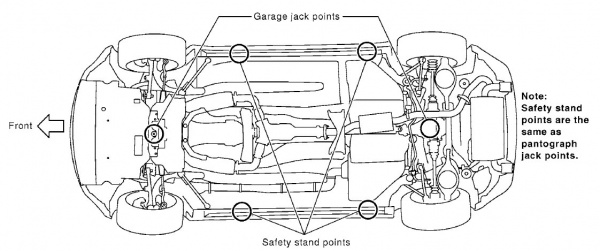
To start off, use the factory recommended jack points front and rear
With the car up in the air, your first thing is to remove the factory transmission cross member. This is a black steel beam that runs the width of the transmission (sorry the below is so small, and I forgot to snap a pic of it when it was out of the car, but you really can't miss it!)

To loosen the crossmember from the chassis, there are 4 x 14mm bolts. You'll now see the transmission mount, attached to the underside of the transmission, like here:

Next, you will remove the long gold bolt/spacer from the stock transmount, which runs through the crossmember. To gain better access to the bolt, we found it easiest to remove the Y pipe, as it makes things. Since mine has been in there for a few years and I had noticed a bit of an exhaust leak recently, I took this opportunity to replace all the Y pipe gaskets and kill 2 birds with one stone. Take a jack, or jackstand, and place it under the transmission to keep it from sagging. It is still attached to the engine at the bellhousing, as well as the driveshaft, but you don't want any accidents! Finally, remove the 2 x 14mm bolts and the transmissiom mount comes off the transmission. Fitting the new mount is just a direct reversal of the above process and goes right in. Here is a pic of the new mount installed, before the crossmember goes back in:

Next, reinstall the crossmember, using the jack to still support the transmission. Once the crossmember has been torqued to spec, you can remove the jack from the transmission case.
That's all there is to it!
So what does it feel like � HOLY **** stiff! The car immediately has a much deeper tone inside the cabin just by virtue of the fact that the new mount has much less slop in it, and has a full radius bushing (if you look in the picture showing the comparison with the stock mount, you can see daylight with the stock mount!). This disconnect keeps things quiet and Camry like, but also gives the car a much vaguer feeling compared to the new mount. It was so much different sounding I thought my Y pipe was still disconnected! The shifter has a much more positive feel to it, which is very noticeable especially at higher rpm shifts. Engaging first and running through the gears from a dead stop, you immediately notice that the car has a much more direct overall feel. If you are in a higher rpm and just crusing (for example 2nd, entering a turn) the slight rocking back and forth that the car used to have is completely gone. I�ll drive the car through the weekend provided the weather is nice and post any noticeable changes.
We've toyed around with maybe doing a urethane motor mount set as well, but are still up in the air. The stock mounts are quite rigid already. However, we still may do it if demand is there, as it would be a nice alternative for those who don't want to run a full solid motor mount set.
Any questions, let me know
I did a how-to write up on our blog, but figured I'd post it here too:
http://cornerbalance.wordpress.com/2...mount-350zg35/
It was straight forward, and can easily be done at home for all you DIY'ers
To start off, use the factory recommended jack points front and rear
With the car up in the air, your first thing is to remove the factory transmission cross member. This is a black steel beam that runs the width of the transmission (sorry the below is so small, and I forgot to snap a pic of it when it was out of the car, but you really can't miss it!)
To loosen the crossmember from the chassis, there are 4 x 14mm bolts. You'll now see the transmission mount, attached to the underside of the transmission, like here:
Next, you will remove the long gold bolt/spacer from the stock transmount, which runs through the crossmember. To gain better access to the bolt, we found it easiest to remove the Y pipe, as it makes things. Since mine has been in there for a few years and I had noticed a bit of an exhaust leak recently, I took this opportunity to replace all the Y pipe gaskets and kill 2 birds with one stone. Take a jack, or jackstand, and place it under the transmission to keep it from sagging. It is still attached to the engine at the bellhousing, as well as the driveshaft, but you don't want any accidents! Finally, remove the 2 x 14mm bolts and the transmissiom mount comes off the transmission. Fitting the new mount is just a direct reversal of the above process and goes right in. Here is a pic of the new mount installed, before the crossmember goes back in:
Next, reinstall the crossmember, using the jack to still support the transmission. Once the crossmember has been torqued to spec, you can remove the jack from the transmission case.
That's all there is to it!
So what does it feel like � HOLY **** stiff! The car immediately has a much deeper tone inside the cabin just by virtue of the fact that the new mount has much less slop in it, and has a full radius bushing (if you look in the picture showing the comparison with the stock mount, you can see daylight with the stock mount!). This disconnect keeps things quiet and Camry like, but also gives the car a much vaguer feeling compared to the new mount. It was so much different sounding I thought my Y pipe was still disconnected! The shifter has a much more positive feel to it, which is very noticeable especially at higher rpm shifts. Engaging first and running through the gears from a dead stop, you immediately notice that the car has a much more direct overall feel. If you are in a higher rpm and just crusing (for example 2nd, entering a turn) the slight rocking back and forth that the car used to have is completely gone. I�ll drive the car through the weekend provided the weather is nice and post any noticeable changes.
We've toyed around with maybe doing a urethane motor mount set as well, but are still up in the air. The stock mounts are quite rigid already. However, we still may do it if demand is there, as it would be a nice alternative for those who don't want to run a full solid motor mount set.
Any questions, let me know
Will it not cause damage in some way?
07-15-2017, 10:47 AM
#54
New Member

It shouldn't, it looks like Z1 Performance installed without upgrading the motor mounts. I have Z1 Motorsports' urethane motor mounts, and plan on swapping my stock transmission mount for their urethane mount soon.

Thread
Thread Starter
Forum
Replies
Last Post