Another LS build. You'll read it anyways.
 11-19-2014, 07:07 PM
#1
Registered User
Thread Starter

Whats up, my name is Mike. I've been a long time lurker in the shadows and corners of this forum. Not much of a keyboard warrior, just a regular **** with a passion for engines and a passion for cars. I have a 2006 350z, Pikes Peak White. It is currently undergoing an LS swap but theres a few things that make my build a little different.
Before you jump to the pictures, like I know most of you do...Heres a little bio, I'm 26, i'm a fulltime college student, currently a senior at a black college (I'm white). I was in the Air Force for 4 years, spent all my money on women, car stuff, alcohol and saved none of it. I have nothing to really show for myself that Im proud of. I made my Z my one thing that I put all my life issues into until I can graduate and afford a real sports. I pour what little money I do have into with the hopes of bringing this car to the level I expect of it. Some people go to the gym, some people build cars, some people are fortunate enough to bang all girls lol
I'm very familiar with the "why did you go LS when you build the VQ for the same money and have just as much power"...same story, different ********. Its my car, my ambition, my goals. You're just here to read, my friend. I've had a single turbo VQ by APS way back when. It made a 475whp on Q16 on a Mustang dyno. Wasn't impressed.
I decided that I didnt want a traditional LS setup. over 60% of all swaps into outside GM owned vehicles are LS1s, some have mods, some are bored over to make more displacement, some are just turbo'd and thats the end of it. I wanted something a little different so I had the old motor taken out and I began the process of obtaining an LQ4 engine off eBay and tore it down and rebuilt the motor at home with the help of a good friend who found my LS swap to be a waste of time for a Japanese "rice-car" lol I chose the LQ4 because its an iron block and it holds F/I really well. It can also be bored out to a 427 without needing sleeves. As its iron, if something ever happens to my cylinder walls, it'll be easier to fix than aluminum. It was also at the time I bought it, very affordable and puts out a good bit of torque in stock form...like I was gonna stay stock. Its "stock" lol
Will continue story.....Stay tuned lol
I have a 2006 350z, Pikes Peak White. It is currently undergoing an LS swap but theres a few things that make my build a little different. Before you jump to the pictures, like I know most of you do...Heres a little bio, I'm 26, i'm a fulltime college student, currently a senior at a black college (I'm white). I was in the Air Force for 4 years, spent all my money on women, car stuff, alcohol and saved none of it. I have nothing to really show for myself that Im proud of. I made my Z my one thing that I put all my life issues into until I can graduate and afford a real sports. I pour what little money I do have into with the hopes of bringing this car to the level I expect of it. Some people go to the gym, some people build cars, some people are fortunate enough to bang all girls lol
I'm very familiar with the "why did you go LS when you build the VQ for the same money and have just as much power"...same story, different ********. Its my car, my ambition, my goals. You're just here to read, my friend. I've had a single turbo VQ by APS way back when. It made a 475whp on Q16 on a Mustang dyno. Wasn't impressed.
I decided that I didnt want a traditional LS setup. over 60% of all swaps into outside GM owned vehicles are LS1s, some have mods, some are bored over to make more displacement, some are just turbo'd and thats the end of it. I wanted something a little different so I had the old motor taken out and I began the process of obtaining an LQ4 engine off eBay and tore it down and rebuilt the motor at home with the help of a good friend who found my LS swap to be a waste of time for a Japanese "rice-car" lol I chose the LQ4 because its an iron block and it holds F/I really well. It can also be bored out to a 427 without needing sleeves. As its iron, if something ever happens to my cylinder walls, it'll be easier to fix than aluminum. It was also at the time I bought it, very affordable and puts out a good bit of torque in stock form...like I was gonna stay stock. Its "stock" lol
Will continue story.....Stay tuned lol
 11-20-2014, 04:58 AM
#2
Registered User

Join Date: Feb 2011
Location: florida
Posts: 251
Likes: 0
Received 0 Likes
on
0 Posts
Very interested to see this get completed. Some have made 1,500+ HP on this block. From:
http://www.lsxtv.com/tech-stories/en...ags-to-riches/
I like how this block is cast iron. How much heavier is the new engine compared to vq?
http://www.lsxtv.com/tech-stories/en...ags-to-riches/
I like how this block is cast iron. How much heavier is the new engine compared to vq?
11-20-2014, 10:15 AM
#3
Registered User
Thread Starter
I believe that its about 135lbs heavier than a stock VQ setup, it works out to be almost even in weight with a single turbo VQ setup. Its an estimate as I have mixed LS and truck parts all mixed together.
11-20-2014, 10:49 AM
#4

Baitzboy, the race team I work for has a copy of DynoSim engine simulation program. If you PM me your parts list for the engine plus a few details, I can build it in the software and give you an engine dyno sheet. We use it to develop the engine combinations for our competition cars.
11-20-2014, 11:00 AM
#5
Registered User
Thread Starter
Once we got the motor torn down, we rebuilt it with new OEM parts except for the pushrods and the pistons/rods. The pushrods were left to soak in a gas solvent to simply clean them. The pistons were removed and scrubbed off and the rods were left to also soak in the same gas solvent as the pushrods. A simple cleaning was done to make sure there were no marks, scars, cracks, lines, etc that would need to be replaced. Once satisfied with that, all parts were reinstalled.
Obviously the stock cam wasnt going to be sufficient. I know a majority of people wont be able to under the cam specs thing, but I put up a pic of it anyways. If you know how to read the cam card, then you know that its a very brutal cam lol
Ordered a ported Melling Z06 performance oil pump. Gotta keep this guy well lubbed up for the future abuse it'll be most likely enduring.
Since I had no idea what I was really doing, I felt it smarter to let a shop do that. I figured JGY Motorsports would be able to handle this relatively simple task...that turned out to be a major disaster. Jason of JGY is a quite a character and was simply out of his league with this project...despite that he does do pretty acceptable work on RB motors. But thats jumping ahead. So we got the car ready to go to JGY and let them do their thing.
Now once they had the car, we needed a swap kit. Basically it was either Sikky or Hinson motorsports with a swap kit. But as I would learn, Fueled Racing was quietly offering an LS swap kit as well. I ordered the Sikky kit, it seemed logical, everyone that were doing swaps were basically using it. JGY got the Sikky kit in...realized it was for 240. I had waited 5 weeks to go that kit just for them to send me the wrong one. It was returned and I simply decided to jump into un-known territory with the Fueled Racing swap kit.
Side note: for those that dont know Sikky has been re-engineering their entire swap kit by updating it. Free info!
The Fueled Racing sits VERY far back in the engine bay, which is what you want with weight distribution, keep it centered and low. The FR kit came with solid engine mounts as standard while the Sikky was poly bushings. You can also see in the pic of the oil pan, there are 2 visible trap doors, but theres a total of 4 traps. Sikky's design was nothing like this. The Sikky pan is front sump, the FR is rear sump, sits behind the steering assembly.
11-20-2014, 11:01 AM
#6
Registered User
Thread Starter
Baitzboy, the race team I work for has a copy of DynoSim engine simulation program. If you PM me your parts list for the engine plus a few details, I can build it in the software and give you an engine dyno sheet. We use it to develop the engine combinations for our competition cars.
 Facebook: "Michael Casciano"
11-20-2014, 05:15 PM
Facebook: "Michael Casciano"
11-20-2014, 05:15 PM
#7
New Member

I read in another LS thread that there were some clearance issues with the "double firewall" of the 350Z using the
Fueled Racing kit. Do you know if this indeed an issue?
Do you know what upgrades/changes Sikky are making? I am thinking about going LS, but can't decide which kit is best. Thanks for any info.
Fueled Racing kit. Do you know if this indeed an issue?
Do you know what upgrades/changes Sikky are making? I am thinking about going LS, but can't decide which kit is best. Thanks for any info.
Trending Topics
11-20-2014, 05:34 PM
#8
Registered User
Thread Starter
that is partially true. It depends on several things, it depends on the heads, the year of heads, the style of valve covers, LS or truck coil packs, etc etc. You will need to knock a hole about the size of golf ball on the passenger side. I will be completely removing that little wall (where the VIN placard goes) and remount it somewhere else. It does nothing and is not a structural part of the engine bay. Will make install a lot easier.But thats all I've done and my motor is in and locked down. I will have pics later on. There is a Facebook you can join "350z/G35 LS(X) Owners/Builders"
11-21-2014, 04:39 AM
#9
New Member
that is partially true. It depends on several things, it depends on the heads, the year of heads, the style of valve covers, LS or truck coil packs, etc etc. You will need to knock a hole about the size of golf ball on the passenger side. I will be completely removing that little wall (where the VIN placard goes) and remount it somewhere else. It does nothing and is not a structural part of the engine bay. Will make install a lot easier.But thats all I've done and my motor is in and locked down. I will have pics later on. There is a Facebook you can join "350z/G35 LS(X) Owners/Builders"
11-21-2014, 08:21 AM
#10
Registered User
Thread Starter
I left off at the differences of the Sikky to Fueled Racing swap kits, I believe.
So the car sat at JGY Customs for 8 months, I was in Seattle, WA at the time,...relying on these guys to finish the work I started. This turned out to be a frustrating decision. They accomplished minimal work on my car. After a while, we came to an impasse and I collected my car and all the parts and brought it home to begin attempting this disaster myself with a few friends. At this point I'd like to point out I live in the poorest region of VA (24314). There are a total of 4 Zs, mine makes the 5th. That is it. Its nothing but lifted trucks and Mustangs/Camaro/Corvettes out here..its very deep south haha So all my local helpers were in for a shock when I asked for their help on this endeavor.
So I trailered the car home. Car sits too low to get it up on a car transport from U-Haul so we had to do it the two-wheeled way :/ Not my preferred method, but whatever.
Was going to use a Collins LS adaptor on a 2008 CD05 and use the Z tranny on the LS motor. But as I realized that I was going to eventually go F/I, there was no reason to not make the jump for a T56 and just bite that bullet and get it over it...so I did. Got a great deal on it. Got a ProComp 5.0 adjustable short shifter, an LS7 clutch and flywheel and the tranny for $1800 shipped, I was pretty thrilled.
Did some initial fitment tests of the motor in the engine bay. By the way, please dont ever do this with the core support/radiator still on the car...super difficult to deal with.
11-22-2014, 07:58 AM
#11
Registered User
Thread Starter
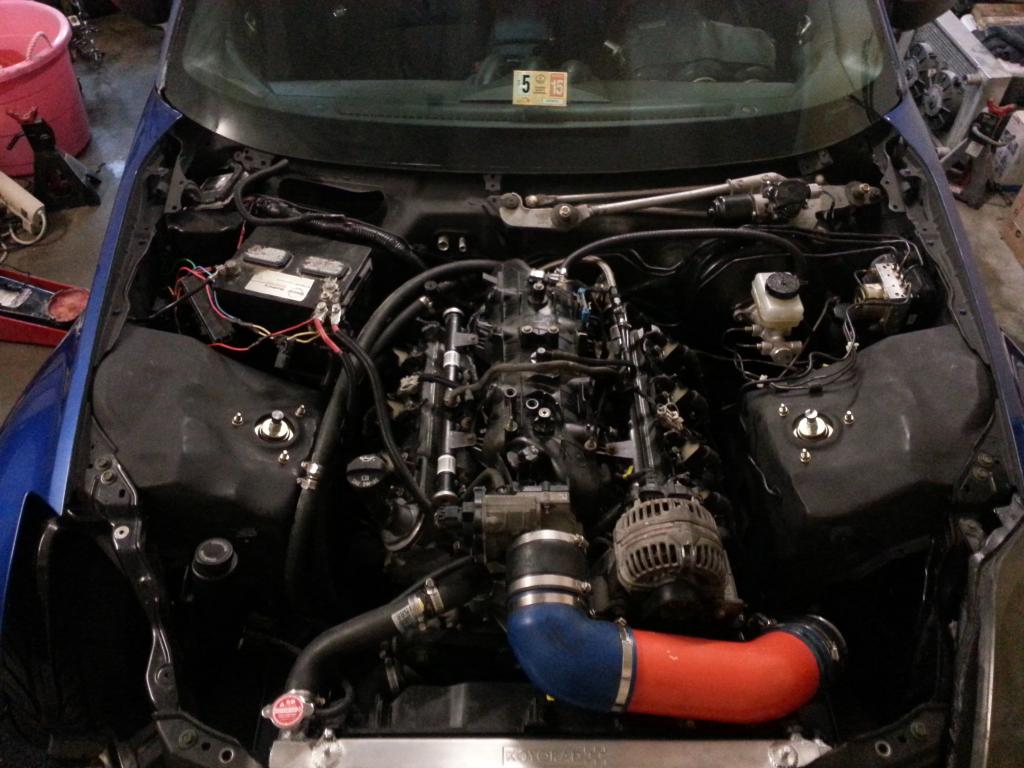
Just some pics of engine and tranny attached going into car. Nothing special. Removed core support and radiator and all that bull-mess.
the one pic with my fist is the stock brace bar and the amount of clearance I have due to how low the Fueled Racing kit places the motor.
Didnt get the GTO shifter assembly...so I have to make a little adjust to the tunnel, no biggie. Someone also managed to have their way with my oversized DEFI center gauges so I had to order OEM replacements since I dont have funds to replace them sadly (#collegekidbudget)
Just doing some of the electrical. I don't know anything about that part, its beyond my capability to explain or grasp it.
Everything in the pics is self explanatory and/or just different angles of the same stuff. Thats all for a while, unless I get bored and feel like getting back on here. Don't LS swap unless you plan on putting a turbo on it from the get-go. Sell your Z and get a Corvette, like I should have done. Don't be stupid.
Good luck on your builds. If you have one.
11-22-2014, 10:34 PM
#13
Hardest Setting

iTrader: (3)
Join Date: Feb 2008
Location: MexiCali dodging potholes
Posts: 13,406
Received 130 Likes
on
102 Posts
^^^
+1
Once completed you can hand this link out to others to so they can take a peek at what's need to be done, and how you did things different to other LSX swaps.
Keep up the good work
+1
Once completed you can hand this link out to others to so they can take a peek at what's need to be done, and how you did things different to other LSX swaps.
Keep up the good work
11-25-2014, 12:44 PM
#14
Registered User
Thread Starter
So hopefully the pics load up in the correct chronological way I intended them to.
First two pictures should show the water pump issue I mentioned last week. I found that Dirty Dingo makes water pump spaces for LS style water pumps to work on truck blocks with those using truck front end accessories. So two pictures of that for you guys.
I got myself all mixed up on the fuel feed and return setup. I have posted two pictures, one with my writing on it and one of a diagram I found. I would like verification that I am interpreting the information correctly. If not please help me out so I dont f*** myself over
A random pic of one of my redneck friends completely confused at my setup. He calls it the "white rice rocket" lol
A pic of my parents backyard...its pretty big lol plenty of room for a future racetrack/drift course haha
There are two pictures of the hole in the firewall that I mentioned I have to punch through, I believe someone wanted to see those pictures and I finally remembered to do that. One pic is from the battery bay and other from the engine bay, at the very back of the passenger side rear head (sorry for the long descriptions)
And the last picture are my intended beer tap shift *****. Both are pretty epic and rare. Especially the shark one lol
Things we have left to do: finish the wiring, figure out the exhaust setup,and install front end accessories + belt and in THEORY it should be good to go
Interesting that theres been no trolls, no questions, no snide comments so far...I must be the last guy doing an LS swap apparently...lmao
11-26-2014, 09:11 AM
#16
New Member
So hopefully the pics load up in the correct chronological way I intended them to.
First two pictures should show the water pump issue I mentioned last week. I found that Dirty Dingo makes water pump spaces for LS style water pumps to work on truck blocks with those using truck front end accessories. So two pictures of that for you guys.
I got myself all mixed up on the fuel feed and return setup. I have posted two pictures, one with my writing on it and one of a diagram I found. I would like verification that I am interpreting the information correctly. If not please help me out so I dont f*** myself over
A random pic of one of my redneck friends completely confused at my setup. He calls it the "white rice rocket" lol
A pic of my parents backyard...its pretty big lol plenty of room for a future racetrack/drift course haha
There are two pictures of the hole in the firewall that I mentioned I have to punch through, I believe someone wanted to see those pictures and I finally remembered to do that. One pic is from the battery bay and other from the engine bay, at the very back of the passenger side rear head (sorry for the long descriptions)
And the last picture are my intended beer tap shift *****. Both are pretty epic and rare. Especially the shark one lol
Things we have left to do: finish the wiring, figure out the exhaust setup,and install front end accessories + belt and in THEORY it should be good to go
Interesting that theres been no trolls, no questions, no snide comments so far...I must be the last guy doing an LS swap apparently...lmao
First two pictures should show the water pump issue I mentioned last week. I found that Dirty Dingo makes water pump spaces for LS style water pumps to work on truck blocks with those using truck front end accessories. So two pictures of that for you guys.
I got myself all mixed up on the fuel feed and return setup. I have posted two pictures, one with my writing on it and one of a diagram I found. I would like verification that I am interpreting the information correctly. If not please help me out so I dont f*** myself over
A random pic of one of my redneck friends completely confused at my setup. He calls it the "white rice rocket" lol
A pic of my parents backyard...its pretty big lol plenty of room for a future racetrack/drift course haha
There are two pictures of the hole in the firewall that I mentioned I have to punch through, I believe someone wanted to see those pictures and I finally remembered to do that. One pic is from the battery bay and other from the engine bay, at the very back of the passenger side rear head (sorry for the long descriptions)
And the last picture are my intended beer tap shift *****. Both are pretty epic and rare. Especially the shark one lol
Things we have left to do: finish the wiring, figure out the exhaust setup,and install front end accessories + belt and in THEORY it should be good to go
Interesting that theres been no trolls, no questions, no snide comments so far...I must be the last guy doing an LS swap apparently...lmao
Did you use a corvette FPR filter for your return line?
Thanks
11-26-2014, 10:12 AM
#17
New Member

Welcome to the LSx world!
I have an LQ9/t56 in my 06 Z. I have the FR kit and have cut the sub-firewall out as well as done all the wiring myself. Let me know if you have any questions or anything and I'd love to help!
(Link to my build https://my350z.com/forum/engine-and-...ld-inside.html)
I have an LQ9/t56 in my 06 Z. I have the FR kit and have cut the sub-firewall out as well as done all the wiring myself. Let me know if you have any questions or anything and I'd love to help!

(Link to my build https://my350z.com/forum/engine-and-...ld-inside.html)
11-26-2014, 07:03 PM
#18
Registered User
Thread Starter
In response to (blufc3s), you are right on. I am using a Corvette component for that. A car friend of mine gave it to me when he upgraded his fuel system setup.
In response to to (mkiv20vt), I am actually aware of your build lol I know most of the LS 300zx and 350z projects going on...word travels fast. Even the garage builds get around to me. I run the 350z LSx Facebook group and we are all about sharing information and finding the low down and dirty about such projects. lol Sadly, you have a more straightforward build. I have a number of more...difficulties by switching to newer LS3 items. Yours is more straightforward and basic in nature, which is smarter and more affordable than what I did, as you stuck with the motor and didnt cross-breed things. I also have the information to utilize all my stock gauges,...well, I hope lol Good looking build my friend. Drop a turbo on dat hoe and turn up the heat!
In response to to (mkiv20vt), I am actually aware of your build lol I know most of the LS 300zx and 350z projects going on...word travels fast. Even the garage builds get around to me. I run the 350z LSx Facebook group and we are all about sharing information and finding the low down and dirty about such projects. lol Sadly, you have a more straightforward build. I have a number of more...difficulties by switching to newer LS3 items. Yours is more straightforward and basic in nature, which is smarter and more affordable than what I did, as you stuck with the motor and didnt cross-breed things. I also have the information to utilize all my stock gauges,...well, I hope lol Good looking build my friend. Drop a turbo on dat hoe and turn up the heat!
11-27-2014, 02:05 PM
#19
New Member
Keeping the stock gauges (tach and oil pressure) was/is a waste I feel. No need to waste space on the stock ECU for those few things IMHO.
Are you planning on DBW?
Are you planning on DBW?
11-27-2014, 04:30 PM
#20
Registered User
Thread Starter
In the pictures I have pictures of my setup, hopefully I made it apparent that I'm going drive-by-cable. Already got the cable hooked up to the pedal...lol no turning back now haha
Not sure how maintaining the function of the stock gauges is a waste..only helps keep my dash cleaner and sets me apart from everyone else in just another aspect. But 95% of all other swaps have replacement gauges. the goal is to be different, isn't it? I mean, you wanted to be different and go an LS, so Im continuing that goal throughout the car. But hey, everyone has different goals and ideas...Its your car, you did what you thought was best and I'm doing what I want for my setup. Any plans for changing out those heads and F/I?
Not sure how maintaining the function of the stock gauges is a waste..only helps keep my dash cleaner and sets me apart from everyone else in just another aspect. But 95% of all other swaps have replacement gauges. the goal is to be different, isn't it? I mean, you wanted to be different and go an LS, so Im continuing that goal throughout the car. But hey, everyone has different goals and ideas...Its your car, you did what you thought was best and I'm doing what I want for my setup. Any plans for changing out those heads and F/I?

