
Steering Wheel and Gauge Cluster Blacked Out


 03-15-2009, 06:50 PM
#4
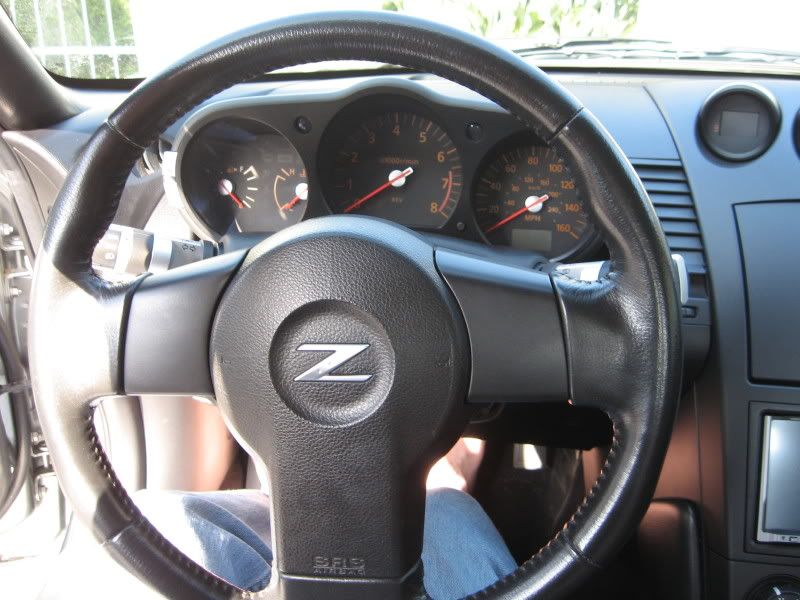
This is a base model. No cruise control and no audio controls on the steering wheel.
Time will tell on the finish. I am wondering about that myself. If the steering wheel pieces become a mess, I know a professional interior guy up north Long Beach and will take them to him. Might be better to cover those with vinyl similar to what's already on the steering wheel.
I'm open to experimenting, the process for taking this stuff apart is surprisingly easy.
I used DupliColor adhesion promoter and DupliColor Vinyl and Fabric (flat black) after sanding with 800 and then 1500 grit sandpaper.
Last edited by lbz; 03-15-2009 at 06:53 PM.
03-15-2009, 07:11 PM
#5
Registered User

Join Date: Jun 2007
Location: NJ
Posts: 260
Likes: 0
Received 0 Likes
on
0 Posts
I like it and now that you mention it, I would probably like the steering wheel pieces
wrapped in vinyl but I doubt it could be done on mine, the cruise button stick through and I don't see how you could wrap vinyl through the cut outs w/o affecting room for
the button. Let us know how it holds up to touching...the natural oils in human skin
can wear down paints or dye. Nice project tho...looks sharp.
03-15-2009, 07:36 PM
#7
Registered User
iTrader: (1)

Join Date: Mar 2008
Location: Canada, montreal
Posts: 506
Likes: 0
Received 0 Likes
on
0 Posts
but i would prob would of just replaced the stock aluminum parts with new ones instead of painting it black.
Trending Topics
03-15-2009, 07:49 PM
#8
Thanks for all the feedback. The silver pieces do add an element of style, for sure. I'm a bit of a minimalist and I felt they were ... waht's the right word... distratcting.. or, over done.
I considered the CF kit but that seemed a bit flashy...
Anyway, will post updates on finish as it holds up / comes apart.
I considered the CF kit but that seemed a bit flashy...
Anyway, will post updates on finish as it holds up / comes apart.
03-15-2009, 07:49 PM
#9
Registered User
Join Date: Jun 2007
Location: NJ
Posts: 260
Likes: 0
Received 0 Likes
on
0 Posts
exactly what i was thinking... if you really had to do something with the steering wheel (had to) i would of wrapped it with the dry carbon fiber.. it seems to be the new thing to do and more and more ppl are doing it since its so easy to apply
but i would prob would of just replaced the stock aluminum parts with new ones instead of painting it black.
but i would prob would of just replaced the stock aluminum parts with new ones instead of painting it black.
it is like a Rihanna song, over played.
03-15-2009, 09:26 PM
#10
Registered User
iTrader: (1)
Join Date: Mar 2008
Location: Canada, montreal
Posts: 506
Likes: 0
Received 0 Likes
on
0 Posts
but blacking out the steering wheel and the cluster is just dull. IF I HAD TO replace the aluminum parts or paint them... i would at least do something that looks somewhat nice and not dull
my .02
03-16-2009, 12:12 AM
#12
Had to take the steering wheel off. It's actually pretty easy but you need a T30 tamper resistant Torx bit, a normal T40 Torx bit, phillips head #2 screwdriver and a 19mm socket to do it.
Here's where I found the info. I didnt need the entire posting, just the steering wheel removal part. Actually, you can go to step 8 on the procedure linked below, flop the steering wheel over, pull the rear cowling off and that should expose the remaining screws (1 for each piece) that are holding those trim pieces in.
https://my350z.com/forum/body-interi...t-install.html
Last edited by lbz; 03-16-2009 at 12:17 AM.
 03-16-2009, 04:20 AM
#14
Registered User
Join Date: Jun 2007
Location: NJ
Posts: 260
Likes: 0
Received 0 Likes
on
0 Posts
Had to take the steering wheel off. It's actually pretty easy but you need a T30 tamper resistant Torx bit, a normal T40 Torx bit, phillips head #2 screwdriver and a 19mm socket to do it.
Here's where I found the info. I didnt need the entire posting, just the steering wheel removal part. Actually, you can go to step 8 on the procedure linked below, flop the steering wheel over, pull the rear cowling off and that should expose the remaining screws (1 for each piece) that are holding those trim pieces in.
https://my350z.com/forum/body-interi...t-install.html
Here's where I found the info. I didnt need the entire posting, just the steering wheel removal part. Actually, you can go to step 8 on the procedure linked below, flop the steering wheel over, pull the rear cowling off and that should expose the remaining screws (1 for each piece) that are holding those trim pieces in.
https://my350z.com/forum/body-interi...t-install.html
03-16-2009, 06:47 AM
#15
When I went to start the car after I was done, was funny, I put my seat back all the way back.. was afraid it still might fire for some reason.
03-16-2009, 07:14 AM
#16
Registered User
Join Date: Jun 2007
Location: NJ
Posts: 260
Likes: 0
Received 0 Likes
on
0 Posts
I was concerned as well until I got into the procedure. Battery leads off was one step. Only two screws holding it in made for easy removal, once the two leads were off the back, no way to fire unless dropped. I just worked slowly and carefully when handling. I put it on the P side floor while doing the rest of the work so it had no where to fall.
When I went to start the car after I was done, was funny, I put my seat back all the way back.. was afraid it still might fire for some reason.
When I went to start the car after I was done, was funny, I put my seat back all the way back.. was afraid it still might fire for some reason.
I would have sat in the pass seat! (I have an auto)
I read somewhere at one time that the simple act of disconnecting/reconnecting a power source can trigger airbag deployment.
The article said something about the wires/connectors for the air bag circuit and not anything as simple as the battery. It said air bags have some type of battery backup to trigger deployment if the triggered event severs the primary voltage source.
03-16-2009, 08:47 AM
#17
Had to take the steering wheel off. It's actually pretty easy but you need a T30 tamper resistant Torx bit, a normal T40 Torx bit, phillips head #2 screwdriver and a 19mm socket to do it.
Here's where I found the info. I didnt need the entire posting, just the steering wheel removal part. Actually, you can go to step 8 on the procedure linked below, flop the steering wheel over, pull the rear cowling off and that should expose the remaining screws (1 for each piece) that are holding those trim pieces in.
https://my350z.com/forum/body-interi...t-install.html
Here's where I found the info. I didnt need the entire posting, just the steering wheel removal part. Actually, you can go to step 8 on the procedure linked below, flop the steering wheel over, pull the rear cowling off and that should expose the remaining screws (1 for each piece) that are holding those trim pieces in.
https://my350z.com/forum/body-interi...t-install.html
Thanks for the info. I thought it would have been a "unscrew then pop" procedure. I'll keep the link for future reference.
 03-16-2009, 07:08 PM
#19
take those 4 screws out and work the underside of the steering area cover off.
Then you will see there are 4 10mm bolts up in there. Take all 4 out.
You can now lift the cluster and unclip the signal cable from the back.
After that, pop the rear cover off, no screws holding it in.
From there I just carefully took the cluster casing halves (upper and lower) off and the bezel came right off, I had to give it a bit of a tug as there was a very small amount of adhesive.
I'm about 1/3 of the way through the procedure, covers the lower console, upper console, gauge cluster and steering wheel. Once done I will post.

