
3M ScotchPrint Black Carbon Fiber Vinyl on Interior!
 06-13-2011, 09:36 AM
#61

i think a lot of it just has to do with having the "real" thing. I mean realistically unless you are a professional driver.... i don't think saving a couple of pounds (and spending thousands of dollars) by using real CF panels is going to help much.
my reason for not using fake CF is that it usually looks awful and tacky, but this product looks really good...but i'll have to see it in person before deciding
my reason for not using fake CF is that it usually looks awful and tacky, but this product looks really good...but i'll have to see it in person before deciding
 06-13-2011, 11:26 PM
#62
Registered User

Join Date: Jun 2011
Location: Vancouver BC
Posts: 21
Likes: 0
Received 0 Likes
on
0 Posts
.....Just a heads up, you do not want to use vinyl inside the engine compartment, or anywhere else where there is constant high heat. The vinyl will melt and make a mess, and possibly damage surrounding parts.
06-14-2011, 08:48 AM
#63

Of course, you wouldn't want to put vinyl on anything with direct heat. But engine covers, intake tubing and other slightly cooler items seem to work fine.
06-15-2011, 11:40 AM
#64
Registered User
Join Date: Jun 2011
Location: Vancouver BC
Posts: 21
Likes: 0
Received 0 Likes
on
0 Posts
.....Di-Noc is not the same as 3M scotchprint vinyl. Di-Noc is a permanent, thick, strong adhesive backed vinyl used for permanent applications such as signage. What ever you apply Di-Noc to, it is a permanent application and will destroy most things it is removed from. Scotchprint is an automotive application that is much thinner with an adhesive that is meant to be removed from its application. Used in places where above average heat is, it will melt and ruin the parts it is surrounding aka under the hood, around brake parts like callipers and wheels etc. Just a heads up! : ) would hate for you to be spending hours and hours trying to remove gooey vinyl, or worse replacing parts.
06-15-2011, 03:27 PM
#65
.....Di-Noc is not the same as 3M scotchprint vinyl. Di-Noc is a permanent, thick, strong adhesive backed vinyl used for permanent applications such as signage. What ever you apply Di-Noc to, it is a permanent application and will destroy most things it is removed from. Scotchprint is an automotive application that is much thinner with an adhesive that is meant to be removed from its application. Used in places where above average heat is, it will melt and ruin the parts it is surrounding aka under the hood, around brake parts like callipers and wheels etc. Just a heads up! : ) would hate for you to be spending hours and hours trying to remove gooey vinyl, or worse replacing parts.
06-15-2011, 06:46 PM
#66
Registered User
iTrader: (2)

Join Date: Aug 2010
Location: Virgin-ia
Posts: 636
Likes: 0
Received 0 Likes
on
0 Posts
So which is better to wrap the interior parts? I actually just finished wrapping mine with the di-noc... But I did a hasty job and was going to order some more to re-do it... I didn't know they had this scotchprint stuff too.
Ive already got the primer.
Ive already got the primer.
06-16-2011, 12:25 AM
#67
Registered User
Join Date: Jun 2011
Location: Vancouver BC
Posts: 21
Likes: 0
Received 0 Likes
on
0 Posts
3M scotchprint all the way, for interior and exterior. Di-Noc is not for automotive applications guys. Its permanent and will ruin the finish if removed from most applications. 3M scotchprint is thinner, and will bend and shape to any application, and remain that way! The carbon fiber 3M scotchprint is a little thicker thus protects the application a little better, especially on the outside. I hope when you remove the Di-Noc from your interior pieces they are not too messed up. You will want to recover with 3M scotchprint automotive vinyl all the way!
06-16-2011, 01:49 PM
#69
New Member
iTrader: (20)

Join Date: Mar 2007
Location: Dallas
Posts: 781
Likes: 0
Received 0 Likes
on
0 Posts
^^Di-Noc is not for automotive applications guys. Its permanent and will ruin the finish if removed from most applications.
Is this really true? I had Di-noc cf vinyl on my roof for about 5 months now. All I know is if you plan to remove, please use heat it up first.
Is this really true? I had Di-noc cf vinyl on my roof for about 5 months now. All I know is if you plan to remove, please use heat it up first.
06-28-2011, 09:12 AM
#71
Update:
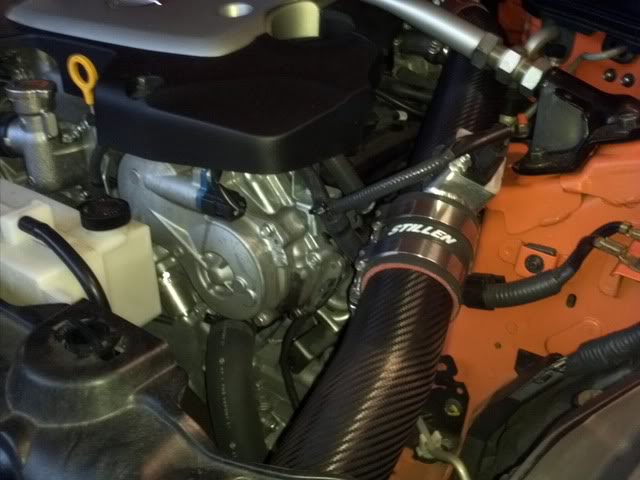
The Scotchprint seems to be holding up fine on my intake tubing. I've put a couple hundred miles on since the install which has included long highway drives, periods of stop and go, as well as long periods of idling. The pipes do get pretty warm to the touch, but not anywhere close to a melting point.
I wouldn't go wrapping everything in the engine compartment as most of the other components get a lot hotter than the intakes.
Here's a shot of how it turned out.
 06-28-2011, 01:04 PM
#74
Registered User
iTrader: (2)
Join Date: Aug 2010
Location: Virgin-ia
Posts: 636
Likes: 0
Received 0 Likes
on
0 Posts
Got mine in the mail the other day....
The scotchprint is alot more "glossy" than the Di-Noc (not cleared at least.. or they might sell a shiny version now).
Scotchprint also has a smaller pattern on it compared to the Di-Noc
Di-Noc is a little thicker.... but not by a whole lot.
My Di-noc is holding up pretty well, especially since I did not use the primer 94.... It does have a few spots where some air came in on the edges... where the primer would/should have been used.
I'll be redoing it to the scotchprint pretty soon, so I'll be able to see how much easier it is to work with.
06-28-2011, 03:00 PM
#75
The Primer 94 makes all the difference in the world. The vinyl adheres like crazy to that stuff. However, once you lay the vinyl over the primer, you have very little room for error, whereas if you are laying it down on a bare surface you can lift and retry. Make sure you lay the vinyl down carefully where you are using the primer or you'll be  !
!
!
06-28-2011, 04:01 PM
#76
Registered User
iTrader: (2)
Join Date: Aug 2010
Location: Virgin-ia
Posts: 636
Likes: 0
Received 0 Likes
on
0 Posts
That is why I stayed away at first lol.... but I think doing it again will be much easier than the first time with no experience. A friend makes it 2x as easy also.
07-11-2011, 02:25 PM
#77
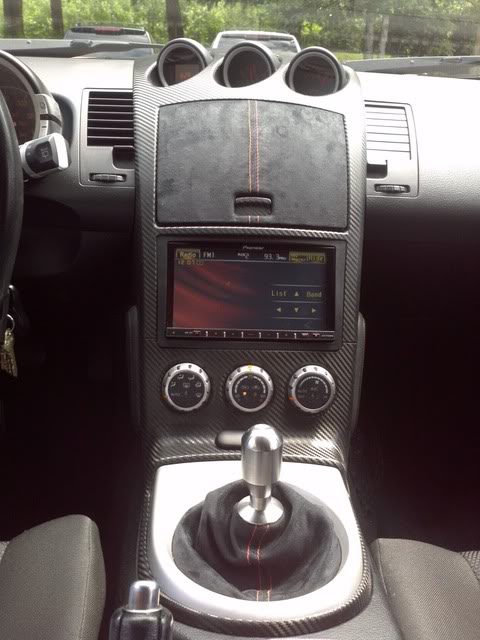
Finally finished my interior wrapping project this weekend!
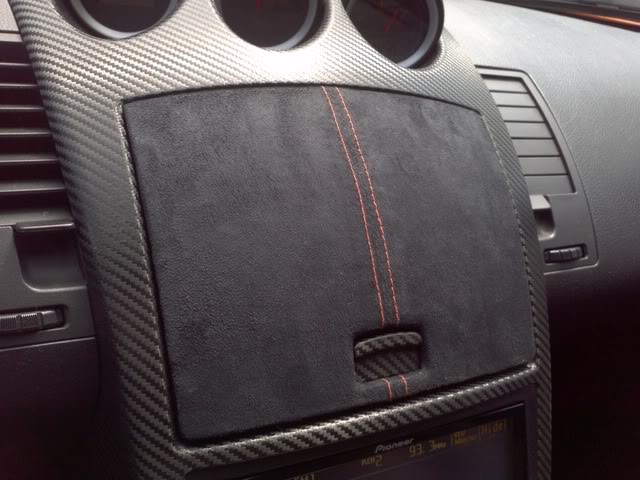
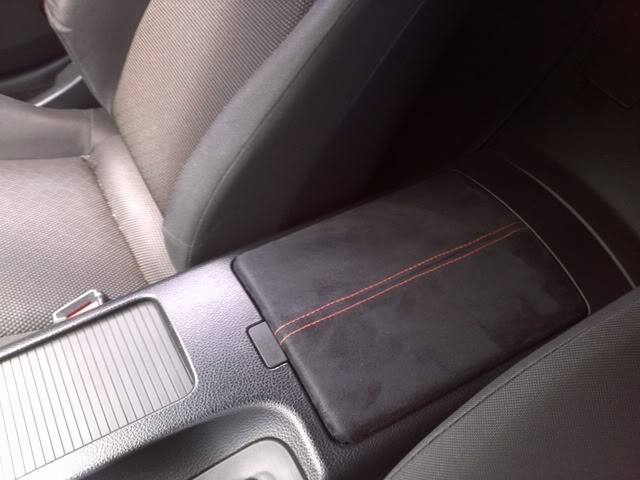
I ended up doing the waterfall and shift surround in Scotchprint, then wrapping my cubby door, shift boot, center console armrest, and the rear strut-bar panel in black microfiber with an orange double stitch to match the Solar Orange exterior/speaker box.
I feel that it turned out really well. I decided to use 3M's primer 94 on the entire surface due to the extended periods of heat that an interior will suffer through the summer.
Here's some lessons I learned:
1. The Scotchprint material is thin enough to see a bit of the bumpy texture through it. I actually like how it looks due to the carbon weave looking too smooth by itself.
2. Do the waterfall panel first, starting at the top and working your way down 2-4 inches at a time. If you peel the backing completely off your sheet, you'll end up having to fight with the material trying to double over on itself.
3. In order to get the weaves to line up between the waterfall and shift surround, do the top panel first. Once you're finished, take the sheet of 3M for the surround and lightly lay about an inch of it onto the top/waterfall panel. Once you have it lined up, put the two panels together as if they were in the car, then begin sticking the 3M onto bottom panel. Everything should then line up pretty darn well. Mine ended up being only a fraction of an inch off.
4. To wrap the cubby door in a fabric, you'll want to shave the edges of the door a bit. Luckily I thought of this before hand. Mask a guide-line (don't use the bumpy texture as a guide, I measured a bunch of times and found the texture to be slightly crooked) so you don't take off too much, then use a Dremel, or better yet a belt sander to remove a bit off the edges. Also, the button isn't able to be pushed up quite as far after the wrap, so I shaved a bit off of each side of the latching mechanism. Works like charm.
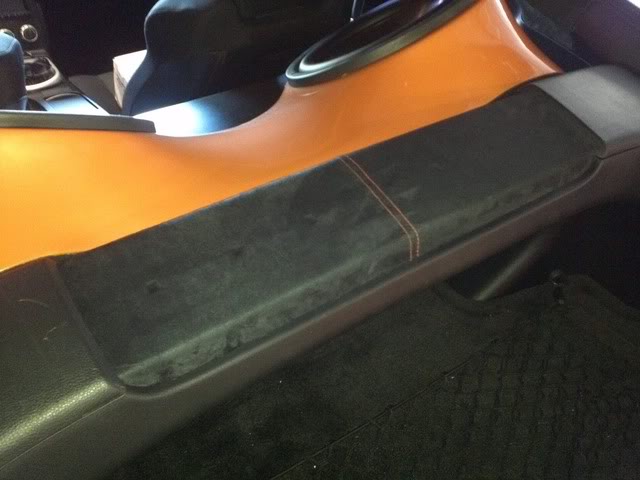
Last edited by TPete19; 07-12-2011 at 09:34 AM.

 07-14-2011, 09:27 PM
#80
The microfiber for the cubby and shift boot I got at a local fabric store. It isn't the cheaper, stretchy stuff. I lucked out and got it on a sale for 50% off, but it generally runs about $20-25 a yard.
I bought the Scotchprint from metrorestyling.