Help on some body work
 06-22-2013, 07:15 AM
#1
Registered User
Thread Starter

Join Date: Aug 2010
Location: boise id
Posts: 10
Likes: 0
Received 0 Likes
on
0 Posts
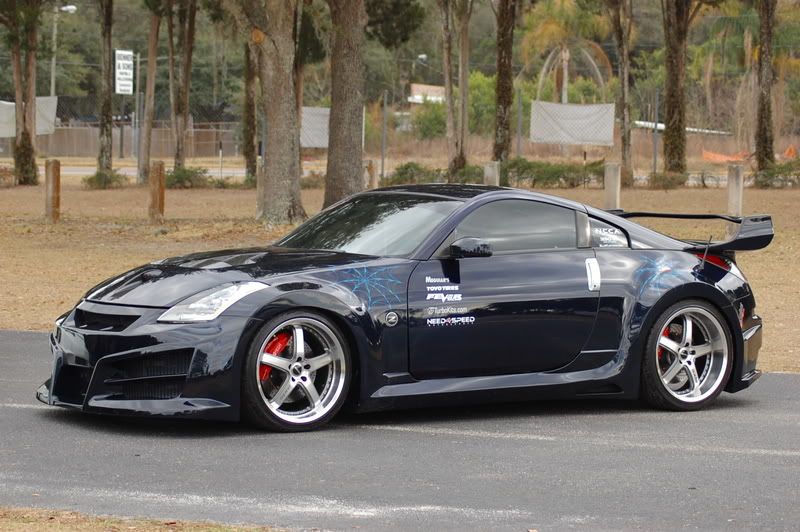
ok guys so i have been on forum for sometime, never really posted though. i know im going to get a lot of blow back on not doing this but its happening; was hoping i could get some assistance. since the first time i saw cayennes 350 i was in love. recently got the full Havoc wide body for a steal of a price. i am well versed in doing body conversions and such but this kit is a VERY minimal mold system. theres ALOT to do on it and sadly... i can find NO information on installation methods. namely the side skirts. does ANYONE have any experience with it or know who to talk to on how the side skirts are to be done? either there is about 4 hours of custom build up required , which seems silly, or it looks like i need to cut the factory side skirts and affix the new skins over those. im comfortable doing either... just want it done as the kit was originally intended to be installed and would rather not slice up the factory skirts only to find out it wasn't needed. thanks again guys for all your efforts and assistance.
 07-23-2013, 05:24 AM
#2
Registered User
Thread Starter
Join Date: Aug 2010
Location: boise id
Posts: 10
Likes: 0
Received 0 Likes
on
0 Posts
ok so this will be a journal of sorts as i post updates, frustrations and ask for advice while i dive into a massive project... the Havoc wide body conversion.
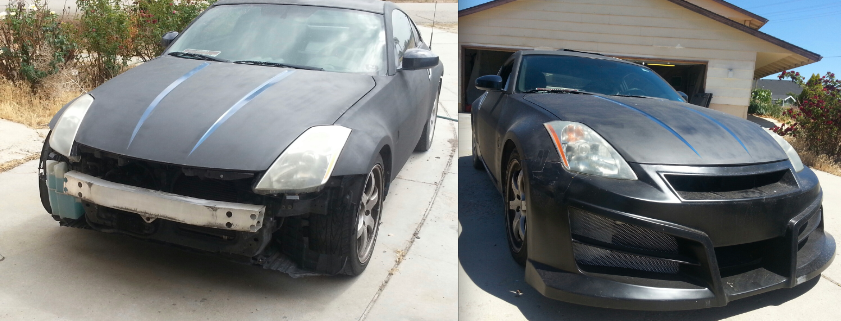
got a killer deal on the kit, but sadley not a soul out there seems to have any advice on istalling it. this kit is a VERY VERY basic kit. its a rough mold with no mounting holes drilled. might have no drill holes as it doesnt even have the flanges to drill holes into. so every piece must be measured, trimed, and flanges built up just to drill mount holes into. its a crap ton of work but coming along well. first thing i did was take the base donar car strip it down and applied a base primer that encourages fiberglass adhesion. then removed front ,rear and sides. the front was pretty simple to dry fit.
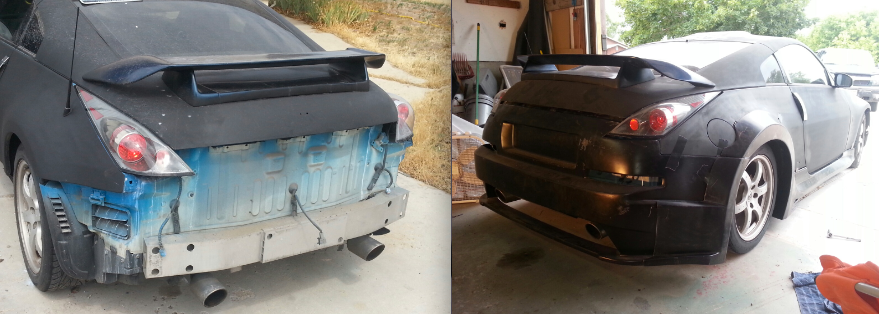
the rear however was a lot of precision cutting and build up.
now i have the side skirts dry hung in place in that picture. however i still need to attach the factory trimmed down side to the new fiberglass skin. does anyone have recommendations on how you'd do that? the factory skin is urethane while new cover is fiber glass. im thinking a few recessed pop rivets and back fill in between the two with spray foam to give added support . thoughts?
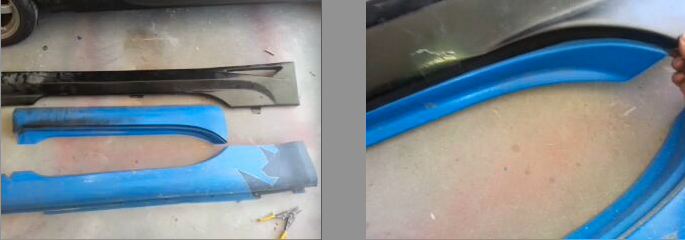
the short piece is one of the stock sides trimmed to what is needed for mounting. the photo on right shows what parts actually come in contact; its only point where the two meet is the first ridge inside the door jam sill. .
as i move forward in the next short time ill be doing the fender flares as well. now as im doing this.. what are your thoughts pros and cons on doing a smooth flush mounting? i know if i ever break a panel its a pain int he *** to repair when you cant remove it. but assuming i don't curb check and shatter it all... if i used a product like bondo glass to fill and smooth the panel seams. . . will they crack over time? or should it all hold fine for the fender contours?
thank you all and ill keep future pics and updates coming in.
got a killer deal on the kit, but sadley not a soul out there seems to have any advice on istalling it. this kit is a VERY VERY basic kit. its a rough mold with no mounting holes drilled. might have no drill holes as it doesnt even have the flanges to drill holes into. so every piece must be measured, trimed, and flanges built up just to drill mount holes into. its a crap ton of work but coming along well. first thing i did was take the base donar car strip it down and applied a base primer that encourages fiberglass adhesion. then removed front ,rear and sides. the front was pretty simple to dry fit.
the rear however was a lot of precision cutting and build up.
now i have the side skirts dry hung in place in that picture. however i still need to attach the factory trimmed down side to the new fiberglass skin. does anyone have recommendations on how you'd do that? the factory skin is urethane while new cover is fiber glass. im thinking a few recessed pop rivets and back fill in between the two with spray foam to give added support . thoughts?
the short piece is one of the stock sides trimmed to what is needed for mounting. the photo on right shows what parts actually come in contact; its only point where the two meet is the first ridge inside the door jam sill. .
as i move forward in the next short time ill be doing the fender flares as well. now as im doing this.. what are your thoughts pros and cons on doing a smooth flush mounting? i know if i ever break a panel its a pain int he *** to repair when you cant remove it. but assuming i don't curb check and shatter it all... if i used a product like bondo glass to fill and smooth the panel seams. . . will they crack over time? or should it all hold fine for the fender contours?
thank you all and ill keep future pics and updates coming in.
07-23-2013, 05:51 AM
#3
Super Moderator
MY350Z.COM
MY350Z.COM


iTrader: (8)
Please throw the kit in the trash before you ruin a perfectly good car anymore
07-23-2013, 07:38 AM
#5
Registered User
Thread Starter
Join Date: Aug 2010
Location: boise id
Posts: 10
Likes: 0
Received 0 Likes
on
0 Posts
i know imma get
 like no other for my decision in body kits. but i grew up overseas in an area that a TON of over the top kits are common scene. its what i like and feel comfortable with. id appreciate good feedback, but u know trolls love to troll so ill weed through those posts for the ones with the feedback im seeking. and for those who do flame the hell out of this post... well, im glad to see my terrible choice and stupid decisions entertain you and keep your attention.

Trending Topics


 07-24-2013, 08:33 PM
#10
Super Moderator
MY350Z.COM
MY350Z.COM
iTrader: (8)
Holy crap, I saw a vert today with that same bumper while on the Camp Pendleton beach today. I almost swerved to hit him head on to save the Z from being destroyed anymore. How can anyone think it looks got. It makes the Veilside catfish bumper look classy.
 07-25-2013, 01:26 AM
#12
 07-27-2013, 09:52 PM
#13
Registered User
Thread Starter
Join Date: Aug 2010
Location: boise id
Posts: 10
Likes: 0
Received 0 Likes
on
0 Posts
well i knew id get flamed. and thats fine. i like the look. its so over the top i cant help but to love it. i have seen a ton of kits over the years, and while they differ... they aren't a HUGE change from stock. if im gonna do the time to make a change. i want it to be massive. it was this or the v3. both are massive changes. but this one is just. ... over the top. ill make sure i keep the updates coming. so for those who are reluctant to speak up, enjoy. to those who wish to keep flaming... enjoy. either way.. its already begun, and its going through. lol now onto a topic i hope to get some good feedback on. the wheel gap on this new kit is to much to ignore. i need to stretch the stance 2 inches per side. i have found 2 options. either go with spacers to bring the wheels out. or go with a "deep well" rim. both bring the rubber flush with the new fenders. any advice on pros and cons of going with these options? or will it have the same result either way? thanks again everyone.
07-27-2013, 10:26 PM
#14

i have been on forum for sometime, never really posted though. i knew id get flamed. and thats fine. i like the look. ill make sure i keep the updates coming. so for those who are reluctant to speak up, enjoy. to those who wish to keep flaming... enjoy. either way.. its already begun, and its going through.
i hope to get some good feedback on. the wheel gap on this new kit is to much to ignore. i have found 2 options. either go with spacers to bring the wheels out. or go with a "deep well" rim. both bring the rubber flush with the new fenders. any advice on pros and cons of going with these options? or will it have the same result either way? thanks again everyone.
As for your 2 options: The biggest spacers won't push your stock wheels out far enough to sit flush. And even if you do find spacers that big of a spacer, I wouldn't put them on. You'll need to go with option 2... wheels with custom spec and offset very expensive, not including tires.
I do not like your kit... very poor choice but it's your money, your car, good luck with your build.
07-28-2013, 01:50 AM
#15
Registered User

there is a reason you got a "DEAL" on that kit. because no one in there right mind would put that on the 350. not unless you do everything over the top(interior, engine bay, suspension, wheels) and make it strictly a show piece.
if you put that kit on and some spacers, its just gonna be a joke.
wither way, its your money. and if you looking for support, you wont get much if any for obvious reasons.
if you put that kit on and some spacers, its just gonna be a joke.
wither way, its your money. and if you looking for support, you wont get much if any for obvious reasons.
07-28-2013, 03:24 AM
#16

I think you've overstepped your boundaries; mounting kits like this is no easy task. From what I've read so far, you should try to find some local guy that is a body tech. to help if you want this done. As long as hes not a hack, you might be ok. But it wont help it look any better in the end