
Gonna wrap it gloss black
 06-28-2014, 03:29 PM
#21
Registered User
Thread Starter

Join Date: Sep 2012
Location: Tampa, FL
Posts: 245
Likes: 0
Received 0 Likes
on
0 Posts
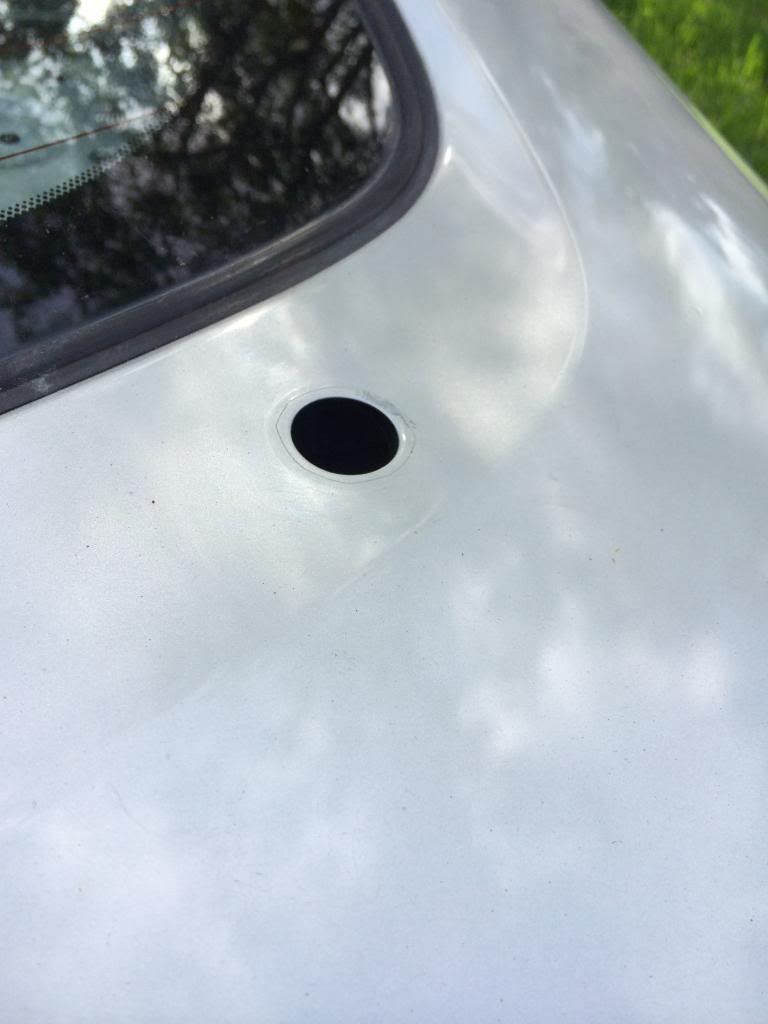
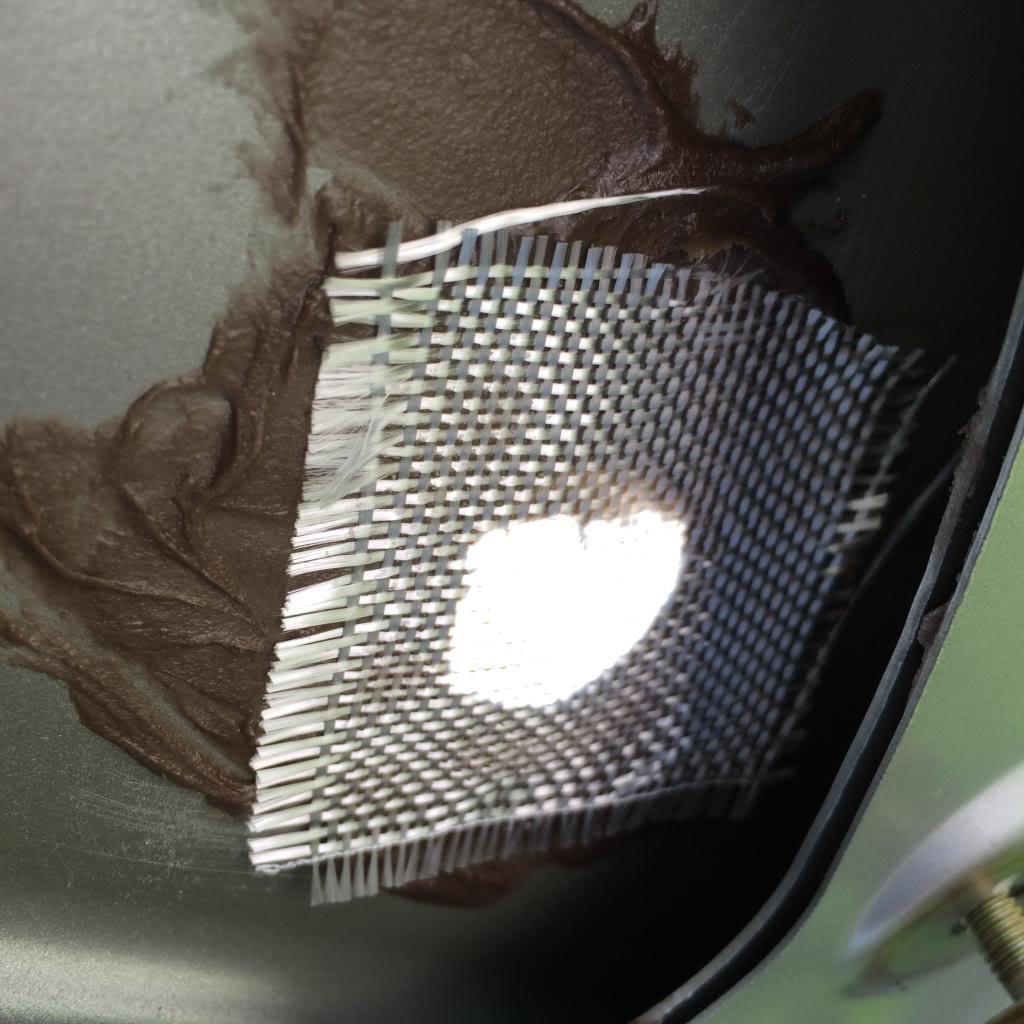
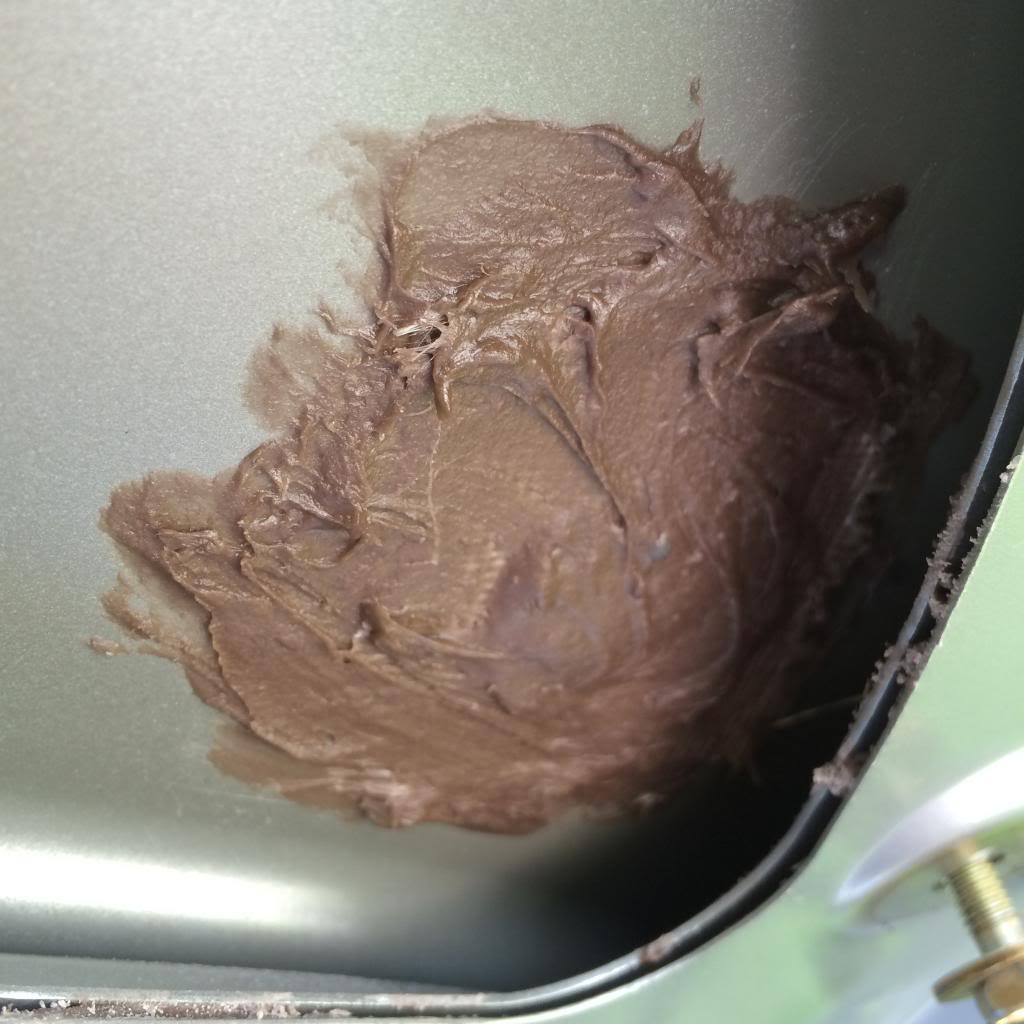
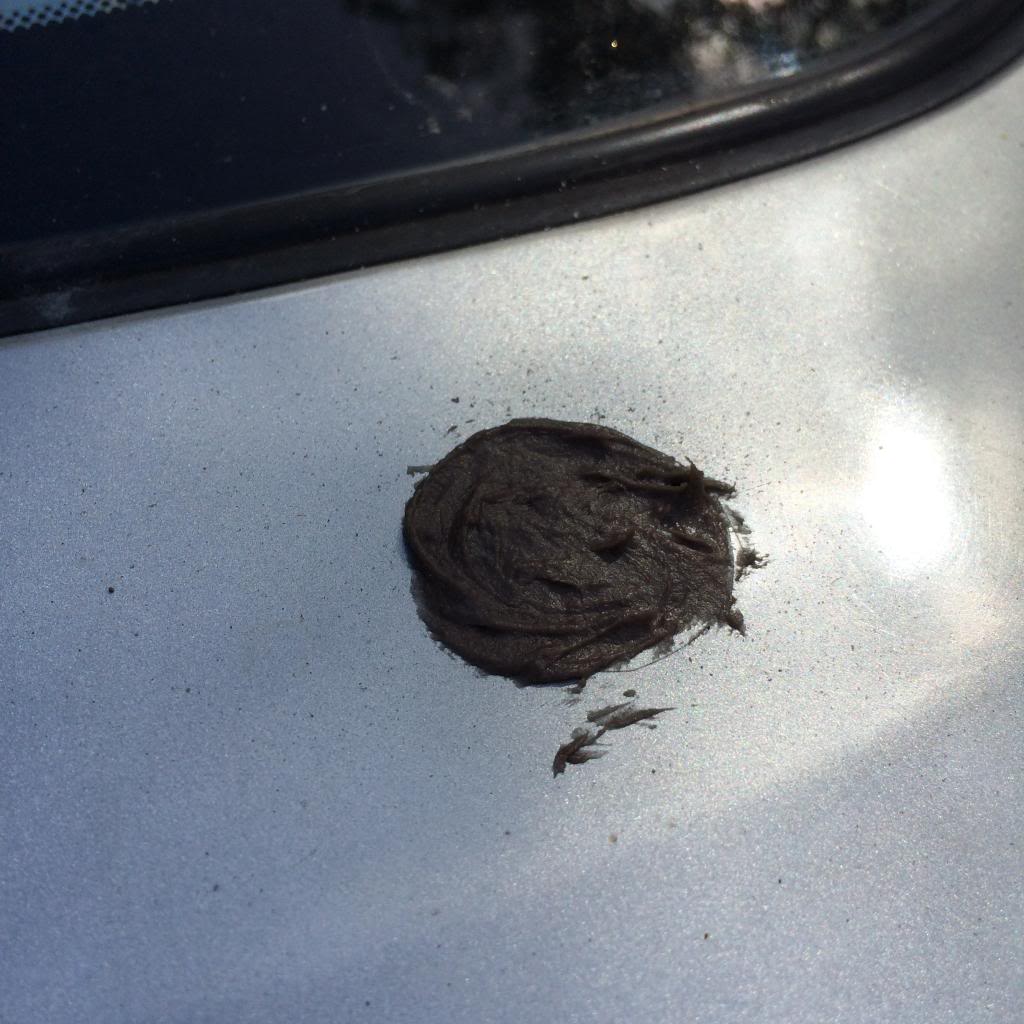
Some final touches before the wrap job scheduled for the end of July....I was looking around at some of the cars on the forum and was inspired to delete the rear wiper and antenna, and fill the rear emblem holes.
I like the simple, smooth look you get with the deletes. I'm not quite sure if I'll go emblemless on the rear deck, but I'm leaning that way. I've at least given myself the option.
Used fiberglass and fill, smoothed with some glaze, primed and coated, still needing wet sand and clear. Picture progression of the wiper delete (the antenna and emblem were done the same way:


 06-28-2014, 09:14 PM
#23
Registered User
Thread Starter
Join Date: Sep 2012
Location: Tampa, FL
Posts: 245
Likes: 0
Received 0 Likes
on
0 Posts
Can't rule that out. If it were to crack, I'd have to either weld it, redo the fill and re-wrap the hatch, or use one of the aftermarket plugs. Good point though. Yet another notch on my learning curve.
If nothing else, we can track it over time and see how it holds up along with some of the other elements of the wrap project.
If nothing else, we can track it over time and see how it holds up along with some of the other elements of the wrap project.
07-30-2014, 08:37 PM
#24
Registered User
Thread Starter
Join Date: Sep 2012
Location: Tampa, FL
Posts: 245
Likes: 0
Received 0 Likes
on
0 Posts
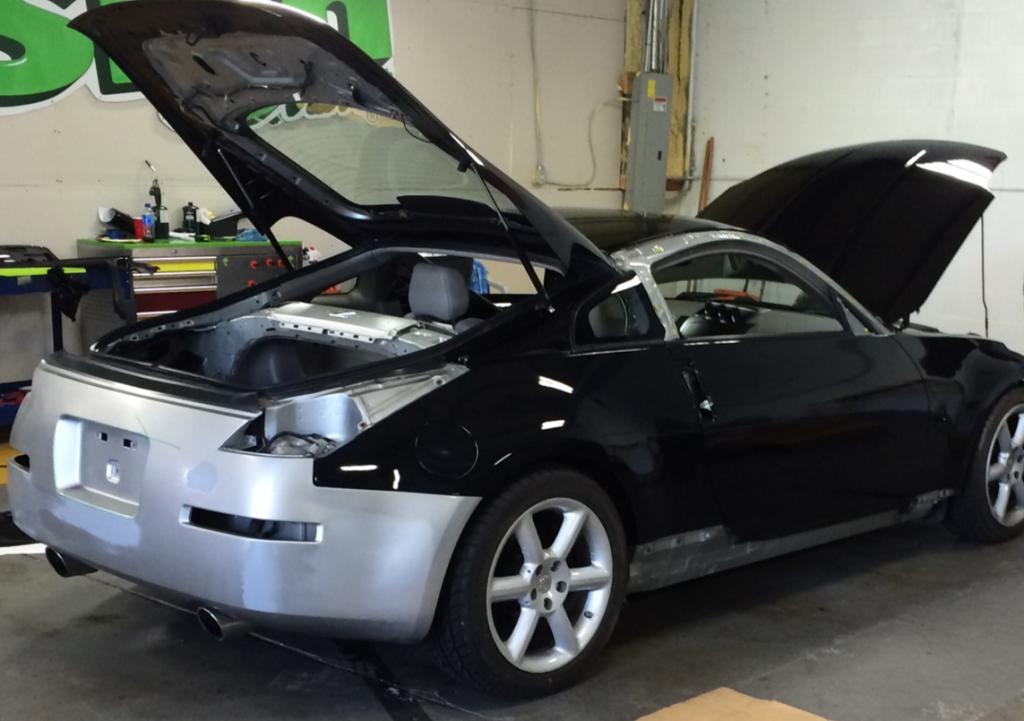
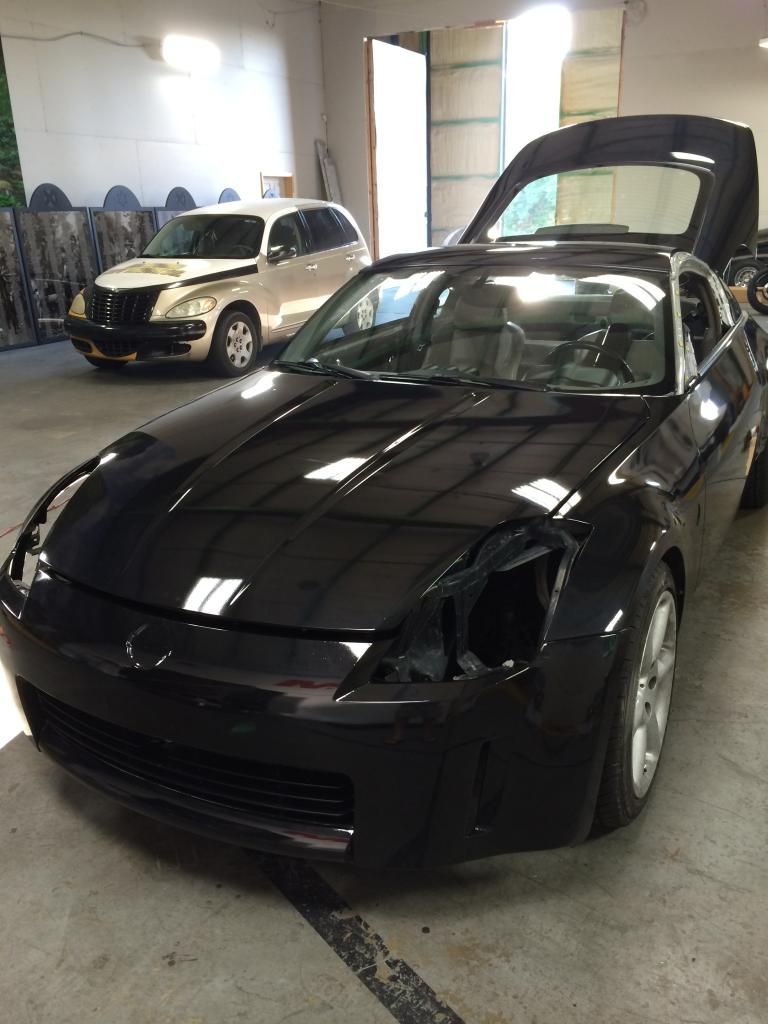
There it is, stripped down and being dropped off at Sign Parrot in east Tampa. It's got this funky calico paint job now from using a coupla cans of this silver and that silver to finish up body repair.
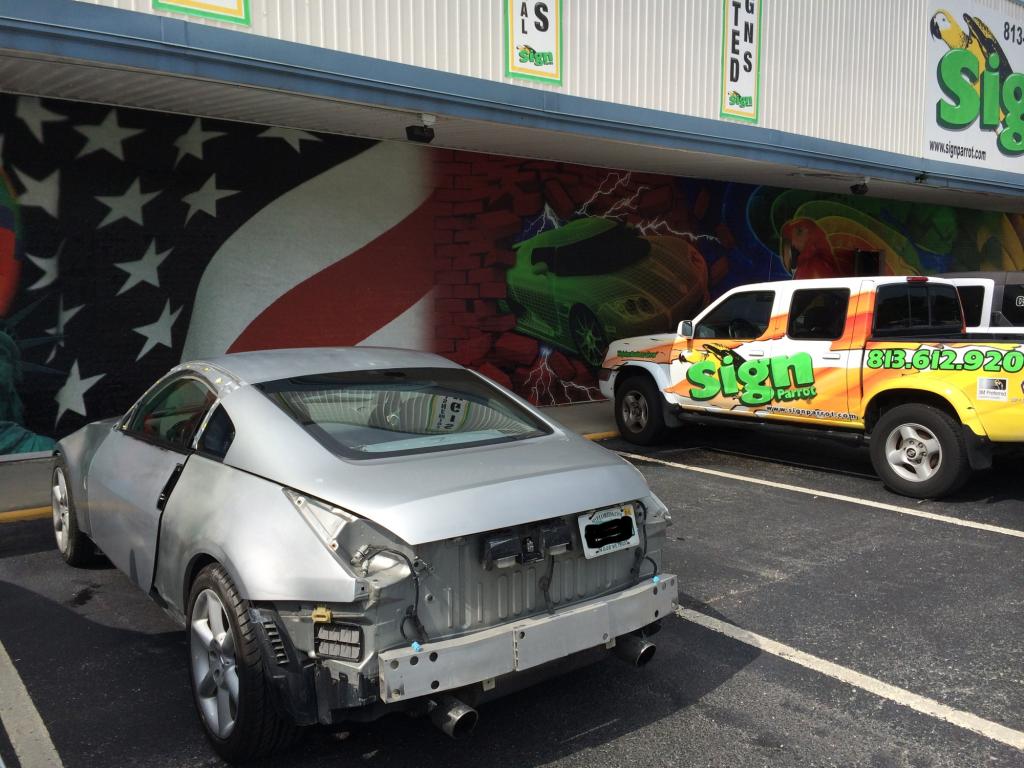
(Photo notes for the uber-observant: Body line is straight, the door is slightly ajar.......and, no.....that's not overspray on the tire.)
Probably pulled at least 12 dents and dings out of the body. Repaired a bumper rip and two other bumper boo-boos. Additionally, the entire drivers side suffered some sort of crash with the PO years ago, then suffered the indignity of a real crap paint job.....paint match, etc.
Decided to take a stab at deleting the wiper and antenna.....If the fills crack, I'll probably just reinstall the part in that hole. We'll see how they hold up.
Nonetheless, the car has been wet-sanded and DA polished to provide the smoothest possible surface for the wrap to adhere to. Anything loose was sanded and polished back to solid substrate, even primer in some spots - it's ugly, but smooth and solid. I think that's what will matter most.
I painted and cleared the door jambs, hatch jambs, and under the hood. I ultimately decided against removing the doors, mainly because I'm a one-man operation and I really couldn't afford to scrape them up at this stage. It really became a matter of masking it all off and shooting paint in the jambs until it was covered. The door and hatch jambs were further rubbed out and polished. Here's one of the rocker panels with the upper part finished, should look nice where the wrap will meet the black:
 07-31-2014, 06:09 AM
#25

Can't rule that out. If it were to crack, I'd have to either weld it, redo the fill and re-wrap the hatch, or use one of the aftermarket plugs. Good point though. Yet another notch on my learning curve.
If nothing else, we can track it over time and see how it holds up along with some of the other elements of the wrap project.
If nothing else, we can track it over time and see how it holds up along with some of the other elements of the wrap project.
07-31-2014, 09:22 AM
#26
Registered User
Thread Starter
Join Date: Sep 2012
Location: Tampa, FL
Posts: 245
Likes: 0
Received 0 Likes
on
0 Posts
07-31-2014, 02:22 PM
#28
Registered User
Thread Starter
Join Date: Sep 2012
Location: Tampa, FL
Posts: 245
Likes: 0
Received 0 Likes
on
0 Posts
Progress:
.....and the first fail. I had to go fetch the mirrors because they weren't cooperating with the process. The original paint had flaked off to the plastic before I started this. My attempt at totally repainting the mirrors seems to have exceeded the scope of my abilities. Funny, I did adhesion and tear tests everywhere except the mirrors.....
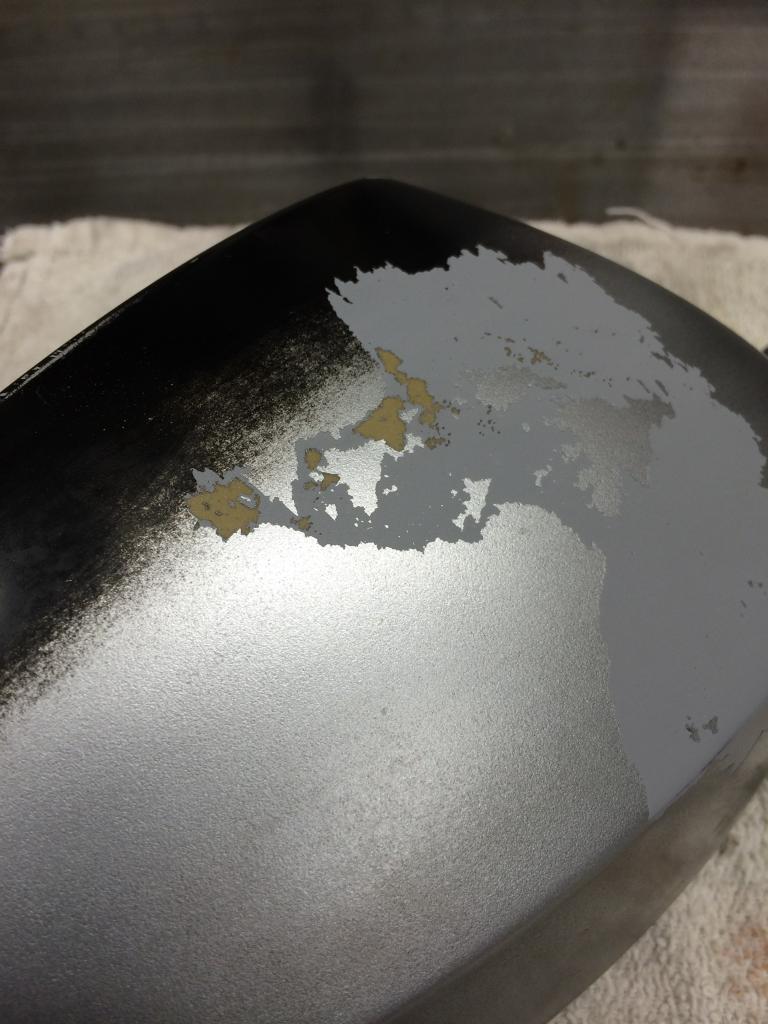
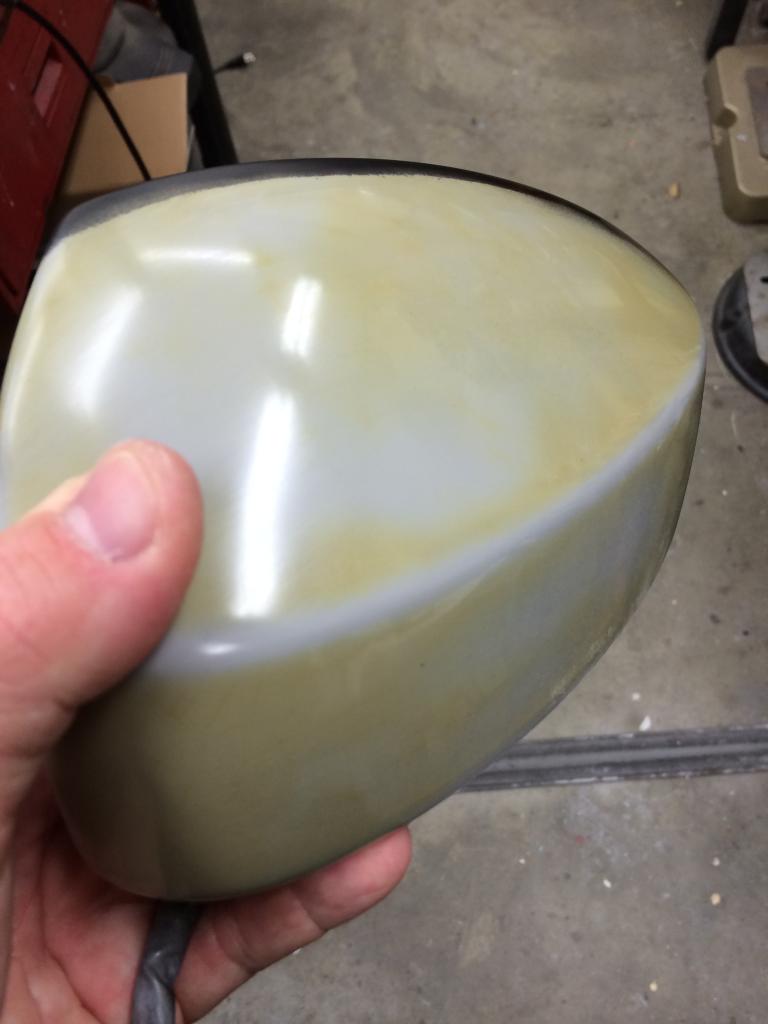
Easy solution though. I stripped them completely, wet-sanded and polished smooth. They say the wrap will adhere fine with some 3m primer added on:
The rocker panels came out great.....they are of course a different kind of plastic, but I worked and painted the hell out of those things and they had no problems with them. Go figure.

.....and the first fail. I had to go fetch the mirrors because they weren't cooperating with the process. The original paint had flaked off to the plastic before I started this. My attempt at totally repainting the mirrors seems to have exceeded the scope of my abilities. Funny, I did adhesion and tear tests everywhere except the mirrors.....

Easy solution though. I stripped them completely, wet-sanded and polished smooth. They say the wrap will adhere fine with some 3m primer added on:

The rocker panels came out great.....they are of course a different kind of plastic, but I worked and painted the hell out of those things and they had no problems with them. Go figure.
08-01-2014, 06:03 AM
#30

had the same problem with a fiberglass bumper cover that I had modified to fit my fenders. epic fail.....as bumper with complex curves are hard enough but when you add primer flaking off when repositioning the vinyl....just sucked more than I can say.
My solution was to by a urethane bumper.
OP....the wrap is look GREAT!!!
My solution was to by a urethane bumper.
OP....the wrap is look GREAT!!!
 08-01-2014, 02:18 PM
#32
Registered User
Thread Starter
Join Date: Sep 2012
Location: Tampa, FL
Posts: 245
Likes: 0
Received 0 Likes
on
0 Posts
Took the mirrors in and they were happy with the revised paintless polishing. I was most pleased to see the front bumper done......that piece was worked over about as much as the driver's side door. Both were taken down to bare substrate in parts, then smoothed, primed, painted and polished. That black plastic material the bumper is made of was an unpredictable PIA. I was quite confident about the metal, but less so about the soft bumper. My biggest fear with both was that the wrap process and re-lifting during installation would lift the new finish. My second concern was outgassing from the new paint causing bubbling. Outgassing on wraps is supposed to reveal itself within 24 hours, so all is good there.
A messy removal process in a few years is a foregone conclusion, but inevitable, since this car would ultimately have to be fully stripped before a proper paint job could be done. The key for this job is that the body work is homegrown and the paint is consumer-grade duplicolor that any of us could do to rehab a car's exterior short of a full respray.
Looks like they're in the finishing stages with just some detail work left. I can see that I'll have to touch up the black around the grille area......lucky me if that's as bad as it gets:
 08-02-2014, 05:40 PM
#33
New Member

Join Date: Apr 2005
Location: BEHIND YOU!! BEHIND YOU!!!
Posts: 8,689
Received 203 Likes
on
150 Posts
Took the mirrors in and they were happy with the revised paintless polishing. I was most pleased to see the front bumper done......that piece was worked over about as much as the driver's side door. Both were taken down to bare substrate in parts, then smoothed, primed, painted and polished. That black plastic material the bumper is made of was an unpredictable PIA. I was quite confident about the metal, but less so about the soft bumper. My biggest fear with both was that the wrap process and re-lifting during installation would lift the new finish. My second concern was outgassing from the new paint causing bubbling. Outgassing on wraps is supposed to reveal itself within 24 hours, so all is good there.
A messy removal process in a few years is a foregone conclusion, but inevitable, since this car would ultimately have to be fully stripped before a proper paint job could be done. The key for this job is that the body work is homegrown and the paint is consumer-grade duplicolor that any of us could do to rehab a car's exterior short of a full respray.
Looks like they're in the finishing stages with just some detail work left. I can see that I'll have to touch up the black around the grille area......lucky me if that's as bad as it gets:
 08-02-2014, 06:32 PM
#34
Registered User
Thread Starter
Join Date: Sep 2012
Location: Tampa, FL
Posts: 245
Likes: 0
Received 0 Likes
on
0 Posts
No respray here. This 3m 1080 wrap is costing me 2K. Since the car required a bit of bodywork, and since I color-matched the door jambs, under the hood, and the hatch jambs.....add in another couple hundred for supplies and paint, and many hours of work. 
08-07-2014, 07:38 PM
#36
Registered User
Thread Starter
Join Date: Sep 2012
Location: Tampa, FL
Posts: 245
Likes: 0
Received 0 Likes
on
0 Posts
Got the car back and it's back together except for some emblems and a few tweaks here and there. Some pics:


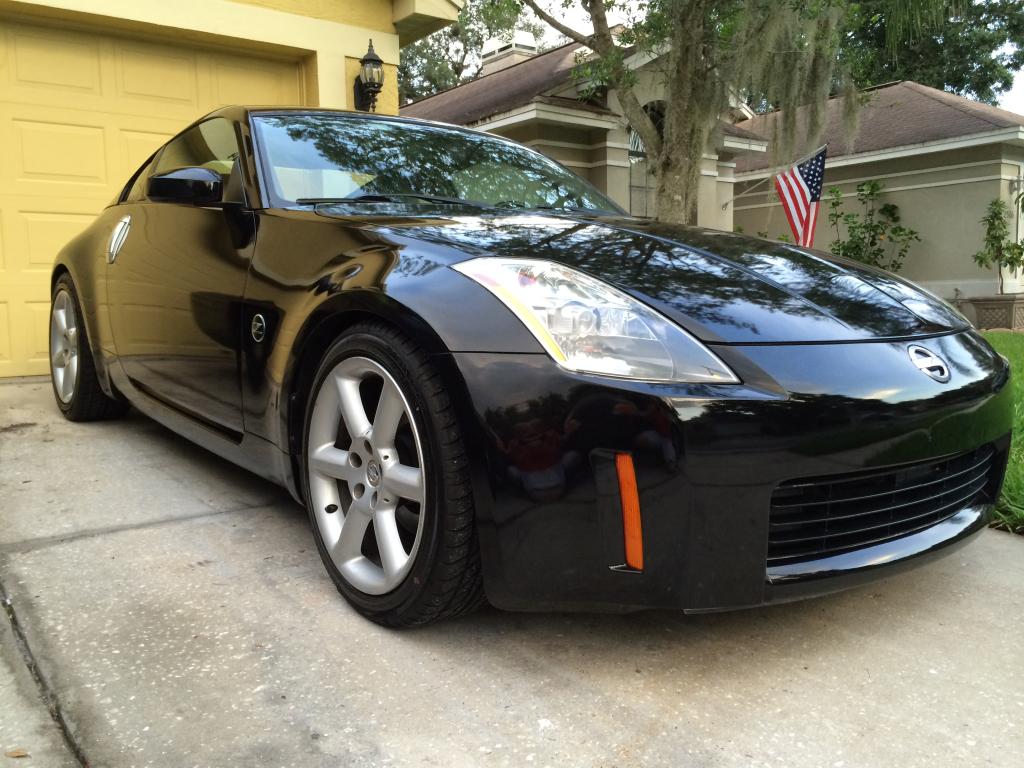
Put a fresh restoration on the headlights while they were out. I'm considering leaving the mud guards off.....I like this clean look; tint will come soon. And the wheels.....yes, the wheels.")
These were some photos I got on the way out the door today. It's actually dirty and hasn't been polished yet.....not too shabby to start. Next post is going to be a bit more detailed as a review of the results I got, some problems that popped up and had to be dealt with, how some things went better than I thought they would, and how I got nipped by a few things.......the kind of info one might want if they were considering wrapping a nine year old car with a problematic body.
All told, I'm very happy with the results.


Put a fresh restoration on the headlights while they were out. I'm considering leaving the mud guards off.....I like this clean look; tint will come soon. And the wheels.....yes, the wheels.
These were some photos I got on the way out the door today. It's actually dirty and hasn't been polished yet.....not too shabby to start. Next post is going to be a bit more detailed as a review of the results I got, some problems that popped up and had to be dealt with, how some things went better than I thought they would, and how I got nipped by a few things.......the kind of info one might want if they were considering wrapping a nine year old car with a problematic body.
All told, I'm very happy with the results.
08-08-2014, 06:04 PM
#37
Registered User
Thread Starter
Join Date: Sep 2012
Location: Tampa, FL
Posts: 245
Likes: 0
Received 0 Likes
on
0 Posts
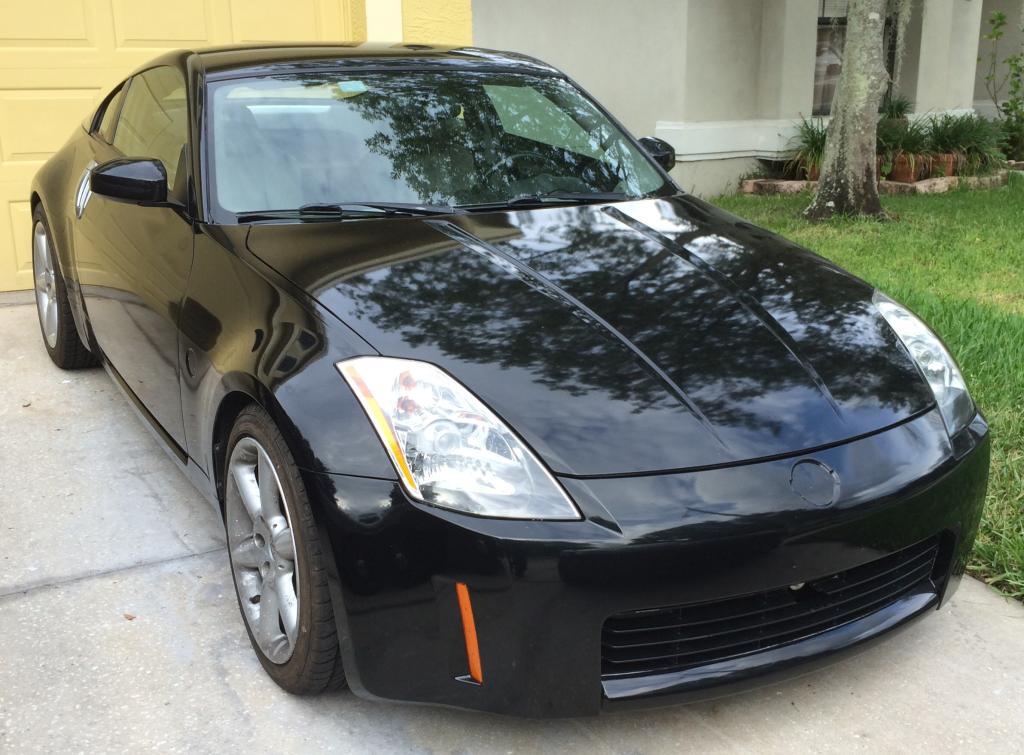
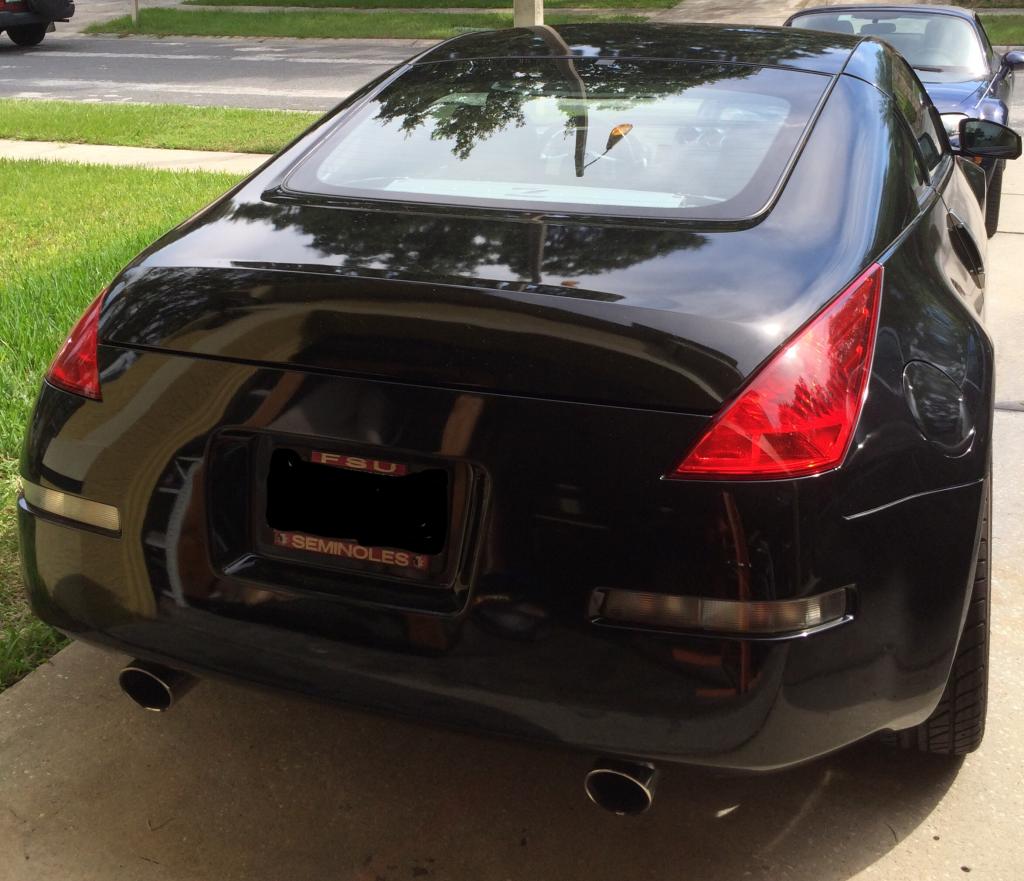
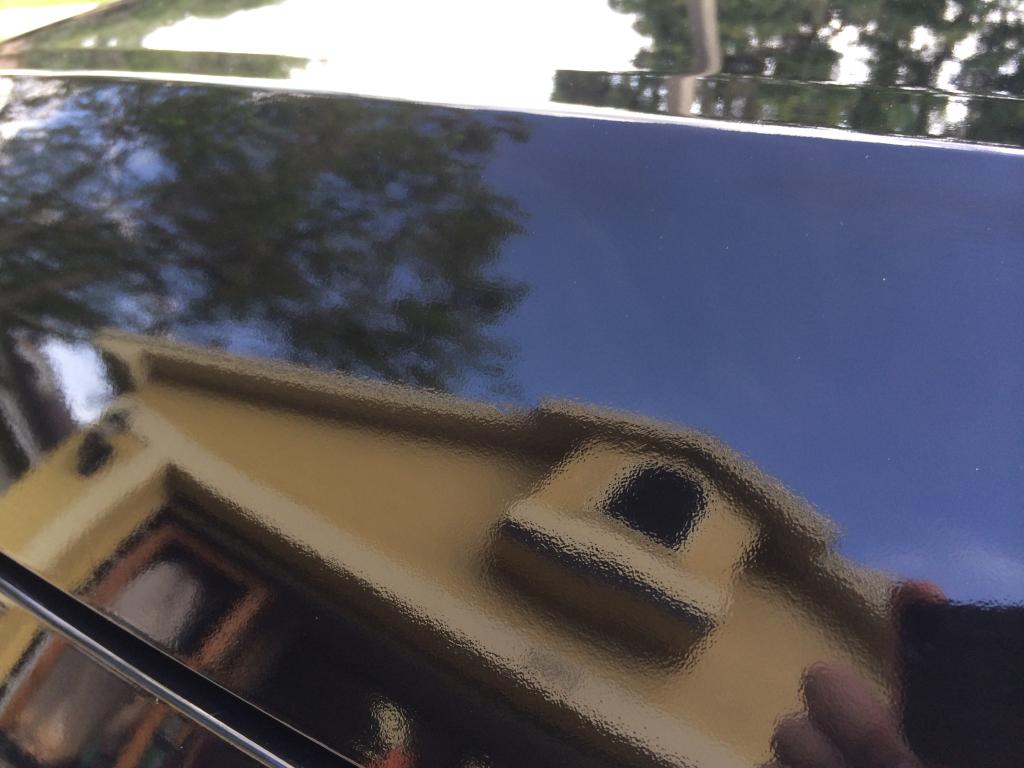
Brief detour: It's always nice to get the emblems back on, feels like progress. I replaced the front with the "Z" emblem; and the hatch is shaved. Also, 3m recommends Meguiar's Gold Class Carnuba Plus Premium Liquid Wax for their gloss vinyls, so I gave it a try......Impressive results. Great at polishing out smears and scuffs. Immediately made the black go deeper, and left a nice shine.
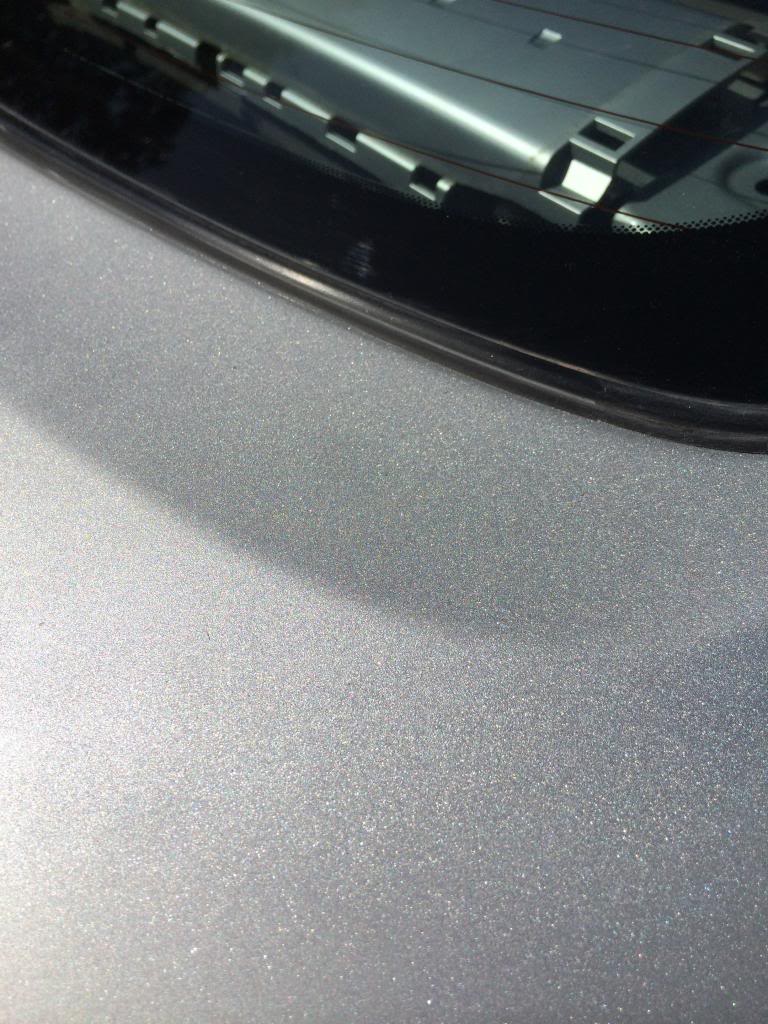
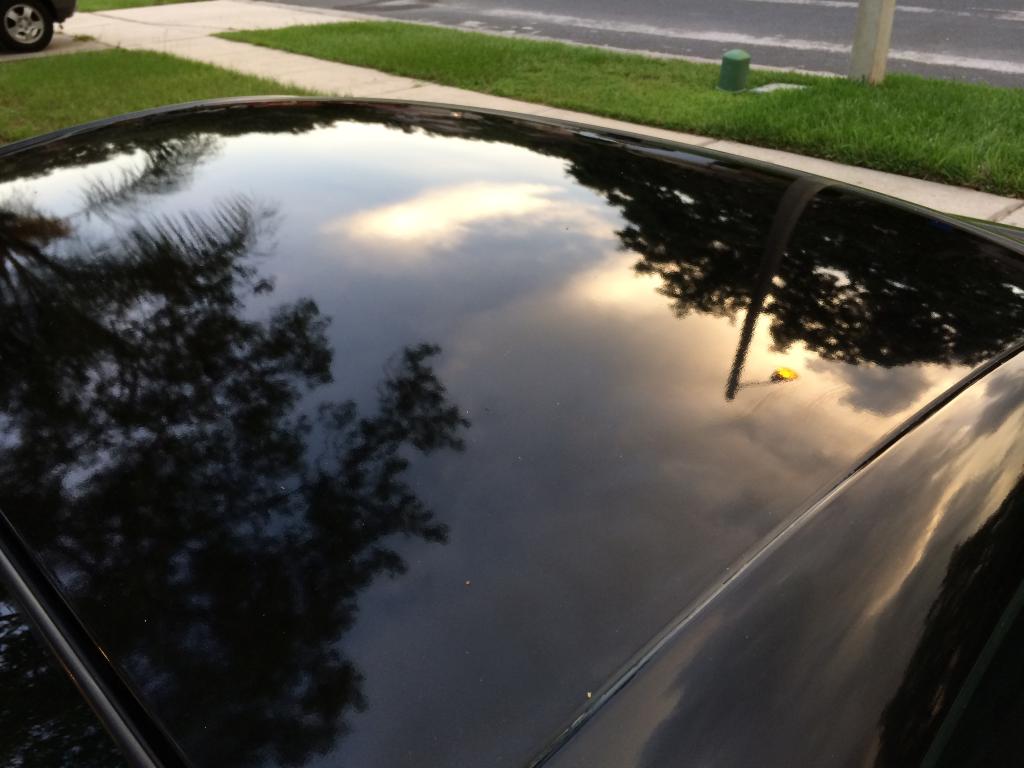
Some nice reflectivity in the rear deck and off the roof:
On to the bad......I spent a lot of time worrying that outgassing from the paint I used. My concern was that it would cause severe bubbling, particularly on the driver's side door, which was completely refinished in it. I used Duplicolor Perfect Match, although the color just needed to be something close to silver. This is a lacquer aerosol. Repairs were dollied out, glazed, primed with Duplicolor primer, then the lacquer, then Duplicolor Clear Coat.
I had zero problems with outgassing and bubbles. I only had adhesion issues on the mirrors and a small part of the rear bumper. Directions and dry times were adhered to. A 50/50 alcohol water mix was used to wipe down the work after sanding etc. Primer coats, top coats, and clears were wet sanded. Clear was ultimately DA polished.
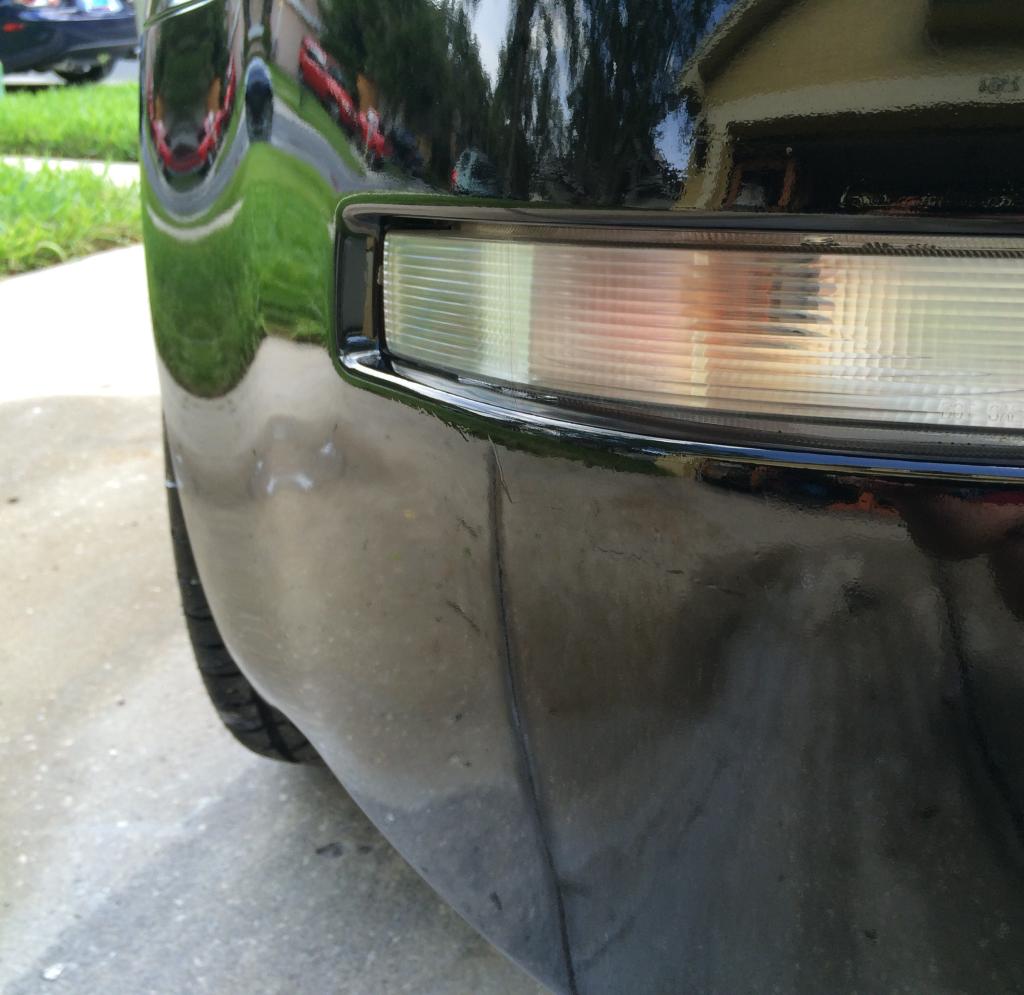
Here's where a lift occurred on the rear bumper:
Going in, I knew that wrapping this body was a one-shot deal. There's no possibility of re-doing a panel that I painted.....mostly. I did tear tests on various parts and found that the metal panels ended up with a more stable repaint than the flexible bumpers. That said, wrapping a car with a poor body comes with a caveat: Lay it down nice the first time and live with small imperfections; it won't survive a redo.
How about long-term adhesion? I think the one month cure time for the paint, and some reasonably sound approaches to the job will bear out good adhesion. I wet sanded all the panels to 2000gr and DA polished them to provide the smoothest surface. The removal will be messy. Funny thing is, a lot of wrap companies say you should get your car professionally patched up and painted before a wrap.....4-5k to straighten this body and respray, then more for the wrap.....yeah. Stick it on once, enjoy it, maybe plan for the full job down the road.
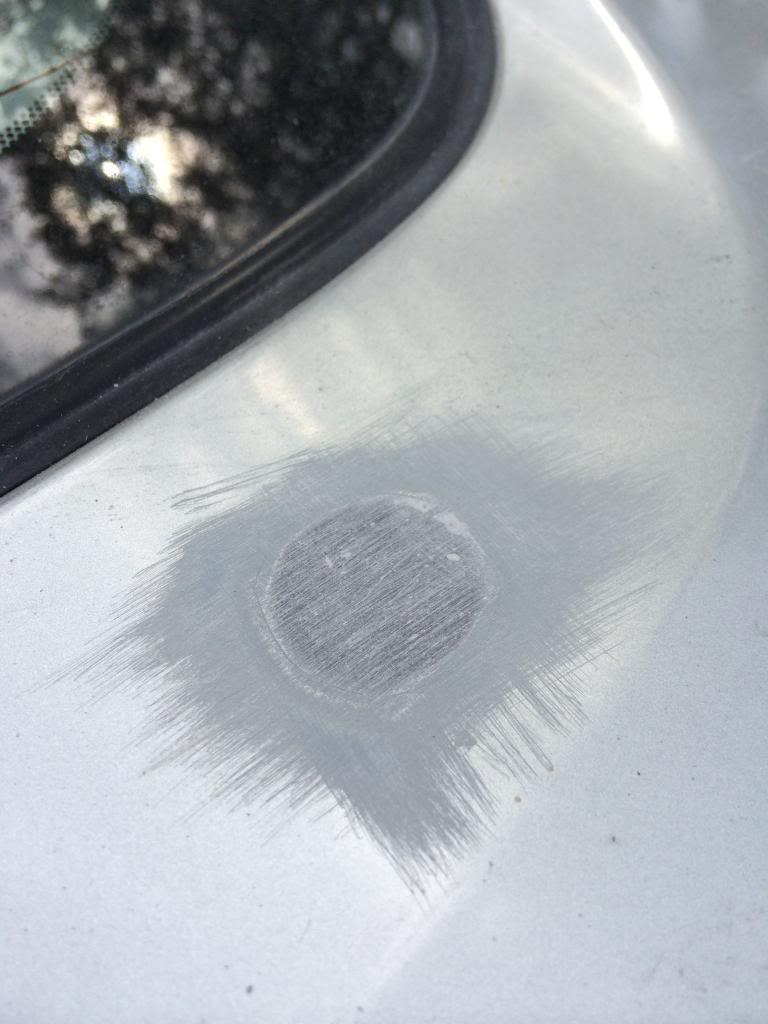
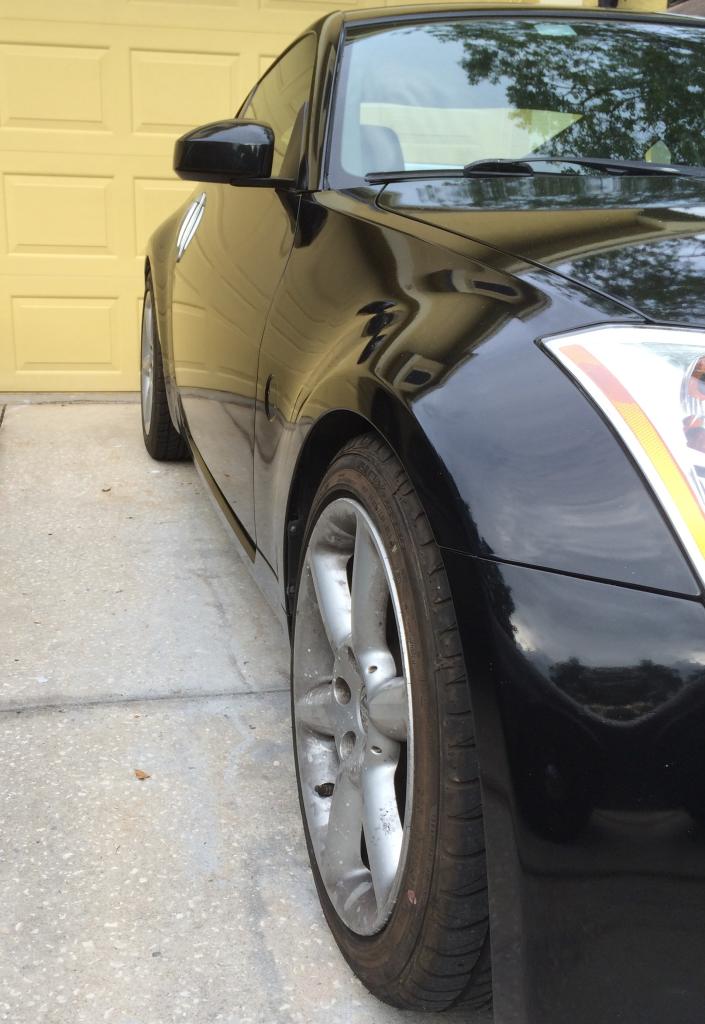
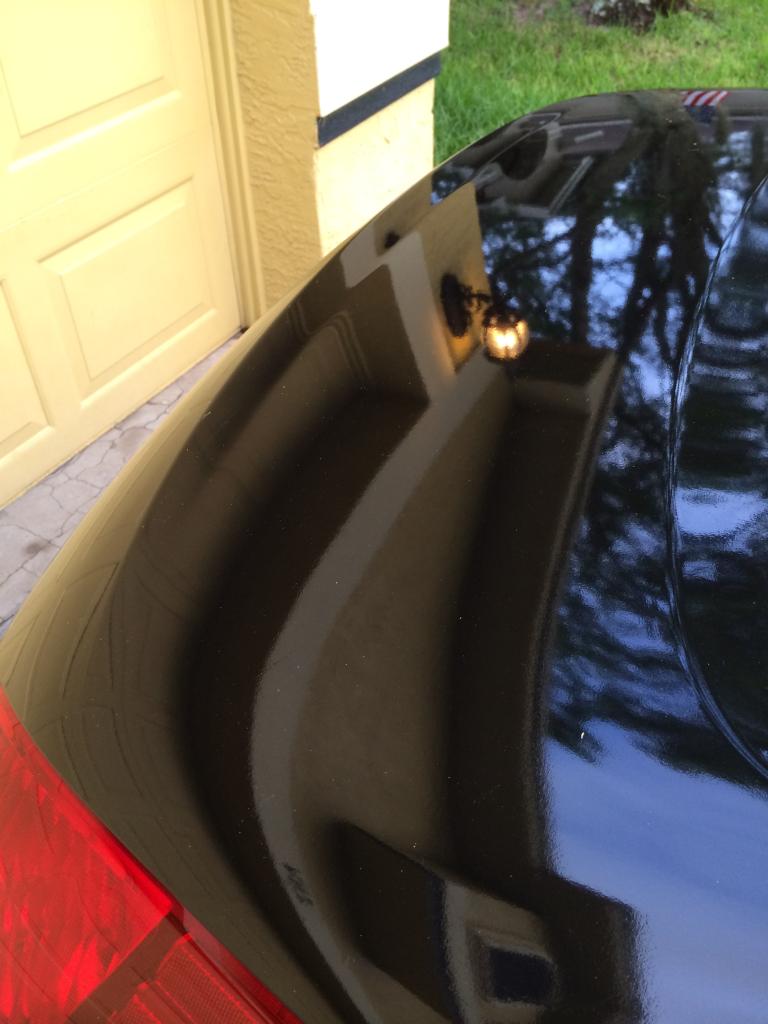
My attempt at shaving the wiper, rear emblem, and antenna: I did this on a whim, curious to see what it would look like. I like the look and I'll keep it as long as it holds up. If it fails, I'll just add the wiper back. When it was all said and done, the wiper delete resulted in a slight depression. Interestingly, I saw this part mid-wrap, and it was flawless. What caused it to shrink was the post-heating process of the wrap install. Not noticeable unless you know what you're looking for:
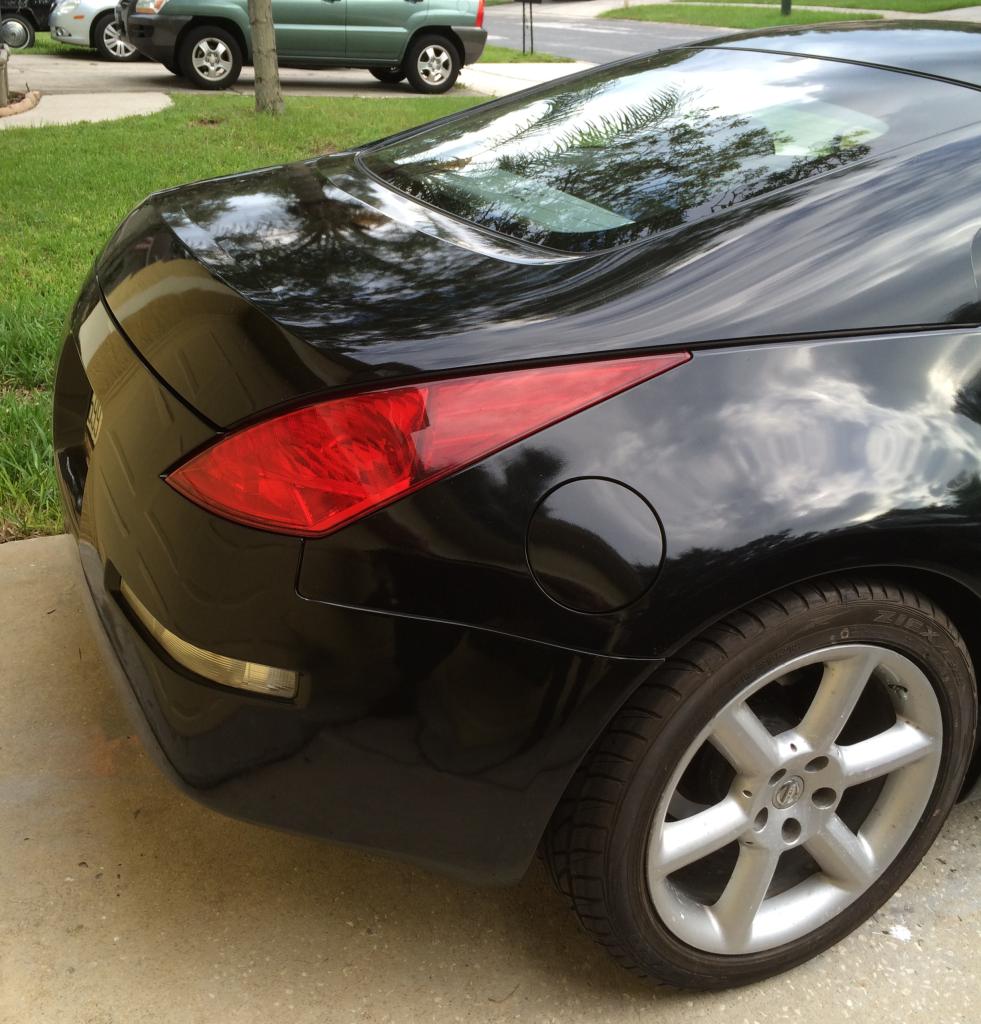
Similarly, if you look really hard, you can see the holes where the rear emblem was:
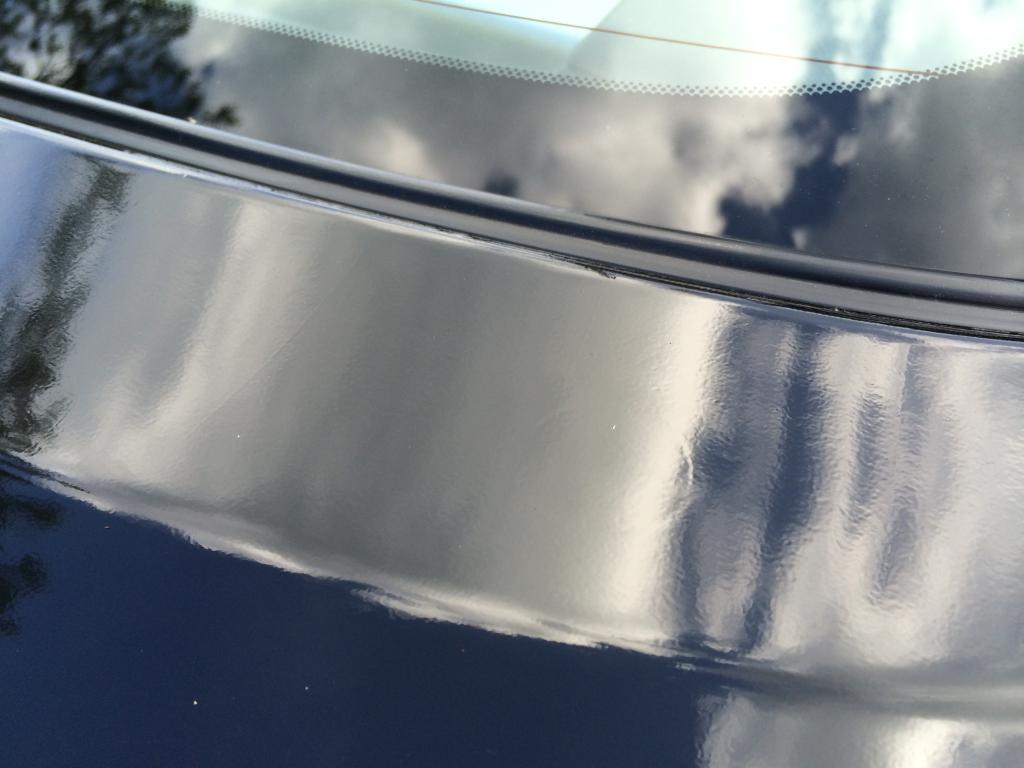
Some of my dent repairs ended up with a slight recess you can see if you get real close. As much as I tried, I invariably missed some parts of the 9 year old abused and neglected body.....a scratch here, a divot there. What I find interesting about the gloss is that, within two feet, it's merciless if you zoom in on a flaw. However, that overall gloss causes those flaws to disappear in the gleam and shine, especially to the casual viewer like my neighbor, who asked me today why I was waxing a freshly painted car.
I'm very happy with it, especially post-wax, and plan to enjoy it for a few years. Would I recommend it? Depends. If you are a perfectionist, and if you put this on a less-than-perfect body, all the small imperfections will drive you nuts. It's not like a paint job on which you can polish out the flaws. If your car has a nice, smooth body, you'll enjoy a better result. This is all common knowledge. I'm posting this to document what you can expect in these particular circumstances, to caution you to be realistic, and to demonstrate that some nice results can be had for not a lot of money.

Some nice reflectivity in the rear deck and off the roof:


On to the bad......I spent a lot of time worrying that outgassing from the paint I used. My concern was that it would cause severe bubbling, particularly on the driver's side door, which was completely refinished in it. I used Duplicolor Perfect Match, although the color just needed to be something close to silver. This is a lacquer aerosol. Repairs were dollied out, glazed, primed with Duplicolor primer, then the lacquer, then Duplicolor Clear Coat.
I had zero problems with outgassing and bubbles. I only had adhesion issues on the mirrors and a small part of the rear bumper. Directions and dry times were adhered to. A 50/50 alcohol water mix was used to wipe down the work after sanding etc. Primer coats, top coats, and clears were wet sanded. Clear was ultimately DA polished.
Here's where a lift occurred on the rear bumper:

Going in, I knew that wrapping this body was a one-shot deal. There's no possibility of re-doing a panel that I painted.....mostly. I did tear tests on various parts and found that the metal panels ended up with a more stable repaint than the flexible bumpers. That said, wrapping a car with a poor body comes with a caveat: Lay it down nice the first time and live with small imperfections; it won't survive a redo.
How about long-term adhesion? I think the one month cure time for the paint, and some reasonably sound approaches to the job will bear out good adhesion. I wet sanded all the panels to 2000gr and DA polished them to provide the smoothest surface. The removal will be messy. Funny thing is, a lot of wrap companies say you should get your car professionally patched up and painted before a wrap.....4-5k to straighten this body and respray, then more for the wrap.....yeah. Stick it on once, enjoy it, maybe plan for the full job down the road.
My attempt at shaving the wiper, rear emblem, and antenna: I did this on a whim, curious to see what it would look like. I like the look and I'll keep it as long as it holds up. If it fails, I'll just add the wiper back. When it was all said and done, the wiper delete resulted in a slight depression. Interestingly, I saw this part mid-wrap, and it was flawless. What caused it to shrink was the post-heating process of the wrap install. Not noticeable unless you know what you're looking for:

Similarly, if you look really hard, you can see the holes where the rear emblem was:

Some of my dent repairs ended up with a slight recess you can see if you get real close. As much as I tried, I invariably missed some parts of the 9 year old abused and neglected body.....a scratch here, a divot there. What I find interesting about the gloss is that, within two feet, it's merciless if you zoom in on a flaw. However, that overall gloss causes those flaws to disappear in the gleam and shine, especially to the casual viewer like my neighbor, who asked me today why I was waxing a freshly painted car.
I'm very happy with it, especially post-wax, and plan to enjoy it for a few years. Would I recommend it? Depends. If you are a perfectionist, and if you put this on a less-than-perfect body, all the small imperfections will drive you nuts. It's not like a paint job on which you can polish out the flaws. If your car has a nice, smooth body, you'll enjoy a better result. This is all common knowledge. I'm posting this to document what you can expect in these particular circumstances, to caution you to be realistic, and to demonstrate that some nice results can be had for not a lot of money.
08-08-2014, 06:46 PM
#38
I still think you would have been happier with a lighter color, black is just so hard to make look good unless it's perfect. Imperfections and flaws just get magnified with it, not to mention orange peel is almost a guarantee. As long as you like it is all that really matter though, now enjoy it.
