Turbonetics water cooled turbo installation thread.
 06-25-2007, 10:14 PM
#1
Registered User
Thread Starter
iTrader: (18)
Join Date: Oct 2004
Location: .
Posts: 9,482
Likes: 0
Received 0 Likes
on
0 Posts
This one's for all the Turbonetics ST owners who are ordering your water cooled bearing housings and are going to do the install on your own. I installed mine a few months back, and unfortunately didn't take the best pics.
So, what I plan to do here is post up the ones I do have, and attempt to explain how to install the lines in text. If you have any suggestions, or if you can supply pics of the parts that come with the water lines, or better pics of the actual install, please post them here and I'll update this post.
All this being said, it's a really simple install. The only thing left up to question is where the lines are intended to be tapped into.
Here are the steps:
1) Reinstall the new water-cooled turbocharger per the instructions that came with the turbo kit. You should have all the bolts on the turbo bolted down and everything tightened up. You want to install the lines BEFORE you install the intake charge pipe. Install any sort of turbo blanket or heat shield you're using on the turbo. It is recomended that you remove the throttle body from the upper plenum so that you have more room to work.
2) Drain the coolant. You can drain the majority of the coolant through a valve on the bottom of the radiator. On a stock radiator, this is found on the bottom drivers' side of the radiator itself. It looks like a small black plastic phillips head screw. There will still be some coolant left in the lines, but it should be fairly clear.
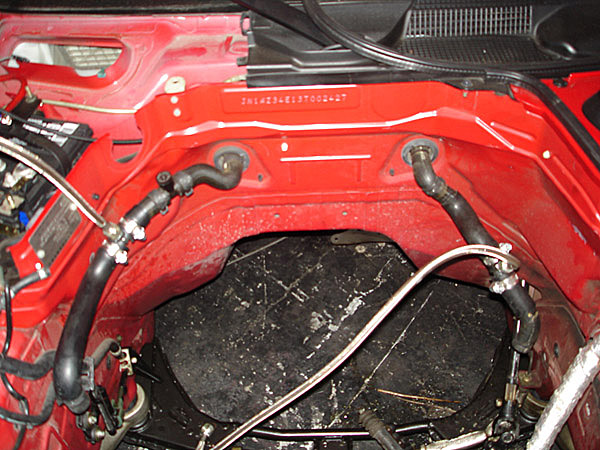
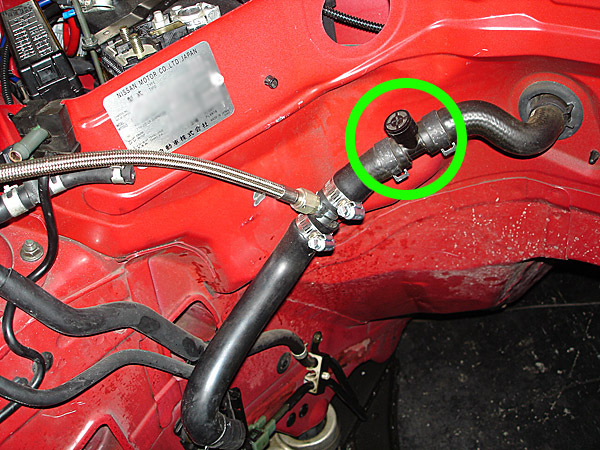
3) The coolant lines that you will need to tap into are located behind the motor itself. There are two lines, one on each side of the engine bay near the firewall. The one on the passenger side has a valve on it that is used to bleed coolant.
Here is a picture of the coolant lines with my motor out:
4) Carefully cut through the lines with a large pair of sharp shears. It is best to buy some that are especially large so that you can get a single, clean cut through the line. Make sure the cut is perpendicular to the length of the line, and straight. You don't want to have a jagged cut and have to trim any back, because it will be very little extra slack. MAKE SURE YOU CUT ON A STRAIGHT SECTION OF LINE WITH PLENTY OF ROOM FOR THE T FITTINGS INSIDE THE LINE.
5) Slide the worm drive hose clamps on the lines before you do anything else. The last thing you want to do is get the T fittings in there and find out you forgot a hose clamp. The T's are TIGHT and you'll be kicking your own *** if you forget this.
6) Insert the T fittings into the line. Make sure it is pointed up, at an angle that will keep the hose from being kinked when routed. It will take some muscle, but you can wiggle it back and forth while applying pressure and it will eventually seat fully.
7) Tighten down hose clamps on either side of the fitting.
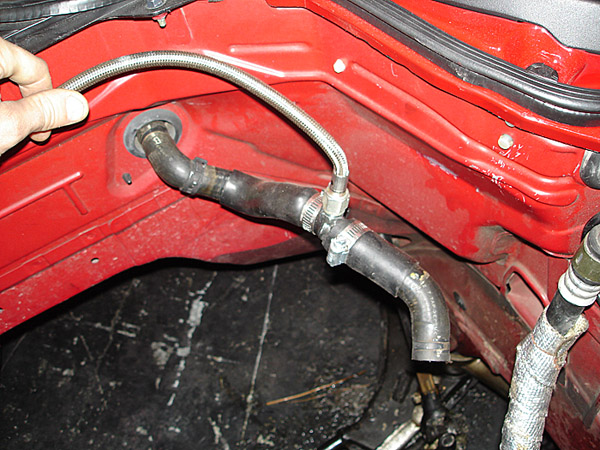
8) Screw the braided water lines into fitting. I used a bit of teflon tape on these to make sure it sealed fully. Make sure you install the longer line on the passenger side on the passenger side.
This is what it should look like when done:
9) Route the lines to the turbo like so:
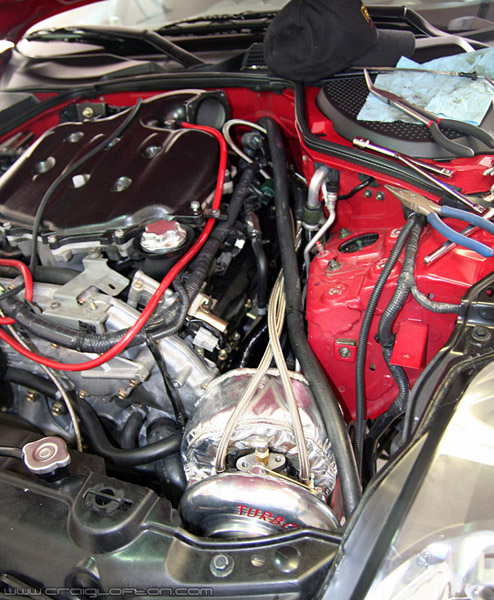
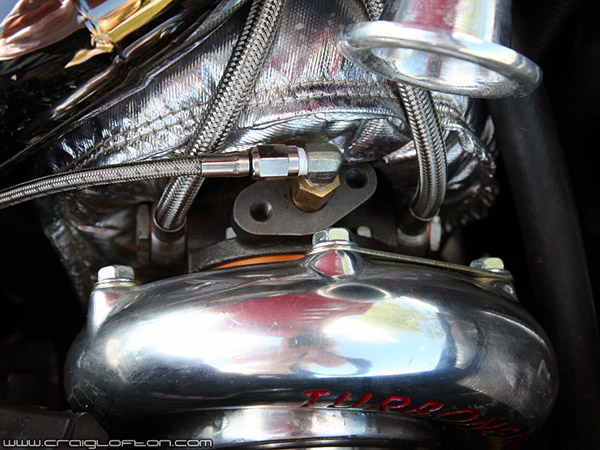
10) Attach the water lines to the water-cooled bearing housing. It does not mattter which side each line goes to, the coolant will flow properly in either direction. Grab the supplied banjo bolts and put one copper washer on each side of the hose fitting, then tighten down good and tight. It should look like this:
11) Refill the coolant system with your choice of coolant. I chose to use a 50/50 mix of distilled water and redline water wetter, as it doesn't get cold heere.
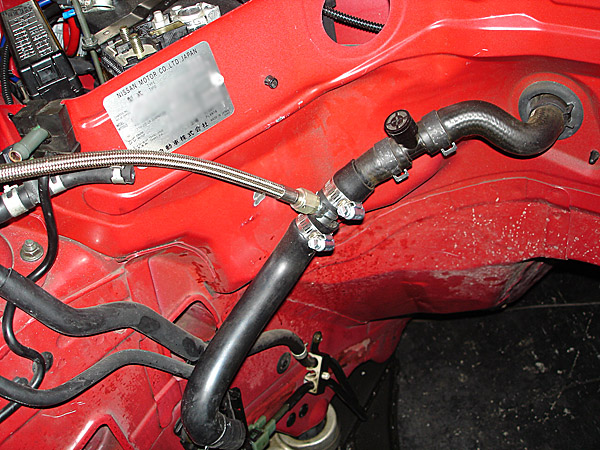
12) You MAY need to bleed any air bubbles from the coolant system. To do this, first start the car up and let it run for a bit for the engine/coolant to heat up. After it has warmed up, continue to let it run and grab a long phillips head screwdriver and a rag. You will bleed the air through the valve on the passenger side coolant line that you tapped into earlier. SLOWLY begin to open the valve and you will should hear the air coming out with some coolant bubbles. Eventually it will start releasing pure coolant. This means that the air is gone. Immediately close the valve with the screwdriver and use the rag to clean up any coolant mess. You may need to repeat this process a few times to get all the air out.
Here is a the valve I'm referring to:
13) That's it, you're now water cooled. Install the rest of the kit and enjoy!!!
This install is simple but can be a pain in the *** if not everything is thought out before hand. Just be very careful where and how you cut the coolant lines and everything should be fine.
As I said before, please feel free to post your own install pics here as they would be a great help to those who have questions on how its done. Thanks!
So, what I plan to do here is post up the ones I do have, and attempt to explain how to install the lines in text. If you have any suggestions, or if you can supply pics of the parts that come with the water lines, or better pics of the actual install, please post them here and I'll update this post.
All this being said, it's a really simple install. The only thing left up to question is where the lines are intended to be tapped into.
Here are the steps:
1) Reinstall the new water-cooled turbocharger per the instructions that came with the turbo kit. You should have all the bolts on the turbo bolted down and everything tightened up. You want to install the lines BEFORE you install the intake charge pipe. Install any sort of turbo blanket or heat shield you're using on the turbo. It is recomended that you remove the throttle body from the upper plenum so that you have more room to work.
2) Drain the coolant. You can drain the majority of the coolant through a valve on the bottom of the radiator. On a stock radiator, this is found on the bottom drivers' side of the radiator itself. It looks like a small black plastic phillips head screw. There will still be some coolant left in the lines, but it should be fairly clear.
3) The coolant lines that you will need to tap into are located behind the motor itself. There are two lines, one on each side of the engine bay near the firewall. The one on the passenger side has a valve on it that is used to bleed coolant.
Here is a picture of the coolant lines with my motor out:
4) Carefully cut through the lines with a large pair of sharp shears. It is best to buy some that are especially large so that you can get a single, clean cut through the line. Make sure the cut is perpendicular to the length of the line, and straight. You don't want to have a jagged cut and have to trim any back, because it will be very little extra slack. MAKE SURE YOU CUT ON A STRAIGHT SECTION OF LINE WITH PLENTY OF ROOM FOR THE T FITTINGS INSIDE THE LINE.
5) Slide the worm drive hose clamps on the lines before you do anything else. The last thing you want to do is get the T fittings in there and find out you forgot a hose clamp. The T's are TIGHT and you'll be kicking your own *** if you forget this.
6) Insert the T fittings into the line. Make sure it is pointed up, at an angle that will keep the hose from being kinked when routed. It will take some muscle, but you can wiggle it back and forth while applying pressure and it will eventually seat fully.
7) Tighten down hose clamps on either side of the fitting.
8) Screw the braided water lines into fitting. I used a bit of teflon tape on these to make sure it sealed fully. Make sure you install the longer line on the passenger side on the passenger side.
This is what it should look like when done:
9) Route the lines to the turbo like so:
10) Attach the water lines to the water-cooled bearing housing. It does not mattter which side each line goes to, the coolant will flow properly in either direction. Grab the supplied banjo bolts and put one copper washer on each side of the hose fitting, then tighten down good and tight. It should look like this:
11) Refill the coolant system with your choice of coolant. I chose to use a 50/50 mix of distilled water and redline water wetter, as it doesn't get cold heere.
12) You MAY need to bleed any air bubbles from the coolant system. To do this, first start the car up and let it run for a bit for the engine/coolant to heat up. After it has warmed up, continue to let it run and grab a long phillips head screwdriver and a rag. You will bleed the air through the valve on the passenger side coolant line that you tapped into earlier. SLOWLY begin to open the valve and you will should hear the air coming out with some coolant bubbles. Eventually it will start releasing pure coolant. This means that the air is gone. Immediately close the valve with the screwdriver and use the rag to clean up any coolant mess. You may need to repeat this process a few times to get all the air out.
Here is a the valve I'm referring to:
13) That's it, you're now water cooled. Install the rest of the kit and enjoy!!!
This install is simple but can be a pain in the *** if not everything is thought out before hand. Just be very careful where and how you cut the coolant lines and everything should be fine.
As I said before, please feel free to post your own install pics here as they would be a great help to those who have questions on how its done. Thanks!
Last edited by taurran; 06-25-2007 at 10:31 PM.


Trending Topics


 06-26-2007, 04:58 AM
#9
Registered User
Join Date: Mar 2006
Location: Palm Beach County, FL
Posts: 209
Likes: 0
Received 0 Likes
on
0 Posts
hey this was done really well... i guess im not gonna have a problem at all then when i decide to do it.
this must be a permanent page!
hey, those parts used to sit in the coolant lines... are they supplied by turbonetics as well?..meaning the portion used to seal the spliced lines based on that T-set up i see on both lines.
if so, this is perfect!
this must be a permanent page!
hey, those parts used to sit in the coolant lines... are they supplied by turbonetics as well?..meaning the portion used to seal the spliced lines based on that T-set up i see on both lines.
if so, this is perfect!
06-26-2007, 07:05 AM
#11
Registered User
iTrader: (3)
Join Date: Jul 2003
Location: Escondido
Posts: 11,373
Likes: 0
Received 0 Likes
on
0 Posts
All the parts including the tee, lines, banjo bolts, washers, and worm drive clamps should be included. Craig GREAT write up. Those pics bring back memories of a late night filled with tons of cursing...  Do you have the 11/16" wrench you bastard!!! If anyone has any questions you can post here or PM me also. I helped Craig with this and this was the second car I set this up on.
Might I also add one thing, after helping with Craig's car I honestly think you should attach the water lines to the tee fittings before you try to connect the tees to the rubber line. I've notice that when you try to tighten down the water line the twisting motion on the tee may force it to pop off the rubber line which results in loud obsene comments that will wake the dead. Do yourself a favor and torque down the water line onto the tee fitting before you start pushing it into the rubber coolant lines. You're neighbors will thank me later. Criag, sorry I thought of this after your car...
Do you have the 11/16" wrench you bastard!!! If anyone has any questions you can post here or PM me also. I helped Craig with this and this was the second car I set this up on.Might I also add one thing, after helping with Craig's car I honestly think you should attach the water lines to the tee fittings before you try to connect the tees to the rubber line. I've notice that when you try to tighten down the water line the twisting motion on the tee may force it to pop off the rubber line which results in loud obsene comments that will wake the dead. Do yourself a favor and torque down the water line onto the tee fitting before you start pushing it into the rubber coolant lines. You're neighbors will thank me later. Criag, sorry I thought of this after your car...
Last edited by MIAPLAYA; 06-26-2007 at 07:10 AM.
 06-26-2007, 07:46 AM
#14
Registered User
Thread Starter
iTrader: (18)
Join Date: Oct 2004
Location: .
Posts: 9,482
Likes: 0
Received 0 Likes
on
0 Posts
Originally Posted by QuadCam
nice write up....
Craig, how many bottles of Water Wetter did it take to make a 50/50 mix?
Craig, how many bottles of Water Wetter did it take to make a 50/50 mix?
 ..well, i think thats what he meant...