When you click on links to various merchants on this site and make a purchase, this can result in this site earning a commission. Affiliate programs and affiliations include, but are not limited to, the eBay Partner Network.
I feel if you're going to have a heavily modified car, it's better to know it well for the inevitable issues down the road. Otherwise every little thing is an open up your wallet and say aahh. Plus it's a nice hands on hobby.
Exactly. I know my car front to back (very not stock) and when something goes wrong it was my screw and i know how to fix it if it.
And you got to customize it to your liking.
the other thing to think about when you swap motors is to install things in a way that you can remove them with the engine still in as best you can. Put clamps/fittings/small items in places you can get to.
Originally Posted by aarrgghh
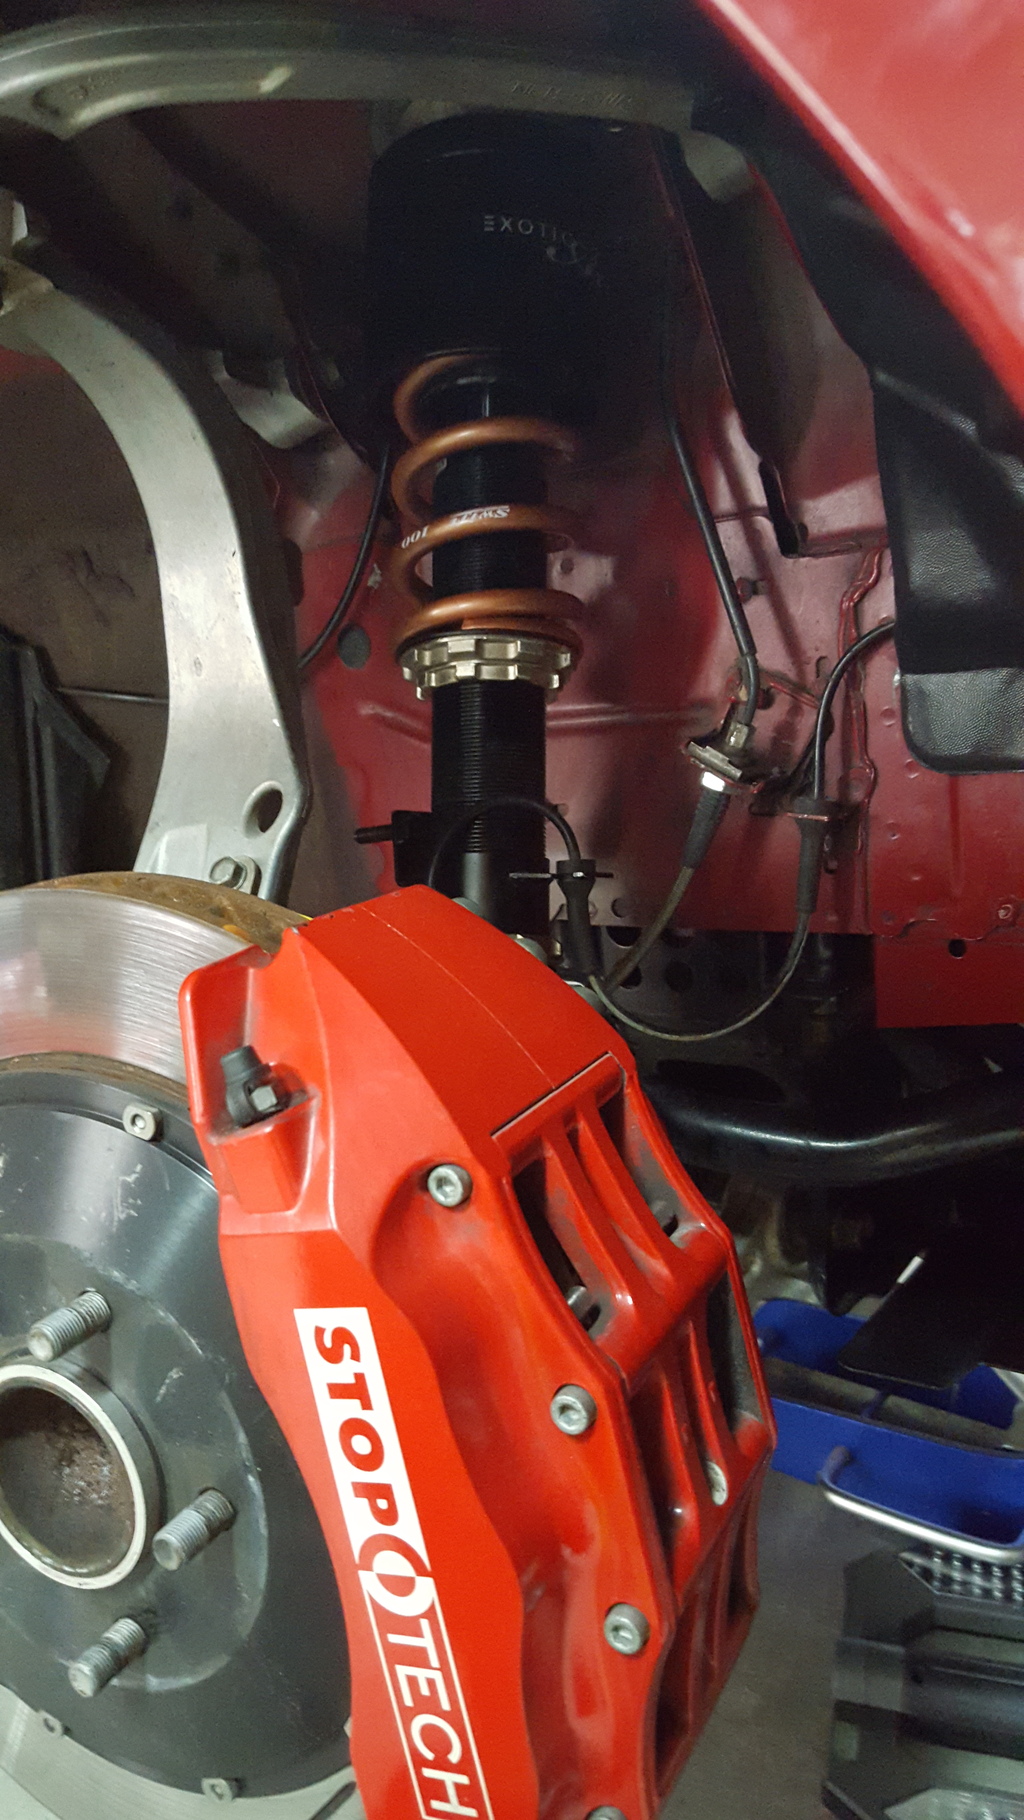
The red turned out good. Just to **** off the two members of the local Z club who (jokingly) argue over the best Z32 red, I picked a red from the Jaguar line. Mostly though I wanted a reasonable match to the stoptechs.
Wow great job documenting your build! If you plan on going past 21psi on those EFR 6758s you should definitely swap to the high boost actuators when you put the new motor in!
I too was an early adopter and Max, who was my point of contact/is no longer at AAM, totally didn't get me the high boost actuators before leaving! Since the kit comes standard with the medium actuators my car can not make anymore than 21 PSI.
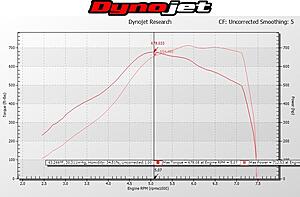
Here is what my 2007 G35s Sedan VQ35HR does at 21 PSI, E85, and 10:1 compression:
Wow great job documenting your build! If you plan on going past 21psi on those EFR 6758s you should definitely swap to the high boost actuators when you put the new motor in!
I too was an early adopter and Max, who was my point of contact/is no longer at AAM, totally didn't get me the high boost actuators before leaving! Since the kit comes standard with the medium actuators my car can not make anymore than 21 PSI.
Hmm, what happens at 21 PSI? Actuators can't hold the waste gates closed any more?
Wastegate springs will generally allow boost up to two times the spring pressure. So a 10 pound spring is good for 20 psi of boost. There are variables that affect this, like exhaust backpressure. For turbos that are hard to get to you have to choose wisely at the start. Keep in mind that if you choose a spring that is too strong you may be setting your minimum boost level too high.
I initially assumed you had a boost controller and the exhaust was forcing the wastegates open against the spring (with the boost line signal blocked by the solenoids).
If I remember correctly the default kit setup is actually the low boost actuators so stock block kits with no boost controller can set boost into the right 6-9 PSI range. With mid ones and a boost controller you should be able to get much higher, around 40 PSI if rcdash's rule of thumb is about right. Even the low should get to around 28 (double 14).
I'm running the Haltech as the closed loop boost controller, and my spring boost is around 5 PSI (max I hit is currently 9ish). I'll touch base with AAM on Monday, and maybe move to the mids. I like having a lowish spring boost as we use that for a 'safetly' boost level should the Haltech detect any issues. Plus it allows some range to play with for wheel slip based boost control (when I ever get my weird steering angle sensor issue fixed https://my350z.com/forum/forced-indu...sor-issue.html).
I really like your swagelok fuel feed line, nice work
Thanks, but that's all standard CJM fuel return kit stuff. I did take the extra time to pressure test with regulated compressed air and made sure all of the connections were soap bubble tight.
I initially assumed you had a boost controller and the exhaust was forcing the wastegates open against the spring (with the boost line signal blocked by the solenoids).
If I remember correctly the default kit setup is actually the low boost actuators so stock block kits with no boost controller can set boost into the right 6-9 PSI range. With mid ones and a boost controller you should be able to get much higher, around 40 PSI if rcdash's rule of thumb is about right. Even the low should get to around 28 (double 14).
I'm running the Haltech as the closed loop boost controller, and my spring boost is around 5 PSI (max I hit is currently 9ish). I'll touch base with AAM on Monday, and maybe move to the mids. I like having a lowish spring boost as we use that for a 'safetly' boost level should the Haltech detect any issues. Plus it allows some range to play with for wheel slip based boost control (when I ever get my weird steering angle sensor issue fixed https://my350z.com/forum/forced-indu...sor-issue.html).
Sorry I misunderstood, I am using an Innovate SCG-1 Solenoid Controller and it doesn't matter because the actuators can't keep them closed past 21psi. I was told by Max (whom I got my kit from and who is no longer with AAM) that all the kits ship with the medium boost acuators.
Sorry I misunderstood, I am using an Innovate SCG-1 Solenoid Controller and it doesn't matter because the actuators can't keep them closed past 21psi. I was told by Max (whom I got my kit from and who is no longer with AAM) that all the kits ship with the medium boost acuators.
That's disconcerting. With a boost controller you should be able to boost higher. That seems really coincidental. Is it possible your wastegates or solenoids (or recircs) are misplumbed? A simple check (included in the BW pdf I linked to) is to pull the boost lines off the wastegates and carefully check the boost level. You should hit a higher boost, carefully, as it will over boost.
I'll discuss with AAM and maybe Specialty Z. For my race tune, I know I'll need to be over 21 psi.
Here is the routing diagram from the SCG-1 manual. I had a boost line pop off and it caused me to be stuck at spring pressure.
It may be safer to pull the lines off of the top of the wastegates and see if anything changes as opposed to removing the bottom ones.
Your SCG-1 MAP sensor and solenoids look very different from mine... I only have one solenoid in fact, and the MAP is much much smaller.
Awesome boost controller though, great safety features and data logging capabilities.
The plumbing is different for external and internal wastegates. Yup, pulling the lines at the solenoid to test is probably way easier than at the bottom, same effect.
I'm using the solenoids for the BG turbos. Original plan was to mount them on the compressor housings as BG had designed. Didn't work out for two reasons. One, they simply didn't fit as they would interfere with the engine/mounts. Two, if they ever failed they be a pita to get to. The benefit is faster boost control.
Be sure to disable or plug the solenoids up.
Seems like the solenoids would be exposed to some extreme conditions if they were mounted near the compressor housings... You made a good call there. A stuck open solenoid could spell disaster with upgraded WG springs.
I tapped in post intercooler for my solenoid boost lines, and in the manifold itself for the MAP sensor and fuel pressure regulator.
I'm curious if you would see a noticible difference in boost controller response with the solenoids mounted at the turbos. I'm doubtful that would be the case.
I think you guys are missing the cause or I am not explaining it correctly. My spring only pressure/preload is about 10 psi (solenoid control off) - the controller is properly installed and working as it should. However, the medium boost actuator can not hold more than 21 psi because the turbine housing pressure is blowing the wastegate open even at 100% WGDC (which is basically the same as disconnecting the vacuum line to the actuators). The only way to make higher than 21 psi would be to change to the high boost actuator (which is equivalent to swapping the springs on an EWG).
Edit: Have a look at the full stroke pressure and also the bottom of the chart you linked too previously
 01-22-2016, 02:55 PM