When you click on links to various merchants on this site and make a purchase, this can result in this site earning a commission. Affiliate programs and affiliations include, but are not limited to, the eBay Partner Network.
The struts came with the black hardware parts like the original Nissan ones. I used a 12mm wrench to remove the top stud ball and a 10mm wrench to remove the bottom 2 bolts, then installed the new set. very simple!
I know this post is a little old but thought I would update with my experiences. I just bought these same struts from the same seller on eBay.
The struts are very strong and do open the hatch from any opening position more than ~25%. The ball studs at the top are not actually 12 mm, one came off with a 12 mm wrench but the other was too tight and I rounded the head. I used a dremel to cut the thin part of the neck on the ball stud (only took ~2 minutes, very easy to cut through). The 10 mm bolts on the bottom were straight forward. I did notice that the new brackets are not the same exact as OEM and the bend is a little higher, which is a good thing. The head of these shocks that snap onto the ball stud are a little larger than OEM. Plus due to the strength of these heavy duty shocks there is some obvious deflection of that bracket before the shocks start to compress when you go to pull down on the hatch to close. There is no contact with the body of the car but about 30% of the clearance between the head of the shock and the body is used up by the deflection of the brackets supplied. SO far no issues at all, but I was disappointed with the amount of deflection from the supplied brackets.
^ ya, your better off replacing those brackets with the oem ones....they are weak and the riveted ball stud will shear off and the hatch will fall with the shock still attached on the top (hatch side).........
Hello all, I'm new here. Bought a 2003 Nissan 350z Touring a few months ago, which was my first "new" car purchase, meaning it wasn't a hand-down from a parent.
Here's my facts: Bought the Invotekken struts off ebay. Dremeled the old ball stud off the hatch and removed it with a socket wrench. Have the new ball stud installed, but for the life of me I can't the socket on the new strut to "snap" onto it. The ball easily snaps onto the socket for the bottom bracket. Anyone with experience have advice on this? (I've already messaged Invotekken on ebay but haven't heard back yet.)
you need to get a 11mm and grind down the inside to 11.75mm and then use that..if you screw up the original 11mm, then get a 10mm and try again...
effectively, the ball stud mounted to the car is a 11.75 mm hex on it...the closest thing to use US spec is a 15/32 open ended wrench. but thats an odd size to find...
-J
THANK-YOU!
I thought I was going MAD for a while there - Tried 8 different open enders, thinking they must ALL be mis-shaped from USE or garbage!
...I FIGURED that SURELY being Japanese, they'd be using METRIC sizes, but this seemed to be half a size difference! How very, VERY odd of them!!
* For fellow AUSTRALIAN forum users: I HIGHLY recommend this company!
I ordered 2 new hatch struts for the ‘Z’ friday afternoon – They were HERE next day (Saturday!)
And I only paid for regular mail ‘2 to 5 days’
Ebay had some same price but only 1 year warrantee - these guys have 2 years!
Best price from the 3 regular auto parts guys were $99 EACH!!
- These cost me a grand total of about $34 !!
These are an exact replacement, WITH new bottom brackets attached - and now I'm confident that dremelling off just below the top ball IS the way to go!
(Were these installed on the assembly line by a robot using 1000 tons of torque or WHAT???)
Last edited by Steve Mack; 12-26-2015 at 05:22 PM.
BTT: Word of warning - DO NOT purchase rear hatch support/strut kits from Lift Supports Depot on Amazon. These replacements will make the top of your hatch lift about 1/3" at the B-pillars when the hatch is closed. Often times, with aftermarket parts, the prices are too good to be true. At $45, you're going to be out cash and time when you use their Turkish-made "Qty (2) Nissan 350Z 2003 To 2008 "Added Pressure for larger spoiler" Rear Hatch Lift Supports, Struts Bracket & Stud inc"
Again, these do not fit. Do not buy them. Find a better alternative. I can say with 100% certainty, that these do not fit the 2008 350Z Touring, and since the body didn't change over the years, I'm guessing they won't fit on any Z coupe built between 2003 and 2008.
I hope this helps SOMEONE avoid the hassle I ran into.
I literally just ordered these exact ones and wish I'd have come in here first. Hopefully I can still cancel my order?
i had the exact same problem as zakmartin after installing aftermarket ones; where the roof met the hatch, the hatch was higher. HOWEVER, while i cannot say for certain what his cause was, for me it was simply a matter of me making a very rookie mistake during installation
i didn't take photos of the original, and insisted to my girlfriend it was like that. she got annoyed with the wind noise and accused me of installing the bracket on to the chassis backwards. turns out she was absolutely correct
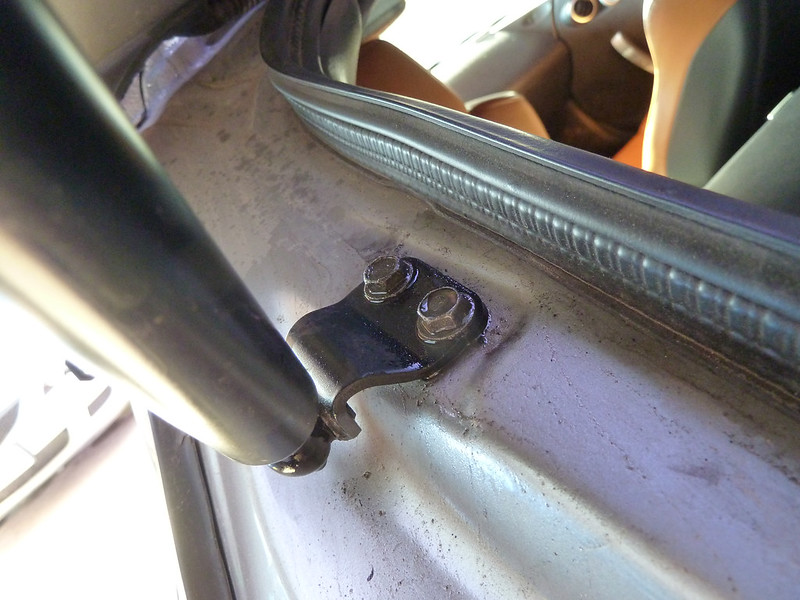
it MUST be installed like this:
looking from above, the bracket should appear convex to you (curving down). if it is installed reverse and concave to you (curving up), it will make the hatch sit higher
i bought cheap ones from eBay for $26 USD in March 2015
they still work 1.5 years later. when it was really cold it would kind of slowly come back down on me. the seals aren't meant for Canadian winter i guess. i just jammed some anti-seize (really) in where the rod goes in and out (don't know what it's called sorry, where the silver part meets the black part? lol) and i have not had a single time where it could not hold up the hatch
oem hatch, oem glass, rear wiper and motor still on it
back in the good 'ol days of useful treads.. I'm having a dandy of a time getting the 12mm (or 11.75mm as it appears) nut loose from the top of the strut. Looks like it's time to get some more use of the dremel.
.. but of course, after hacking my oem semi-working hatch struts off and installing the new Z1 struts.. there is an issue. Appears the new one are too long or something. Causing the hatch to bow out on both sides and explode off the latch like a jack in the box when released. Had to remove them until I can get this sorted.. great fun trying to get in the hatch now.
thanks, just got the same response from Z1. will reinstall
Let me know how that goes it appears i need to replace the rubber gasket between the bracket an the body of the car,clearance doesn't allow not having the rubber piece
Went fine. All good now, amazing what following the instructions gets you..
My gasket was more rigid and somewhat disintegrated.. I re-used it anyways because I couldn't find a replacement in my quick online search. I have some quality weatherproof rubber that I could cut to desired shaped and drill holes into.. but my car sees very little road time nowadays so I'm not too concerned about it. The bolts were in decent shape too, no rust and easy to remove and reinstall.
I was mainly interested in making sure there were no more issues with fitment. It's a simple uninstall/reinstall so maybe I will try to make some gaskets for the heck of it.
Finished installing a new stereo and having issues sleeping.. so I made some gaskets. I already had this material, so I used it. Probably would have purchased something a little thinner if I was buying specific for this purpose. But.. it worked perfectly.
 05-14-2010, 02:25 AM


 I literally just ordered these exact ones and wish I'd have come in here first. Hopefully I can still cancel my order?