How To Repair 5th Bow Motor, with photos.
 12-29-2011, 10:11 AM
#21
New Member
Thread Starter

...just to be sure it's the 5th bow issue before I try all of this, please tell me if my car has the symptoms. Here is a video of what happens.
:01 -> :04 - it struggles really hard to open
:15 - it pauses for a quick moment
Here is the link:
http://www.youtube.com/watch?v=hmpd0sk4b9c

Thanks!
:01 -> :04 - it struggles really hard to open
:15 - it pauses for a quick moment
Here is the link:
http://www.youtube.com/watch?v=hmpd0sk4b9c
Thanks!
Good Luck
BB
 12-29-2011, 10:14 AM
#22
New Member
Thread Starter
BB
03-25-2012, 07:23 PM
#23
Registered User

Join Date: Mar 2012
Location: St. Louis, MO
Posts: 5
Likes: 0
Received 0 Likes
on
0 Posts
Like everyone else, I'm having the same problem, with my 2004 Roadster. The 5th bow is malfunctioning. Can you tell me, where can I find the new bushings? And, is there one or two motors? The Nissan Dealers are telling me there is a right and left motor.
Thank you
Krunch
04-03-2012, 03:39 PM
#24
Registered User

Join Date: Dec 2011
Location: Portland OR
Posts: 48
Likes: 0
Received 0 Likes
on
0 Posts
There is a link to the new bushings in the first post of this topic. This repair is only for the single 5th bow motor, not for the two main top motors or the two hard cover motors.
Last edited by DarrenDriven; 04-03-2012 at 09:23 PM.
05-16-2012, 07:26 AM
#25
Registered User


I have everything down on this DIY. I got the new brushes, soldered them on, have the spindle and the plastic piece with brushes on them seated perfectly. EXCEPT when I put the gold COVER back on, it doesnt seat all the way back on. The gold cover is about 1 centimeter away from closing. If I take the spindle out and just put the Gold cover on (Over the Plastic piece with the Brushes) it seats correctly. So I figurered out its the SPINDLE not seating in the motor all the way. Anyone have any problems like this?
Last edited by mnDanger69; 05-16-2012 at 08:41 AM.
05-16-2012, 08:04 AM
#26
Registered User

Join Date: Jun 2010
Location: DC
Posts: 116
Likes: 0
Received 0 Likes
on
0 Posts
I have everything down on this DIY. I got the new brushes, soldered them on, have the spindle and the plastic piece with brushes on them seated perfectly. EXCEPT when I put the gold COVER back on, it doesnt seat all the way back on. The gold cover is about 1 centimeter away from closing. If I take the spindle out and just put the Gold cover on (Over the Plastic piece with the Brushes) it seats correctly. So I figurered out its the SPINDLE not seating in the motor all the way. Anyone have any problems like this?
05-16-2012, 08:26 AM
#27
Registered User
The whole DIY only takes a few hours. If you havent ever soldered before I have a set of two brushes cause I ruined the first pair I had. If I could get the GOLD housing over everything I'd be done! But so far I am stuck.
05-16-2012, 11:25 AM
#28
Registered User
Join Date: Jun 2010
Location: DC
Posts: 116
Likes: 0
Received 0 Likes
on
0 Posts
05-16-2012, 04:27 PM
#31
New Member
Thread Starter
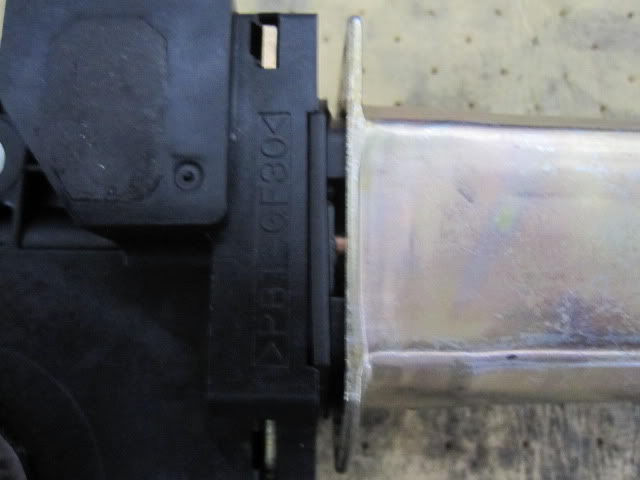
Alrighty then, the spindle can be a bit fiddly, first thing... ensure that the brushes are not hung up under the copper part they are supposed to make contact with, 2) I'm not seeing the rubber gasket in place did you lose it? you will need this. 3) if it's not hung up on the brushes and they appear to be making contact then you will need to twist the spindle clockwise while applying pressure as the spindle is like a screw you have to get it to bite on the cogs inside the housing, it takes a little pressure and you will know when it's in far enough as it will start to turn the exterior cog, it can be a bit stiff. When you think it won't go any further twist it some more!!! tis is more than likely the issue.
If you have tried all this to no avail then I would probably strip down the assembly completely and check to make sure nothing has got into the plastic chassis that could obstruct the spindle. Best of luck if I think of anything else I will be sure to post!
BB
If you have tried all this to no avail then I would probably strip down the assembly completely and check to make sure nothing has got into the plastic chassis that could obstruct the spindle. Best of luck if I think of anything else I will be sure to post!
BB
05-16-2012, 04:29 PM
#32
New Member
Thread Starter
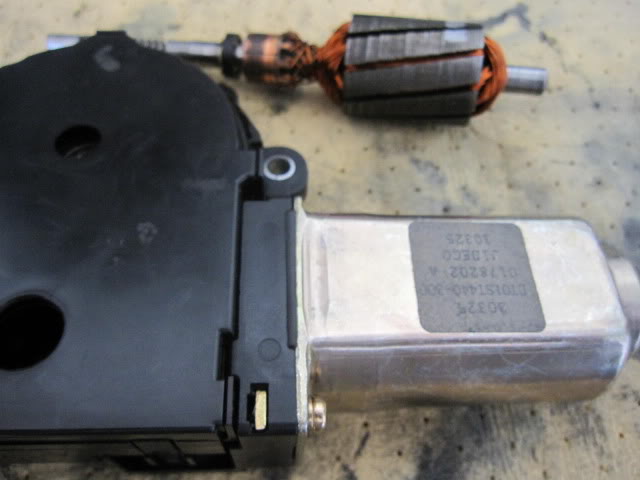
Also! you might want to check inside the gold cover, to make sure you are seating it correctly on the end of the spindle as this was a bugger for me, and it took several attempts before I got it to seat correctly!
BB
BB
05-17-2012, 05:20 AM
#34
New Member
Thread Starter
05-18-2012, 09:42 AM
#35
Registered User
The black rubber gasket is on there, guess you cant see it in the picture. In theory I should be able to JUST have the Spindle and the gold cover on and it should seat correctly correct? I've taken out the plastic piece with the brushes cause Ive broken two brushes trying to seat this spindle. I tried spinning it clockwise and turning it while i apply pressure to the spindle to get it to Grab on to the gears. The cog does spin while im turning the spindle clockwise. It doesnt spin very fast though. But the Gold Housing is still not quite all the way in. Im taking it to a friend today that is a mechanic and see if he can help. Ill take some video over there if we cant seem to get the spindle in all the way in.
Last edited by mnDanger69; 05-18-2012 at 09:50 AM.

 05-19-2012, 07:00 AM
#37
New Member
Thread Starter
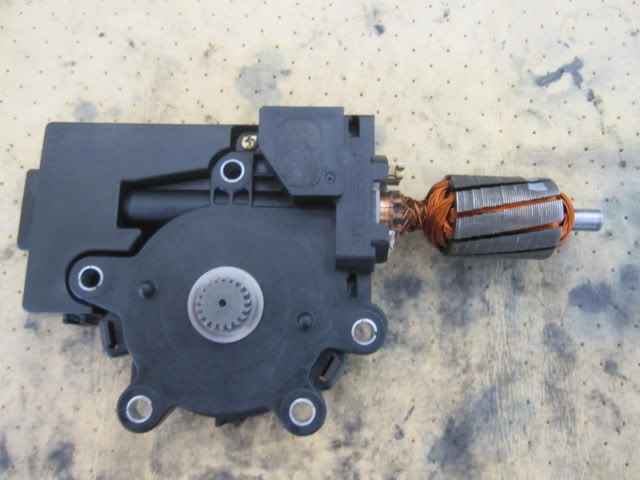
Ok, so i re-reviewed some of my repair pics, in your 1st and 2nd photo it shows that the copper contacts that should be seated flush against the brushes are clearly visible which suggests to me that those brushes are sitting below it and preventing the spindle from going all the way in.... I would suggest the following... (just in case) remove spindle and remove the white/cream colored plastic bit that houses the brushes, then seat the plastic bit on the spindle ensuring the brushes are flush against the copper contacts on the spindle... then try re-inserting both parts at the same time.
When I did mine i tried to do it by putting in the plastic part first and then inserting the spindle, which proved to be a nightmare because the brushes were so far into the housing I couldn't push them back to get the spindle in. I ended up removing the spindle and the white plastic part and doing it that way.
Hope you mechanic friend can figure it out... after all, it came apart.. so it should go back together! I'm sure you are pretty frustrated by now, I know I would be.
http://www.mybritishcomputerguy.com/hostedimg/08.jpg
BB
The black rubber gasket is on there, guess you cant see it in the picture. In theory I should be able to JUST have the Spindle and the gold cover on and it should seat correctly correct? I've taken out the plastic piece with the brushes cause Ive broken two brushes trying to seat this spindle. I tried spinning it clockwise and turning it while i apply pressure to the spindle to get it to Grab on to the gears. The cog does spin while im turning the spindle clockwise. It doesnt spin very fast though. But the Gold Housing is still not quite all the way in. Im taking it to a friend today that is a mechanic and see if he can help. Ill take some video over there if we cant seem to get the spindle in all the way in.
05-22-2012, 07:00 PM
#38
Registered User
iTrader: (1)

Join Date: Feb 2003
Location: MD
Posts: 1
Likes: 0
Received 0 Likes
on
0 Posts
i did some research and came across this thread. seems like a great DIY, but i have no experience whatsoever with this kind of stuff. first of all, where can i purchase the new brushes? the link you provided, it's not available anymore. can you elaborate the part where you mentioned to file the brushes down to fit? I've been quoted anywhere between $1,200 to $13,000 to fix the problem (my top not folding all the way down). After reading this thread, back of my head is keep telling me what have i got to lose for $10, but i'm not mechanically inclined.. thx.
05-23-2012, 06:55 AM
#39
New Member
Thread Starter
If you do the repair as outlined and it works for you, you'll be glad you did! it saved me quite a bit of money! below is one of the only pics of the brushes I have, hopefully there is enough info on the packet for you to be able to source some. You might want to try a RC Car store as this is what they are from. I did find some here for about $6.00 http://www3.towerhobbies.com/cgi-bin...P?I=LXUDP1&P=8

As far as the filing is concerned, just be gentle with them as they are made of a soft metal, be sure to file the end that makes contact with the spindle into a crescent shape so that it fits somewhat flush to the spindle (i'm not sure if it's 100% needed as it really just needs to make contact with the spindle and friction from it spinning over time will wear it down, I went ahead and did this anyway) also you want to clip off the O fastener before soldering, and you may need to trim the wire a little.
Good luck and feel free to message me if you have anymore questions!
BB
i did some research and came across this thread. seems like a great DIY, but i have no experience whatsoever with this kind of stuff. first of all, where can i purchase the new brushes? the link you provided, it's not available anymore. can you elaborate the part where you mentioned to file the brushes down to fit? I've been quoted anywhere between $1,200 to $13,000 to fix the problem (my top not folding all the way down). After reading this thread, back of my head is keep telling me what have i got to lose for $10, but i'm not mechanically inclined.. thx.
Last edited by bluebadge; 05-23-2012 at 06:56 AM.
05-23-2012, 09:40 AM
#40
Registered User
Join Date: Jun 2010
Location: DC
Posts: 116
Likes: 0
Received 0 Likes
on
0 Posts