RAW Processing w/ Canon's Digital Photo Professional (Maximize your Canon DSLR Pics)
 08-16-2007, 01:25 AM
#1
Registered User
Thread Starter
iTrader: (9)

Join Date: Dec 2003
Location: Waipahu HI; Phoenix AZ
Posts: 2,069
Likes: 0
Received 1 Like
on
1 Post
Did you recently buy a Canon DSLR and not getting the image quality you want or expect? You might ask, is it my photography skills? Or is it my camera? Or scarier yet, do I need a better lens?
Most likely the answer is you have not processed your shots, especially if you are new to DSLRs. You can use the software that comes with your camera, such as Digital Photo Pro (DPP) bundled with every Canon DSLR, or 3rd party ones, such as Adobe's Photoshop CS3 and Elements, Corel Photo-Paint and Paint Shop Pro (or Painter ), or free ones such as Gimp. Most programs can edit JPEGs, but beginners should shoot in RAW as they yield better results from adjustments.
What is a RAW image file and how does it differ from JPEG or TIFF?
A RAW file is data from the image sensor of a camera. These RAW files must be "processed" to a viewable image format like JPEG or TIFF. A JPEG image file is a compressed image file, viewable on your web browser as it has become the standard image file for use on the internet. A JPEG shot from a camera is made from the data taken from the sensor [the "RAW," unprocessed data] and processed internally by the camera. Once processed, that RAW data is dumped.
Of course, there are other image files viewable on the internet such as GIF (max of 256 colors is a weakness, but animation is a plus), BMP, and PNG. The reason why JPEG and GIF is generally used on the internet are it's compression capabilities. Compression is how much you shrink a file's size. For JPEG, there is usually a slider to adjust compression when using image manipulation software such as Photoshop. The upside with more compression is a smaller file, taking up less room on the hard drive and of course, downloads faster on the web browser. Conversely, the downside is a less detailed picture. Also, more compression introduces what's called "artifacting" as you can see by the blockiness. You might have seen this phenomenon on digital tv when the pictures become blocky at times.
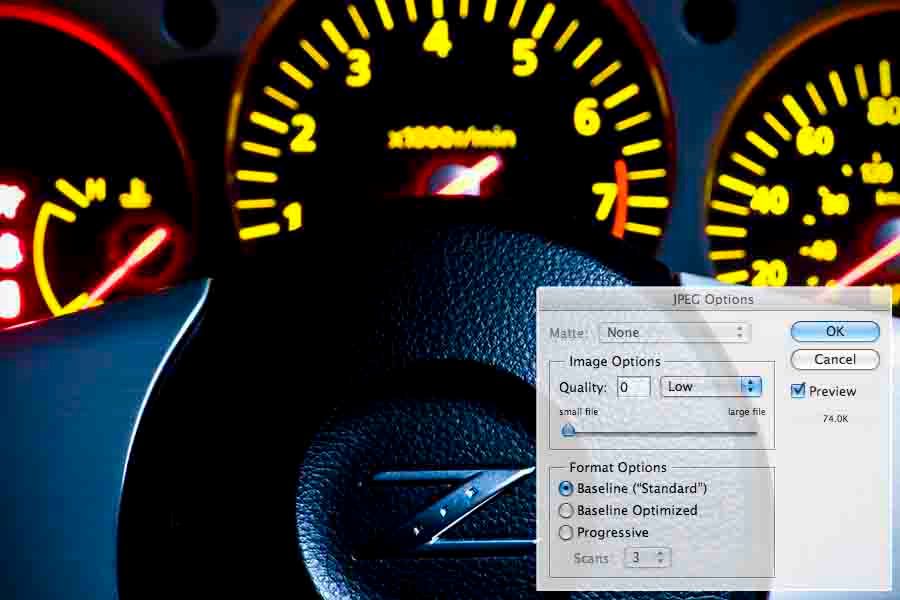
A Low quality JPEG (74 kb).
This has a ton of artifacting, a sign of a heavy compression.
The artifacting looks bad but is significantly less in size of the high quality JPEG below. This is a compromise made to save space, or speed up downloading. Image size used to be a major concern "back in the day" as pages loaded slowly when big images were present. Bandwidth and server/hosting cost has improved drastically.
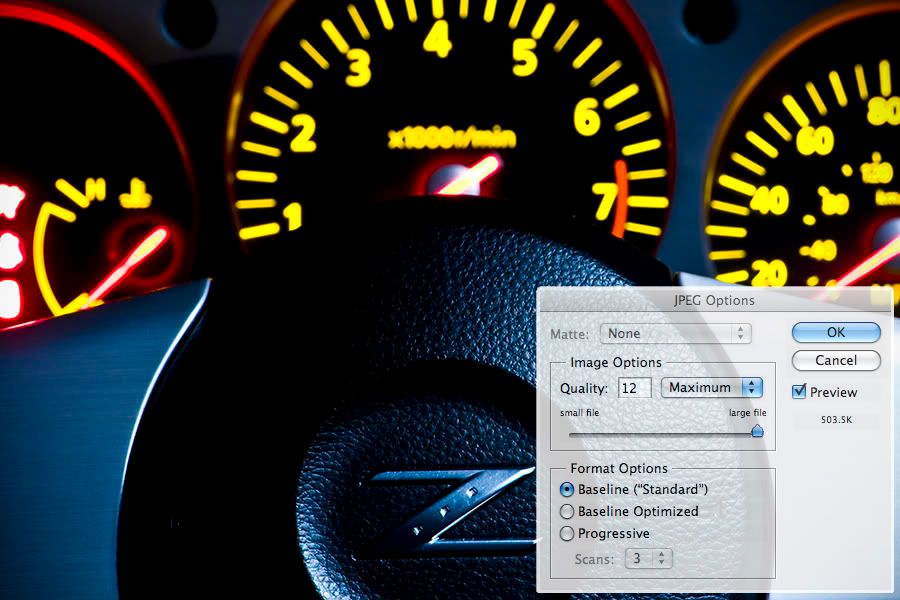
A High quality JPEG (503 kb).
A TIFF file is an uncompressed image file and yields no signs of compression, but is significantly larger in size terms of memory.
So if a TIFF file is a high quality, uncompressed image file, why shoot in RAW? Because RAW is pretty much the DNA of the photo. The RAW file contains a ton of info from lens used, aperture, exposure time, and other in-camera settings. You can adjust in-camera settings without losing the original DNA. Canon's bundled software, Digital Photo Professional (DPP) allows you to make in-camera adjustments AFTER the shot. Camera specific data is lost with TIFF and JPEG, although EXIF data is preserved.
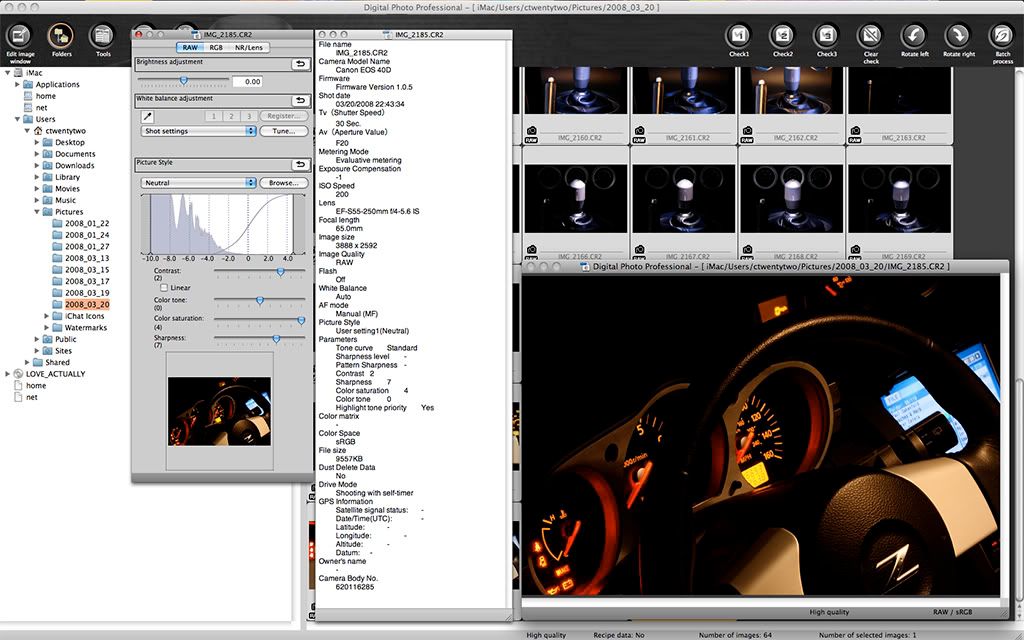
In-Camera settings as well as other information displayed by Canon's DPP.
Notice that info also contains the lens used for the shot, and interestingly, the serial# of the camera body used.
USING DIGITAL PHOTO PROFESSIONAL
Upon starting DPP, select the location of your RAW files by clicking the "Folders" icon located on the upper left of the screen, or go to the top menu and select VIEW>Folders, then select the directory. Once selected, your RAW files will be represented by thumbnails. Make sure you have the "Tools" button selected at the top of the program to display the "toolbar," or you can go the top menu through VIEW>TOOLBAR.
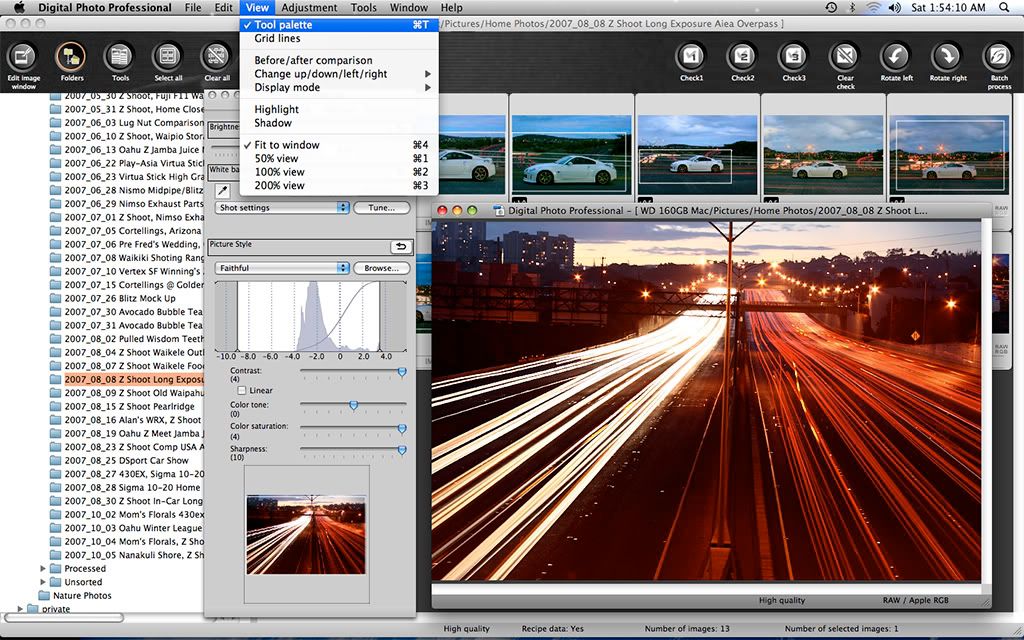
Double Click the thumbnail of the image you want to adjust. If the "tool palette" does not show, go to the top menu and select VIEW>TOOL PALETTE.
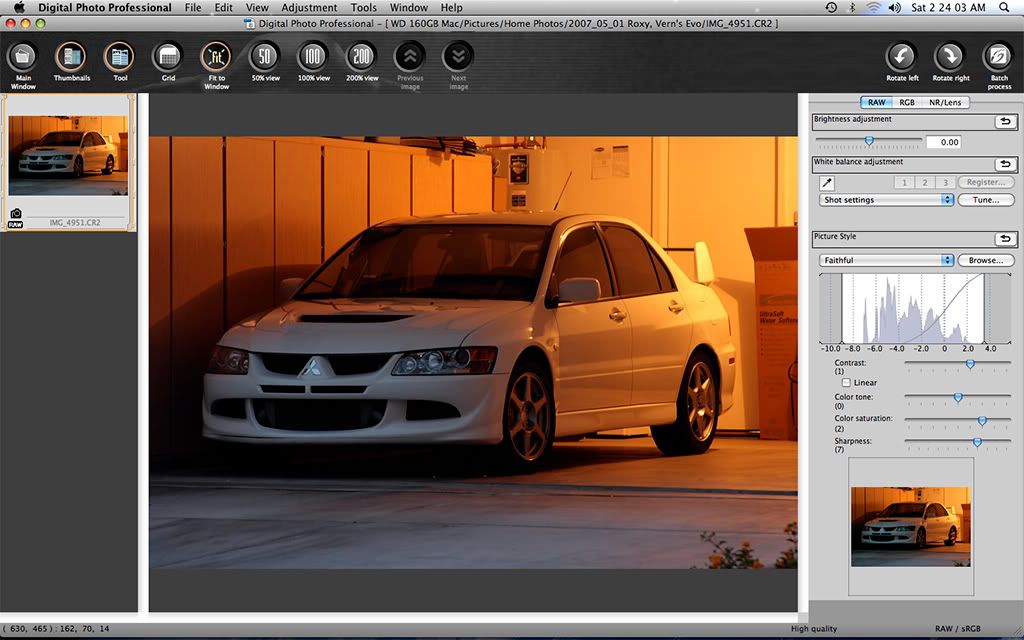
Or you can highlight the thumbnail and click "Edit image window" on the upper left corner to access the full screen editor. Here is how a shot turned out "out of the camera."
The settings you see in the toolbar is the settings I chose on the camera.
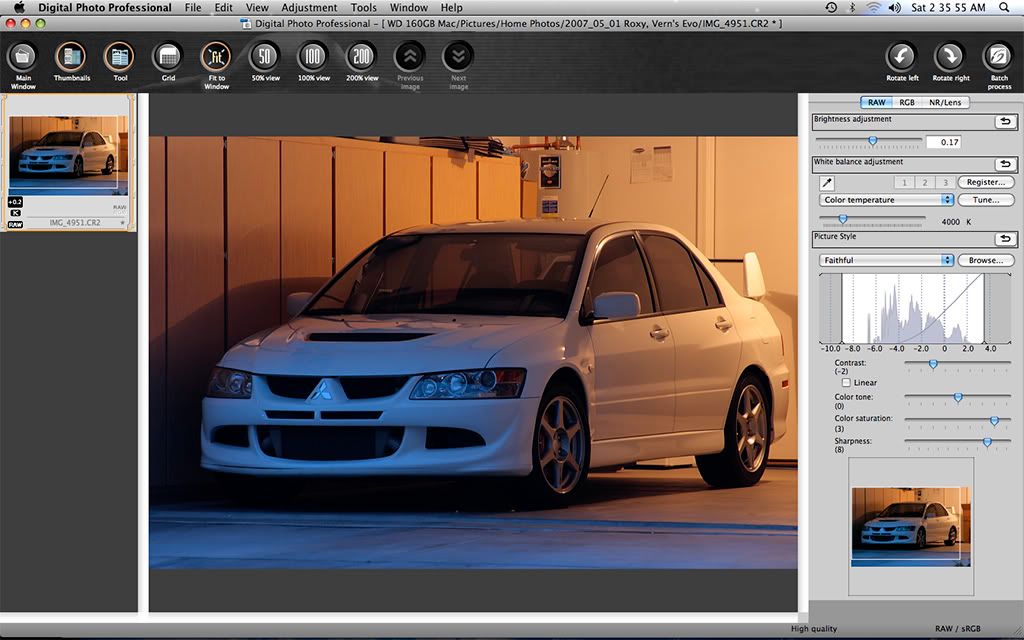
The result of "post processing." With "RAW" selected on the top of the toolbar, I adjusted various "in-camera" settings, as well as cropped the image.
Moving down through the toolbar...
Brightness is the equivalent to adjusting ISO, so the brighter you go, the noisier it gets.
White Balance was cooled to 4000k. White Balance adjusts the warmness and coolness (temperature) of the picture. When shooting at night under tungsten lights, there will be an orange (warm) tint that you may want to cool, as illustrated by the previous to picture examples. To adjust White Balance, you can choose "Tungsten" in the pull-down menu, or you can manually adjust it by choosing "Color Temperature."
Choosing tungsten didn't compensate it enough for my tastes, so I manually adjusted the temp to 4000k.[/SIZE][/B]
Picture Style was kept at "Faithful." The various Picture Styles have differing preset settings for contrast, tone, contrast, and sharpness.
Contrast was adjusted to -2. Contrast is the relationship of light and dark. Adjusting contrast either widens or narrows this relationship. In the case of the original, there was lost detail in the shadows, so I lessened contrast.
Color Tone was not adjusted. Color Tone gives the picture a red, green, or blue hue.
Color Saturation adjusts the amount of color in the picture, so you can go from an "unsaturated" picture which is black and white; or a rheavily saturated in color picture.
Lastly, Sharpness "sharpens" the pic. Too much sharpening via software (especially DPP!) can lead to jagginess of some lines. You cannont correct "camera shake" via DPP by sharpening, although other programs can correct shake. Either get an Image Stabilized lens, use a tripod, or practice taking shots with a steady hand. Technique (how you hold your camera) is everything!
Other adjustments can be made by clicking "RGB" (in between "RAW" and "NR") at the top of the toolbar.
It will let you adjust the same settings possible in "RAW," allowing you to double contrast, saturation, tone, and sharpness. Most importantly, it also does "curves." Curves lets you adjust the luminance of the entire photo, or by RGB (Red, Green, Blue). But you'll have to Google Curves. Sorry... too complicated.
"NR" lets you choose the amount of noise reduction.
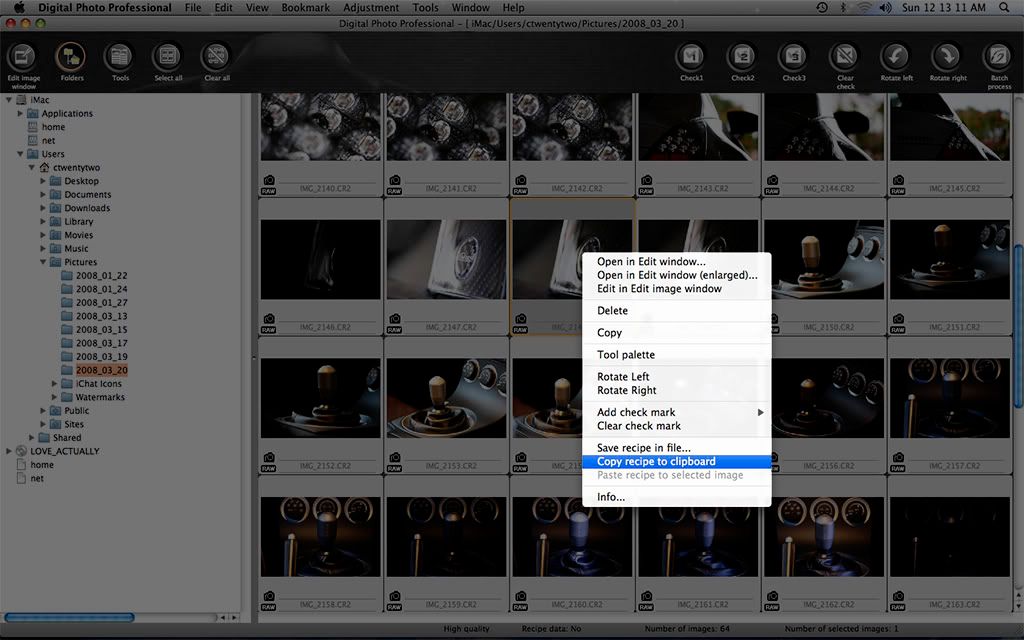
Other features let you copy the settings of the various adjustments you made to a RAW file, and paste those same settings to other RAW files.
Just right click on the thumbnail and select "Copy recipe to clipboard."
Then you can select the file(s) you want to paste the settings to by holding down the "command" key on your keyboard as you click.
Once you have your files selected, right click again on any of the selected images, and select "Paste recipe to selected image."
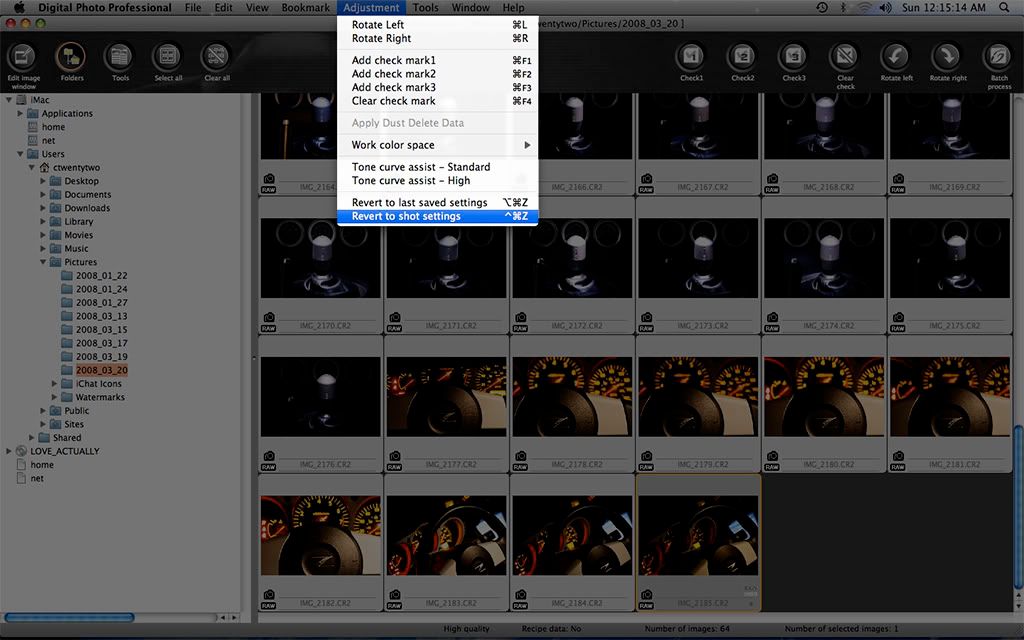
To revert to the original shot settings. Any adjustments you make are "non-destructive" to the original file.
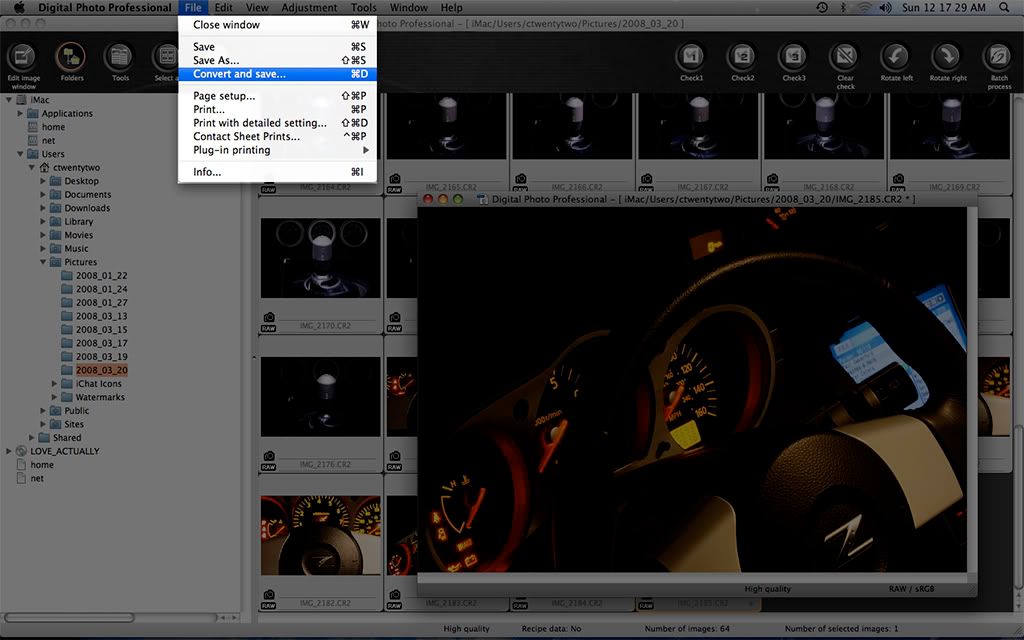
To export the image as a JPEG, select "File>Convert and save" from the menu.
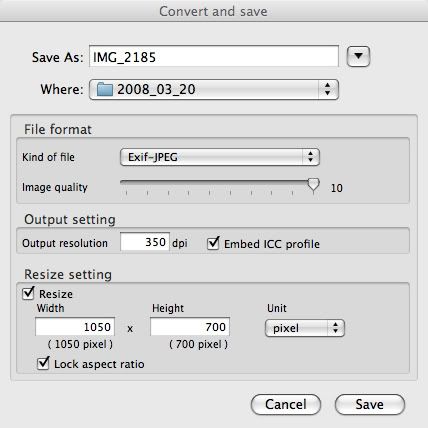
... and this pop-up window will appear.
It lets you resize the photo, select the JPEG quality, select the file type (JPEG or TIFF), select the output resolution, select where the file is saved, etc.
I usually resize my photos to a width of 1050 pixels.
The PC version of DPP is essentially the same as the Mac version.
You can also use Photoshop or other compatible RAW converters. These quick and simple adjustments are essential to maximize your photos with minimal time.
You can download the lastest version of DPP from Canon USA here:
Canon's Latest Software
There is still alot to using DPP that I have not covered. For detailed, animated tutorials, click here:
Canon's DPP Website
What adjustments you make are up to you. Everyone's an individual. Post your pics and let's discuss and critique.
Most likely the answer is you have not processed your shots, especially if you are new to DSLRs. You can use the software that comes with your camera, such as Digital Photo Pro (DPP) bundled with every Canon DSLR, or 3rd party ones, such as Adobe's Photoshop CS3 and Elements, Corel Photo-Paint and Paint Shop Pro (or Painter
), or free ones such as Gimp. Most programs can edit JPEGs, but beginners should shoot in RAW as they yield better results from adjustments.What is a RAW image file and how does it differ from JPEG or TIFF?
A RAW file is data from the image sensor of a camera. These RAW files must be "processed" to a viewable image format like JPEG or TIFF. A JPEG image file is a compressed image file, viewable on your web browser as it has become the standard image file for use on the internet. A JPEG shot from a camera is made from the data taken from the sensor [the "RAW," unprocessed data] and processed internally by the camera. Once processed, that RAW data is dumped.
Of course, there are other image files viewable on the internet such as GIF (max of 256 colors is a weakness, but animation is a plus), BMP, and PNG. The reason why JPEG and GIF is generally used on the internet are it's compression capabilities. Compression is how much you shrink a file's size. For JPEG, there is usually a slider to adjust compression when using image manipulation software such as Photoshop. The upside with more compression is a smaller file, taking up less room on the hard drive and of course, downloads faster on the web browser. Conversely, the downside is a less detailed picture. Also, more compression introduces what's called "artifacting" as you can see by the blockiness. You might have seen this phenomenon on digital tv when the pictures become blocky at times.
A Low quality JPEG (74 kb).
This has a ton of artifacting, a sign of a heavy compression.
The artifacting looks bad but is significantly less in size of the high quality JPEG below. This is a compromise made to save space, or speed up downloading. Image size used to be a major concern "back in the day" as pages loaded slowly when big images were present. Bandwidth and server/hosting cost has improved drastically.
A High quality JPEG (503 kb).
A TIFF file is an uncompressed image file and yields no signs of compression, but is significantly larger in size terms of memory.
So if a TIFF file is a high quality, uncompressed image file, why shoot in RAW? Because RAW is pretty much the DNA of the photo. The RAW file contains a ton of info from lens used, aperture, exposure time, and other in-camera settings. You can adjust in-camera settings without losing the original DNA. Canon's bundled software, Digital Photo Professional (DPP) allows you to make in-camera adjustments AFTER the shot. Camera specific data is lost with TIFF and JPEG, although EXIF data is preserved.
In-Camera settings as well as other information displayed by Canon's DPP.
Notice that info also contains the lens used for the shot, and interestingly, the serial# of the camera body used.
USING DIGITAL PHOTO PROFESSIONAL
Upon starting DPP, select the location of your RAW files by clicking the "Folders" icon located on the upper left of the screen, or go to the top menu and select VIEW>Folders, then select the directory. Once selected, your RAW files will be represented by thumbnails. Make sure you have the "Tools" button selected at the top of the program to display the "toolbar," or you can go the top menu through VIEW>TOOLBAR.
Double Click the thumbnail of the image you want to adjust. If the "tool palette" does not show, go to the top menu and select VIEW>TOOL PALETTE.
Or you can highlight the thumbnail and click "Edit image window" on the upper left corner to access the full screen editor. Here is how a shot turned out "out of the camera."
The settings you see in the toolbar is the settings I chose on the camera.
The result of "post processing." With "RAW" selected on the top of the toolbar, I adjusted various "in-camera" settings, as well as cropped the image.
Moving down through the toolbar...
Brightness is the equivalent to adjusting ISO, so the brighter you go, the noisier it gets.
White Balance was cooled to 4000k. White Balance adjusts the warmness and coolness (temperature) of the picture. When shooting at night under tungsten lights, there will be an orange (warm) tint that you may want to cool, as illustrated by the previous to picture examples. To adjust White Balance, you can choose "Tungsten" in the pull-down menu, or you can manually adjust it by choosing "Color Temperature."
Choosing tungsten didn't compensate it enough for my tastes, so I manually adjusted the temp to 4000k.[/SIZE][/B]
Picture Style was kept at "Faithful." The various Picture Styles have differing preset settings for contrast, tone, contrast, and sharpness.
Contrast was adjusted to -2. Contrast is the relationship of light and dark. Adjusting contrast either widens or narrows this relationship. In the case of the original, there was lost detail in the shadows, so I lessened contrast.
Color Tone was not adjusted. Color Tone gives the picture a red, green, or blue hue.
Color Saturation adjusts the amount of color in the picture, so you can go from an "unsaturated" picture which is black and white; or a rheavily saturated in color picture.
Lastly, Sharpness "sharpens" the pic. Too much sharpening via software (especially DPP!) can lead to jagginess of some lines. You cannont correct "camera shake" via DPP by sharpening, although other programs can correct shake. Either get an Image Stabilized lens, use a tripod, or practice taking shots with a steady hand. Technique (how you hold your camera) is everything!
Other adjustments can be made by clicking "RGB" (in between "RAW" and "NR") at the top of the toolbar.
It will let you adjust the same settings possible in "RAW," allowing you to double contrast, saturation, tone, and sharpness. Most importantly, it also does "curves." Curves lets you adjust the luminance of the entire photo, or by RGB (Red, Green, Blue). But you'll have to Google Curves. Sorry... too complicated.
"NR" lets you choose the amount of noise reduction.
Other features let you copy the settings of the various adjustments you made to a RAW file, and paste those same settings to other RAW files.
Just right click on the thumbnail and select "Copy recipe to clipboard."
Then you can select the file(s) you want to paste the settings to by holding down the "command" key on your keyboard as you click.
Once you have your files selected, right click again on any of the selected images, and select "Paste recipe to selected image."
To revert to the original shot settings. Any adjustments you make are "non-destructive" to the original file.
To export the image as a JPEG, select "File>Convert and save" from the menu.
... and this pop-up window will appear.
It lets you resize the photo, select the JPEG quality, select the file type (JPEG or TIFF), select the output resolution, select where the file is saved, etc.
I usually resize my photos to a width of 1050 pixels.
The PC version of DPP is essentially the same as the Mac version.
You can also use Photoshop or other compatible RAW converters. These quick and simple adjustments are essential to maximize your photos with minimal time.
You can download the lastest version of DPP from Canon USA here:
Canon's Latest Software
There is still alot to using DPP that I have not covered. For detailed, animated tutorials, click here:
Canon's DPP Website
What adjustments you make are up to you. Everyone's an individual. Post your pics and let's discuss and critique.
Last edited by ctwentytwo; 03-23-2008 at 02:59 AM.


Trending Topics
08-16-2007, 06:31 AM
#9
Registered User
iTrader: (13)
Join Date: May 2004
Location: Ontario, Canada
Posts: 6,002
Likes: 0
Received 0 Likes
on
0 Posts
Great Write up man!
Can I suggest that we have a new subforum dedicated to Digital Photography techniques such as this thread, the one where c22 talked about his lens etc, and the sticky thread of Digital Photography 101? Feels like we're going to lose alot of useful information as threads like this gets pushed down by other stuff.
Can I suggest that we have a new subforum dedicated to Digital Photography techniques such as this thread, the one where c22 talked about his lens etc, and the sticky thread of Digital Photography 101? Feels like we're going to lose alot of useful information as threads like this gets pushed down by other stuff.
 08-16-2007, 08:45 AM
#14
Registered User
iTrader: (3)

Join Date: Oct 2004
Location: Cincinnati
Posts: 864
Likes: 0
Received 0 Likes
on
0 Posts
Originally Posted by Conceyted
photoshop cs2? or is this a separate program?
 08-16-2007, 08:47 AM
#15
Registered User
Thread Starter
iTrader: (9)
Join Date: Dec 2003
Location: Waipahu HI; Phoenix AZ
Posts: 2,069
Likes: 0
Received 1 Like
on
1 Post
Originally Posted by _NIZMO_
Why use canon or nikon raw editors, when cs2 raw editor is far superior.
Originally Posted by g-unit9999
yea.. why not do it in CS2?
then you don't have to save the jpg twice (which degrades it) if you want to use some of the effects in CS2..
--mike
then you don't have to save the jpg twice (which degrades it) if you want to use some of the effects in CS2..
--mike
Photoshop CS3 is supposed to cost at least $600 (non-upgrade)`
 for one of the cheapest Suites. Plus, Photoshop has a learning curve. No doubt using more powerful software will produce better results, but if you read the write-up carefully, it's loaded with "disclaimers."
DPP has some learning curve, but IMO, it's way easier to use than an image editor. This write up was done to help along the begginner. I just cringed when I saw that some images were "shot with my new DSLR," and you knew that they were shot without any type of post processing. Personally, I hate to spend too much time on post processing. Kind of takes the fun away from photography, even though I'm pretty proficient with image editors.
Hopefully, we can see better photos here on these forums.
Mike, good to see you back BTW. Always a big fan of your work.
BTW, thanks for the comments guys. I'm glad to help out some of you here... oh and one more thing... if you have a Canon DSLR and just starting out on DSLRs and is looking for another lens to compliment the stock 18-55mm, check out the 50mm f1.8. It's only $70.
Last edited by ctwentytwo; 08-16-2007 at 08:51 AM.
08-16-2007, 08:55 AM
#16
Registered User
Thread Starter
iTrader: (9)
Join Date: Dec 2003
Location: Waipahu HI; Phoenix AZ
Posts: 2,069
Likes: 0
Received 1 Like
on
1 Post
Originally Posted by push
Photoshop CS2... But who uses that? Lightroom + CS3 is the way to go or for HDR photomatix + cs3

Kidding... kidding. Remember, this primer was written to help along the beginner.
But who uses lightroom? Aperture + CS3 is the way to go!
08-16-2007, 08:56 AM
#17
Registered User
iTrader: (16)
Join Date: Dec 2004
Location: Clearwater, FL
Posts: 870
Likes: 0
Received 0 Likes
on
0 Posts
Great write-up! I've had my XTi since Christmas and have never used DDP. I've only taken 1 or 2 RAW images...but maybe I'll have to give this a shot. I have CS3...so maybe I'll compare the two?
08-16-2007, 09:50 AM
#18
Registered User
iTrader: (3)
Join Date: Oct 2004
Location: Cincinnati
Posts: 864
Likes: 0
Received 0 Likes
on
0 Posts
Originally Posted by ctwentytwo
Oh noes, I have a feeling the "photoshop snobs" are going to be chiming in quite often.
Kidding... kidding. Remember, this primer was written to help along the beginner.
But who uses lightroom? Aperture + CS3 is the way to go!
Kidding... kidding. Remember, this primer was written to help along the beginner.
But who uses lightroom? Aperture + CS3 is the way to go!
08-16-2007, 09:56 AM
#19
Registered User
iTrader: (1)

Join Date: Jan 2004
Location: Nashville, TN
Posts: 112
Likes: 0
Received 0 Likes
on
0 Posts
Great write up. I recently went over to using Adobe Lightroom for my Raw editing, but DPP would definitely be my #2 choice especially for those who don't want to shell out for extra Adobe software.
A NOTE ON SHARPNESS:
To those who use DPP, I highly recommend that you do not increase the sharpness of files that are shot at high ISO. This will simply exaggerate the noise levels of the image. When I process raw, I always divide my photos using the Exif by the ISO (DPP makes it easy to see if you use the scrolling view rather than the thumbnail view). For ISO 100 or 200 photos, you're probably safe to jack up the sharpness as high as you please, but as the ISO goes up, I'd drop the sharpness at the same time.
Then, use Noise Ninja on those ISO 800+ images!