Bass Drop Out
 08-11-2009, 06:09 AM
#41
Banned

Join Date: Jul 2009
Location: Bridgeton, NJ
Posts: 22
Likes: 0
Received 0 Likes
on
0 Posts
The reason that rely came loose was because of the vibration from the sub. I still do not see how you can enjoy the bose system. The system is designed for the bass and highs to fade out at higher volume, they did this because of 2 things. One is they do not want the speakers do distort and at all, and 2 they know that the small tiny little sub amp can not rely power a sub let alone there own. They have been doing this for years. I could put a 1200 dollar system in any car and blow the bose away maybe even less. Just my observation and my 2 cents.
 08-14-2009, 05:36 PM
#43
Registered User

Join Date: Aug 2009
Location: VA
Posts: 4
Likes: 0
Received 0 Likes
on
0 Posts
Brand new to the forums, and already this site has been tons and tons of help. To help this thread out a bit I found a simple clean how to removal/replace guide on the sub amp. I'm not claiming its mine just a simple google search brought this up.
http://lifedocumented.blogspot.com/2...placement.html
I just finished "fixing" the sub amp so I took some pics of the little grey box and the inside of the actual amp itself. Can't wait to have some funds to put in a real system.
<a href="http://twitpic.com/dxh0s" title="Bose subamp1 on Twitpic"><img src="http://twitpic.com/show/thumb/dxh0s.jpg" width="150" height="150" alt="Bose subamp1 on Twitpic"></a>
<a href="http://twitpic.com/dxh1w" title="Bose subamp2 on Twitpic"><img src="http://twitpic.com/show/thumb/dxh1w.jpg" width="150" height="150" alt="Bose subamp2 on Twitpic"></a>
Hope this was of some help
08-17-2009, 05:30 PM
#44
Registered User

Join Date: Mar 2008
Location: Bowling Green, Ky
Posts: 35
Likes: 0
Received 0 Likes
on
0 Posts
I've had my zr for nearly 2 years now, purchased with 36k on it, now has 95k. I've taken the sub and sub amp out twice simply reconnecting the connectors to make it not cut out(sub quits). It only repairs for a day or so. I've used Deox when working with electronics in the past, requested a bottle from a couple of friends who still work with the electronics company where I worked for 13yrs. Trouble is that was 10 years ago and these two always claim to be out when I see them from time to time. Told my oldest son about the trouble, he said I could get it from radio shack. Sure enough, 15bucks and it comes in a spray bottle with two, tin pin connections and gold. After I resoldered the relay to the board with no luck I removed the grey cover from the relay and spayed deox in the relay and left the cover off and the metal shields off. The z uses tin pins on the circuit board so now I have a tiny bottle of gold spray maybe I'll use some day. Just simply disconnect the connectors and spray the deox on both the pins and the plug and it's fixed.
Radio shack has it label deoxit. Has advertising on the package for use on computer cords.
Deox is nonconductive so no need to worry about overspray. Next time my airbag light comes on I'll zap the sensor beside the hood latch but with the battery disconnected before unplugging that sensor.
These pins should have been gold plated. DC or pulsed dc will build up corrosion. Deox cleans the metal chemically. Wish I'd done what I knew miles ago
Last edited by simplewon; 04-20-2010 at 08:41 AM.
08-19-2009, 07:09 PM
#45

Brand new to the forums, and already this site has been tons and tons of help. To help this thread out a bit I found a simple clean how to removal/replace guide on the sub amp. I'm not claiming its mine just a simple google search brought this up.
http://lifedocumented.blogspot.com/2...placement.html
I just finished "fixing" the sub amp so I took some pics of the little grey box and the inside of the actual amp itself. Can't wait to have some funds to put in a real system.
<a href="http://twitpic.com/dxh0s" title="Bose subamp1 on Twitpic"><img src="http://twitpic.com/show/thumb/dxh0s.jpg" width="150" height="150" alt="Bose subamp1 on Twitpic"></a>
<a href="http://twitpic.com/dxh1w" title="Bose subamp2 on Twitpic"><img src="http://twitpic.com/show/thumb/dxh1w.jpg" width="150" height="150" alt="Bose subamp2 on Twitpic"></a>
Hope this was of some help
http://lifedocumented.blogspot.com/2...placement.html
I just finished "fixing" the sub amp so I took some pics of the little grey box and the inside of the actual amp itself. Can't wait to have some funds to put in a real system.
<a href="http://twitpic.com/dxh0s" title="Bose subamp1 on Twitpic"><img src="http://twitpic.com/show/thumb/dxh0s.jpg" width="150" height="150" alt="Bose subamp1 on Twitpic"></a>
<a href="http://twitpic.com/dxh1w" title="Bose subamp2 on Twitpic"><img src="http://twitpic.com/show/thumb/dxh1w.jpg" width="150" height="150" alt="Bose subamp2 on Twitpic"></a>
Hope this was of some help
08-20-2009, 07:18 AM
#46
Registered User
Join Date: Aug 2009
Location: VA
Posts: 4
Likes: 0
Received 0 Likes
on
0 Posts
I did what someone else posted, got some paper and folded it up so when I put the cover back on it applied enough pressure. I figure why not use paper, it will only be temporary until I have enough pennies for a new system 
08-20-2009, 10:02 AM
#47
Thanks for that I will definatley give it a shot, does it require a lot of pressure ? (ie a big wad of paper!) or light pressure, might try using a small block of wood, less likley to dislodge.
Cheers
Cheers
08-20-2009, 12:49 PM
#48
Registered User

Join Date: Oct 2007
Location: Boise, Idaho
Posts: 1,695
Likes: 0
Received 0 Likes
on
0 Posts
YES!!!!!!!!!
My 350z pet peeve will now be fixed!!!!!

*done. I used cardboard. I cut out about 6 3/4 inch squares, smashed them together and super-glued them above the grey box on the metal cover. I was suprised how much pressure it took. I think I started with 3 unsmashed layers. It squished the 3 layers and didnt put enough pressure on it. So I had to double the amount of cardboard and pre-smash it. Now the blows stereo sounds mediocre again
My 350z pet peeve will now be fixed!!!!!
*done. I used cardboard. I cut out about 6 3/4 inch squares, smashed them together and super-glued them above the grey box on the metal cover. I was suprised how much pressure it took. I think I started with 3 unsmashed layers. It squished the 3 layers and didnt put enough pressure on it. So I had to double the amount of cardboard and pre-smash it. Now the blows stereo sounds mediocre again
Last edited by WhiteNoiz; 08-21-2009 at 10:03 AM.
08-22-2009, 09:45 AM
#49
Thanks for posting this. I just tried this on my Bose sub amp and it actually worked.
If you open up the amp itself, which is enclosed in a metal enclosure, you'll see this gray box on the circuit board. I made my sub go out first on purpose (by increasing bass) and then applied pressure to see if that indeed would correct the problem (while the amp was taken apart but still connected). Lo and behold, it actually solved the issue and I blasted everything to purposely make the sub go out again with pressure applied, but it held up fine. BTW, I have an aftermarket headunit with its own amp, which also allows me to crank up the "bass" more than the stock headunit.
I just folded up some printer paper and taped it down to the gray box, then closed the enclosure back up. One corner of the enclosure was lifted up maybe a little under 2mm, which I felt was enough, when the enclosure was put back together. Then when you put the screw back it, it will hold the pressure onto that gray box.
Anyway, you probably can't imagine this in your head, but once you start taking things apart and see the actual pieces, it will make sense.
Thanks again for posting this little trick.
My other concern with the paper method is I had no idea how much heat was likley to build up in the unit after operating it for lengthy periods and didn't feel like taking a chance on having the paper ignite.
Hope this is found to be useful.. If I ever take it apart again I will post some pics.
 10-03-2009, 11:36 AM
#51
Registered User

Join Date: May 2009
Location: oklahoma
Posts: 12
Likes: 0
Received 0 Likes
on
0 Posts
Who ever came up with this has too much time on there hands but THANKS! Just tried it this morning and it worked. Used a pencil eraser to put pressure on relay. Problem has been bugging the S*^T out of my wife and I. THANKS again
10-27-2009, 12:26 PM
#53
Registered User

Join Date: Oct 2009
Location: San Mateo Ca
Posts: 24
Likes: 0
Received 0 Likes
on
0 Posts
Thanks for posting this fix, it really works, I was about to dump the bose sub and amp and get new one. I dirlled a hole on the outer cover and screwed a screw in until it applied pressure on the grey box. Used a flat end screw the metal kind.
10-28-2009, 06:18 AM
#54
The paper idea is a great one, I did this myself yesterday. The only issue was that it was a pain to figure out how much paper I needed to wodge in there to get it to work so. I tried several times to get the right amount of pressure but it seemed like the paper was not exerting enough force so..., (now this sounds drastic but worked great) I drilled a small hole in the housing above the relay (obviously the circuit board had been removed from housing first!) then found a bolt, re-assembled the unit and just screwed down the bolt until it applied enough pressure on the top of the relay to get it working (whatever you do if you try this DO NOT USE A SCREW as this will puncture the relay and could cause permanent damage).
My other concern with the paper method is I had no idea how much heat was likley to build up in the unit after operating it for lengthy periods and didn't feel like taking a chance on having the paper ignite.
Hope this is found to be useful.. If I ever take it apart again I will post some pics.
My other concern with the paper method is I had no idea how much heat was likley to build up in the unit after operating it for lengthy periods and didn't feel like taking a chance on having the paper ignite.
Hope this is found to be useful.. If I ever take it apart again I will post some pics.
") 11-09-2009, 06:27 PM
11-09-2009, 06:27 PM
#55
Registered User
iTrader: (1)

Join Date: Apr 2009
Location: Deep South Mississippi
Posts: 34
Likes: 0
Received 0 Likes
on
0 Posts
I just have to chime in and say it worked here too (so far). At least until I can find a decently priced replacement or figure out a better amp/speaker solution.
thanks! (no fires yet)
m
thanks! (no fires yet)
m
11-16-2009, 02:32 PM
#56
Registered User

Just joined the forum and this has been a wealth of information already. I hope my post helps.
So first off thank you "Jimmy Mack". I tried out what you wrote and it worked. Before this I was going to buy a new BOSE subwoofer and Sub-amp but this took 30 minutes, a folded piece of paper and a wrench. I took pics so everyone knows what I am talking about. Hope this helps a lot of people

Remove subwoofer cover on top left corner. Insert a flat screw driver and it just pops off.
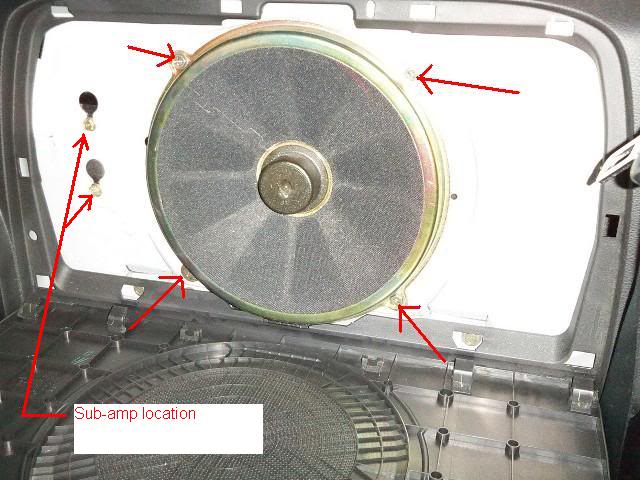
Shown are the subwoofer and sub-amp. Remove the 4 screws on the subwoofer.
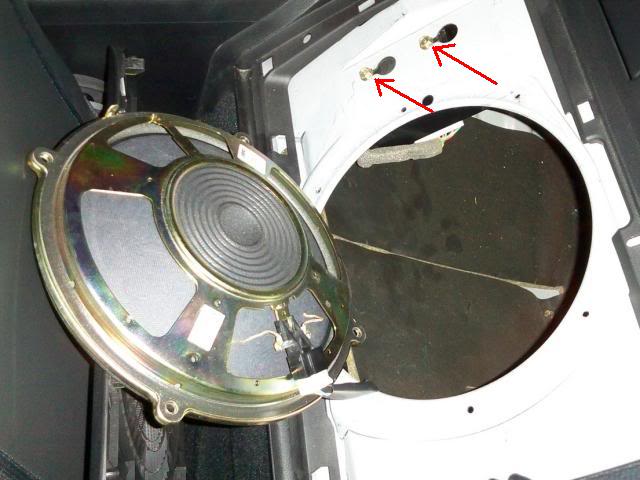
You do not have to remove the subwoofer if you do not want to. You just need access to the sub-amp. Lower the subwoofer as shown. Slightly unscrew the sub-amp screws, but do not remove them. Lift and pull out the sub-amp.
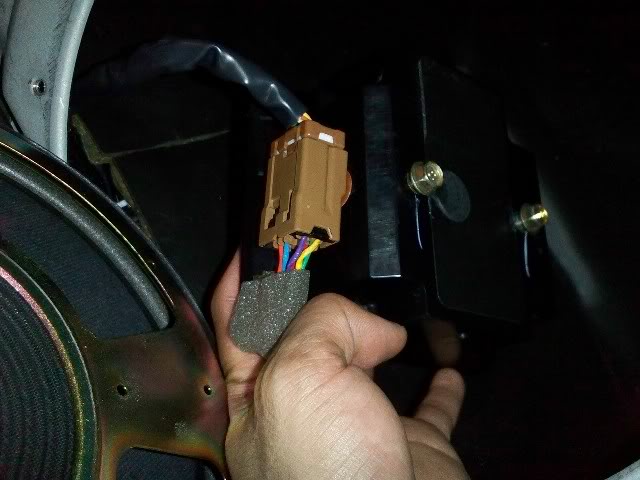
Disconnect the male and female connectors to the sub-amp.
View of the sub-amp. Its very small.
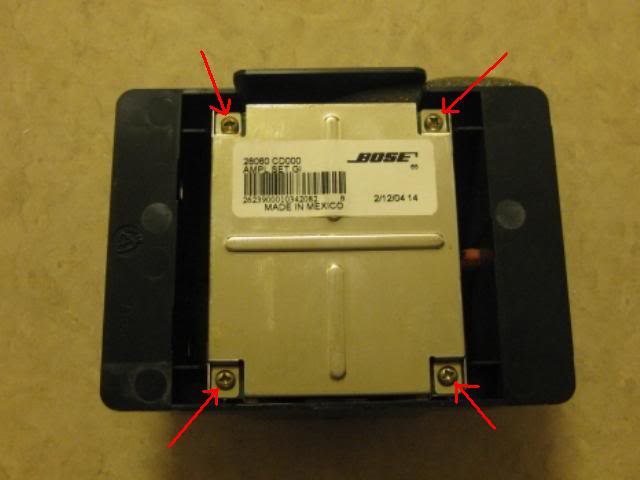
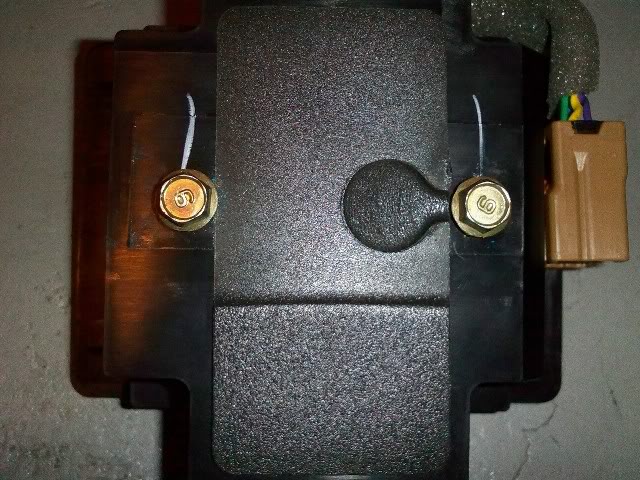
Turn over the sub-amp and remove the 4 screws shown with the red arrows.
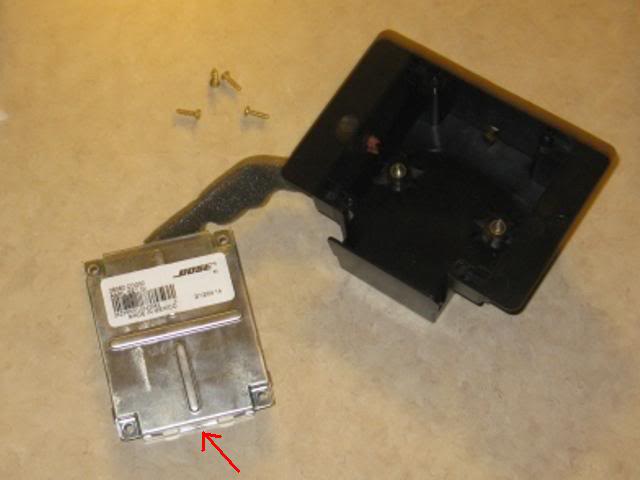
One you remove the 4 screws take the sub-amp out of the black plastic box. You do not need to disconnect any cables. Open the sub-amp with a small flat head screwdriver where the red arrow is shown. The sub-amp opens up like a car hood.
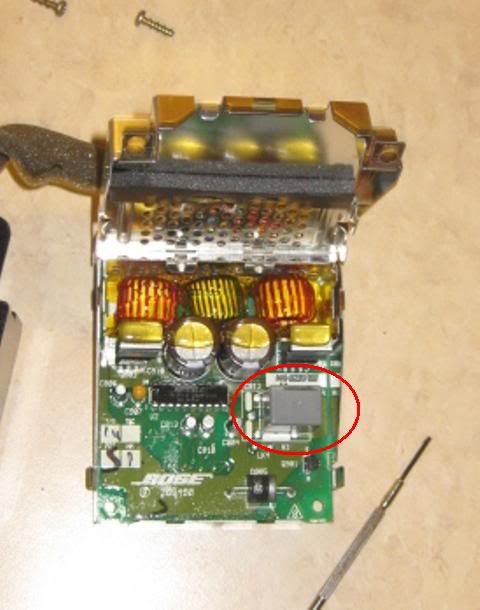
Shown in the red circle is the faulty gray relay that we need to put pressure on.
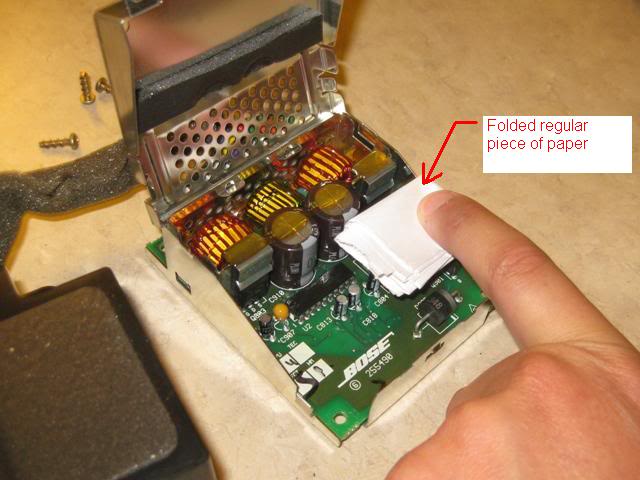
Next place a piece of folded paper on the relay. When you close the sub-amp (lower the hood) the piece of paper will put pressure on the gray relay making better contact. From what I read pressure varies from person to person. Some might need slight pressure, other might need lots of pressure. Add folded paper accordingly.
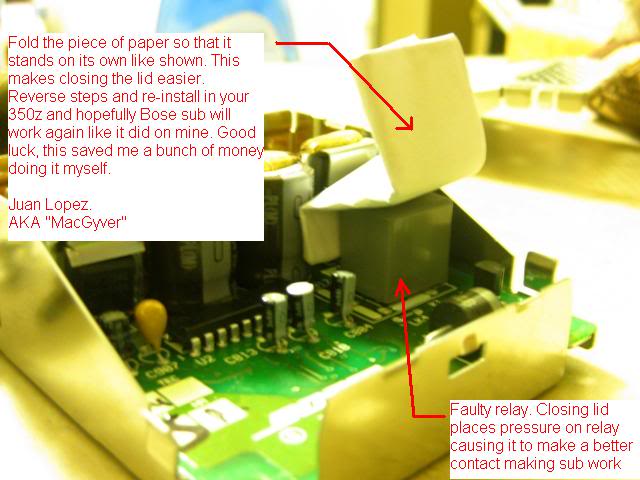
I folded my piece of paper in such a way that it stayed in place without me having to hold it. This helps a lot because trying to hold it and "close the hood" at the same time is difficult. This just makes life easier.
I hope this helps out people. It was a major headache but now it got fixed totally free. If your Sub still cuts in and out try adding more paper or maybe you'll have to bite the bullet and buy a new sub-amp.
Juan L.
AKA "MacGyver"
So first off thank you "Jimmy Mack". I tried out what you wrote and it worked. Before this I was going to buy a new BOSE subwoofer and Sub-amp but this took 30 minutes, a folded piece of paper and a wrench. I took pics so everyone knows what I am talking about. Hope this helps a lot of people
Remove subwoofer cover on top left corner. Insert a flat screw driver and it just pops off.
Shown are the subwoofer and sub-amp. Remove the 4 screws on the subwoofer.
You do not have to remove the subwoofer if you do not want to. You just need access to the sub-amp. Lower the subwoofer as shown. Slightly unscrew the sub-amp screws, but do not remove them. Lift and pull out the sub-amp.
Disconnect the male and female connectors to the sub-amp.
View of the sub-amp. Its very small.
Turn over the sub-amp and remove the 4 screws shown with the red arrows.
One you remove the 4 screws take the sub-amp out of the black plastic box. You do not need to disconnect any cables. Open the sub-amp with a small flat head screwdriver where the red arrow is shown. The sub-amp opens up like a car hood.
Shown in the red circle is the faulty gray relay that we need to put pressure on.
Next place a piece of folded paper on the relay. When you close the sub-amp (lower the hood) the piece of paper will put pressure on the gray relay making better contact. From what I read pressure varies from person to person. Some might need slight pressure, other might need lots of pressure. Add folded paper accordingly.
I folded my piece of paper in such a way that it stayed in place without me having to hold it. This helps a lot because trying to hold it and "close the hood" at the same time is difficult. This just makes life easier.
I hope this helps out people. It was a major headache but now it got fixed totally free. If your Sub still cuts in and out try adding more paper or maybe you'll have to bite the bullet and buy a new sub-amp.
Juan L.
AKA "MacGyver"
The following users liked this post:
PD27 (06-21-2018)
11-25-2009, 06:46 AM
#57
Registered User
iTrader: (2)

Join Date: Oct 2008
Location: Las Vegas
Posts: 206
Likes: 0
Received 0 Likes
on
0 Posts
Yay!!!, my sub works now. I don't think it ever work since I bought it 3 years ago. I was thinking the whole time how crappy the Bose system was and how little to no base it created. Now my system actually sounds decent.
I can't imagine the next person that ever gets this car will find all these random crap I have done to fix this car like this trick or the penny trick I did in the hatch to make it pop higher.
I can't imagine the next person that ever gets this car will find all these random crap I have done to fix this car like this trick or the penny trick I did in the hatch to make it pop higher.
11-30-2009, 03:44 PM
#60
Registered User
iTrader: (7)

Join Date: Apr 2008
Location: Davis, CA
Posts: 274
Likes: 0
Received 0 Likes
on
0 Posts
When i play CD, bass drop out. However, its ok when i listen to radio. ??? I removed the audio deck once. I think i might have got some wire loose or something. i can't think of any other reason. I tried applid pressure to the grey box but doesn't work. man, the bass drop out is driving me nuts.