DIY: Spring Installation #2 revised by YUSOSLO
 10-01-2008, 06:03 PM
#41
Registered User
iTrader: (32)

Join Date: Sep 2008
Location: Behind you, with a spoon
Posts: 3,928
Likes: 0
Received 0 Likes
on
0 Posts
Thumbs up to this write up.
To those asking about spring compressors, there is no need to use one if installing lowering springs back on the car. Once you get the stock springs/shocks off the front, just put them in your grass laying on it's side, step on the spring/top plate, and undo the center nut. Once undone, the shock will jump about 6 inches or so, no big deal. The lowering springs go on the shocks without nearly any tension, so you can just thread the nut on the shaft by hand to start it.
I didn't even use an impact wrench on the shaft nut. Just use an offset 17mm wrench while holding the flat portion of the shock shaft threads from the top with an adjustable wrench.
The rear spring is ease like the others said. It's very easy to figure out.
I have a 2007 Enth, just for your reference. I installed the Eibach pro-kit springs. Hope this is helpful.

 10-02-2008, 12:21 PM
#42

I just put my stock springs back on and after a week of driving, I took her in for alignment. To my dismay, there is uneven front caster, which cannot adjust. The alignment guy said nothing to worry about, but according to the specs, the difference in caster only allows up to .8 degrees difference in caster. I noticed the car pulls right, and I have to drive with the steering wheel cocked to the left most of the time (with lots of correcting). What bolts should I recheck to make sure my caster is not being thrown off by bad install?
02-15-2009, 04:46 PM
#43
Registered User
iTrader: (5)

Join Date: Feb 2007
Location: Oceanside, California
Posts: 1,163
Likes: 0
Received 0 Likes
on
0 Posts
Thanks to your write up and tips, this DIY challenge wasn't as hard as I thought, but because it was my first time it took me the whole 8 hrs to get it down. Well the time included installing the camber kit, rotating tires, which by the way I had to end up shelling out $400 dollars for a new set of new rear tires because while breaking the bead my cheap as* tires broke and bubbled out once they were inflated. That part sucked. Any who, the rear was no challenge at all but the front indeed was. Most definitely use: IMPACT WRENCH, SPRING COMPRESSORS, AND THE RIGHT TOOLS. Man, If it hadn't been for those two tools I would probably have take longer and been much harder. Thanks dude!
04-01-2009, 09:25 AM
#45

I just had a shop quote me $550 to install the eibach pro-kit.... that seemed high. They also said about removing the bump stops all together???? does that make sense... This is my first suspension mod and i'm kinda reading up and doing this on the fly.... Thanks for the help
05-15-2009, 10:33 PM
#46
Registered User
Join Date: Dec 2006
Location: Tyler, Tx
Posts: 1,253
Likes: 0
Received 0 Likes
on
0 Posts
i just did this install today, everything went smooth but now it seems there are noises(clanking) when i hit bumps or difference in road. the noise is coming from all four corners(mainly front). i did tanabe gf with 25mm wheel spacers. has anyone had this problem?the spring is tightly in there but seems like its trying to settle with the new added weight to them.
05-16-2009, 01:52 PM
#47
Registered User
iTrader: (30)

Join Date: Mar 2008
Location: S. CAL
Posts: 175
Likes: 0
Received 0 Likes
on
0 Posts
i did my install yesterday, rear is pretty easy, install toe bolt, camber arm all together.......but the front lower shock bolt is *****.......spray PB blaster like half can, air impact gun...still not work....then end up take to local shop for installation. $40 each side............this is my first time doing on suspension, not hard as you think, but must have the RIGHT tool and a helper!
05-16-2009, 07:06 PM
#48
Registered User
Join Date: Dec 2006
Location: Tyler, Tx
Posts: 1,253
Likes: 0
Received 0 Likes
on
0 Posts
okay i just tested it out now i has a creak/noise in the passenger side anybody might know what this is. im really thinking the bolt on the spring mount(i believe thats what its called) is not tightened all the way
 01-18-2010, 12:03 PM
#50
New Member
iTrader: (16)

Join Date: Apr 2007
Location: Denver
Posts: 399
Likes: 0
Received 0 Likes
on
0 Posts
Thanks for the DIY, was very helpful. I have an '06 Track, and removed the wheels and put all four corners on jackstands for my H&R Coilovers install (they reuse stock endplates, so it is similar to this spring job). Here are my observations:
p.s. I got my electric impact wrench at Harbor Freight Tools for $42! I also tried their spring compessors for $10, but they are absolute TRASH and fell apart in the middle of the me trying to get the first front endplate off. I was really lucky that it didn't hurt me or damage my car. I stepped up to sears craftsman coil spring compressors, way more expensive but they worked great.
- As mentioned before (in this thread, or another), the rears are a cake-walk and instill a false sense of how easy the job is going to be. They took me about 2 hours total (1.25 hours for first side, .75 hours for other side).
- I could not for the life of me get the fronts off without spring compressors and an impact wrench. I spent the better part of one evening trying to figure it out. All of the bolts were extremely tight, and I eventually got them all loose with much effort, but even when all the bolts were removed I still could not get enough room to remove the front strut. I don't know if this is because the '06 had "revised" spring rates, or because I had installed SS brake lines, and they didn't permit as much movement in the front spindle (they are significantly shorter than stock brembo lines). I easily spent 3 hours attempting to get this done (unsuccessfully) So, I purchased an electric impact wrench and spring compressors, and it made the job SO much easier. Doing the rest of the drivers side, and the passenger side completely only took two additional hours.
- You will definitely find it easier to remove and reinstall the front endplates if you have a high-offet box-end wrench (17mm) or something similar (I had a "dog-bone" wrench that I got for Christmas, worked perfect).
- If I had the tools in place ahead of time, I could have done this in 4 hours as a complete novice. I figure that next time, I will be able to do it in 3 or less.
p.s. I got my electric impact wrench at Harbor Freight Tools for $42! I also tried their spring compessors for $10, but they are absolute TRASH and fell apart in the middle of the me trying to get the first front endplate off. I was really lucky that it didn't hurt me or damage my car. I stepped up to sears craftsman coil spring compressors, way more expensive but they worked great.
 06-03-2010, 10:42 AM
#53
Registered User
iTrader: (2)

Join Date: Nov 2008
Location: memphis
Posts: 76
Likes: 0
Received 0 Likes
on
0 Posts
Just incase some people might not know... You can usually go to your local auto parts store and rent a spring compressor. They will give you a full refund when you return it. My local autozone does this. Just thought I'd post it so know one wastes there money!
Great DIY. I'll be installing Eibach sportlines tonight! Can't wait!!
Great DIY. I'll be installing Eibach sportlines tonight! Can't wait!!
 06-05-2010, 09:58 AM
#55
350Z-holic

iTrader: (60)
Join Date: Jan 2006
Location: San Antonio/I miss DFW, TX
Posts: 11,204
Likes: 0
Received 28 Likes
on
19 Posts
I would like to add this from the suspension 101 thread - Post #37
Okay,
I wanna add this....
Okay, remember in post#11
I talk about using the spring compressor tool for removing the oem springs from the factory shocks.....
ALTERNATE OPTION #1:
Well, I have done this before on a 2003 350z. which to my understanding has different shocks from the 2006???? correct me if im wrong please?
Whos to say they are longer or shorter, i dont know, but here goes:
Okay, you can remove the top CENTER BOLT from the shock using an impact gun!
1. Remove the entire front shock assembly and place it on the grass.
2. Get a heavy shop towel or Blanket and fold it over the spring and shock.
3. Have someone step on the assembly with their boot.
4. with a firm grib, but free and clear from the shock IMPACT off the top bolt.
THIS WILL RESULT IN A MINOR JOLT as the spring preload isnt much!!!!
Tada!!! no having to use spring compressor tools??? GET IT???
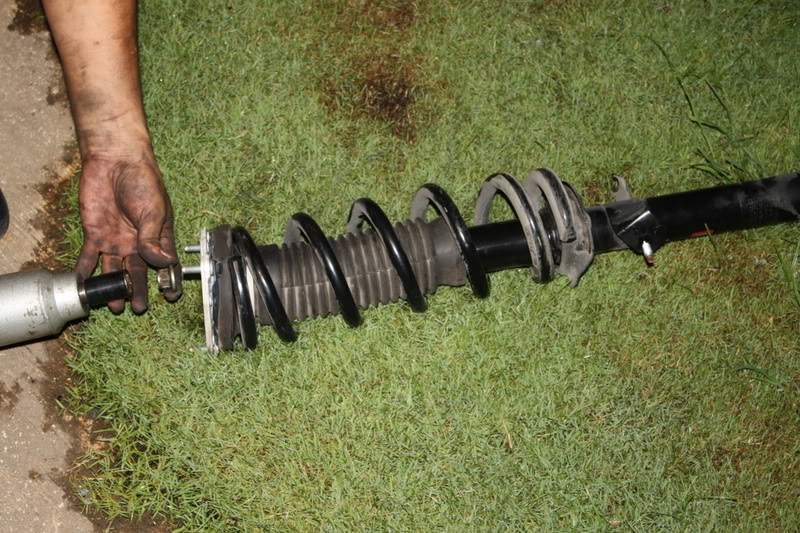
This is a pic showing a guy that just removed - using an impact -- the center bolt:
You can read my comments on this how to here as i did a G37 install for NEXX not to long ago:
http://teamlags.com/install-eibach-springs-g37/
USING AN IMPACT!!! must use an impact � YES, you can remove the top bolt.
For anyone trying this � YOU MUST USE AN IMPACT � put the impact inline with it and fire away on the impact TILL the nut fly's on the floor and your good.
REASON i say � if you DON�T use an impact and are simply turning that nut with a socket the tension is like he says � �really is no compression in the stock springs. just a bit of a jolt when it unbolts.� thats enough force on the spring that if you turn by hand, your gonna LIKELY STRIP THE LAST THREAD ON EITHER THE NUT OR THE SHOCK ROD OR BOTH.
I have seen many friends cry over screwing up their shocks this way�
THE IMPACT SPINS IT SO FAST YOUR FINE, but DONT do it by hand with hand tools�.its too slow and you run the risk of screwing up the threads�
ALTERNATE OPTION #2:
I have also done this as well on a 350z!
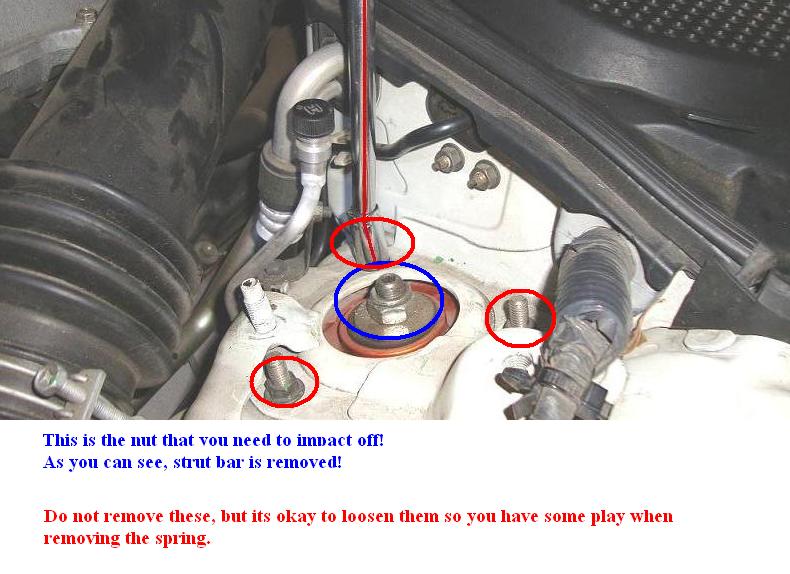
1. Jack the front of the car up ONLY!!! not front and rear, front only! use wheel chaulks at the rear wheels.....(with car jacked up the wheel hangs under weight obviously).
2. open hood, Remove the oem strut bar. DO NOT REMOVE THE 3 bolts holding the shock in place, if anything loosen them a bit, but do not remove them all the way! - loosen just to get some play in the assembly.....
3. get a floor jack and jack up on the tire shoving the front wheel back up into the wheel well, do not raise the car off the jack stands!!! be safe!!!
4. impact off the top nut since the strut bar is removed!
5. now slowly have a buddy bring down the floor jack while you "WEARING LEATHER GLOVES" grab the spring and shock from falling down and appart in the wheel well. this isnt too critical, lower the car wheel slowly.
SEE HERE:
GET IT?? no spring compressor tool needed...
TRUST ME - DO OPTION ONE!!! IMPACT METHOD!
option 2 on car is easy as well, but a pain to remove from the wheel well as its now longer due to being uncompressed!
-J
Okay,
I wanna add this....
Okay, remember in post#11
I talk about using the spring compressor tool for removing the oem springs from the factory shocks.....
ALTERNATE OPTION #1:
Well, I have done this before on a 2003 350z. which to my understanding has different shocks from the 2006???? correct me if im wrong please?
Whos to say they are longer or shorter, i dont know, but here goes:
Okay, you can remove the top CENTER BOLT from the shock using an impact gun!
1. Remove the entire front shock assembly and place it on the grass.
2. Get a heavy shop towel or Blanket and fold it over the spring and shock.
3. Have someone step on the assembly with their boot.
4. with a firm grib, but free and clear from the shock IMPACT off the top bolt.
THIS WILL RESULT IN A MINOR JOLT as the spring preload isnt much!!!!
Tada!!! no having to use spring compressor tools??? GET IT???
This is a pic showing a guy that just removed - using an impact -- the center bolt:
You can read my comments on this how to here as i did a G37 install for NEXX not to long ago:
http://teamlags.com/install-eibach-springs-g37/
USING AN IMPACT!!! must use an impact � YES, you can remove the top bolt.
For anyone trying this � YOU MUST USE AN IMPACT � put the impact inline with it and fire away on the impact TILL the nut fly's on the floor and your good.
REASON i say � if you DON�T use an impact and are simply turning that nut with a socket the tension is like he says � �really is no compression in the stock springs. just a bit of a jolt when it unbolts.� thats enough force on the spring that if you turn by hand, your gonna LIKELY STRIP THE LAST THREAD ON EITHER THE NUT OR THE SHOCK ROD OR BOTH.
I have seen many friends cry over screwing up their shocks this way�
THE IMPACT SPINS IT SO FAST YOUR FINE, but DONT do it by hand with hand tools�.its too slow and you run the risk of screwing up the threads�
ALTERNATE OPTION #2:
I have also done this as well on a 350z!
1. Jack the front of the car up ONLY!!! not front and rear, front only! use wheel chaulks at the rear wheels.....(with car jacked up the wheel hangs under weight obviously).
2. open hood, Remove the oem strut bar. DO NOT REMOVE THE 3 bolts holding the shock in place, if anything loosen them a bit, but do not remove them all the way! - loosen just to get some play in the assembly.....
3. get a floor jack and jack up on the tire shoving the front wheel back up into the wheel well, do not raise the car off the jack stands!!! be safe!!!
4. impact off the top nut since the strut bar is removed!
5. now slowly have a buddy bring down the floor jack while you "WEARING LEATHER GLOVES" grab the spring and shock from falling down and appart in the wheel well. this isnt too critical, lower the car wheel slowly.
SEE HERE:
GET IT?? no spring compressor tool needed...
TRUST ME - DO OPTION ONE!!! IMPACT METHOD!
option 2 on car is easy as well, but a pain to remove from the wheel well as its now longer due to being uncompressed!
-J

 11-30-2010, 08:05 AM
#60
Registered User

Join Date: Jul 2010
Location: Miramar Florida
Posts: 43
Likes: 0
Received 0 Likes
on
0 Posts
in the first post the author reffered to a sticky post with pictures of an original write up...
where can i find that post?
Im installing my gf210s on my z this weekend.
where can i find that post?
Im installing my gf210s on my z this weekend.

