Wheel Hub Assembly (wheel bearing) replacement - FRONT - HOW TO


 02-07-2011, 07:35 AM
#42
Registered User

Join Date: Jan 2011
Location: Here
Posts: 3
Likes: 0
Received 0 Likes
on
0 Posts
02-21-2011, 05:23 PM
#43
Registered User
Join Date: Jan 2011
Location: Here
Posts: 3
Likes: 0
Received 0 Likes
on
0 Posts
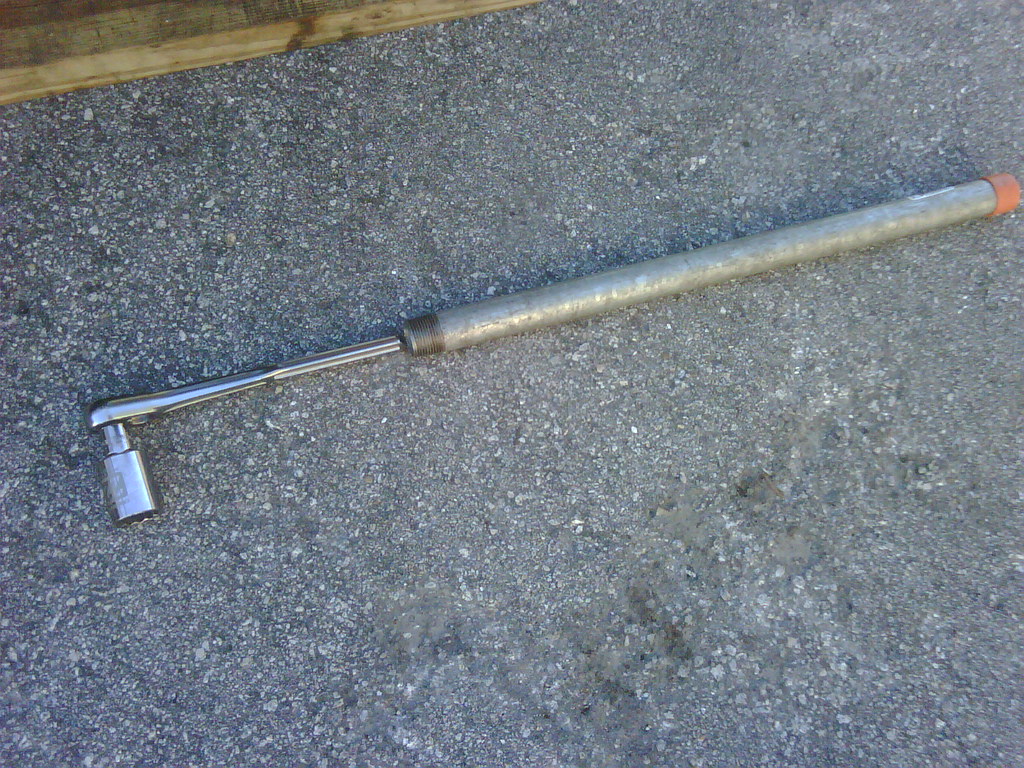
I did this to loosen the 2 22mm caliper bolts, and for the 4 bearing bolts I did this for 2 of them. And for the other 2 bearing bolts which you can't use the jack for because they are on the other side, I just put my foot on the breaker bar and I started jumping on it. Before you do this read my easy tip below...
EASY TIP: After you take the wheel off you can turn the steering wheel to make the bolts easily accessible and it will give you more room to stick your breaker bar/socket in. BE SURE BOTH SIDES ARE ON JACK STANDS. DO NOT TURN THE STEERING WHEEL IF THE OTHER SIDE IS NOT ON A JACK STAND. You will have to turn the wheel to get the 4th bearing bolt out. The 4th bolt is near the compression rod and your socket will not fit perfectly if your wheels are straight. Example, if you are changing the bearing on the passenger side then you turn the steering wheel to the passenger side. This will give you much better access at the caliper bolts and then bearing bolts.
WARNING 1: One stupid problem I encountered was that after I put the new bearing on I put the brake dust shield backwards so it was scraping the rotor. I was pissed. I had already torqued the 4 bearing bolts to spec. I had to take it off and flip the brake dust shield and then it was good. So before you take out the brake shield take note of how it is placed.
WARNING 2: The 4 bearing bolts are not evenly distanced. So align the new bearing first before screwing the bolts in. There are 2 bolts at the top and 2 bolts at the bottom. But the distance from the top and the bottom is different for the bolts on the right. I put it on upside down and I couldn't screw one of the bolts in. So put all 4 bolts in and then visually align them to the 4 holes on the bearing. I ran into this problem and I was pissed because I had already screwed in 3 of the bolts. I hadn't torqued them, but it takes for ever to screw/unscrew them.
With my tips above it will make it easier for you to remove and install the new bearing. It took me about 5 hours with these mistakes so it should take you less. I am going to do the driver side some time later when I have time. It hasn't gone bad yet, but it gives me peace of mind if I keep both sides "even".
02-28-2011, 12:37 AM
#44

Well, after almost 6 years of ownership, as well as membership on this site, I've decided to give back. I haven't seen a how to for replacing the front wheel hub assembly on the 350Z, so I decided to write one up since I was replacing mine.
This was done on my car, which is a 2003 Track model. Steps might be different on cars not equipped with the Brembo brakes.
Additionally, I take no responsibility for what happens to your car if you try to do this on your own. This i merely a documentation of my experience replacing the wheel hub assembly on my car.
Parts and Tools Needed:
17mm socket
22mm socket
socket wrench
torque wrench (if you want to be accurate when re-tightening bolts)
small extension for socket wrench
floor jack
jack stand
zip ties or string or wire
a breaker bar/cheater bar of some sort is helpful
Step 1:
Loosen the lug nuts on the wheel/s where you will be replacing the hub assembly.
Step 2:
Jack up the car and place jack stands. I have to drive onto a block of wood to get my car high enough to fit the jack under the side skirt. (Note: if you are unsure of where to jack up the car from or where to place the jack stands, there is a picture in the service manual, and also floating around on this site.)
Step 3:
Completely loosen lug nuts and remove wheel.

Step 4:
Remove the two 22mm bolts holding the brake caliper in place. I found it difficult to remove with just my 1/2" drive socket wrench, so I used a pipe on the wrench to provide extra leverage.
To provide some support for the brake caliper, I zip-tied it to the top of the control arm.

Step 5:
Remove the rotor from the hub. Some people have claimed to have trouble removing their rotor, but mine slide right off. If you have trouble I recommend figuring out a solution with a 2x4 and mallet.
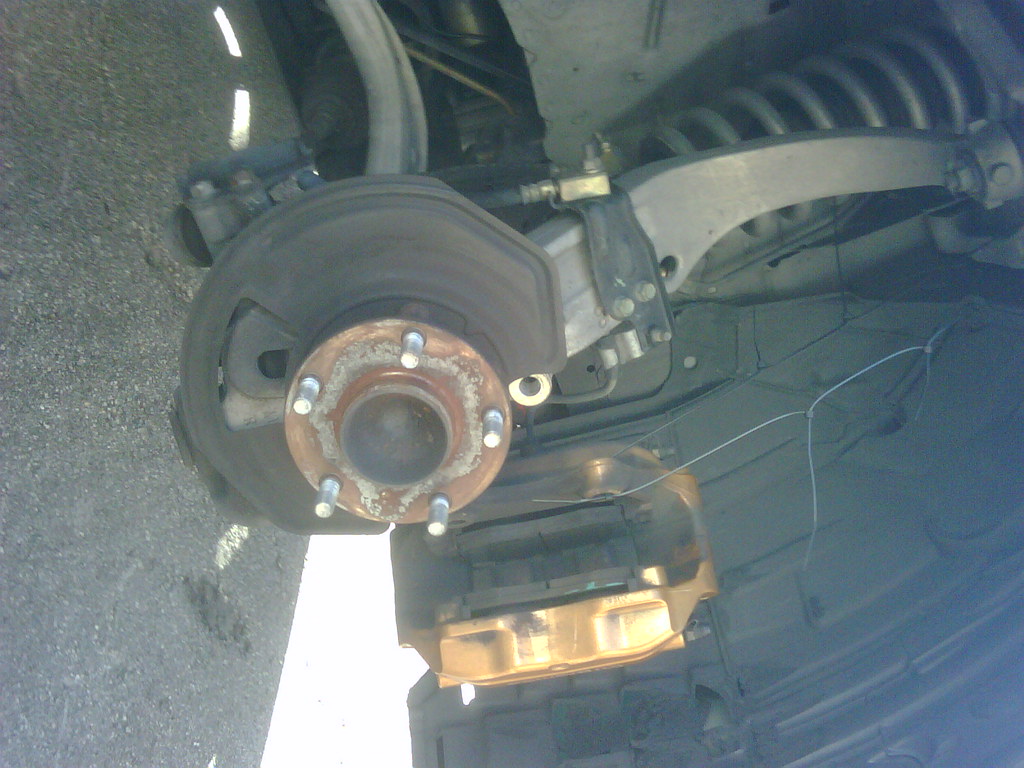
Step 6:
Remove the four 17mm bolts that hold the hub assembly in place. They are located behind the hub assembly. One of the bolts is difficult to access due to the steering knuckle being in the way. I jacked up the suspension a bit to try and make it easier, but am not really sure if it made any difference. You don't need to actually remove the bolt completely anyway so it's not a problem.
The brake shield will also come off, so note its orientation.
Caution: When removing the four bolts, be careful not to have the hub assembly fall off the car and onto your foot while wearing sandals. The hub assembly is pretty heavy, and will hurt your foot (ask me how I know! )
)

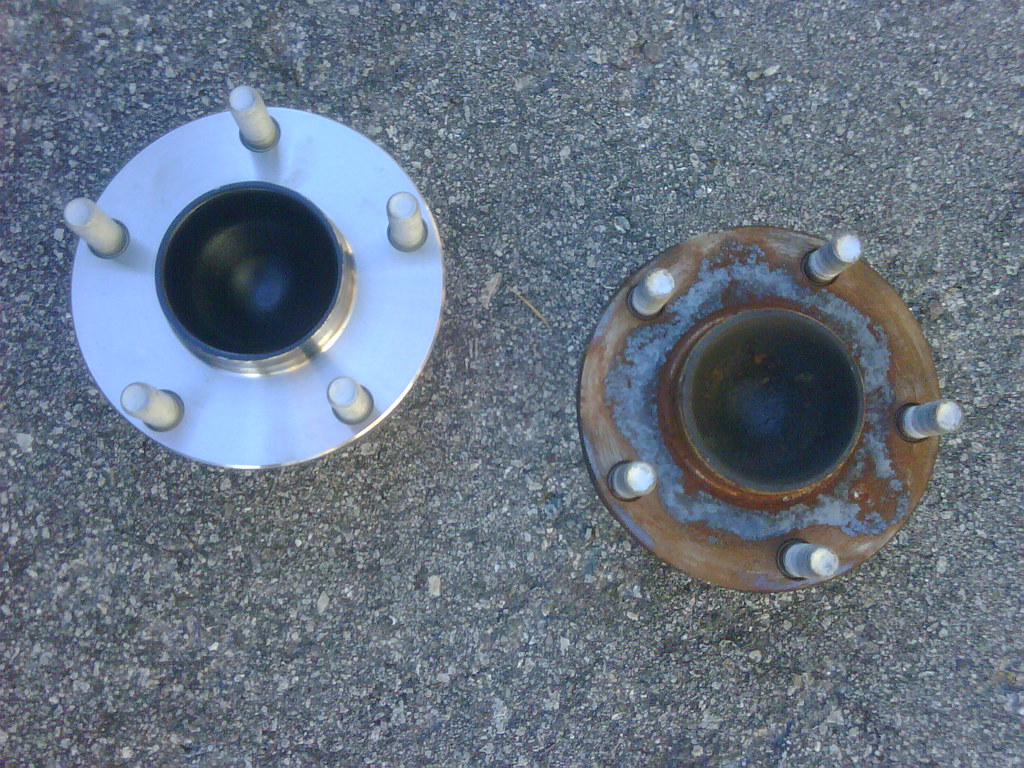
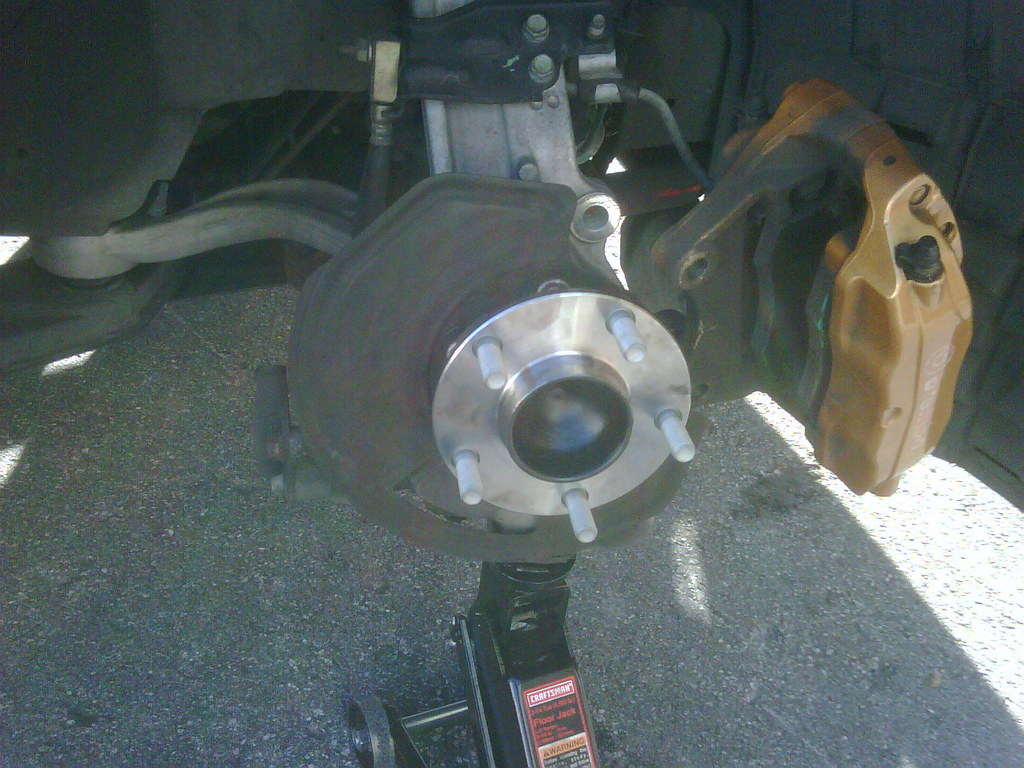
Step 7:
Put it all back together with the new hub assembly!
Torque specs are:
Four 17mm bolts holding hub assembly: 78.5-98.1nm/ 58-72ft-lb
Two 22mm bolts holding brake caliper: 151-152nm/ 111.4-112.1lb-ft

Step 8:
Take car for test drive and enjoy improved driving.

Step 9:
Kick back and enjoy a brewsky of your choice (of in my case what was given to me for free... thanks w0ady!)

The car drives soooo much better now that I replaced the faulty/worn bearing. Before I had serious noise coming from that bearing. It sounded like my friends lifted truck on off roading tires, but worse.
My brake pedal also feels much improved. The engagement of the brakes is way more solid and the pedal is much less mushy.
Overall, this is a pretty simple DIY. This was my first time replacing a part like this, and it took me about 45 min to replace the front passenger side assembly, start to finish. If you can lift the car and remove the wheel, you should be able to replace the hub assembly.
This was done on my car, which is a 2003 Track model. Steps might be different on cars not equipped with the Brembo brakes.
Additionally, I take no responsibility for what happens to your car if you try to do this on your own. This i merely a documentation of my experience replacing the wheel hub assembly on my car.
Parts and Tools Needed:
17mm socket
22mm socket
socket wrench
torque wrench (if you want to be accurate when re-tightening bolts)
small extension for socket wrench
floor jack
jack stand
zip ties or string or wire
a breaker bar/cheater bar of some sort is helpful
Step 1:
Loosen the lug nuts on the wheel/s where you will be replacing the hub assembly.
Step 2:
Jack up the car and place jack stands. I have to drive onto a block of wood to get my car high enough to fit the jack under the side skirt. (Note: if you are unsure of where to jack up the car from or where to place the jack stands, there is a picture in the service manual, and also floating around on this site.)
Step 3:
Completely loosen lug nuts and remove wheel.
Step 4:
Remove the two 22mm bolts holding the brake caliper in place. I found it difficult to remove with just my 1/2" drive socket wrench, so I used a pipe on the wrench to provide extra leverage.
To provide some support for the brake caliper, I zip-tied it to the top of the control arm.
Step 5:
Remove the rotor from the hub. Some people have claimed to have trouble removing their rotor, but mine slide right off. If you have trouble I recommend figuring out a solution with a 2x4 and mallet.
Step 6:
Remove the four 17mm bolts that hold the hub assembly in place. They are located behind the hub assembly. One of the bolts is difficult to access due to the steering knuckle being in the way. I jacked up the suspension a bit to try and make it easier, but am not really sure if it made any difference. You don't need to actually remove the bolt completely anyway so it's not a problem.
The brake shield will also come off, so note its orientation.
Caution: When removing the four bolts, be careful not to have the hub assembly fall off the car and onto your foot while wearing sandals. The hub assembly is pretty heavy, and will hurt your foot (ask me how I know!
)Step 7:
Put it all back together with the new hub assembly!
Torque specs are:
Four 17mm bolts holding hub assembly: 78.5-98.1nm/ 58-72ft-lb
Two 22mm bolts holding brake caliper: 151-152nm/ 111.4-112.1lb-ft
Step 8:
Take car for test drive and enjoy improved driving.
Step 9:
Kick back and enjoy a brewsky of your choice (of in my case what was given to me for free... thanks w0ady!)
The car drives soooo much better now that I replaced the faulty/worn bearing. Before I had serious noise coming from that bearing. It sounded like my friends lifted truck on off roading tires, but worse.
My brake pedal also feels much improved. The engagement of the brakes is way more solid and the pedal is much less mushy.
Overall, this is a pretty simple DIY. This was my first time replacing a part like this, and it took me about 45 min to replace the front passenger side assembly, start to finish. If you can lift the car and remove the wheel, you should be able to replace the hub assembly.
i dont know what happened but my steering wheel got really stiff compared to when it was new. i thought it has to do with alignment but some told me it might be wheel bearing too. Sometimes it make funny noises and vibrate when i turn the wheel while the car is in Park. please help. thanks
02-28-2011, 11:02 AM
#45
when your steering wheel is too stiff does that have anything to do with wheel bearing?
i dont know what happened but my steering wheel got really stiff compared to when it was new. i thought it has to do with alignment but some told me it might be wheel bearing too. Sometimes it make funny noises and vibrate when i turn the wheel while the car is in Park. please help. thanks
i dont know what happened but my steering wheel got really stiff compared to when it was new. i thought it has to do with alignment but some told me it might be wheel bearing too. Sometimes it make funny noises and vibrate when i turn the wheel while the car is in Park. please help. thanks

 08-05-2011, 09:36 AM
#48
Registered User

Join Date: Aug 2011
Location: Canada
Posts: 9
Likes: 0
Received 0 Likes
on
0 Posts
Hi everybody.
Seems like my front bearing is also due to be replaced. I have an annoying sound when I go in a straight line and the sound is becomming louder as I turn right, and stop as I turn left so I guess my front left bearing is dead.
I've read all this topic and I have some questions. First of all, I'm not a mechanic but this DIY seems pretty easy.
2 questions :
-Is it really a problem if I do not torque the bolts to the precise torque specs (as I don't have access to a torque wrench)?
-Someone post that If i want to turn the wheel to have a better access, I need to lift the whole front of the car. My question is why can't I lift only the driver side and turn the wheel?
Thanks a lot for your answers!
08-06-2011, 12:36 PM
#49

Torquing down the bolts to factory spec is ideal and I personally would not drive the car without.
Despite this the bolts are threading into the steel of the hub and large diameter to boot. I would say as tight as possible by hand (normal 3/8 wrench length) then 1/4 to 1/2 turn more would problably be past factory spec and unlikely overstress the threads.
As far as jacking one side of the car and turning the wheel I don't see any significant issue.
Hi everybody.
Seems like my front bearing is also due to be replaced. I have an annoying sound when I go in a straight line and the sound is becomming louder as I turn right, and stop as I turn left so I guess my front left bearing is dead.
I've read all this topic and I have some questions. First of all, I'm not a mechanic but this DIY seems pretty easy.
2 questions :
-Is it really a problem if I do not torque the bolts to the precise torque specs (as I don't have access to a torque wrench)?
-Someone post that If i want to turn the wheel to have a better access, I need to lift the whole front of the car. My question is why can't I lift only the driver side and turn the wheel?
Thanks a lot for your answers!
Seems like my front bearing is also due to be replaced. I have an annoying sound when I go in a straight line and the sound is becomming louder as I turn right, and stop as I turn left so I guess my front left bearing is dead.
I've read all this topic and I have some questions. First of all, I'm not a mechanic but this DIY seems pretty easy.
2 questions :
-Is it really a problem if I do not torque the bolts to the precise torque specs (as I don't have access to a torque wrench)?
-Someone post that If i want to turn the wheel to have a better access, I need to lift the whole front of the car. My question is why can't I lift only the driver side and turn the wheel?
Thanks a lot for your answers!
 11-18-2011, 08:59 AM
#51

Good thread!
My symptoms were a loud rotating noise that increase with speed and wheel vibration. Also if I slightly jerk the wheel to side of the bad bearing it would vibrate.
If you jack up the car and spin the wheels with your hand fast as you can, it should make a noise. Kinda like metallic grinding or crunching noise. Compare both sides, and you will see the difference, it should be quiet.
12-02-2011, 10:54 AM
#52

Thanks for the write up I just replaced this. By the way Penetrating oil (liquid wrench) is a gift from god. I hammered on the bearing for a good 10 minutes and it didn't budge. I went out and got some liquid wrench, sprayed it on, waited 10 minutes and it knocked right out.
Mine made a roaring noise going above 40-50 for the past year but I would wiggle the tire and spin the tire when it was jacked up and it seemed alright. Even spinning it there was no noise. Finally convinced myself to replace the bearing assembly and my car is nice and quiet again. Thanks for this.
Good thread!
My symptoms were a loud rotating noise that increase with speed and wheel vibration. Also if I slightly jerk the wheel to side of the bad bearing it would vibrate.
If you jack up the car and spin the wheels with your hand fast as you can, it should make a noise. Kinda like metallic grinding or crunching noise. Compare both sides, and you will see the difference, it should be quiet.
My symptoms were a loud rotating noise that increase with speed and wheel vibration. Also if I slightly jerk the wheel to side of the bad bearing it would vibrate.
If you jack up the car and spin the wheels with your hand fast as you can, it should make a noise. Kinda like metallic grinding or crunching noise. Compare both sides, and you will see the difference, it should be quiet.
Mine made a roaring noise going above 40-50 for the past year but I would wiggle the tire and spin the tire when it was jacked up and it seemed alright. Even spinning it there was no noise. Finally convinced myself to replace the bearing assembly and my car is nice and quiet again. Thanks for this.
03-30-2012, 03:44 PM
#53
Living in 350Z

iTrader: (30)
Join Date: May 2009
Location: Spartanburg(SparkleCity), SC
Posts: 4,293
Likes: 0
Received 2 Likes
on
2 Posts
Did anyone else have problems removing the hubs? I had done this previously on my roadster and had no problem separating the hub from the arm. However on this coupe I've tried pry bar, pb blaster, hammer, everything… and I still can't get the dang hub to pull loose???
04-07-2012, 08:19 PM
#54
Registered User
iTrader: (14)

Join Date: Oct 2005
Location: Jacksonville & Ft Laud, FL
Posts: 255
Likes: 0
Received 0 Likes
on
0 Posts
Did anyone else have problems removing the hubs? I had done this previously on my roadster and had no problem separating the hub from the arm. However on this coupe I've tried pry bar, pb blaster, hammer, everything� and I still can't get the dang hub to pull loose???
Adrian
 06-21-2012, 04:31 PM
#57

How the heck do you remove the last 17mm bolt...the one that is the most difficult to take out..I got everything but that one...I literally spent more than an hour just on that one in particular behind the hub assembly...is there a special tool needed...I've tried every possible socket plus liquid wrench...I cant get a good enough fitment because of the compression rod/knuckle being in the way...I've turned the wheel as well along with lifting the suspension with jack...no go..any advice is appreciated...thanks!
06-22-2012, 07:08 PM
#59
How the heck do you remove the last 17mm bolt...the one that is the most difficult to take out..I got everything but that one...I literally spent more than an hour just on that one in particular behind the hub assembly...is there a special tool needed...I've tried every possible socket plus liquid wrench...I cant get a good enough fitment because of the compression rod/knuckle being in the way...I've turned the wheel as well along with lifting the suspension with jack...no go..any advice is appreciated...thanks!
06-22-2012, 09:47 PM
#60
Hey dragon. Definitely no special tools required since I only have a pretty basic set of tools myself. I didn't take off or undo any parts that weren't mentioned in my write up so it is just a matter of finding correct angle to get at the bolt. Maybe an extension is needed to give the wrench more clearence Sorry I don't remember anything more specifically. If it's a matter of just not being able to apply enough force, find a way to extend the length of your lever. I was using a pretty long pole for extra leverage.
I made an attempt at removing the compression rod ball joint out of the way, but I can not get it out with a regular ratchet as the stud spins with the nut once loosened. I tried using vice grips for the stud to keep in place but it was a no go. I'm probably going to have to get an impact wrench to actually remove it unless you have any other suggestions. Thanks again for the response.