DIY - Lower Control Arm Bushing Replacement - Translink
 05-16-2013, 05:46 PM
#161
350Z-holic

Thread Starter
iTrader: (60)
Join Date: Jan 2006
Location: San Antonio/I miss DFW, TX
Posts: 11,204
Likes: 0
Received 28 Likes
on
19 Posts
JasonZ - thanks for an awesome write-up! 
I'm getting into auto mechanics, and learning my way around a 350Z, so these how-to threads are incredibly useful. I learned a couple things in the process of replacing my lower control arm yesterday - hopefully no more creaking and grinding . Had a couple questions that might help other newbies to the process...
I had a heck of a time removing the bolt holding the sway bar connecting rod to the control arm (location #3), until I got a jack under the control arm and cranked it up to take the load off the bolt. I'm realizing now that this is probably because I only had one side of the car on a stand, so the sway bar was loaded by the wheel on the ground on the other side. Does this make sense - should both sides be jacked up to make this easier?
The ball joint (location #1) caused me some grief, because the bolt in the ball joint just spins when I turn the (somewhat corroded) nut on the top. I ended up getting it off by disconnecting the rest of the control arm and hauling down on the joint to make it bind while turning the nut. But it leaked some grease out of the boot, and I fear I damaged the ball joint in the process. How do you best keep the bolt from spinning when you take that nut off?
I'm getting into auto mechanics, and learning my way around a 350Z, so these how-to threads are incredibly useful. I learned a couple things in the process of replacing my lower control arm yesterday - hopefully no more creaking and grinding
. Had a couple questions that might help other newbies to the process...I had a heck of a time removing the bolt holding the sway bar connecting rod to the control arm (location #3), until I got a jack under the control arm and cranked it up to take the load off the bolt. I'm realizing now that this is probably because I only had one side of the car on a stand, so the sway bar was loaded by the wheel on the ground on the other side. Does this make sense - should both sides be jacked up to make this easier?
The ball joint (location #1) caused me some grief, because the bolt in the ball joint just spins when I turn the (somewhat corroded) nut on the top. I ended up getting it off by disconnecting the rest of the control arm and hauling down on the joint to make it bind while turning the nut. But it leaked some grease out of the boot, and I fear I damaged the ball joint in the process. How do you best keep the bolt from spinning when you take that nut off?
Q2: if you run into that situation then you need to put a jack at the bottom and press up adding weight force so that the ball joint wont spin...
- other options are to use an impact....and both after using pb blaster, etc..
-J
 10-27-2013, 07:38 PM
#162

Bumping this as opposed to creating a new thread and asking...I just swapped out the transverse/control arm bushings and have everything bolted up and the car in the air. I noticed that when nearing full lock this arm will slightly pull with the spindle as it turns.
This is my first z so I'm not sure if this is normal or not. This was the diy I used and figured this was appropriate place to ask incase any other newcomers noticed the same thing.
This is my first z so I'm not sure if this is normal or not. This was the diy I used and figured this was appropriate place to ask incase any other newcomers noticed the same thing.
10-28-2013, 06:36 AM
#163
350Z-holic
Thread Starter
iTrader: (60)
Join Date: Jan 2006
Location: San Antonio/I miss DFW, TX
Posts: 11,204
Likes: 0
Received 28 Likes
on
19 Posts
^ ya, that sounds right.........hence the torn bushing via steering lock and braking loads.
The 370z and G37 they fix this by making the lower two arms one piece wishbone.
-J
The 370z and G37 they fix this by making the lower two arms one piece wishbone.
-J
11-22-2013, 09:43 PM
#165

I have to replace these bushings, but i'm stuck between brands i have the prothane kit 14-2007 ( http://www.ebay.com/itm/Prothane-Front-Upper-Lower-Control-Arm-Kit-Nissan-350Z-Infinti-G35-Red-/301012920633?pt=Motors_Car_Truck_Parts_Accessories&fits=Model%3A350Z&hash=item4615c4a939&vxp=mtr )
Vs the w5991 and w5992 so which brand do you guys suggest?
Considering everything, i think prothane has lifetime warranty and costs a little less
any experience with the prothane anyone?
any input will be appreciated. thanks
Vs the w5991 and w5992 so which brand do you guys suggest?
Considering everything, i think prothane has lifetime warranty and costs a little less
any experience with the prothane anyone?
any input will be appreciated. thanks
Last edited by jes1888; 11-22-2013 at 09:47 PM.
01-08-2014, 05:37 AM
#166
Anyone????????
i have to replace these bushings, but i'm stuck between brands i have the prothane kit 14-2007 ( prothane front upper lower control arm kit nissan 350z infinti g35 red | ebay )
vs the w5991 and w5992 so which brand do you guys suggest?
Considering everything, i think prothane has lifetime warranty and costs a little less
any experience with the prothane anyone?
Any input will be appreciated. Thanks
vs the w5991 and w5992 so which brand do you guys suggest?
Considering everything, i think prothane has lifetime warranty and costs a little less
any experience with the prothane anyone?
Any input will be appreciated. Thanks
01-17-2014, 07:02 PM
#167

Go with Whiteline for the strut mount, and SPL for the "inner". Everything else is junk......seriously. I will be doing this job shortly along with the compression arm. Will be running SPL compression bushings.
Thinking of buying a press. I plan on doing my rear wheel bearings in the future. Anyone think a 12T press would be sufficient. I know it will handle bushing no problem. Not sure if it has enough muscle to press out wheel bearings.
I will take pictures and post them.
Thinking of buying a press. I plan on doing my rear wheel bearings in the future. Anyone think a 12T press would be sufficient. I know it will handle bushing no problem. Not sure if it has enough muscle to press out wheel bearings.
I will take pictures and post them.
01-17-2014, 07:10 PM
#168
Question I have: Since I am running SPL inner I will not need a socket or pipe to install. Simply a plate is fine to press in, But I am also installing Whiteline strut bushings. Can I just use a plate to press these in, or do i need an adapter/pipe/socket to press on the race instead of the face. There is only about .25 inch of poly or whatever material that sits above the race. Not sure if pressing on the face of the poly would damage the bushing.
01-19-2014, 06:00 AM
#169

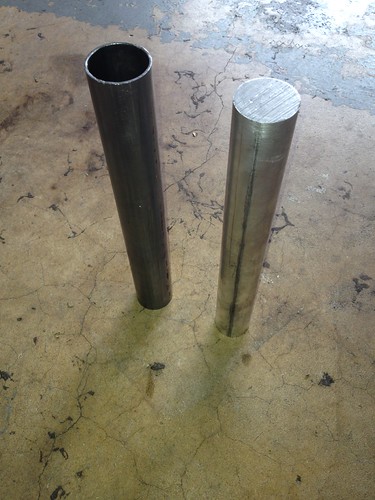
I have some 1 5/8 od 1.495 id dom for pressing the whiteline in. It was all i could find, hope the wall thickness is adequate.
Have 1.5od 6101 round bar for pressing out the old one.
Ill update on how the dom works
just sketched it out looks like it should definitely work, there is quite a bit of overlap
Have 1.5od 6101 round bar for pressing out the old one.
Ill update on how the dom works
just sketched it out looks like it should definitely work, there is quite a bit of overlap
Last edited by guitman32; 01-19-2014 at 03:45 PM.
01-25-2014, 03:12 PM
#170
did my lca inner and lower shock today using a 12 ton press, worked great.
Btw, the race for the bushings on one side of the arm has a beveled edge, the other is just flat...you push it out with the beveled side down, you push it in with the beveled edge up. Dont know if this was already mentioned.
Im going to have 6 extra sets of 1.5odx1.5 long solid aluminum tube (to press out the old) and dom steel tube that fits over the whiteline snugly at 1.5" long (to press in the new). These are extra stock from what i used today, only i wont be including any flat plate to put over the top of the dom tube.
$20 shipped if anyone wants.
I do have some flat plate that i used but it bowed after doing both arms because its too thin. I can include a rough cut piece of this if anyone wants, just know its a one use deal lol.
Last edited by guitman32; 01-25-2014 at 06:45 PM.
04-24-2014, 05:45 PM
#171

So I bought the Whiteline lower inner bushing and lower strut mount bushing over the winter with the intentions of installing them this year.
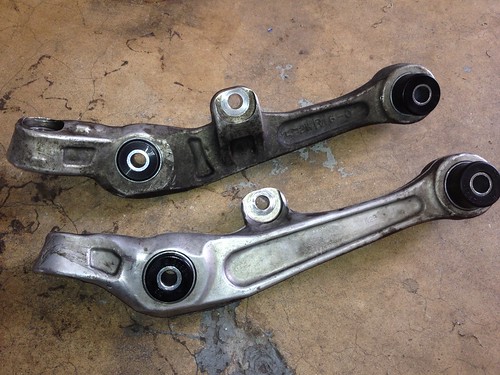
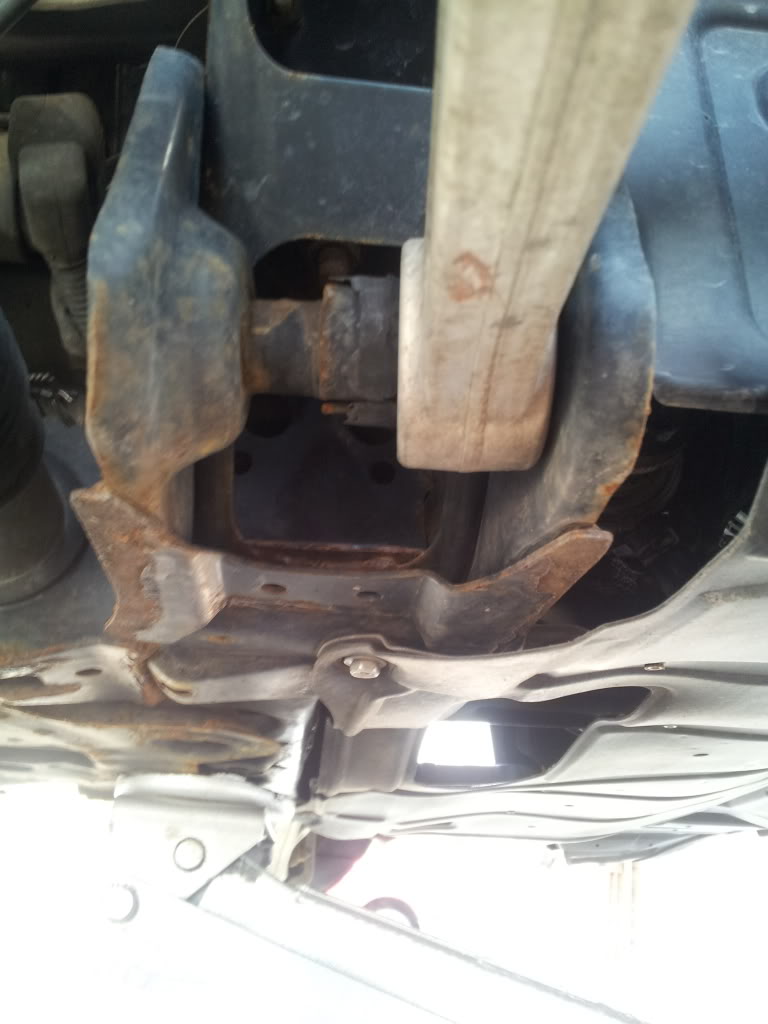
Monday I'm under my car to change the front upper control arms and I see this...
So I got around to installing the new bushings today. Phew. My passenger side inner bushing just fell out of the inner sleeve when I took it off the car.
Used a 12ton shop press and everything pressed out like butter. My only hang up was the dam rusted cotter pins on the tie rods (f'ing Canadian winter rusting everything!)

 06-07-2014, 09:00 AM
#175
350Z-holic
Thread Starter
iTrader: (60)
Join Date: Jan 2006
Location: San Antonio/I miss DFW, TX
Posts: 11,204
Likes: 0
Received 28 Likes
on
19 Posts
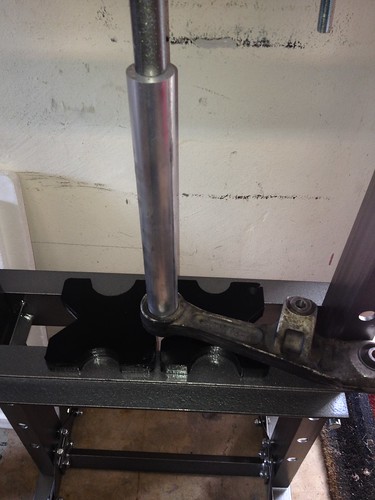
what he said! to go back into why we are using it, we are going to local steel supply places and purchasing the steel to use as a catch!! ie, a small length steel DOM tube is used at the bottom so that when you press the old bushing out of the arm, the bushing falls into the Inner diameter of the DOM purchased....the sizes are given that others have used in early in the thread.
see here:
see here:
06-07-2014, 09:02 AM
#176
Registered User

Join Date: Jun 2014
Location: Wisconsin
Posts: 4
Likes: 0
Received 0 Likes
on
0 Posts
derp i used to setup steel tubing mills to roll up the coils of sheet metal i shoulda known that lmao. I see why one would be more reliable for a press tool for sure ty for the advice
So im kind of concerned that my race might be damaged before i take out the control arms, my bushing looks like its gone, although it doesnt look quite as bad as joe's theres not really any rust just a flatened remnant of a bushing. cross ur fingers for me i really dont want to fork out for new control arms
So im kind of concerned that my race might be damaged before i take out the control arms, my bushing looks like its gone, although it doesnt look quite as bad as joe's theres not really any rust just a flatened remnant of a bushing. cross ur fingers for me i really dont want to fork out for new control arms
Last edited by awakened2001; 06-07-2014 at 09:03 AM.
06-08-2014, 09:28 PM
#177
Registered User

Join Date: Jun 2014
Location: Los Angeles
Posts: 2
Likes: 0
Received 0 Likes
on
0 Posts
Hi all,
Quick question, for those who have energy suspensions LCA inner bushings, the install is just the 2 Poly sleeves inserted to the arm with the metal tube inserted in the middle correct? There is no race tube as with the whitelines?
I may go with energys since the install doesn't require a press and I don't mind minor noises associated with them as long as they keep my LCA centered and the steering feels good. My g sedan is my DD and family car, so never gonna do track days or even spirited road driving. My inners are shot just like the pics on the first page.
06-08-2014, 09:30 PM
#178
Registered User
Join Date: Jun 2014
Location: Los Angeles
Posts: 2
Likes: 0
Received 0 Likes
on
0 Posts
Cool, so I just finished my front LCA inners using ES bushings and the install was simple. The old bushings were pressed out using a 29mm socket and a ball joint press I rented at autozone. Then I just hand pressed the ES bushings greased them with white lithium and torqued them down. I'm sure I don't have to worry about them anymore since it's just my DD.
Last edited by RUBmyGnee; 06-15-2014 at 10:42 AM. Reason: Double
07-20-2014, 10:37 PM
#179
Holy crap spent a week working on my cars suspension. SPL rear camber arms, front upper control arms, front bushing on lower control arm, compression rod bushings, and Energy bushing for shock bushing on lower control arm along with lower ball joints on spindle.
All bushings were shot except for the shock bushing.
All I can say is how well the car handles now its just incredible. I also flushed brake system with synthetic fluid and what a difference there too. Braking is great handleing is great I just need to get accustomed to the steering being a little more stiff.
Im guessing that will loosen up while all the parts get broken in.
I am so glad I have found this site and all its great assistance with installations and how to's.
I last thing I have to do for now is extend the toe bolt slot and install the eccentric washers from SPC.
Oh almost for got I also installed the lockout washers from SPL for the camber arms.
The toe lockouts will be installed once I get coilovers or if I stay oem shock spring setup I'll have to get the SPL midlink.
Everybody have a good week
08-19-2014, 11:13 AM
#180
New Member

To all that are contemplating on performing this DIY (replacement of Translink and Lower Compression Arm bushings). Removal/replacement during this DIY is not for the "faint of heart" or for someone that does not have patience and the right tools! Trust me!! The translinks we're not too bad, however the Compression Arm bushings were a "beast" of a job. Just trying to get the arms off were trouble. I used a 42" pry bar and lots of PB Blaster to try and get the arms off and it took quite some time. I actually had to cut the bushings and pry the inner sleeves off due to build up of rust and corrosion inside the bushing sleeve against the stud (during removal of the Compression Arms). And if you are thinking of replacing the lower ball joints, better to have an impact gun, compressor and ball joint removal tool. These are also a beast!!! Prepare to spend lots of time and energy on this DIY. I have an '03Z, Touring, not lowered. Best of luck!!