DIY - SPL Upper Control Arm Install - Extra shims made!
 03-09-2010, 10:18 AM
#1
350Z-holic

Thread Starter
iTrader: (60)
Join Date: Jan 2006
Location: San Antonio/I miss DFW, TX
Posts: 11,204
Likes: 0
Received 28 Likes
on
19 Posts
Okay so took the time to take pics and do the SPL front upper control arms install.
Thanks to acidjake75 and AllstarE4 for helping me out.
This is the SPL instruction manual PDF:
http://www.splparts.com/doc/SPLFUAZ33v2.pdf
They simply states: "Remove the upper control arm" so i figured ill give a bit more insight to the install, rundown and quick review of the product, etc..
SPL's pics:


-J
Thanks to acidjake75 and AllstarE4 for helping me out.
This is the SPL instruction manual PDF:
http://www.splparts.com/doc/SPLFUAZ33v2.pdf
They simply states: "Remove the upper control arm" so i figured ill give a bit more insight to the install, rundown and quick review of the product, etc..
SPL's pics:
-J
Last edited by JasonZ-YA; 03-09-2010 at 11:06 AM.
 03-09-2010, 10:21 AM
#2
350Z-holic
Thread Starter
iTrader: (60)
Join Date: Jan 2006
Location: San Antonio/I miss DFW, TX
Posts: 11,204
Likes: 0
Received 28 Likes
on
19 Posts
Okay what you see is what you get.


Okay, I personnally didnt like this - but some of the stuff on the arms are SAE.....ya ya.....i should have them and i do, but that crap is in a tool box in the shed.........this was honestly the first time i have had to use SAE in a long time.
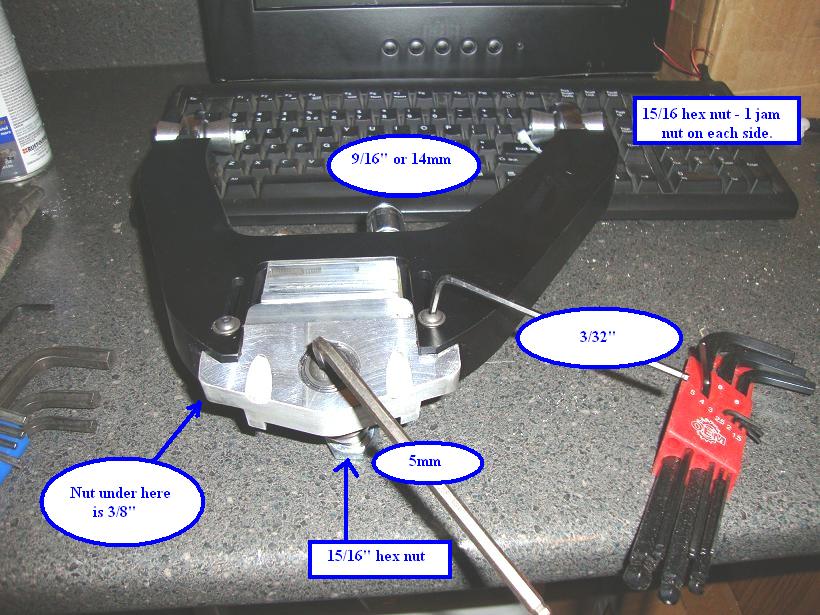
No biggy i guess.......but i figured i would mention it, so everyone knows whats all needed/involved.
-J
Okay, I personnally didnt like this - but some of the stuff on the arms are SAE.....ya ya.....i should have them and i do, but that crap is in a tool box in the shed.........this was honestly the first time i have had to use SAE in a long time.
No biggy i guess.......but i figured i would mention it, so everyone knows whats all needed/involved.
-J
03-09-2010, 10:29 AM
#3
350Z-holic
Thread Starter
iTrader: (60)
Join Date: Jan 2006
Location: San Antonio/I miss DFW, TX
Posts: 11,204
Likes: 0
Received 28 Likes
on
19 Posts
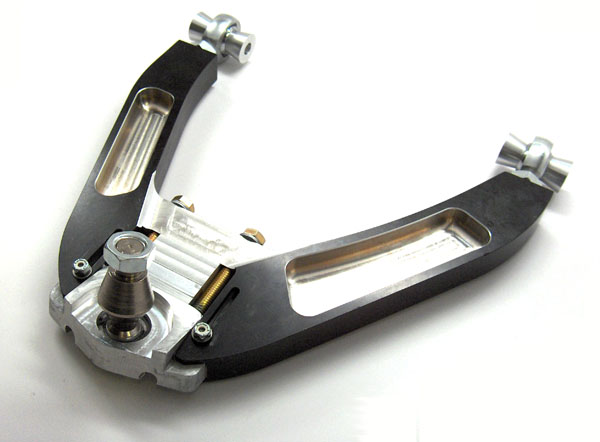
Okay quick run down on the beauty of SPL upper control arms.
They are camber and Caster adjustable - and they do that independently of one another.
PIC:
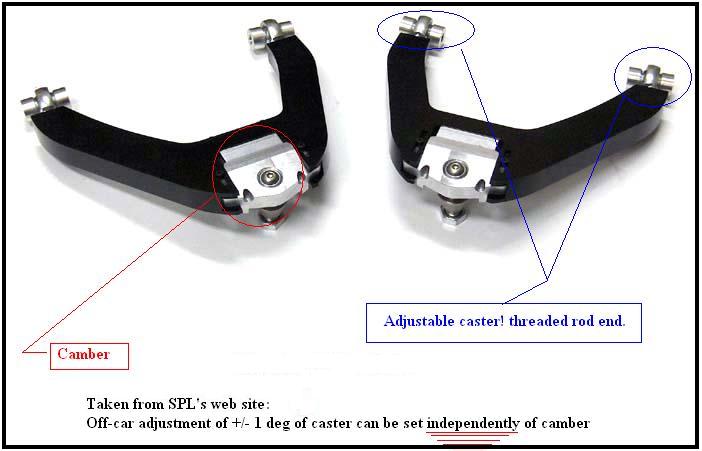
Honestly, i don't know why other companies like cusco, etc don't offer thread rod end style attachment ends on their UCA's to adjust caster and offer them as "advanced" models or some crap to compete with spl but oh well.
To my knowledge SPC is the only other UCA out there that can adjust caster, but it does it at the same time as camber, so ya.....if you know anything about the two, you will know that bites.
CAMBER:
See the win situation is that you can roll around town all day long with say -1.0 camber up front and be within oem spec.
you can show up to an event, remove a shim! and KNOW you are at -2.0 or remove two shims and know you are at -2.5, etc.
SEE HERE:
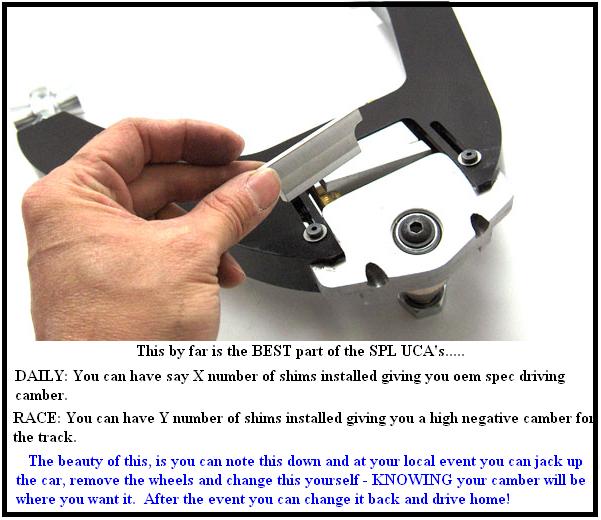
Then after the event you can put XY amount of shims back into the spl uca and drive home.
OF course to be able to do this, the INITIAL alignment will have to be done twice, with XY number of shims for OEM spec and then experiment with XYZ number of shims for race spec, get what im saying?
They are camber and Caster adjustable - and they do that independently of one another.
PIC:
Honestly, i don't know why other companies like cusco, etc don't offer thread rod end style attachment ends on their UCA's to adjust caster and offer them as "advanced" models or some crap to compete with spl but oh well.
To my knowledge SPC is the only other UCA out there that can adjust caster, but it does it at the same time as camber, so ya.....if you know anything about the two, you will know that bites.
CAMBER:
See the win situation is that you can roll around town all day long with say -1.0 camber up front and be within oem spec.
you can show up to an event, remove a shim! and KNOW you are at -2.0 or remove two shims and know you are at -2.5, etc.
SEE HERE:
Then after the event you can put XY amount of shims back into the spl uca and drive home.
OF course to be able to do this, the INITIAL alignment will have to be done twice, with XY number of shims for OEM spec and then experiment with XYZ number of shims for race spec, get what im saying?
03-09-2010, 10:35 AM
#4
350Z-holic
Thread Starter
iTrader: (60)
Join Date: Jan 2006
Location: San Antonio/I miss DFW, TX
Posts: 11,204
Likes: 0
Received 28 Likes
on
19 Posts
OKAY, Lets pretend you have the OEM strut bar.
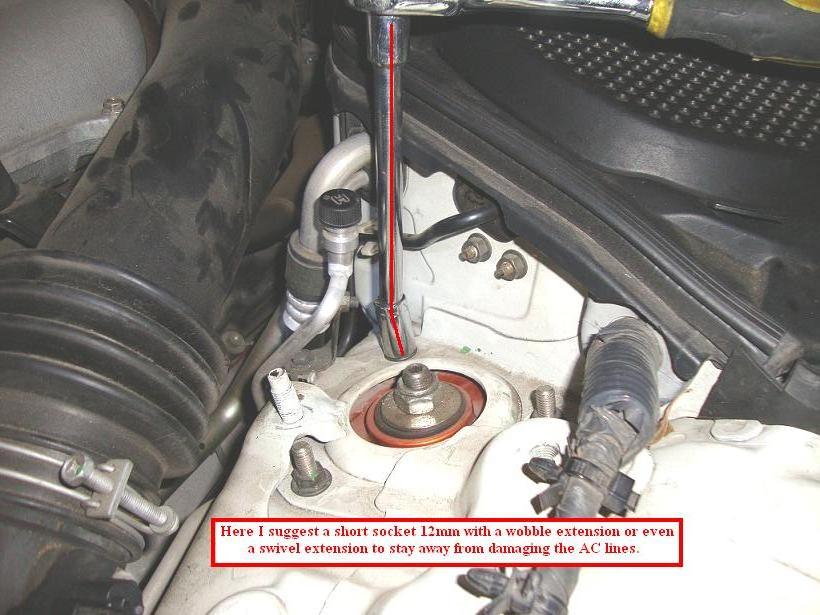
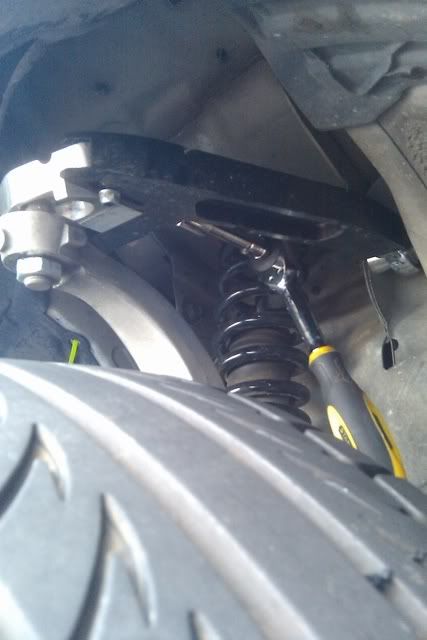
1. Open the hood and remove the OEM strut bar - see you have to access the shock mount 3 each nuts and ONE is TRAPPED under the OEM strut bar.
2. loosen the 3 each OEM strut bar nuts and loose the shocks - aftermarket or oem shocks/spring assembly its easiest to loosen them.
NOw, i found that its best to use a swivel or a wobble extension at the most AFT nut because you dont want to damage or use impact guns and extensions that close to the AC lines. those lines are usually only .025 to .035 thick wall.
SEE HERE:
Removal of the two upper control arm bolts requires moving the oem spring/strut assembly, i have coilovers and it took the same:

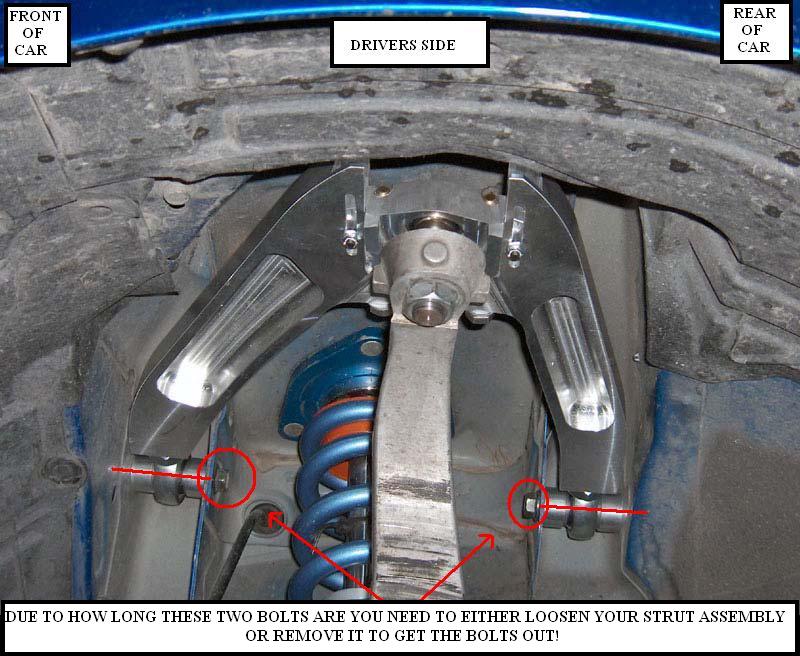
The bolt there is too long and hits the springs. You can possibly turn the springs a bit - ie coilovers - if you loosen the spring perch as well....wiggle and finagle and viola...
-J
1. Open the hood and remove the OEM strut bar - see you have to access the shock mount 3 each nuts and ONE is TRAPPED under the OEM strut bar.
2. loosen the 3 each OEM strut bar nuts and loose the shocks - aftermarket or oem shocks/spring assembly its easiest to loosen them.
NOw, i found that its best to use a swivel or a wobble extension at the most AFT nut because you dont want to damage or use impact guns and extensions that close to the AC lines. those lines are usually only .025 to .035 thick wall.
SEE HERE:
Removal of the two upper control arm bolts requires moving the oem spring/strut assembly, i have coilovers and it took the same:
The bolt there is too long and hits the springs. You can possibly turn the springs a bit - ie coilovers - if you loosen the spring perch as well....wiggle and finagle and viola...
-J
03-09-2010, 10:39 AM
#5
350Z-holic
Thread Starter
iTrader: (60)
Join Date: Jan 2006
Location: San Antonio/I miss DFW, TX
Posts: 11,204
Likes: 0
Received 28 Likes
on
19 Posts
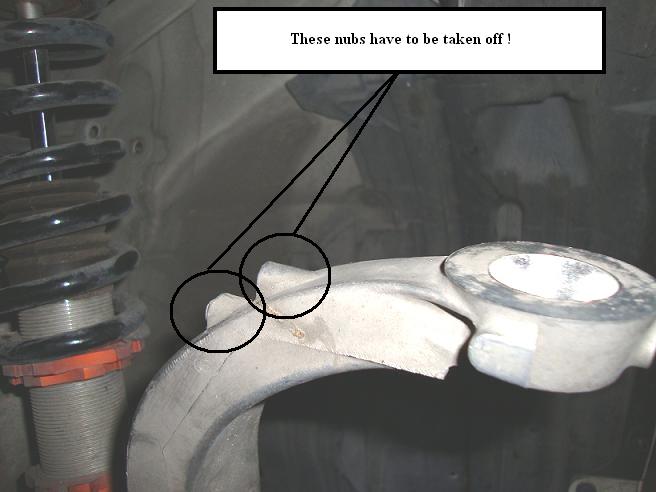
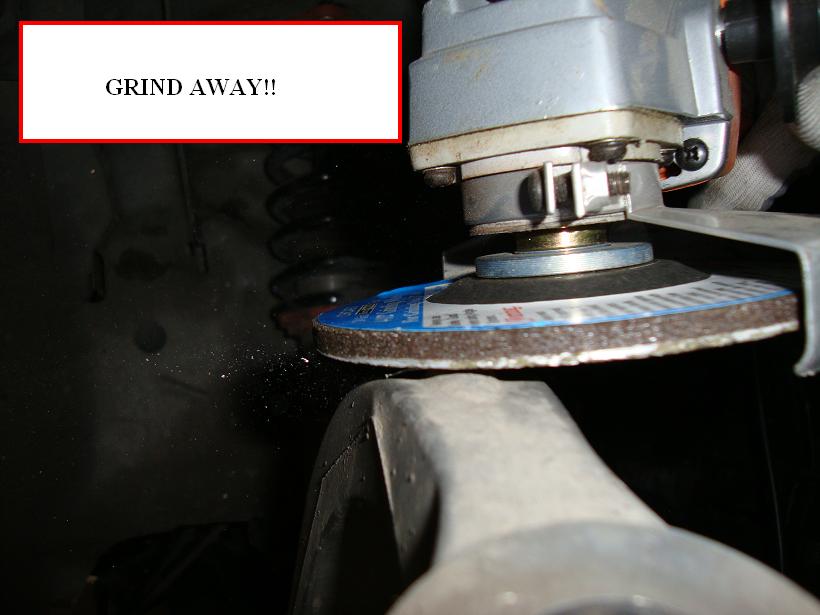
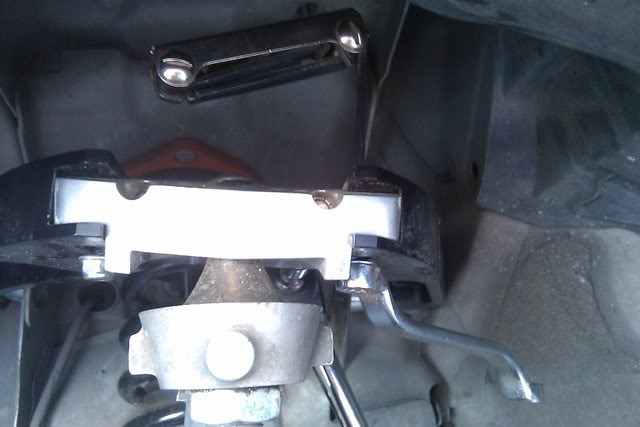
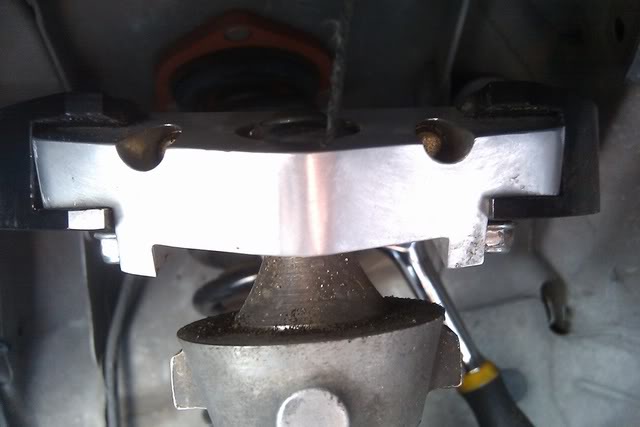
Okay, per SPL's instructions you have to grind off the casting bumps for FULL suspension travel. not a problem!
where are my tools!!
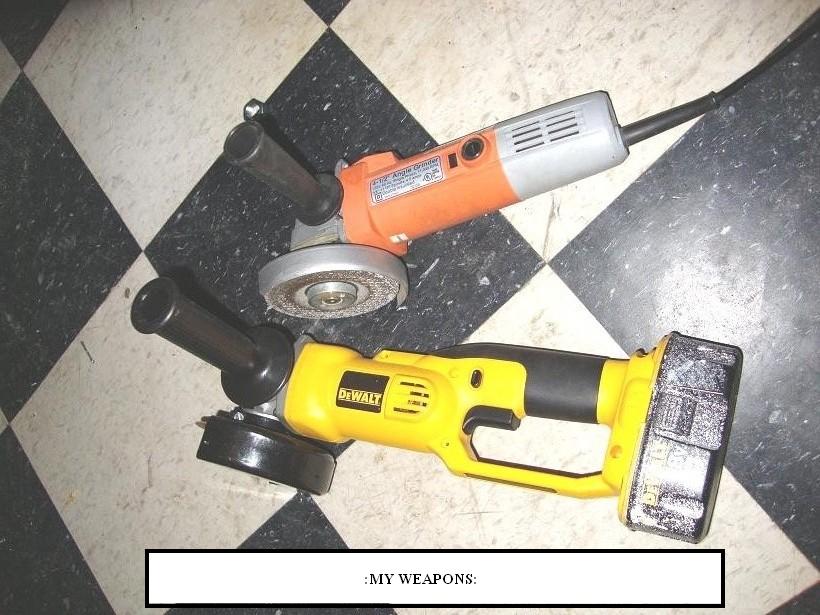
anywho....

where are my tools!!
anywho....
03-09-2010, 10:41 AM
#6
03-09-2010, 10:42 AM
#7
350Z-holic
Thread Starter
iTrader: (60)
Join Date: Jan 2006
Location: San Antonio/I miss DFW, TX
Posts: 11,204
Likes: 0
Received 28 Likes
on
19 Posts
Okay, per SPL. The arms come with only 3 shims! 


Provided are the number of shim blocks:
Thick (~0.8�) provides 2 deg of camber
Medium (~0.4�) provides 1 deg of camber
Thin (~0.2�) provides 0.5 deg of camber
what the fk about .25 deg and .1 deg and well shitz man???
Provided are the number of shim blocks:
Thick (~0.8�) provides 2 deg of camber
Medium (~0.4�) provides 1 deg of camber
Thin (~0.2�) provides 0.5 deg of camber
what the fk about .25 deg and .1 deg and well shitz man???
Trending Topics
03-09-2010, 10:46 AM
#8
350Z-holic
Thread Starter
iTrader: (60)
Join Date: Jan 2006
Location: San Antonio/I miss DFW, TX
Posts: 11,204
Likes: 0
Received 28 Likes
on
19 Posts
Okay, so i got to busting out the enga-me-nering skillz
really the only critical dimension is the RADIUS used and the 2.14 center to center.....I found the radius to be 7/16"...

nom..nomm...nomm...nom...
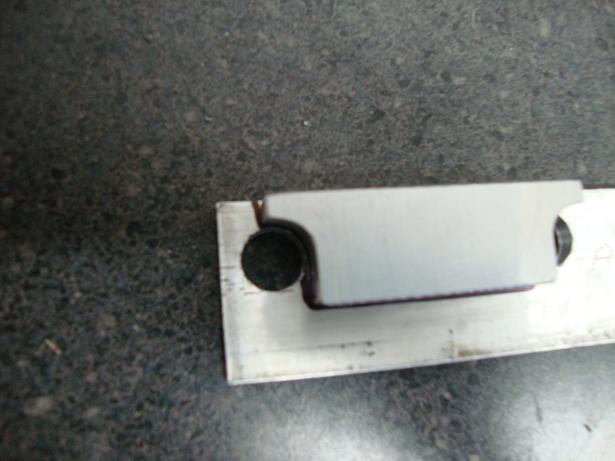
One i made is on the left:

I made a few.........acidjake needs a few too......
Also, making a .1 thick shim isn't that bad of an idea...........but making smaller .050 thick ones would probably be better to make 1.050 and 2.05 thick shims (add the .050 into it) and replace the corresponding .1 or .2 thick shim..........get it?
also, doing so isnt cheap...........finding an aluminum supplier with the thicknesses you need AND them only selling you a 1 foot section of each is quite hard at times......most have a minimum purchase or wont cut off that small of a piece...........you could however pay some of those places a visit and measure off pieces they may have in their "scrap" bin and offer to buy that if they have what you want.......good luck...
**EDIT
Okay, i have gotten multiple PM's to make some shims for peeps, sure no problem, PM me..., but im a busy person so ill do my best to make them in my free time....
-J
really the only critical dimension is the RADIUS used and the 2.14 center to center.....I found the radius to be 7/16"...
nom..nomm...nomm...nom...
One i made is on the left:
I made a few.........acidjake needs a few too......
Also, making a .1 thick shim isn't that bad of an idea...........but making smaller .050 thick ones would probably be better to make 1.050 and 2.05 thick shims (add the .050 into it) and replace the corresponding .1 or .2 thick shim..........get it?
also, doing so isnt cheap...........finding an aluminum supplier with the thicknesses you need AND them only selling you a 1 foot section of each is quite hard at times......most have a minimum purchase or wont cut off that small of a piece...........you could however pay some of those places a visit and measure off pieces they may have in their "scrap" bin and offer to buy that if they have what you want.......good luck...
**EDIT
Okay, i have gotten multiple PM's to make some shims for peeps, sure no problem, PM me..., but im a busy person so ill do my best to make them in my free time....
-J
Last edited by JasonZ-YA; 04-08-2010 at 11:51 AM.
03-09-2010, 10:57 AM
#9
350Z-holic
Thread Starter
iTrader: (60)
Join Date: Jan 2006
Location: San Antonio/I miss DFW, TX
Posts: 11,204
Likes: 0
Received 28 Likes
on
19 Posts
See SPL sends you 3 shims...
recap once again:
Provided are the number of shim blocks:
Thick (~0.8”) provides 2 deg of camber
Medium (~0.4”) provides 1 deg of camber
Thin (~0.2”) provides 0.5 deg of camber
Well, if you read their online description..........
noted here:
Camber adjustment range is -2.5deg to +1deg relative to stock arm; most cars will see actual on-car camber adjustment range of -4deg to -0.5deg, *depending on ride height.
I figured this out really quickly doing so....(you only have adjust ability in camber in " 0.5 degree " increments.
SO,
lets talk oem specs......for ease of explanation well use
.2 to -1.3 which is what local alignment shops round up to anyways..
SEE HERE:
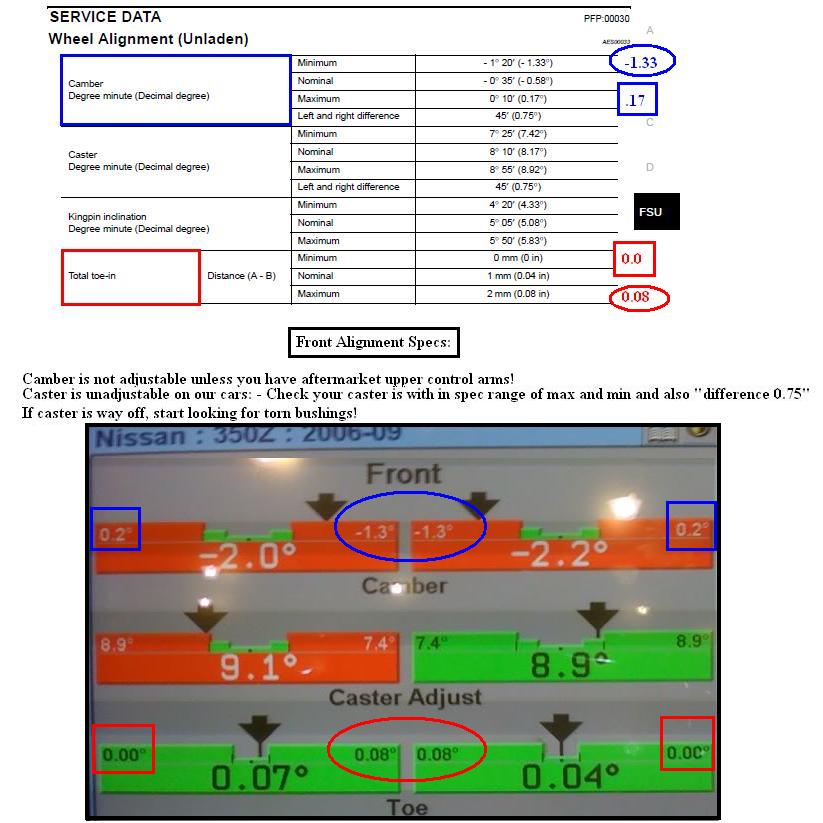
Notice in this pic that alignment is rounded up to .2 and down to -1.30
well anywho....you gotta think practical........in practice its hard to get .03 of alignment.....etc.... your alignment guy is just turning wrenches!
that being said.
You want:
(.2 , .1, 0.0, -.1, -.2, -.3, -.4, -.5, -.6, -.7, -.8, -.9, -1.0, -1.1, -1.2, -1.3 ) done..
you can obtain:
0.0 to -.5 to -1.0 to -1.5
Only in BLUE are you within oem spec!
Two points only.
Sure depending on your height you may end up with .6 and then subtract SPL's "THIN" shim and then you have -1.1
* note, Yes of course, raising and lowering the car adjust camber as well, but ya, thats not what we wanna do........
recap once again:
Provided are the number of shim blocks:
Thick (~0.8”) provides 2 deg of camber
Medium (~0.4”) provides 1 deg of camber
Thin (~0.2”) provides 0.5 deg of camber
Well, if you read their online description..........
noted here:
Camber adjustment range is -2.5deg to +1deg relative to stock arm; most cars will see actual on-car camber adjustment range of -4deg to -0.5deg, *depending on ride height.
I figured this out really quickly doing so....(you only have adjust ability in camber in " 0.5 degree " increments.
SO,
lets talk oem specs......for ease of explanation well use
.2 to -1.3 which is what local alignment shops round up to anyways..
SEE HERE:
Notice in this pic that alignment is rounded up to .2 and down to -1.30
well anywho....you gotta think practical........in practice its hard to get .03 of alignment.....etc.... your alignment guy is just turning wrenches!
that being said.
You want:
(.2 , .1, 0.0, -.1, -.2, -.3, -.4, -.5, -.6, -.7, -.8, -.9, -1.0, -1.1, -1.2, -1.3 ) done..
you can obtain:
0.0 to -.5 to -1.0 to -1.5
Only in BLUE are you within oem spec!
Two points only.
Sure depending on your height you may end up with .6 and then subtract SPL's "THIN" shim and then you have -1.1
* note, Yes of course, raising and lowering the car adjust camber as well, but ya, thats not what we wanna do........
Last edited by JasonZ-YA; 03-09-2010 at 11:00 AM.
03-09-2010, 11:02 AM
#10
350Z-holic
Thread Starter
iTrader: (60)
Join Date: Jan 2006
Location: San Antonio/I miss DFW, TX
Posts: 11,204
Likes: 0
Received 28 Likes
on
19 Posts
Caster is as noted in their instructions....
Turning of the rod ends at each end of the UCA's....
EVERY 0.3" gives 1 degree of caster.
Fully threaded in rod ends are stock 8deg of caster.
To increase caster thread out the rod end closest to the front of the car.
opposite for decrease of caster of course.
OEM CASTER SPECS are above as well on the pic given in post 9
On that note:
I have yet to see a 350z on the alignment rack with caster that is close to one another..........bushings people...check your bushings!
your compression arm to body bushing torn.........caster will be f'd up......compensating with adjusting caster on the arms is not the way to do it...........get new bushings...
Caster is what makes your car start to drift to the left or to the right on the highway when your cruising straight and let go of the wheel...
The Z's spec for caster "DIFFERENCE" is .75 ---- for those that arent familiar its the differnece of caster that really causes problems.........and .75 is a high amount!!! honestly i would call a .5 difference a "problem".
So your aim is to have caster matching from left to right front wheels........odds are on a completely stock Z they wont be..........and good luck at getting the oem 8.0 degrees.......even the guy's pic in the post above is 8.9(in spec barely) and 9.1 out of spec....
the out of spec wouldnt concern me at all.....the difference of 9.1-8.9 = .2 is what i would be more concerned out.........now, having caster at that upper limit of the caster "range" would just result in more turn in....
-J
Last edited by JasonZ-YA; 04-08-2010 at 11:47 AM.
03-09-2010, 11:05 AM
#12
350Z-holic
Thread Starter
iTrader: (60)
Join Date: Jan 2006
Location: San Antonio/I miss DFW, TX
Posts: 11,204
Likes: 0
Received 28 Likes
on
19 Posts
Okay, so I took these pics to show track side camber adjustment.
First you need to jack the front of the car up and set the front on jack stands. You can jack one side at a time if you like as well.
From that point, the wheel and suspension will droop enough to gain all the access needed to do your camber change.
Just to review the array of SAE sizes again: (I hate SAE!!!)
You need:
14mm socket
3/32 allen
3/8 wrench
Shown below to loosen the rear long bolts that allows the top to slide in or out is a 14mm socket on a short extension and my handy dandy ratchet.
Note - my ratchet is called the "rotator" and allows you to twist the handle to turn the socket. its a nice feature.
Here you can see my 3/32 allen key and 3/8 small goose neck wrench to loosen the bolt and nut:
caacc2ab.jpg?t=1282160204
once all 4 points are loose you can remove X number of shims as you wish to adjust your camber track side.
I was daily driving with -1.7 so i removed the medium shim for an additional 1 degree so i can autoX with -2.7 for the day.
Note,
I would suggest getting solid rubber hose and shoving it in the holes shown here: you can use heater hose, rubber stopper plugs from autozone, etc. anything that will fit snug in the holes that you can easily pull back out.
holes on top:
ad82c31d.jpg?t=1282160204
see road grime and grit builds up inside the long bolt holes and i had to use compressed air can to blow the junk out of them so the bolts could thread smoothly.
-J
First you need to jack the front of the car up and set the front on jack stands. You can jack one side at a time if you like as well.
From that point, the wheel and suspension will droop enough to gain all the access needed to do your camber change.
Just to review the array of SAE sizes again:
(I hate SAE!!!)You need:
14mm socket
3/32 allen
3/8 wrench
Shown below to loosen the rear long bolts that allows the top to slide in or out is a 14mm socket on a short extension and my handy dandy ratchet.
Note - my ratchet is called the "rotator" and allows you to twist the handle to turn the socket. its a nice feature.
Here you can see my 3/32 allen key and 3/8 small goose neck wrench to loosen the bolt and nut:
caacc2ab.jpg?t=1282160204
once all 4 points are loose you can remove X number of shims as you wish to adjust your camber track side.
I was daily driving with -1.7 so i removed the medium shim for an additional 1 degree so i can autoX with -2.7 for the day.
Note,
I would suggest getting solid rubber hose and shoving it in the holes shown here: you can use heater hose, rubber stopper plugs from autozone, etc. anything that will fit snug in the holes that you can easily pull back out.
holes on top:
ad82c31d.jpg?t=1282160204
see road grime and grit builds up inside the long bolt holes and i had to use compressed air can to blow the junk out of them so the bolts could thread smoothly.
-J
Last edited by JasonZ-YA; 08-18-2010 at 11:54 AM.
 03-09-2010, 11:13 AM
#14
Did you use steel or aluminum for the shims? I agree they should have added another 0.25 degree shim. I actually used a square sander with 60 grit sandpaper and it took about 20 mins to grind those bumps flat. The tool you pictured is used more for cutting and they are supposed to be used on edge, correct? I almost bought one but the guy at Lowes said that you weren't supposed to use the flat surface and sent me home to use my sander. It worked though it wasn't quick.
It worked though it wasn't quick.
Last edited by rcdash; 03-09-2010 at 11:15 AM.
03-09-2010, 11:18 AM
#16
350Z-holic
Thread Starter
iTrader: (60)
Join Date: Jan 2006
Location: San Antonio/I miss DFW, TX
Posts: 11,204
Likes: 0
Received 28 Likes
on
19 Posts
I actually used a square sander with 60 grit sandpaper and it took about 20 mins to grind those bumps flat. The tool you pictured is used more for cutting and they are supposed to be used on edge, correct? I almost bought one but the guy at Lowes said that you weren't supposed to use the flat surface and sent me home to use my sander. It worked though it wasn't quick.
It worked though it wasn't quick.if you look close, i used the thick "grinding" blade......not the " thin cut off wheel" blade....
so you can use it to grind down a part like that...
Space is limiting, so i should have just busted out my palm sander too.......
-J
03-10-2010, 12:12 PM
#17

Nice write up, I didn't have to remove the strut bar or strut to get the arm bolts out. If I remember correctly, I just jacked it up and rotated the spring on the strut so the bolts could slide just past it.
I second using a grinder for those nubs, hand filing those down was a beotch even though the aluminum is very soft.
Didn't end up lubricating that top joint, simply because there was no lube there to begin with. I don't remember it being in the instructions either... but I could have missed it. Don't think it'll hurt either way.
03-10-2010, 12:41 PM
#18
350Z-holic
Thread Starter
iTrader: (60)
Join Date: Jan 2006
Location: San Antonio/I miss DFW, TX
Posts: 11,204
Likes: 0
Received 28 Likes
on
19 Posts
yes, you "can do that" but i have my coilovers preloaded so i would have to release tension on the spring perch inorder to get them to turn.. but on oem springs you can do that too....its a wiggle here, wiggle there kinda thing, but yes...
-J
03-29-2010, 04:44 AM
#19
Vendor - Former Vendor
iTrader: (10)

Join Date: Nov 2004
Location: Austin TX
Posts: 221
Likes: 0
Received 0 Likes
on
0 Posts
Do not lubricate the tapered part! This part is not supposed to move, all movement is supposed to happen at the bearing only; there has to be sufficient friction between the upright and the ball joint adapter to ensure all movement happens at the bearing. There also has to be sufficient friction so that the retaining nut will not loosen.
Last edited by kuah@splparts.com; 03-29-2010 at 05:22 AM.


