DIY: Nismo-Yahama Body Mass Damper "Installation"
 06-09-2016, 12:29 PM
#1
New Member
Thread Starter

hi all,
here is a very basic guide of installation for anyone wanting to add the Nismo-Yamaha body mass dampers found in the Nismo 350Zs to their vehicle. i say installation in quotations in the title because to be honest it is extremely simple
since Greg'Z33's image links were dead, i figured since i was doing it anyway why not share with the community when i can. there are already so many helpful threads, but i feel i can add i will do my best to help
PART 1: BACKGROUND (feel free to skip ahead to pt3, it is unimportant)
my car is an 03, and had >150,000 km on the odometer. besides bushings (have, not yet replaced), i knew my suspension was pretty done. didn't bother taking off the springs off the front shocks to check, but on the rears one took minutes to rebound, and the other was completely shot
anyway, so i picked up a used set of Ohlins DFV in working order from Japan. these were revalved by Azur, plus stiffer Endless X-coil springs. got $100 back selling off the dead OEM set to some G35 driver (assuming he wanted the springs?)
in any case, while it was already much better than before, it was kind of rough. out of 30ish clicks, i started at Ohlins' recommended 10 clicks. on smooth roads it was wonderful. but alas, all the roads are not smooth
i tried to turn it down to 5, and while better on rough roads, it was not worth rubbing my rear wheels over large road undulations
(highest ride height setting at front, proportion matched rear to OEM of 22 mm (0.866 in) / 3.2354% larger in the rear | 265/35/18 F, 295/35/18 R, ends up ~1 in lower)
so, i wondered what i could do to fix it. having read in the past that the 07/08 Nismo editions had Yamaha produced body mass dampers to help cope with the roughness that came with added stiffness, i wanted to see if this would aid in ride comfort...
* * * * * * * * * *
PART 2: PRICING
so using this thread from Greg'Z33, i went and checked how much it would be. it is quite a bit more than the ~$620 USD quoted (in 2008)
here are the 2016 prices as per Courtesy Nissan
(1) E44B2-1A310 bar assy-damper front = $372.57
(1) E54B2-1A310 bar assy-damper RR = $402.00
(1) E44A6-1A300 brkt assy-damper bar, FR RH = $19.86
(1) E44A7-1A300 brkt assy damper bar, FR LH = $19.86
(1) E54B6-1A300 brkt assy-damper bar, RR RH = $23.64
(1) E54B7-1A300 brkt assy-damper bar, RR LH = $23.64
(4) 08156-8201F bolt (for rear brkt assy's) = N/A (says discontinued)
(4) 08918-3402A nut (for front & rear damper bar end-links) = $0.73
subtotal = $864.49 USD (without the discontinued bolt + additional 4 pieces of 10 mm-1.25 pitch X 35 mm length metric hex bolts required as per Greg'Z33)
that is almost $1100 CAD, without shipping / me driving down using a US forwarding address. obviously that is quite an absurd price, especially considering i don't know if it will do what i want from it
luckily for me i found a used set from Japan for significantly cheaper, so i thought it'd give it a go. plus, it came with all necessary bolts
* * * * * * * * * *
PART 3: "INSTALLATION"
so first a photo of the parts after delivery:
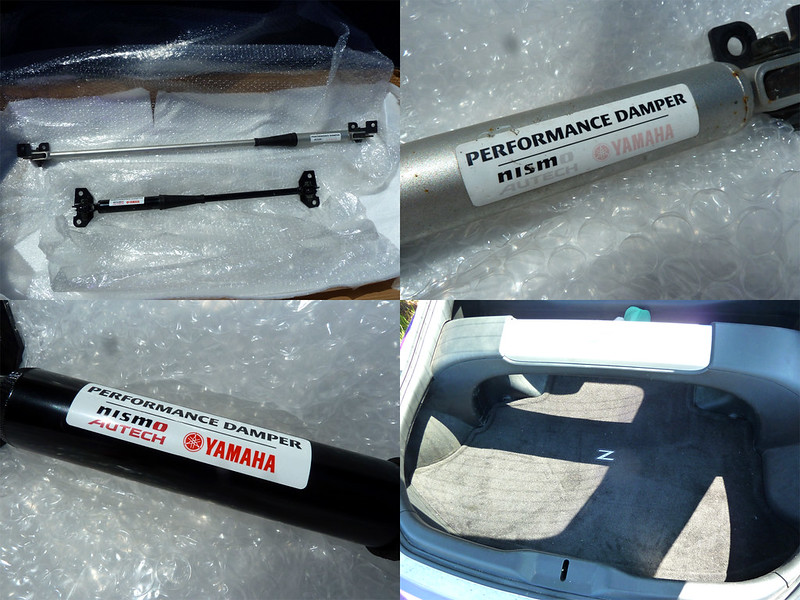
the much longer silver piece is the for the front, and the shorter black piece is for the rear. the front has a bit of rust i guess from rock chips and junk, as it is exposed to environment in front of the radiator. they are quite stiff, and not easily compressed
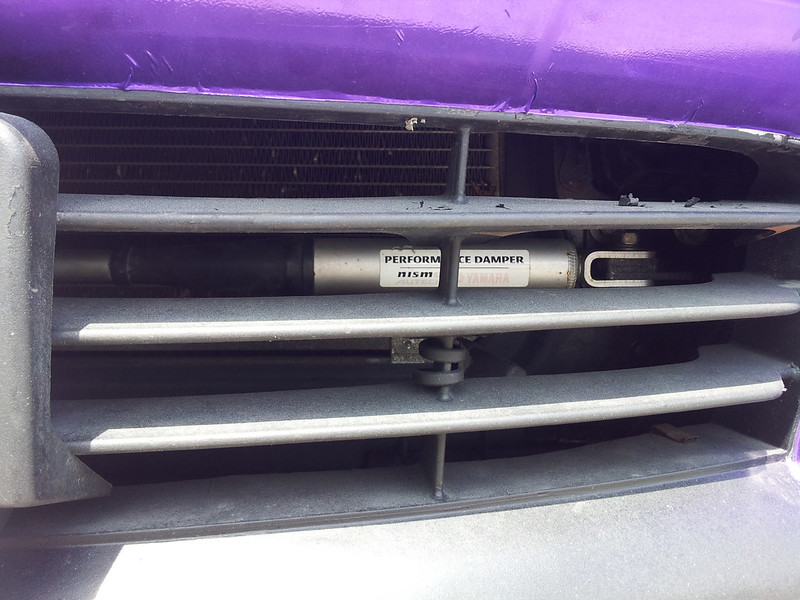
as stated above, the front piece goes in front of the radiator. the rear piece goes in the trunk area beneath the carpets and that board
each damper has a left and right bracket, with each bracket having 2 horizontal holes to attach it to the vehicle, and 1 vertical hole for the bolt that secures the damper to the bracket
* the vertical bolt (M10 -1.25 pitch X 35 mm length, 14 mm hex head) has a washer for the topside of the bracket, and a flanged nut on the underside. you can just get a flanged bolt
it is MUCH easier to do the rear piece first, and should take you less than 10 minutes to complete. you can do it in the driveway. pop the trunk, and take out the carpets and that board underneath. remove the spare tire to give you some more space
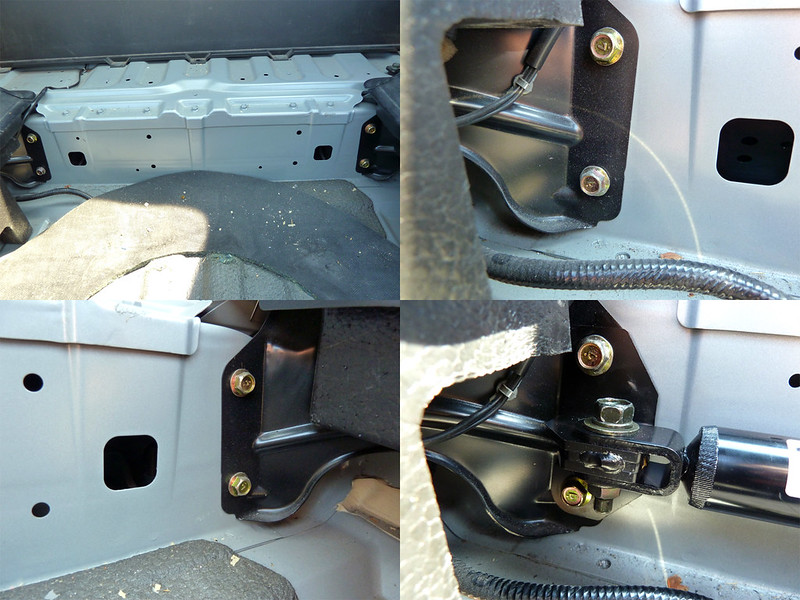
you can see the black brackets with the pair of zinc coated bolts on either side. they are 12 mm metric head. choose a 1/4 drive or racheting wrench depending on personal preference and clearances. they should not be very tight and come out with relative ease
for the rear, you can have the damper+bracket pre-assembled as there is nothing in the way. as with anything else, put all (4) bolts in place lightly before tightening it all down. simple as that, rear is finished!
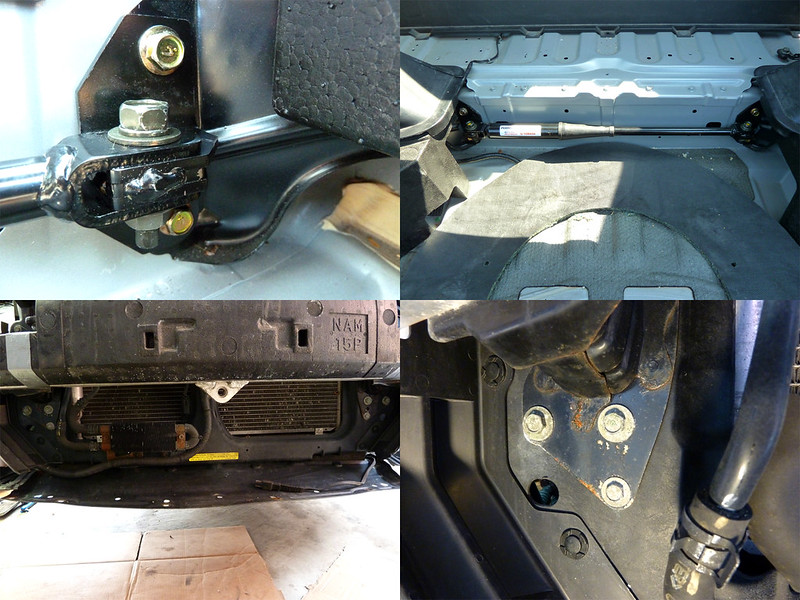
moving on to the front, while i am sure that Greg'Z33 is correct in that you don't have to remove the front bumper completely to access it, i had it off anyway. it would be much easier to work with.
* i had it off to get to my headlight (bought car with sonar headlight, one side LED accent night light wasn't working, couldn't fix it oh well)
under the crash bar, you will see the bolts connecting do the radiator frame support (?)
a day or so before you do it, if you drive it at all in the winter or suspect it's a bit roughed up, spray it with your choice of penetrating lubricant so you don't strip the head. i noticed during my installation that the front bolts where much tighter than the rears. maybe safer to up to 12 mm on 3/8 drive
* i'm not even sure where to get PB blaster here where i live; i just use Lloyd's MOOVIT cuz it's what i have. after spraying it, you will see the signature colour of the zinc coating re-appear
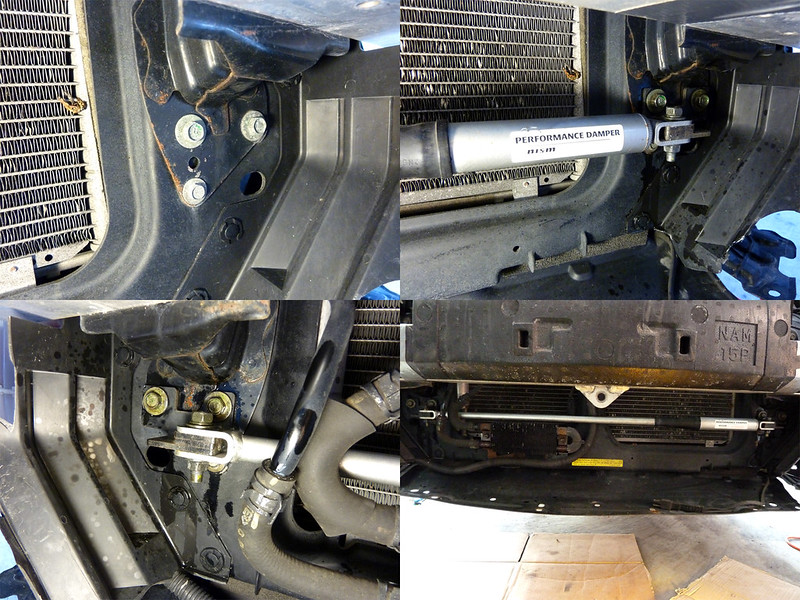
as you may have noticed in the bottom left of the previous photo, the power steering cooler on the passenger side is somewhat in your way (but not really). all this means is that you can't pre-assemble the bracket with the damper
remove the bolts. again, it is the same size as the rear (12 mm hex head). with the brackets separated from the damper itself, re-install the bolts with the brackets first. now, slide the damper in (passenger side first) BEHIND the power steering cooler hoses, and add the vertical bolt (14 mm hex head) and tighten it all up
you're finished! drive it around and enjoy the magic. it was a pretty noticable change for the better in terms of NVH. i'm back at 10 clicks and it feels fine. i can drive it like my Echo, and not have to slow down to a crawl for speed bumps (although to be honest i still kind of do it for steep entry ramps to plazas)
personally i am very happy with my results, but i probably wouldn't recommend it if i had to pay dealer MSRP. that money could go toward many other suspension and bushing replacement/upgrades
(please excuse the crappy wrap job. bought it like that, will fix much later if at all)
here is a very basic guide of installation for anyone wanting to add the Nismo-Yamaha body mass dampers found in the Nismo 350Zs to their vehicle. i say installation in quotations in the title because to be honest it is extremely simple
since Greg'Z33's image links were dead, i figured since i was doing it anyway why not share with the community when i can. there are already so many helpful threads, but i feel i can add i will do my best to help
PART 1: BACKGROUND (feel free to skip ahead to pt3, it is unimportant)
my car is an 03, and had >150,000 km on the odometer. besides bushings (have, not yet replaced), i knew my suspension was pretty done. didn't bother taking off the springs off the front shocks to check, but on the rears one took minutes to rebound, and the other was completely shot
anyway, so i picked up a used set of Ohlins DFV in working order from Japan. these were revalved by Azur, plus stiffer Endless X-coil springs. got $100 back selling off the dead OEM set to some G35 driver (assuming he wanted the springs?)
in any case, while it was already much better than before, it was kind of rough. out of 30ish clicks, i started at Ohlins' recommended 10 clicks. on smooth roads it was wonderful. but alas, all the roads are not smooth
i tried to turn it down to 5, and while better on rough roads, it was not worth rubbing my rear wheels over large road undulations
(highest ride height setting at front, proportion matched rear to OEM of 22 mm (0.866 in) / 3.2354% larger in the rear | 265/35/18 F, 295/35/18 R, ends up ~1 in lower)
so, i wondered what i could do to fix it. having read in the past that the 07/08 Nismo editions had Yamaha produced body mass dampers to help cope with the roughness that came with added stiffness, i wanted to see if this would aid in ride comfort...
* * * * * * * * * *
PART 2: PRICING
so using this thread from Greg'Z33, i went and checked how much it would be. it is quite a bit more than the ~$620 USD quoted (in 2008)
here are the 2016 prices as per Courtesy Nissan
(1) E44B2-1A310 bar assy-damper front = $372.57
(1) E54B2-1A310 bar assy-damper RR = $402.00
(1) E44A6-1A300 brkt assy-damper bar, FR RH = $19.86
(1) E44A7-1A300 brkt assy damper bar, FR LH = $19.86
(1) E54B6-1A300 brkt assy-damper bar, RR RH = $23.64
(1) E54B7-1A300 brkt assy-damper bar, RR LH = $23.64
(4) 08156-8201F bolt (for rear brkt assy's) = N/A (says discontinued)
(4) 08918-3402A nut (for front & rear damper bar end-links) = $0.73
subtotal = $864.49 USD
(without the discontinued bolt + additional 4 pieces of 10 mm-1.25 pitch X 35 mm length metric hex bolts required as per Greg'Z33)that is almost $1100 CAD, without shipping / me driving down using a US forwarding address. obviously that is quite an absurd price, especially considering i don't know if it will do what i want from it
luckily for me i found a used set from Japan for significantly cheaper, so i thought it'd give it a go. plus, it came with all necessary bolts
* * * * * * * * * *
PART 3: "INSTALLATION"
so first a photo of the parts after delivery:
the much longer silver piece is the for the front, and the shorter black piece is for the rear. the front has a bit of rust i guess from rock chips and junk, as it is exposed to environment in front of the radiator. they are quite stiff, and not easily compressed
as stated above, the front piece goes in front of the radiator. the rear piece goes in the trunk area beneath the carpets and that board
each damper has a left and right bracket, with each bracket having 2 horizontal holes to attach it to the vehicle, and 1 vertical hole for the bolt that secures the damper to the bracket
* the vertical bolt (M10 -1.25 pitch X 35 mm length, 14 mm hex head) has a washer for the topside of the bracket, and a flanged nut on the underside. you can just get a flanged bolt
it is MUCH easier to do the rear piece first, and should take you less than 10 minutes to complete. you can do it in the driveway. pop the trunk, and take out the carpets and that board underneath. remove the spare tire to give you some more space
you can see the black brackets with the pair of zinc coated bolts on either side. they are 12 mm metric head. choose a 1/4 drive or racheting wrench depending on personal preference and clearances. they should not be very tight and come out with relative ease
for the rear, you can have the damper+bracket pre-assembled as there is nothing in the way. as with anything else, put all (4) bolts in place lightly before tightening it all down. simple as that, rear is finished!
moving on to the front, while i am sure that Greg'Z33 is correct in that you don't have to remove the front bumper completely to access it, i had it off anyway. it would be much easier to work with.
* i had it off to get to my headlight (bought car with sonar headlight, one side LED accent night light wasn't working, couldn't fix it
oh well)under the crash bar, you will see the bolts connecting do the radiator frame support (?)
a day or so before you do it, if you drive it at all in the winter or suspect it's a bit roughed up, spray it with your choice of penetrating lubricant so you don't strip the head. i noticed during my installation that the front bolts where much tighter than the rears. maybe safer to up to 12 mm on 3/8 drive
* i'm not even sure where to get PB blaster here where i live; i just use Lloyd's MOOVIT cuz it's what i have. after spraying it, you will see the signature colour of the zinc coating re-appear
as you may have noticed in the bottom left of the previous photo, the power steering cooler on the passenger side is somewhat in your way (but not really). all this means is that you can't pre-assemble the bracket with the damper
remove the bolts. again, it is the same size as the rear (12 mm hex head). with the brackets separated from the damper itself, re-install the bolts with the brackets first. now, slide the damper in (passenger side first) BEHIND the power steering cooler hoses, and add the vertical bolt (14 mm hex head) and tighten it all up
you're finished! drive it around and enjoy the magic. it was a pretty noticable change for the better in terms of NVH. i'm back at 10 clicks and it feels fine. i can drive it like my Echo, and not have to slow down to a crawl for speed bumps (although to be honest i still kind of do it for steep entry ramps to plazas)
personally i am very happy with my results, but i probably wouldn't recommend it if i had to pay dealer MSRP. that money could go toward many other suspension and bushing replacement/upgrades
(please excuse the crappy wrap job. bought it like that, will fix much later if at all)

The following 4 users liked this post by Vitamin_B12:
06-09-2016, 02:39 PM
#2
350Z/370Z Tech Moderator
MY350Z.COM
MY350Z.COM


Nice write-up. Well done.
 06-10-2016, 08:33 AM
#3
New Member
Thread Starter
thanks MicVelo
this forum has helped me a lot with little nagging issues (window motor, hatch strut, etc.). there's a whole lot more informed members than me, but i figure it's good to give back to the community when i can
even things that have already been done, doesn't hurt to have more/alternative photos and info :P
when i have some time i will be adding a guide to replacing the high pressure power steering hose (had a leak) with a braided stainless line, and when i finally get it properly sorted (it's about 80% working) an EVAP can replacement for people with exhaust clearance issues
and maybe a half-ish guide for shocks replacement and brakes replacement
The following users liked this post:
rustyschopshop (06-14-2016)

 06-11-2016, 07:51 AM
#6
New Member
Thread Starter
they are not solid. "Body Mass Damper" is the official name as far as i have gathered from Japanese translations and junk. although the official English Yamaha page says "Performance Damper"
you can read more info about it in the old thread, as it is thoroughly explained/debated there:
https://my350z.com/forum/brakes-and-...s-dampers.html
sorry i didn't take zoom photos, as didn't think it was necessary. i thought many members here would already be somewhat familiar with it 7 years on. there's nothing to really show at the joint anyway. there's a bracket on either side to fasten it to the car, and a 2 piece damper body (rod + shaft/pressure tube?)
you can see in my 3rd image from the original post (top right square, lit up trunk) that there is a rubber dust boot/guard where they connect. i don't think it is meant to be disassembled but i'm sure you could get a motocross shop to rebuild the seal and refill the gas if it ever failed
here are some factory images from Courtesy Nissan:


if you want official marketing info, then:
Link A:
http://global.yamaha-motor.com/news/...ce-damper.html
"The Performance Damper is a chassis damping component that is set in the main structural areas of vehicles. It is a device is designed to control and absorb minute distortions and vibrations. The Performance Damper was first used in a mass-production model in April 2004, four years on from its basic concept development in 2000. Since then, the Performance Damper has been contributing to improvements in stability and comfort in a wide variety of vehicle types.
Normally, when a passenger vehicle is in motion, micro distortions of less than 1mm occur in the body. A metal vehicle body has elastic characteristics and lacks damping force, meaning that external distortion energy is accumulated and released almost unchanged, repeating the cycle of distortion at a natural frequency.
Performance Dampers add a damping element to the chassis, thereby absorbing the distortion energy and releasing it as heat. Along with the expectation of curbing an excessive rate of distortion on the chassis, providing greater mobility and stability at high speeds as well as superior maneuverability when the chassis is subjected to relatively high chassis distortion, Performance Dampers also contribute to greater comfort."
------------------------------------
Link B:
http://global.yamaha-motor.com/busin...635.1465659762
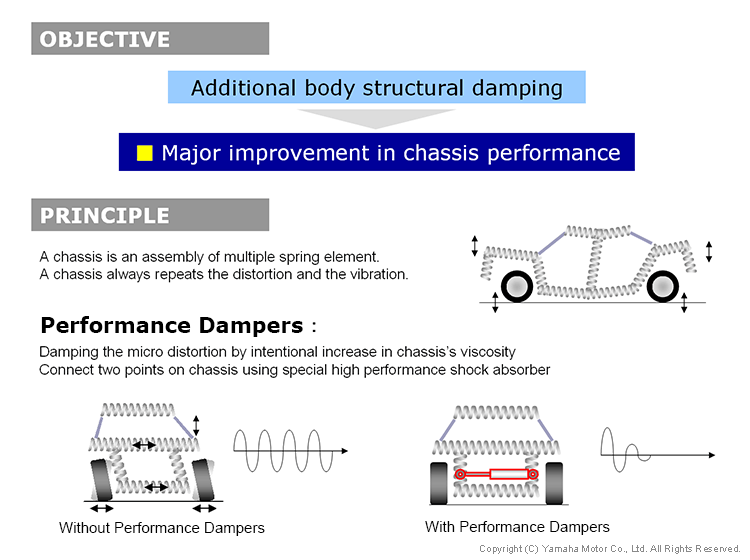
"The Performance Dampers is a completely new technology developed by Yamaha Motor to improve chassis performance. When the chassis is in motion, it limits dynamic distortion to just a few microns.
A metal vehicle body has elastic characteristics and lacks damping force, meaning that external distortion energy is accumulated and released almost unchanged, repeating the cycle of distortion at a natural frequency.
The Performance Dampers adds a damping element to the chassis that absorbs distortion energy and releases it as heat. This curbs the chassis�s excessive distortion speed, not only boosting driving comfort at normal speeds, but also achieving both high mobility and excellent stability at high speeds, which are accompanied by relatively major chassis distortion.
Principle of the Performance Dampers
A chassis is an assembly of multiple spring elements.
While in motion, it undergoes continuous distortion and vibration.
The Performance Dampers connects two points on the chassis using a special high- performance shock absorber (damping element), curbing
micro- distortion and vibrations by intentional increaseing the chassis�s viscosity.
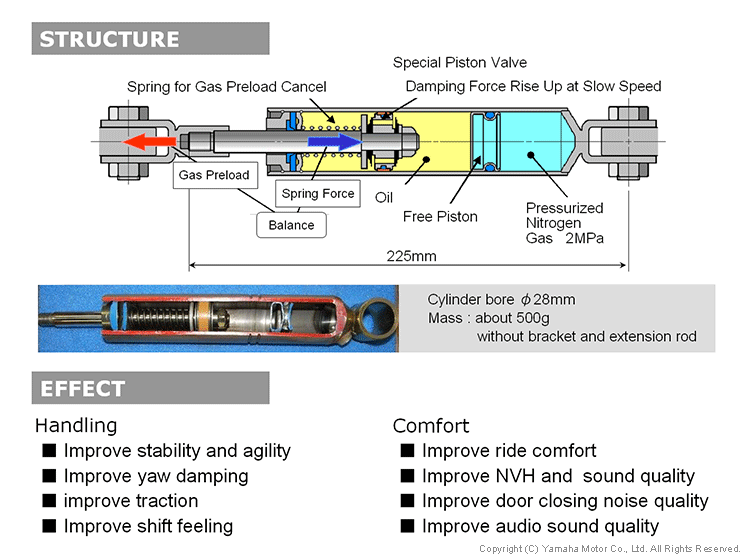
Basic Structure of the Performance Dampers
The Performance Dampers design is based on a high-pressure nitrogen-charged oil damper architecture.
Key Technologies
1. Improved damping performance at ultra low piston speed.
2. Cancellation of gas reaction force.
3. Optimization of damping properties.
Benefits of the Performance Dampers
Adds additional body damping to achieve optimum body viscosity.
Appropriate body viscosity is an essential factor in the comfort and stability that characterize high-quality and premium vehicle bodies.
The Performance Dampers is a product that delivers optimum body viscosity in a controllable manner."
you can read more info about it in the old thread, as it is thoroughly explained/debated there:
https://my350z.com/forum/brakes-and-...s-dampers.html
sorry i didn't take zoom photos, as didn't think it was necessary. i thought many members here would already be somewhat familiar with it 7 years on. there's nothing to really show at the joint anyway. there's a bracket on either side to fasten it to the car, and a 2 piece damper body (rod + shaft/pressure tube?)
you can see in my 3rd image from the original post (top right square, lit up trunk) that there is a rubber dust boot/guard where they connect. i don't think it is meant to be disassembled but i'm sure you could get a motocross shop to rebuild the seal and refill the gas if it ever failed
here are some factory images from Courtesy Nissan:
if you want official marketing info, then:
Link A:
http://global.yamaha-motor.com/news/...ce-damper.html
"The Performance Damper is a chassis damping component that is set in the main structural areas of vehicles. It is a device is designed to control and absorb minute distortions and vibrations. The Performance Damper was first used in a mass-production model in April 2004, four years on from its basic concept development in 2000. Since then, the Performance Damper has been contributing to improvements in stability and comfort in a wide variety of vehicle types.
Normally, when a passenger vehicle is in motion, micro distortions of less than 1mm occur in the body. A metal vehicle body has elastic characteristics and lacks damping force, meaning that external distortion energy is accumulated and released almost unchanged, repeating the cycle of distortion at a natural frequency.
Performance Dampers add a damping element to the chassis, thereby absorbing the distortion energy and releasing it as heat. Along with the expectation of curbing an excessive rate of distortion on the chassis, providing greater mobility and stability at high speeds as well as superior maneuverability when the chassis is subjected to relatively high chassis distortion, Performance Dampers also contribute to greater comfort."
------------------------------------
Link B:
http://global.yamaha-motor.com/busin...635.1465659762
"The Performance Dampers is a completely new technology developed by Yamaha Motor to improve chassis performance. When the chassis is in motion, it limits dynamic distortion to just a few microns.
A metal vehicle body has elastic characteristics and lacks damping force, meaning that external distortion energy is accumulated and released almost unchanged, repeating the cycle of distortion at a natural frequency.
The Performance Dampers adds a damping element to the chassis that absorbs distortion energy and releases it as heat. This curbs the chassis�s excessive distortion speed, not only boosting driving comfort at normal speeds, but also achieving both high mobility and excellent stability at high speeds, which are accompanied by relatively major chassis distortion.
Principle of the Performance Dampers
A chassis is an assembly of multiple spring elements.
While in motion, it undergoes continuous distortion and vibration.
The Performance Dampers connects two points on the chassis using a special high- performance shock absorber (damping element), curbing
micro- distortion and vibrations by intentional increaseing the chassis�s viscosity.
Basic Structure of the Performance Dampers
The Performance Dampers design is based on a high-pressure nitrogen-charged oil damper architecture.
Key Technologies
1. Improved damping performance at ultra low piston speed.
2. Cancellation of gas reaction force.
3. Optimization of damping properties.
Benefits of the Performance Dampers
Adds additional body damping to achieve optimum body viscosity.
Appropriate body viscosity is an essential factor in the comfort and stability that characterize high-quality and premium vehicle bodies.
The Performance Dampers is a product that delivers optimum body viscosity in a controllable manner."
The following users liked this post:
rustyschopshop (06-14-2016)


