
**Steering knuckle ball joints??**
 05-03-2011, 11:39 PM
#121
Super Moderator
MY350Z.COM
MY350Z.COM


iTrader: (8)
Should be 9.13119 but i havn't tried them yet

 05-04-2011, 06:21 AM
#123
Super Moderator
MY350Z.COM
MY350Z.COM
iTrader: (8)
Well i'm orderig boots tonight, can confirm in a few days. Also ordering the rack and pinion bushings. Wish solids were available, but .....
05-04-2011, 12:23 PM
#124
Registered User
iTrader: (6)

Join Date: Feb 2010
Location: new york
Posts: 97
Likes: 0
Received 0 Likes
on
0 Posts
I ordered Energy's dust boot (9.13105) and it does fit; however, it is slightly shorter than the stock boot. So based off my measurements, of all the dust boots they offer, the best fitting boot would be 9.13127 or 9.13125. When I took measurements of the ball joint I didn't have a caliper to get the exact diameter, but from eyeing a ruler, they were as follows:
Stock Boot
Bottom Diameter - 1.5 inches or 38.1mm
Top Diameter - about 0.64 inches or 16.26 mm
Also, keep in mind these boots will only be good if the joint itself is still solid. Also, Mac Auto Parts sells full replacements on ebay and they have fast shipping.
Good luck everyone,
Rob
Stock Boot
Bottom Diameter - 1.5 inches or 38.1mm
Top Diameter - about 0.64 inches or 16.26 mm
Also, keep in mind these boots will only be good if the joint itself is still solid. Also, Mac Auto Parts sells full replacements on ebay and they have fast shipping.
Good luck everyone,
Rob

 05-10-2011, 08:35 PM
#128
Retired Admin
iTrader: (95)
You should note, however, that the dust boot that comes with the knuckle ball joint doesn't really fit properly, so it may be better to order a proper fitting pair. Also, the castle nut that comes with it is prone to rust/corrosion, so if you're **** about that stuff, find yourself a pair of rust/corrosion-proof nuts prior to the install.
05-10-2011, 11:07 PM
#129
Penis ME!
iTrader: (15)
Join Date: Sep 2005
Location: Golden State
Posts: 1,129
Likes: 0
Received 0 Likes
on
0 Posts
You should note, however, that the dust boot that comes with the knuckle ball joint doesn't really fit properly, so it may be better to order a proper fitting pair. Also, the castle nut that comes with it is prone to rust/corrosion, so if you're **** about that stuff, find yourself a pair of rust/corrosion-proof nuts prior to the install.
 05-20-2011, 09:52 PM
#132
so according to this website, which would be the best fitting boot?
http://www.energysuspensionparts.com...Dust-Boots.asp
Would we want the base diameter of the boot to be close to the actual diameter of the ball joint, or should we order a boot that is slightly smaller in diameter so that there is a tight fit?
http://www.energysuspensionparts.com...Dust-Boots.asp
Would we want the base diameter of the boot to be close to the actual diameter of the ball joint, or should we order a boot that is slightly smaller in diameter so that there is a tight fit?
05-21-2011, 10:04 AM
#135
Retired Admin
iTrader: (95)
so according to this website, which would be the best fitting boot?
http://www.energysuspensionparts.com...Dust-Boots.asp
Would we want the base diameter of the boot to be close to the actual diameter of the ball joint, or should we order a boot that is slightly smaller in diameter so that there is a tight fit?
http://www.energysuspensionparts.com...Dust-Boots.asp
Would we want the base diameter of the boot to be close to the actual diameter of the ball joint, or should we order a boot that is slightly smaller in diameter so that there is a tight fit?
06-21-2011, 11:21 PM
#137
New Member
iTrader: (34)

Join Date: Sep 2008
Location: Austin,Texas
Posts: 286
Likes: 0
Received 0 Likes
on
0 Posts
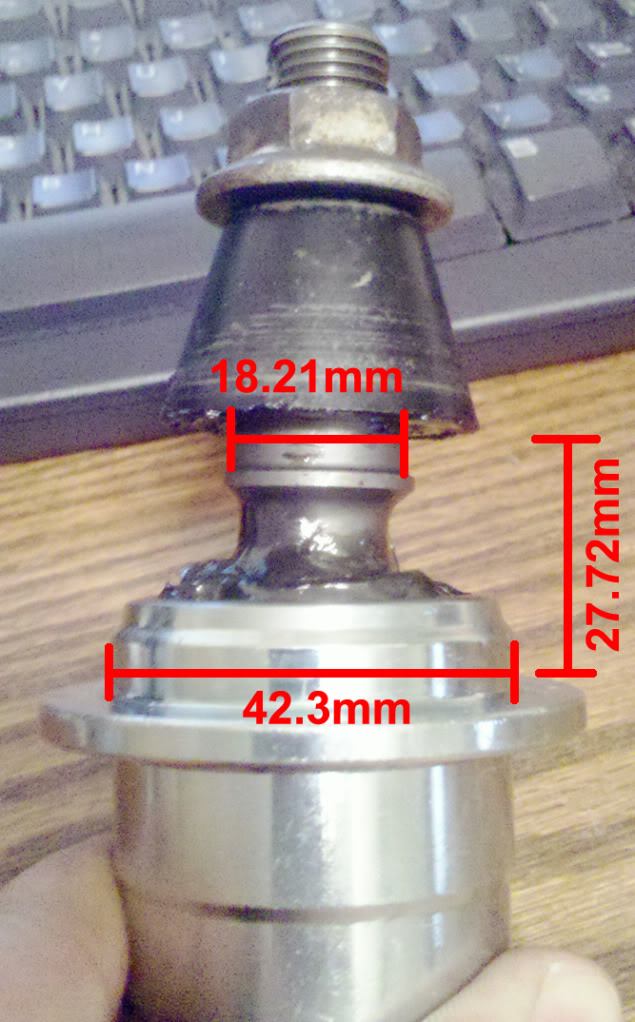
according to your measured caliper measurements it would seem that is the best choice BUT if you go by energy suspensions reccomended
( Dimensions A and B: The polyurethane is flexible and will stretch slightly. Energy Suspension�s recommendation appears to be to use a part that is approx 0.5-1.0 mm smaller than the diameter you need.
Example: If your OEM part measures 12mm then you would use a boot approx 11.5mm � 11mm in diameter at that dimension. This ensures a good tight fit that will seal correctly).
Then (a) Pin Opening Diameter is too big for the energy suspension boot (pn# 13009). oem (18.21) < energy susp (18.55 )...therefor it would not seal.
I only bring this up because i just found one my boots torn, and was looking into this...but it would seem the ebay ball joints is probably going to be my best bet. Hopefully this helps others as well.
08-23-2011, 02:50 PM
#138
Registered User
iTrader: (1)

Join Date: Aug 2010
Location: Toronto
Posts: 49
Likes: 0
Received 0 Likes
on
0 Posts
blAk mAx f-in eh you da man. Solid info there.
I ordered the ones from that Ebay store that has every freaking ball joint known to man for $60, and got them three days later....insanely fast shipping.
This situation is getting done tomorrow!
I ordered the ones from that Ebay store that has every freaking ball joint known to man for $60, and got them three days later....insanely fast shipping.
This situation is getting done tomorrow!
08-25-2011, 05:07 PM
#139
Registered User
iTrader: (1)
Join Date: Aug 2010
Location: Toronto
Posts: 49
Likes: 0
Received 0 Likes
on
0 Posts
Ok got this done today.
I picked up the 11 piece ball joint set at Canadian Tire on loan. I wanted the 21 piece but they did not have. If they have the 21 piece, get it, as the 11 piece was only good for the c-clamp, and the one receiver cup that attaches to the c-clamp (thank god). It would have been impossible with this kit otherwise.
I had to pick up a 2" 1/8ths 12 point shallow socket (at princess auto) for $15 to use as the receiver cup (when pressing out the old ones) to make it happen. I used just the c-clamp itself , and the 2" 1/8ths socket to drive out the old.
I already had a 1" 11/16ths 12 point socket from installing my SPL bushings in the front. So I used this socket to drive in the new BJ's. Fits perfectly for the job.
The 2" 1/8ths socket will work to press out the old. It mangles the rim of the BJ a little bit (so what), but sure as day they pop right out very nicely. No drama.
The only real semi pita was getting the rubber housings fully seated on the new BJ's after pressing them in. There's a metal ring in there so I used two pairs of vice grips on opposite sides to get them fully pressed down firmly around the collars.
Afterwards I tapped around the circumference with a dull straight edged screw driver and hammer (gently) to make sure they were fully seated. No marring of the rubber...all good. They fit rather tight, so I can't see needing to get another rubber housing/dome from another supplier.
Took me two hours including wasting 20 mins looking for the second pair of vice grips.
Test drive was very nice. Nissan dealership diagnosed my right BJ as having play, and I was getting vibrations on the highway, so you can imagine this was a noticeable improvement. Yes no doubt, any loose side to side is gone.
Cost me $75, and two hours. That's the best part.
I'd give this a 4.5 - 5/10 on the difficulty scale, 1/10 being changing the tire.
08-31-2011, 03:44 PM
#140
Registered User
iTrader: (1)
Join Date: Aug 2010
Location: Toronto
Posts: 49
Likes: 0
Received 0 Likes
on
0 Posts
Update....on the ebay $60 ball joints.
Ok, one of the rubber boots has already torn under normal daily driving.
Driver side only lasted six days. That is pretty damn pathetic quality wise.
Safe to say the boots on these things are about as **** as it gets.
Ok, one of the rubber boots has already torn under normal daily driving.
Driver side only lasted six days. That is pretty damn pathetic quality wise.
Safe to say the boots on these things are about as **** as it gets.