DIY - Solid diff bushing install - No subframe drop method, no c clamp either!
 08-02-2010, 08:48 AM
#1
350Z-holic

Thread Starter
iTrader: (60)
Join Date: Jan 2006
Location: San Antonio/I miss DFW, TX
Posts: 11,204
Likes: 0
Received 28 Likes
on
19 Posts
EDIT: PLEASE READ POST #12 - AS I HAVE NOW DONE A QUICKER METHOD AND NO LONGER DO WHAT IS SHOWN BELOW:
This thread outlines how to remove the oem diff bushing and install a solid rear diff bushings - the removal process can be used for installing poly bushings instead of solid if you wish to not have solid rear diff bushings.
READ POLY bushing options here:
https://my350z.com/forum/8293651-post24.html
Okay, I used the draw through method!
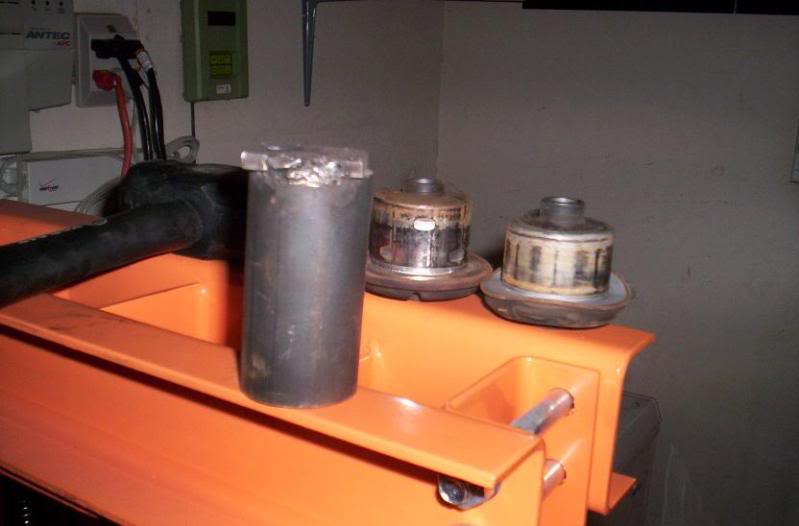
Tools needed!
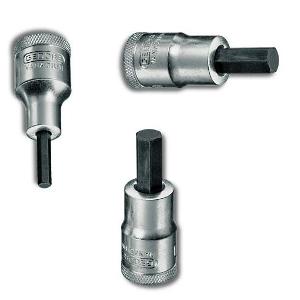
1. Big Frankensteins socket: (2.5" tall at a minimum)

Now, the big franky i just called a few local weld shops and found a shop that had a piece of 4 inch steel pipe laying around. explained over the phone and went to go pick it up. paid cash!
if you must, you can call any local steel salvage or metal wholesaler and have them cut you the pieces you need then run it over to a welder.
Also, my Big franky is only 2.75 inches TALL!! as the oem bushing is only 2.5inches long!
2. M12x1.75 - 200mm grade 12.9 metric Allen head bolts and smooth flange nut:
Now pictured I used a 8.8 grade, but they have stronger! so use it!
Edit - A correct size engine header bolt can be used as well - very strong.
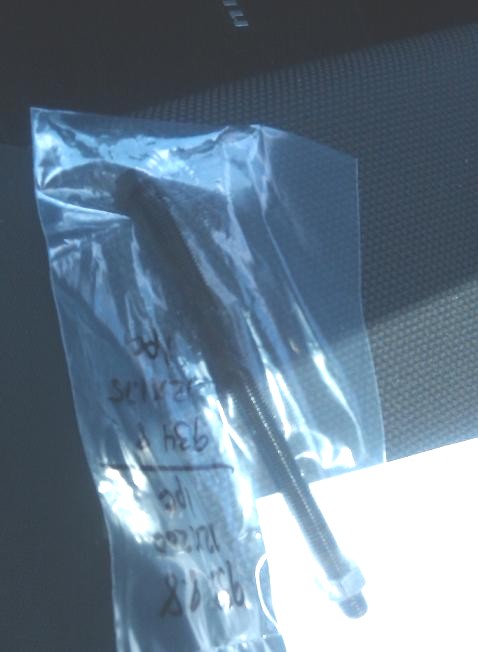
As you can see, i got decreasing length bolts where the threads overlap for when you bottom out:
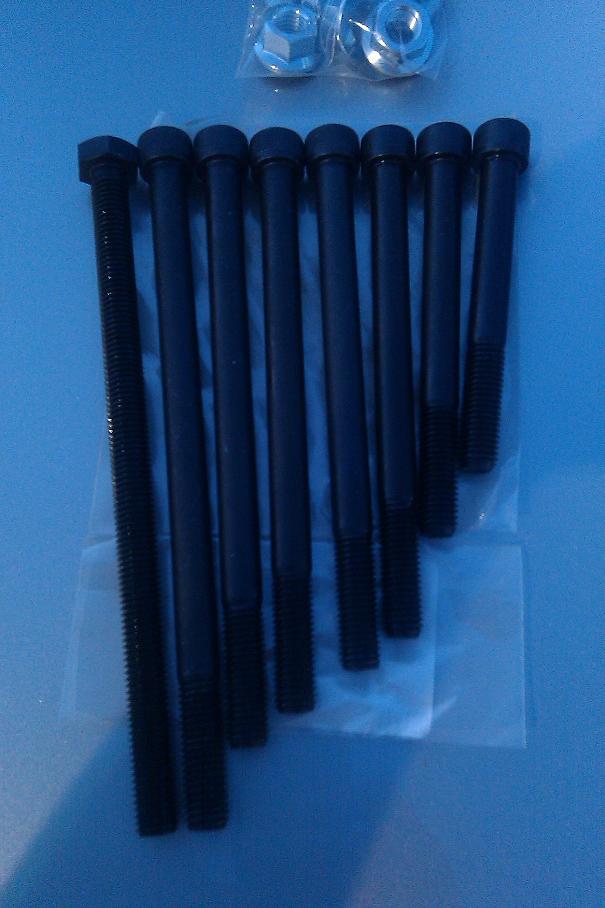
Also, notice that the one on the end is a 8.8 full thread, just in case i need it.
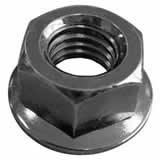
Smooth flange hardened nut:
And hardened smooth washers:

I found local to DFW was a company named "Metric and Multistandard"
www.metricmcc.com/
Metric & Multistandard
2200 Century Circle,
Irving, TX
(972) 870-1017
:Location here:
now, you can call around locally and see if you can find one, but a fully threaded metric high strength bolt is semi hard to find. I believe metric and multi will ship, but if not, let me know and i don't mind doing it for anyone if needed?
You need more than one as well!
Remember they are 12.9 grade, M12x1.75 Full threaded Allen head bolts.
I recommend one 200mm($4.15), 180mm($3.05), 170mm(3.46), 160mm($2.80) , 150mm($2.59), 120mm($1.40), 100mm($1.33) --- See you need all the way down to about 3.5 inches for reinstall!
All-thread sold at home depot is weak and only made in grade 2 for the most part, so stick with the stronger 12.9 grade bolt, plus it doesn't have a head on the end to keep from spinning. This rig was much easier with a bolt head that can be held from spinning!
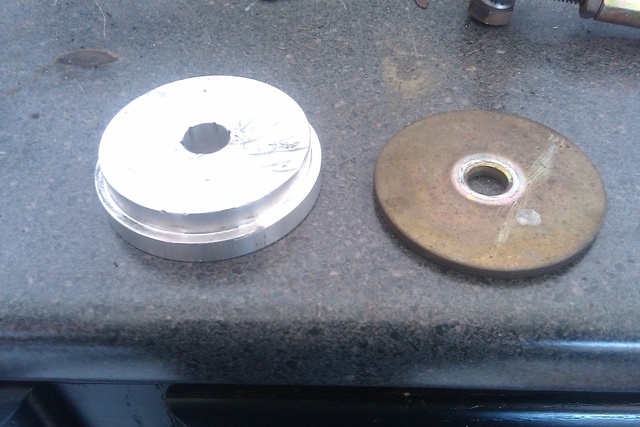
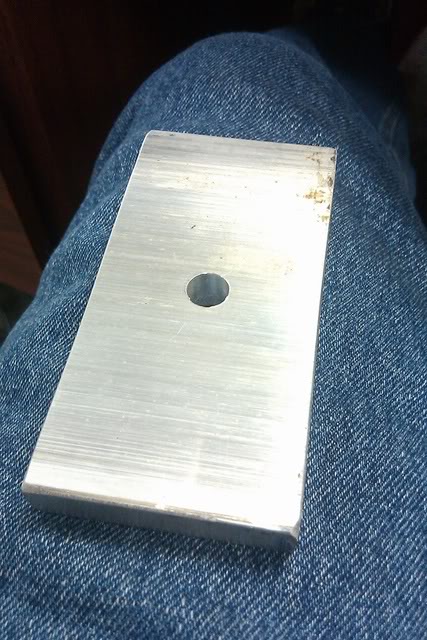
3. Metal plate with hole in center:
Mine is 1/2 inch thick aluminum, but steel would work just fine:
2650af89.jpg?t=1280764717
This is used to draw the bushing in when installing the solid diff bushing.
This is how its rigged - shown with the oem bushing removed:

I recommend using the spl driver tool at the end though. more on this later.
4. Go through socket set:
Now I own this set, and it came in handy due to the length of the bolts, and their protrusion. But a deep socket would work fine, if you change out the bolts when you bottom out.
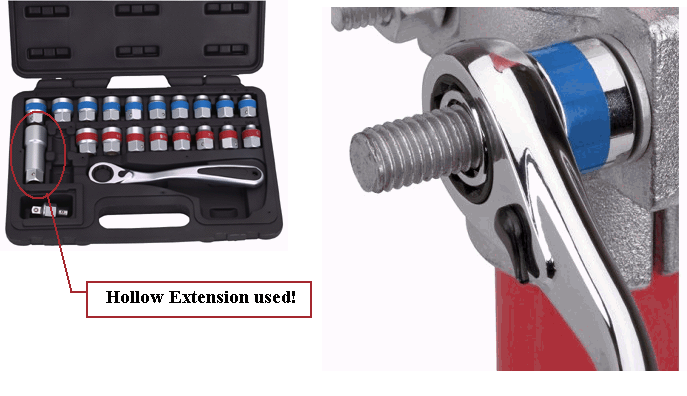
Found at Harbor Freight for cheap.
5. Allen head socket:
Due to buying a Allen head metric bolt from metric and multi-standard you will need to keep the head of the bolt from spinning, so you would best need a 10mm allen head socket:
most Z owners have this from changing their MT tranny oil/diff oil, etc
6. Ratcheting Breaker bar:
Not exactly needed, but a nice addition..as a regular breaker bar will work, but the ratcheting feature is win!
pairing a ratcheting breaker bar with the go through sockets is awesome!! makes for really easy work! you must use a breaker bar, as a lot of strength and force is needed and nothing short of an 18 inch breaker bar is recommended.
EDIT:
DIY on G35 SEDAN - has spare tire wheel well that hangs down and may be in the way
https://my350z.com/forum/engine-driv...-bushings.html
-J
Last edited by JasonZ-YA; 06-25-2012 at 06:59 AM.
 08-02-2010, 08:53 AM
#2
350Z-holic
Thread Starter
iTrader: (60)
Join Date: Jan 2006
Location: San Antonio/I miss DFW, TX
Posts: 11,204
Likes: 0
Received 28 Likes
on
19 Posts
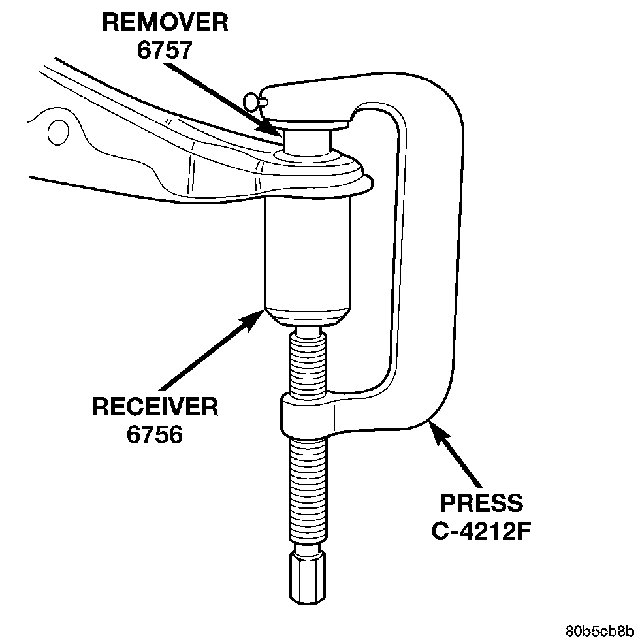
This is a quick diagram showing the rig set up.
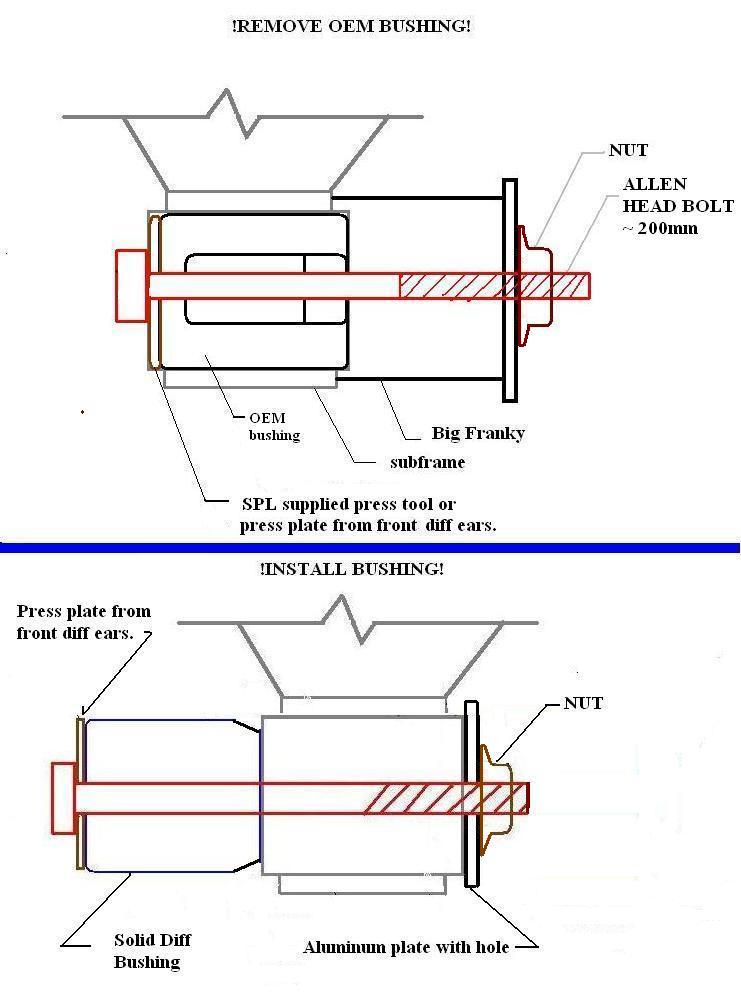
This is the SPL driver tool (LEFT) that is supplied when you buy the SPL solid diff bushings. You will notice in the pictures i used the diff plates (RIGHT) from the bottom of the diff front ears, but trust me use the SPL driver tool as its much stronger!
Diff ear plates:
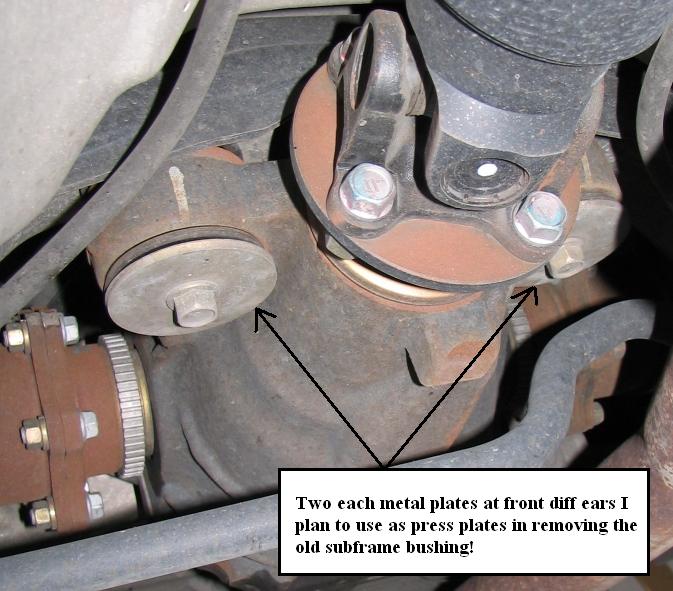
Again, much better to use the SPL Tool!
-J
This is the SPL driver tool (LEFT) that is supplied when you buy the SPL solid diff bushings. You will notice in the pictures i used the diff plates (RIGHT) from the bottom of the diff front ears, but trust me use the SPL driver tool as its much stronger!
Diff ear plates:
Again, much better to use the SPL Tool!
-J
08-02-2010, 09:16 AM
#3
350Z-holic
Thread Starter
iTrader: (60)
Join Date: Jan 2006
Location: San Antonio/I miss DFW, TX
Posts: 11,204
Likes: 0
Received 28 Likes
on
19 Posts
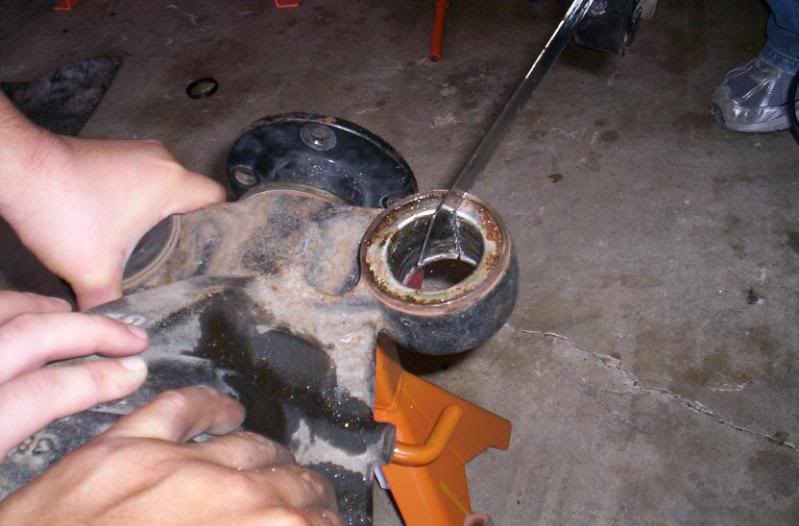
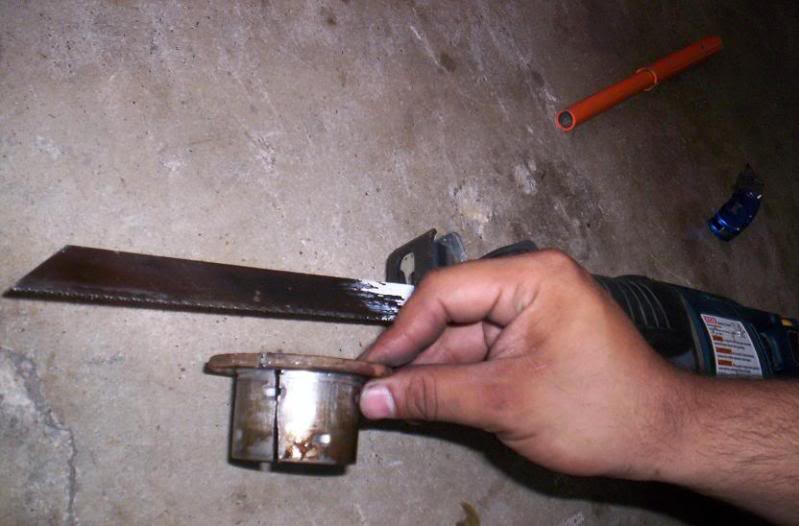
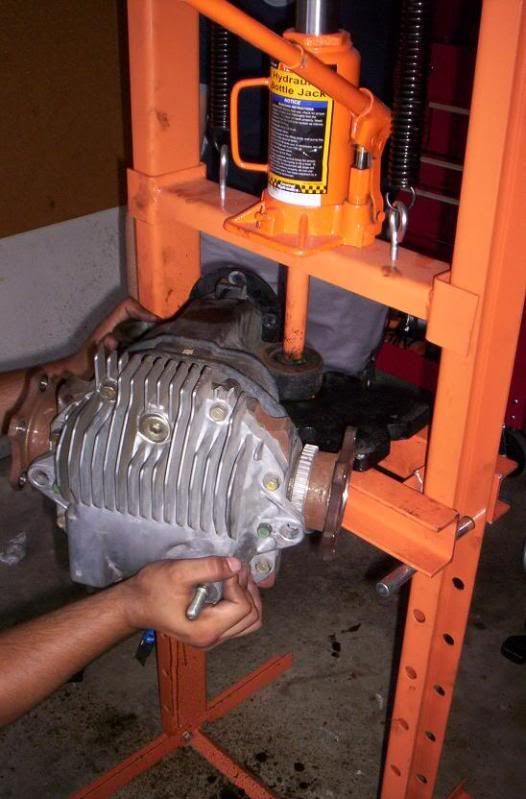
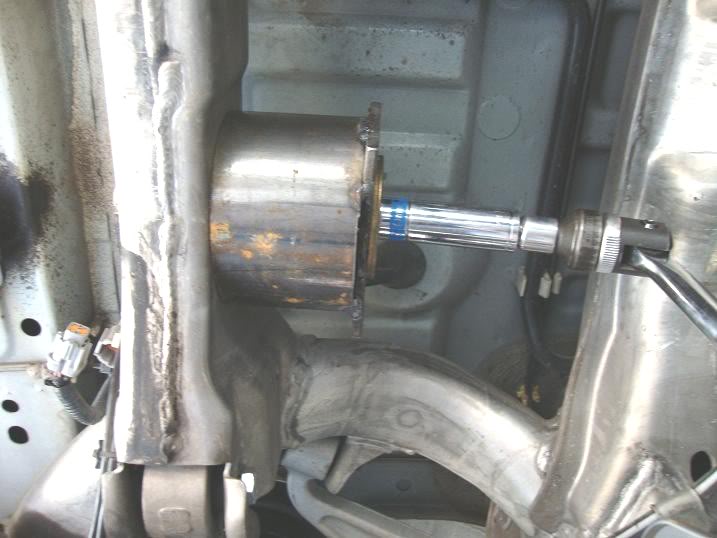
Here is the big frank, bolt and rig all set up with a 18 inch ratcheting breaker bar:
fa896d53.jpg?t=1280769045
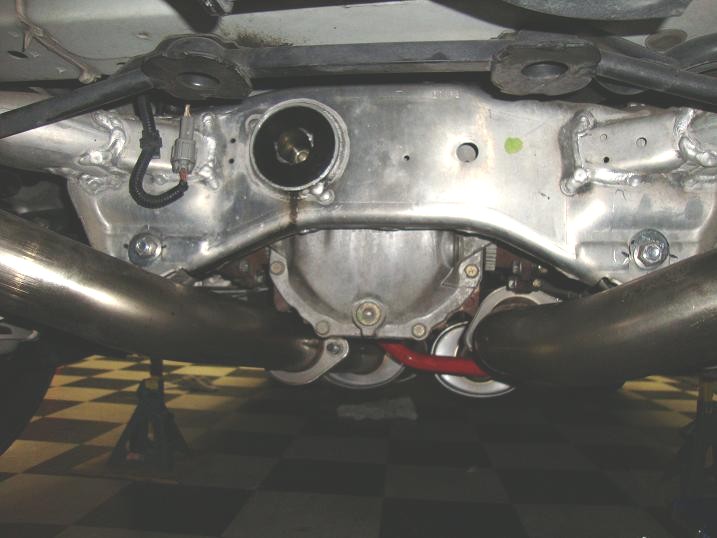
As you can see, the 4 inch inner diameter Big franky socket fits over the subframe hole perfectly:
147a4129.jpg?t=1280769120
HERE you can start to see the bushing being pulled through:
786e67d7.jpg?t=1280769185
Another pic of the bushing pulling through and breaker bar:
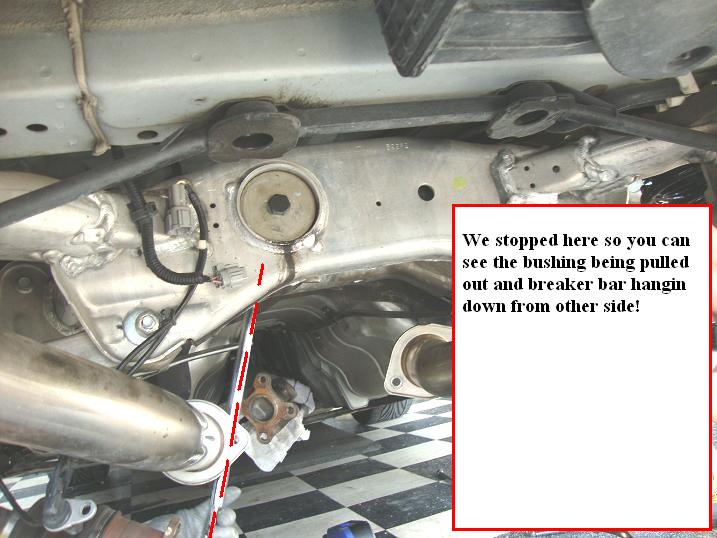
Now, here you can see that i had a goose neck 19mm wrench holding the bolt from spinning:
With an allen head bolt you can simply use an Allen head socket on the end of a ratchet:
like this:
We have the car jacked up as high as possible in the rear to give us all the room we need. Ensure the car is supported well and jacks are used as back up because cranking on the breaker bar really gets things moving!
fa896d53.jpg?t=1280769045
As you can see, the 4 inch inner diameter Big franky socket fits over the subframe hole perfectly:
147a4129.jpg?t=1280769120
HERE you can start to see the bushing being pulled through:
786e67d7.jpg?t=1280769185
Another pic of the bushing pulling through and breaker bar:
Now, here you can see that i had a goose neck 19mm wrench holding the bolt from spinning:
With an allen head bolt you can simply use an Allen head socket on the end of a ratchet:
like this:
We have the car jacked up as high as possible in the rear to give us all the room we need. Ensure the car is supported well and jacks are used as back up because cranking on the breaker bar really gets things moving!
Last edited by JasonZ-YA; 08-04-2010 at 05:10 AM.
08-02-2010, 09:18 AM
#4
350Z-holic
Thread Starter
iTrader: (60)
Join Date: Jan 2006
Location: San Antonio/I miss DFW, TX
Posts: 11,204
Likes: 0
Received 28 Likes
on
19 Posts
Here you can see that its a good time to stop cranking and step down to a 180mm or 170mm bolt as the first bolt will be super hot and you dont want it to snap!
a057bb41.jpg?t=1280769354
We snapped one bolt thinking we could continue! thats why i recommend purchasing the stronger 12.9 grade bolts and purchasing so many so you can stop and switch out regularly!
NOTE:
you can drill out the bushing and actually even saw saw out all the rubber center prior if you want...that may help relieve the hoop stress on it and allow for the rig to work easier.
-J
Last edited by JasonZ-YA; 08-03-2010 at 11:01 AM.
08-02-2010, 09:27 AM
#5
350Z-holic
Thread Starter
iTrader: (60)
Join Date: Jan 2006
Location: San Antonio/I miss DFW, TX
Posts: 11,204
Likes: 0
Received 28 Likes
on
19 Posts
NOW REVIEW THE INSTALL DIAGRAM AND LOOK BELOW AT THE RIG TO REINSTALL.
Review lower section of diagram for INSTALL:
Note once again, this is only showing how its done using the oem bushing and a simple bolt i had laying around:
Also, its good to put a press plate on the square plate side so that it holds the plate centered on the aluminum subframe hole!
-J
Review lower section of diagram for INSTALL:
Note once again, this is only showing how its done using the oem bushing and a simple bolt i had laying around:
Also, its good to put a press plate on the square plate side so that it holds the plate centered on the aluminum subframe hole!
-J
Last edited by JasonZ-YA; 08-02-2010 at 09:29 AM.
08-02-2010, 09:41 AM
#6
350Z-holic
Thread Starter
iTrader: (60)
Join Date: Jan 2006
Location: San Antonio/I miss DFW, TX
Posts: 11,204
Likes: 0
Received 28 Likes
on
19 Posts
Now, i talked to Kual at SPL Parts because the first thing i noticed was that the SPL bushings were different, not just in color but in fabriction aspects as well.
I noticed a significant taper at the driving end and decided to call and talk to Kual about it.
Well it turns out the overall dimensions and press fit were redone and now the bushing is much easier to install with its new press fit dimensions.
Notice the new SPL diff bushings:
Taper on end:

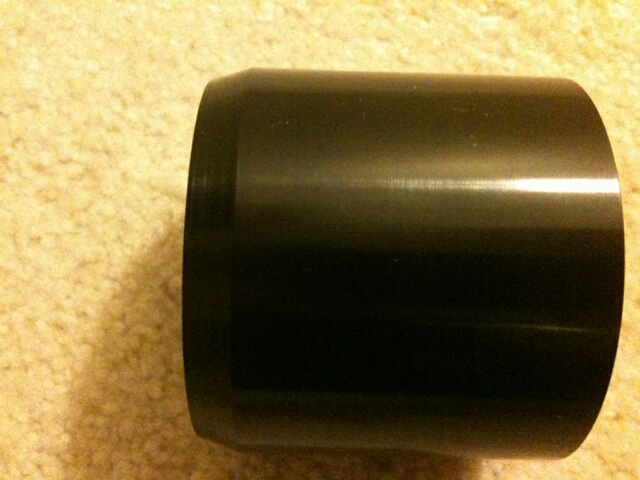
So, trust me!!! stick this thing in the freezer! I put ours in a zip lock bag and then i put it in the ice cube tray letting the ice maker drop cubes on it!!! LOL..
Wearing gloves - its cold!!! - With the new significant taper you can easily put the bushing in the hole from the back of the car side and hammer on it to line it up. you can attach the driver to the end if you wish with a short bolt and hammer on the driver.
Then you can set up the rig and pull it through quickly!
-J
I noticed a significant taper at the driving end and decided to call and talk to Kual about it.
Well it turns out the overall dimensions and press fit were redone and now the bushing is much easier to install with its new press fit dimensions.
Notice the new SPL diff bushings:
Taper on end:
So, trust me!!! stick this thing in the freezer! I put ours in a zip lock bag and then i put it in the ice cube tray letting the ice maker drop cubes on it!!! LOL..
Wearing gloves - its cold!!! - With the new significant taper you can easily put the bushing in the hole from the back of the car side and hammer on it to line it up. you can attach the driver to the end if you wish with a short bolt and hammer on the driver.
Then you can set up the rig and pull it through quickly!
-J
08-02-2010, 09:49 AM
#7
350Z-holic
Thread Starter
iTrader: (60)
Join Date: Jan 2006
Location: San Antonio/I miss DFW, TX
Posts: 11,204
Likes: 0
Received 28 Likes
on
19 Posts
Okay, our reinstall literally took 10 seconds!!!! 
NO lie! this is what we did!
We sprayed the hell out of the subframe hole with Brakekleen or PB blaster:
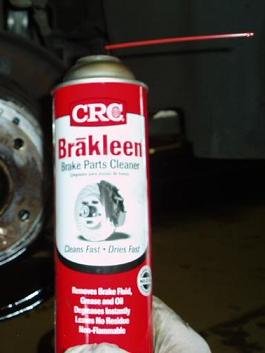
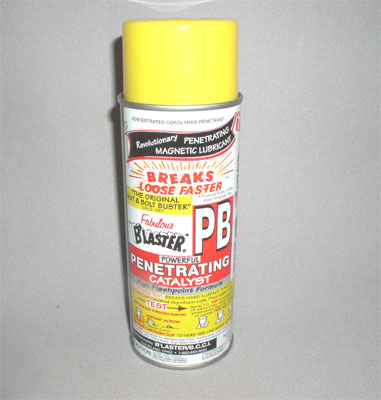
This acted as a lubricant and will evaporate away and be just fine!
We sprayed all in here:
From there, we got a long pipe and a big hammer - used the steel pipe i had from a heavy duty truck jack and got the big hammer ready!!
I ran outside with the frozen bushing and ACIDJAKE75 tapped it with the hammer and put it in place!
Now, imagine that the rear of the car is up in the air ONLY, so its literally a straight shot with the metal pipe on the bushing and Nexx hammered from the pipe end and the bushing was in 10 seconds flat!!!


We let the bushing get warm as we were working in TX heat and later we were able to torque the diff stud down to spec and no movement at all! lube we used evaporated and was no visual sign of it anywhere!
I attribute the freezing method working better for us than it has for others that have posted about this method because of the dimensional tolerances i discussed with SPL and the use of lube.
-J
NO lie! this is what we did!
We sprayed the hell out of the subframe hole with Brakekleen or PB blaster:
This acted as a lubricant and will evaporate away and be just fine!
We sprayed all in here:
From there, we got a long pipe and a big hammer - used the steel pipe i had from a heavy duty truck jack and got the big hammer ready!!
I ran outside with the frozen bushing and ACIDJAKE75 tapped it with the hammer and put it in place!
Now, imagine that the rear of the car is up in the air ONLY, so its literally a straight shot with the metal pipe on the bushing and Nexx hammered from the pipe end and the bushing was in 10 seconds flat!!!
We let the bushing get warm as we were working in TX heat and later we were able to torque the diff stud down to spec and no movement at all! lube we used evaporated and was no visual sign of it anywhere!
I attribute the freezing method working better for us than it has for others that have posted about this method because of the dimensional tolerances i discussed with SPL and the use of lube.
-J
Last edited by JasonZ-YA; 08-02-2010 at 11:57 AM.
Trending Topics
08-02-2010, 09:58 AM
#8
350Z-holic
Thread Starter
iTrader: (60)
Join Date: Jan 2006
Location: San Antonio/I miss DFW, TX
Posts: 11,204
Likes: 0
Received 28 Likes
on
19 Posts
We did the hammer method: took 2 minutes tops! Thanks to Acidjake75 and his BFH!
Hammer method:
Call a local steel yard and get a 1-7/8" solid piece of steel about 2 to 3 inches long and use that to pound down on the diff ears.........
Acidjake75 used the little frank socket from the Translink bushing HOW to i made for him, but you can easily have used a large socket thats sized to fit the diff ears!
NOTE:
One side the metal sleeve flares inward and is easy to do, the other side is a thin race, and requires either the 1-7/8" piece of steel or a perfectly sized socket to sit on the race.
PRESS METHOD:
One bushing had silicone liquid in there and when it popped it was JUICY! You can see the liquid all over the floor and on my press..

To do the press method, i just got a razor blade and started slicing at the bushing to help initiate tear......the press then ripped it out with ease.
Saw Zaw METHOD:
The saw zaw cutting of the "race" is easy as well. It comes right out - it was WAY easier that I had thought -
you can use needle nose pliers once it comes loose and comes RIGHT out.
Ready for the new goodness
LOL at diff on jackstands....
From here, you just easily hammer the SPL diff bushings into the diff ears. Its not super hard, but takes a few normal whacks!
Also note,
That the diff has a breather hose on top!!! in order to put the SPL diff ears on, you need to flip the diff upside down! Its best to cap up the breather hose hole or reattach the rubber line and fold it in half and zip tie it so no diff fluid leaks out!!! -- get it??
-J
Hammer method:
Call a local steel yard and get a 1-7/8" solid piece of steel about 2 to 3 inches long and use that to pound down on the diff ears.........
Acidjake75 used the little frank socket from the Translink bushing HOW to i made for him, but you can easily have used a large socket thats sized to fit the diff ears!
NOTE:
One side the metal sleeve flares inward and is easy to do, the other side is a thin race, and requires either the 1-7/8" piece of steel or a perfectly sized socket to sit on the race.
PRESS METHOD:
One bushing had silicone liquid in there and when it popped it was JUICY! You can see the liquid all over the floor and on my press..
To do the press method, i just got a razor blade and started slicing at the bushing to help initiate tear......the press then ripped it out with ease.
Saw Zaw METHOD:
The saw zaw cutting of the "race" is easy as well. It comes right out - it was WAY easier that I had thought -
you can use needle nose pliers once it comes loose and comes RIGHT out.
Ready for the new goodness
LOL at diff on jackstands....
From here, you just easily hammer the SPL diff bushings into the diff ears. Its not super hard, but takes a few normal whacks!
Also note,
That the diff has a breather hose on top!!! in order to put the SPL diff ears on, you need to flip the diff upside down! Its best to cap up the breather hose hole or reattach the rubber line and fold it in half and zip tie it so no diff fluid leaks out!!! -- get it??
-J
Last edited by JasonZ-YA; 08-03-2010 at 05:41 AM.
08-02-2010, 10:05 AM
#9
350Z-holic
Thread Starter
iTrader: (60)
Join Date: Jan 2006
Location: San Antonio/I miss DFW, TX
Posts: 11,204
Likes: 0
Received 28 Likes
on
19 Posts
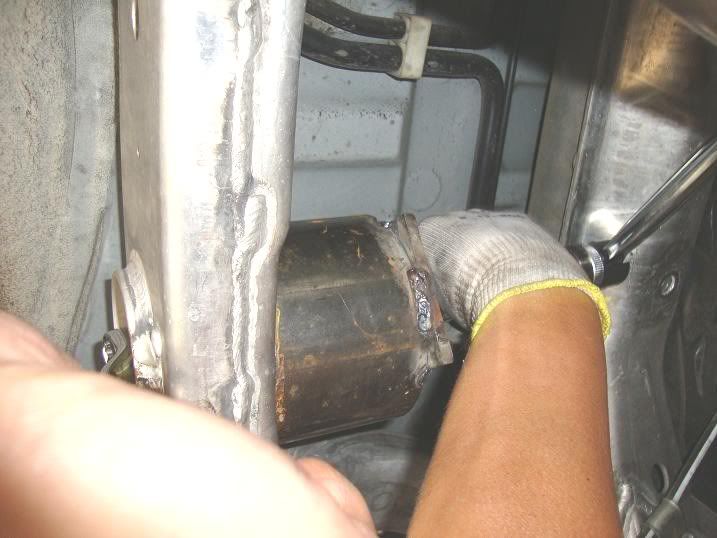
Here is the SPL diff bushing installed and done!
Notice the hits on the face of it where we didnt use the SPL drive to pound on. we simply put the 4 foot jack pole right up to it and banged away! LOL...

-J
Notice the hits on the face of it where we didnt use the SPL drive to pound on. we simply put the 4 foot jack pole right up to it and banged away! LOL...
-J
Last edited by JasonZ-YA; 08-02-2010 at 10:19 AM.
08-02-2010, 10:05 AM
#10
350Z-holic
Thread Starter
iTrader: (60)
Join Date: Jan 2006
Location: San Antonio/I miss DFW, TX
Posts: 11,204
Likes: 0
Received 28 Likes
on
19 Posts
Okay, using a C clamp is not a bad idea at all.
HOwever, you need to use the right style of C -clamp. The kind with a hex driver on the end and not a cheesy little handle.............and best to get one that has interchangeable tips that can fit in the hole of the big frank socket you have to make and the spl driver tool!
Those types of c-clamps are usually found as most "ball joint press tool kits"
even autoZone rents them out! so thats an option, the problem is finding one large enough to span across the subframe!
Examples here:
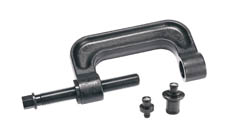

Notice how these clamps have a hex on the end to crank away on!!
its an option! but using a normal C clamp - good luck!!
-J
HOwever, you need to use the right style of C -clamp. The kind with a hex driver on the end and not a cheesy little handle.............and best to get one that has interchangeable tips that can fit in the hole of the big frank socket you have to make and the spl driver tool!
Those types of c-clamps are usually found as most "ball joint press tool kits"
even autoZone rents them out! so thats an option, the problem is finding one large enough to span across the subframe!
Examples here:
Notice how these clamps have a hex on the end to crank away on!!
its an option! but using a normal C clamp - good luck!!
-J
Last edited by JasonZ-YA; 08-02-2010 at 10:12 AM.
08-02-2010, 10:06 AM
#11
350Z-holic
Thread Starter
iTrader: (60)
Join Date: Jan 2006
Location: San Antonio/I miss DFW, TX
Posts: 11,204
Likes: 0
Received 28 Likes
on
19 Posts
extra in case needed later..
and special thanks to my bud Terrasmack for enlightening me on how he did his install using "all thread"
-J
and special thanks to my bud Terrasmack for enlightening me on how he did his install using "all thread"
-J
Last edited by JasonZ-YA; 08-02-2010 at 10:37 AM.
08-02-2010, 10:06 AM
#12
350Z-holic
Thread Starter
iTrader: (60)
Join Date: Jan 2006
Location: San Antonio/I miss DFW, TX
Posts: 11,204
Likes: 0
Received 28 Likes
on
19 Posts
OKAY GUYS, 
I didn't take pics, and the next time I do this i will be sure to take some and update this thread but this is how i removed the OEM bushing quick!
*Some of the pics shown i have found and edited to use to help show how this was done until i actually take pics of this process.
REMOVING OEM BUSHING:
1. Jack up rear of car as high as possible, placing chalks under front tires and rear on jack stands.
2. Remove the rear wheels (they are heavy and you need to for # - read on)
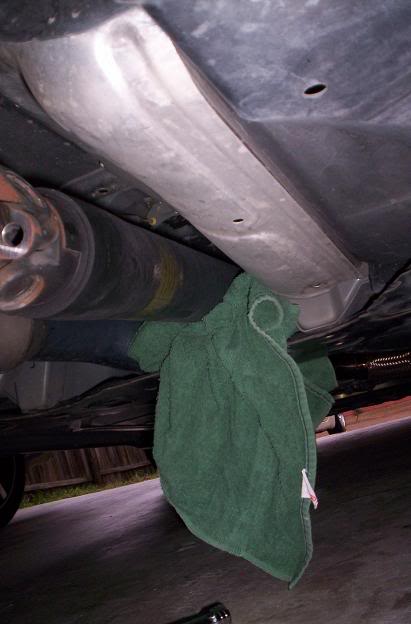
3. Disconnect drive shaft and place a towel over midpipe and W brace to rest the drive shaft down and out of the way (17mm goose neck wrenches).
Drive shaft on green towel:
4. Disconnect the axle nuts and bolts (14mm goose neck wrenches)
Zip tie the drive shafts up to the rear upper control arms so they are not hanging and out of the way (FSM tells you not to let them hang)
5. Remove the two plastic trays (one on each side of the car) in order to remove the sway bar bolts. (Trays require 10mm socket - there are two nuts and one bolt).

6. Remove sway bar from car completely and from endlinks (14mm deep socket), place sway bar out of the way.
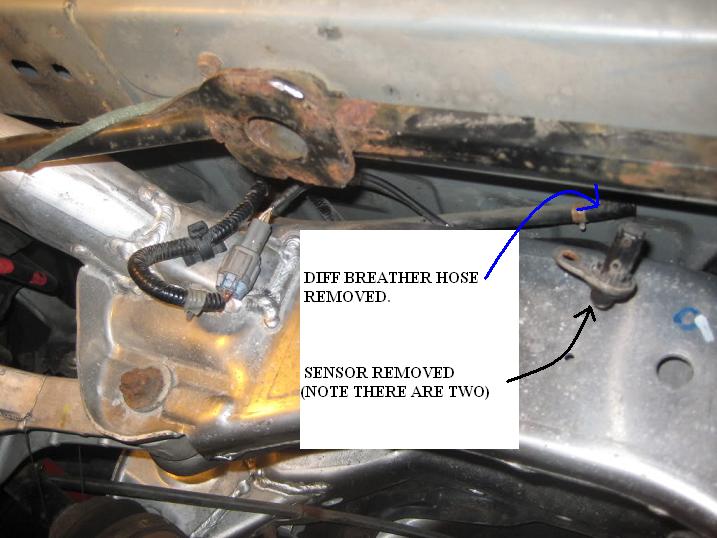
7. Remove the two sensors from the back of the diff - one on each side (12mm short socket)
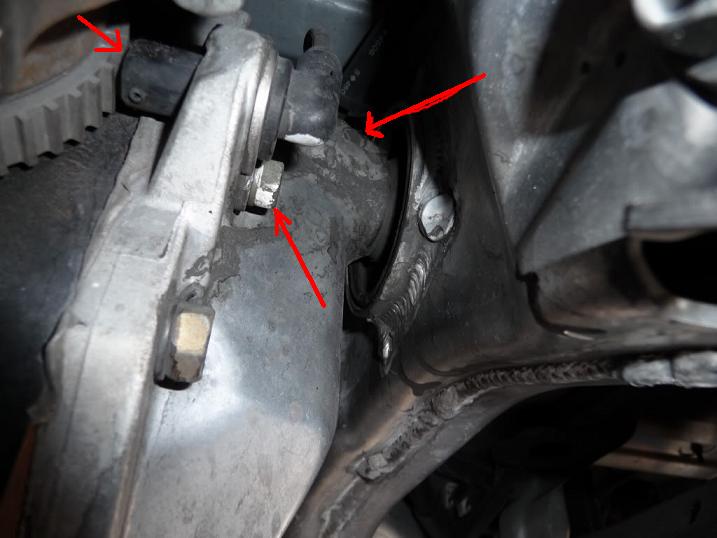
8. Remove the diff breather hose from on top of the diff breather pipe - Used my hands, but sometimes having long needle nose pliers is helpful as some are hard and brittle and wont come off easy.
9. REMOVE THE OEM EXHAUST rear canister (12mm deep socket with extension to remove 6 each bolts from back ends
9a - must remove plastic mud flaps from rear bumper *if car has them* (phillips screw driver)
9b - Then remove 3 each (10mm socket) bolts to remove metal support hidden in corners in order to access the original 3 (12mm) bolts per side, 6 total.
NOTE:
-9c The oem mid pipe was not in the way.
-9d AFTER MARKET exhaust may or may not need to be removed - ie single exhaust, etc.
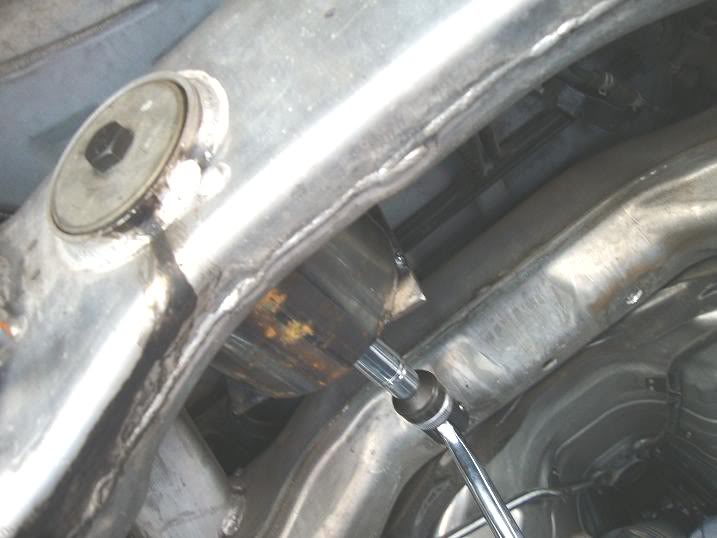
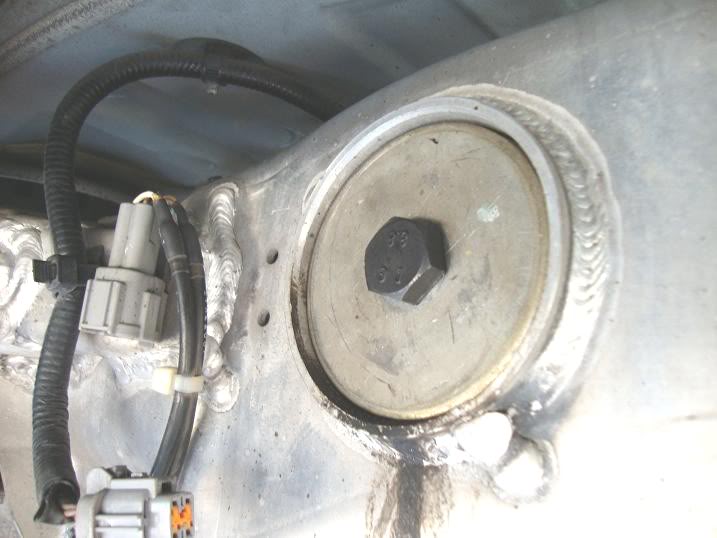
10. Remove the 17mm nut holding the diff stud that is in the BLOW rear OEM Bushing.
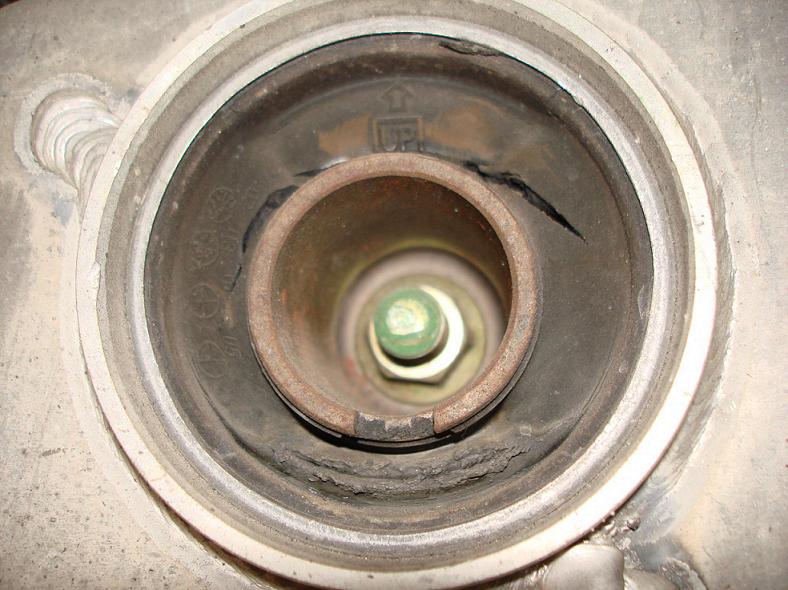
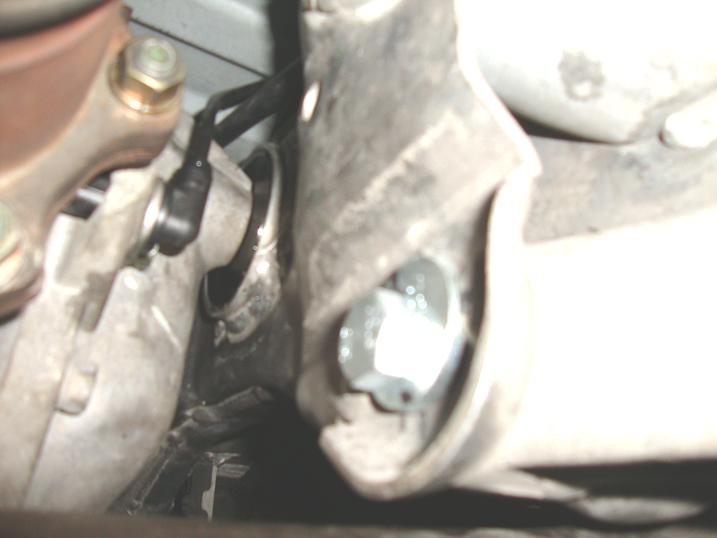
11. using a tall jack or transmission jack support the diff and using an impact remove the two diff ear bolts (17mm socket).
NOTE: Careful as there are two black metal plates on top of the diff ears that will come falling down that are unseen. the two gold diff ear plates come down with the bolt obviously.
At this point, jack down the diff/man handle the diff down and onto the ground.
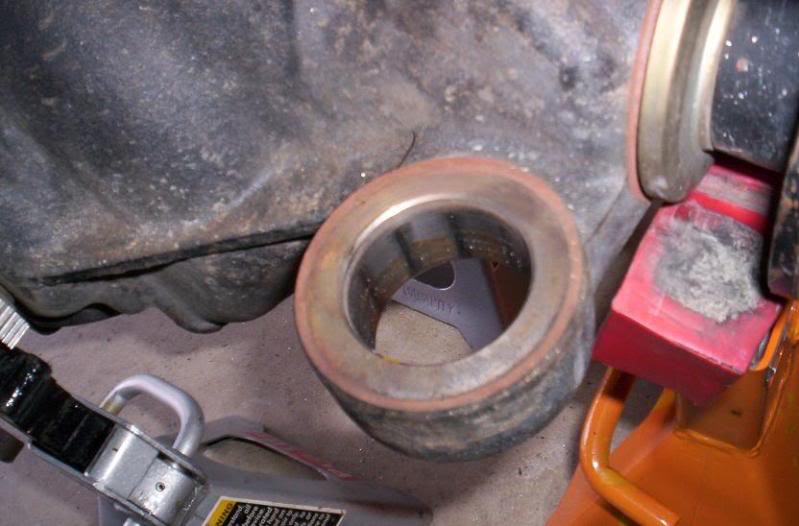
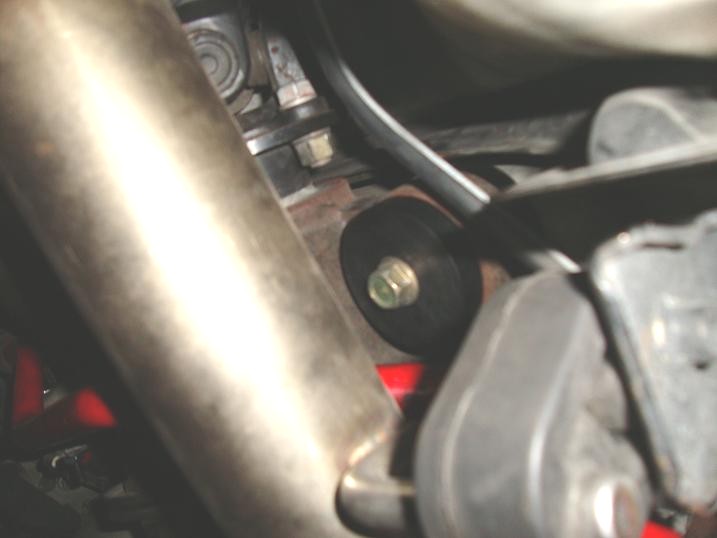
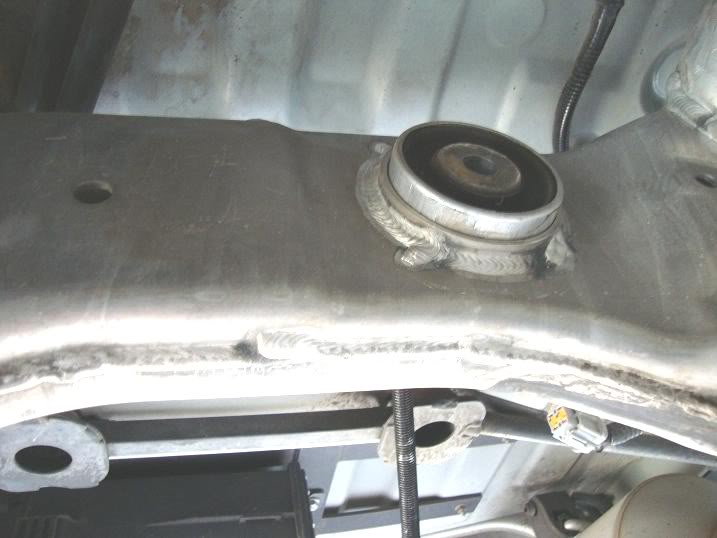
NOW at this point that everything is removed you easily see the blown diff bushing on each side:
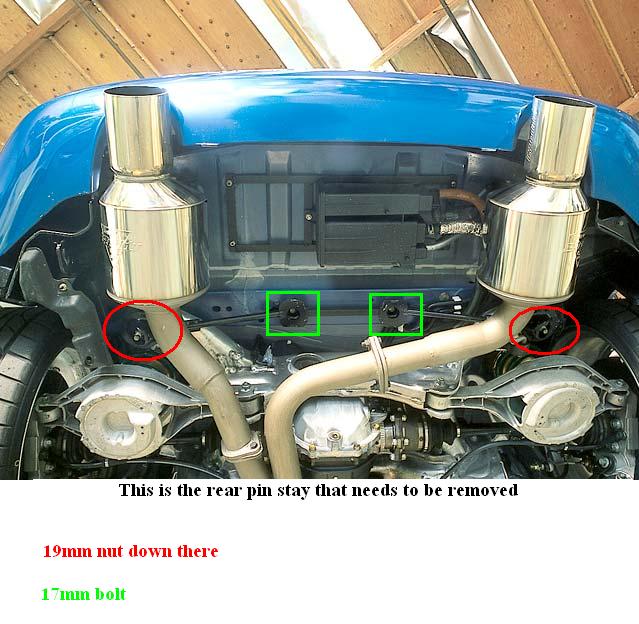
12. Remove bolts on the rear pin stay - two (17mm socket) bolts in the center.
12a -Remove the two (19mm socket) nuts on the ends common to the rear subframe-to-unibody mounts.
12b -Remove the pin stay and place it out of the way.
12c -reinstall the two end 19mm nuts by bench pressing the subframe back up into the air only enough to catch the first 5 or so threads.
THIS WILL ALLOW THE REAR SUBFRAME TO DROOP DOWN A WEE BIT gaining you even more access to the rear subframe oem blown bushing!!!
PIN STAY IS THIS BLACK STEEL PIECE:
13. Drill holes using a drill and about a 3/8 drill bit into the oem bushing until it is mutilated to all hell!!!

14. Get a saw saw with a typical 4 -6" long wood cutting blade and run it all around and cut the oem bushing center out. (this takes 2 minutes tops for items 13 and 14)

15. Get the saw saw and switch to a metal cutting blade and cut the bushing race at two locations - one cut at 5-O'clock position and one at the 7-O'clock position.
16. Get a flat head screw driver (small one) and hammer on the end to pry up the 5 to 7 o clock section at the bottom and peal it away like a banana peal side.
from there you can easily remove the race as it is so weak and broken at this point using the screw driver and maybe some needle nose plyers.
OEM BUSHING IS NOW REMOVED!
Take from post 7:
INSTALL OF SPL SOLID DIFF BUSHING INTO SUBFRAME HOLE:
Take from post #8
DIFF EAR BUSHING REMOVEAL AND INSTALL:
I didn't take pics, and the next time I do this i will be sure to take some and update this thread but this is how i removed the OEM bushing quick!
*Some of the pics shown i have found and edited to use to help show how this was done until i actually take pics of this process.
REMOVING OEM BUSHING:
1. Jack up rear of car as high as possible, placing chalks under front tires and rear on jack stands.
2. Remove the rear wheels (they are heavy and you need to for # - read on)
3. Disconnect drive shaft and place a towel over midpipe and W brace to rest the drive shaft down and out of the way (17mm goose neck wrenches).
Drive shaft on green towel:
4. Disconnect the axle nuts and bolts (14mm goose neck wrenches)
Zip tie the drive shafts up to the rear upper control arms so they are not hanging and out of the way (FSM tells you not to let them hang)
5. Remove the two plastic trays (one on each side of the car) in order to remove the sway bar bolts. (Trays require 10mm socket - there are two nuts and one bolt).
6. Remove sway bar from car completely and from endlinks (14mm deep socket), place sway bar out of the way.
7. Remove the two sensors from the back of the diff - one on each side (12mm short socket)
8. Remove the diff breather hose from on top of the diff breather pipe - Used my hands, but sometimes having long needle nose pliers is helpful as some are hard and brittle and wont come off easy.
9. REMOVE THE OEM EXHAUST rear canister (12mm deep socket with extension to remove 6 each bolts from back ends
9a - must remove plastic mud flaps from rear bumper *if car has them* (phillips screw driver)
9b - Then remove 3 each (10mm socket) bolts to remove metal support hidden in corners in order to access the original 3 (12mm) bolts per side, 6 total.
NOTE:
-9c The oem mid pipe was not in the way.
-9d AFTER MARKET exhaust may or may not need to be removed - ie single exhaust, etc.
10. Remove the 17mm nut holding the diff stud that is in the BLOW rear OEM Bushing.
11. using a tall jack or transmission jack support the diff and using an impact remove the two diff ear bolts (17mm socket).
NOTE: Careful as there are two black metal plates on top of the diff ears that will come falling down that are unseen. the two gold diff ear plates come down with the bolt obviously.
At this point, jack down the diff/man handle the diff down and onto the ground.
NOW at this point that everything is removed you easily see the blown diff bushing on each side:
12. Remove bolts on the rear pin stay - two (17mm socket) bolts in the center.
12a -Remove the two (19mm socket) nuts on the ends common to the rear subframe-to-unibody mounts.
12b -Remove the pin stay and place it out of the way.
12c -reinstall the two end 19mm nuts by bench pressing the subframe back up into the air only enough to catch the first 5 or so threads.
THIS WILL ALLOW THE REAR SUBFRAME TO DROOP DOWN A WEE BIT gaining you even more access to the rear subframe oem blown bushing!!!
PIN STAY IS THIS BLACK STEEL PIECE:
13. Drill holes using a drill and about a 3/8 drill bit into the oem bushing until it is mutilated to all hell!!!
14. Get a saw saw with a typical 4 -6" long wood cutting blade and run it all around and cut the oem bushing center out. (this takes 2 minutes tops for items 13 and 14)
15. Get the saw saw and switch to a metal cutting blade and cut the bushing race at two locations - one cut at 5-O'clock position and one at the 7-O'clock position.
16. Get a flat head screw driver (small one) and hammer on the end to pry up the 5 to 7 o clock section at the bottom and peal it away like a banana peal side.
from there you can easily remove the race as it is so weak and broken at this point using the screw driver and maybe some needle nose plyers.
OEM BUSHING IS NOW REMOVED!
Take from post 7:
INSTALL OF SPL SOLID DIFF BUSHING INTO SUBFRAME HOLE:
Okay, our reinstall literally took 10 seconds!!!!
NO lie! this is what we did!
We sprayed the hell out of the subframe hole with Brakekleen or PB blaster:
This acted as a lubricant and will evaporate away and be just fine!
We sprayed all in here:
From there, we got a long pipe and a big hammer - used the steel pipe i had from a heavy duty truck jack and got the big hammer ready!!
I ran outside with the frozen bushing and ACIDJAKE75 tapped it with the hammer and put it in place!
Now, imagine that the rear of the car is up in the air ONLY, so its literally a straight shot with the metal pipe on the bushing and Nexx hammered from the pipe end and the bushing was in 10 seconds flat!!!
We let the bushing get warm as we were working in TX heat and later we were able to torque the diff stud down to spec and no movement at all! lube we used evaporated and was no visual sign of it anywhere!
I attribute the freezing method working better for us than it has for others that have posted about this method because of the dimensional tolerances i discussed with SPL and the use of lube.
-J
Take from post #8
DIFF EAR BUSHING REMOVEAL AND INSTALL:
We did the hammer method: took 2 minutes tops! Thanks to Acidjake75 and his BFH!
Hammer method:

Call a local steel yard and get a 1-7/8" solid piece of steel about 2 to 3 inches long and use that to pound down on the diff ears.........
Acidjake75 used the little frank socket from the Translink bushing HOW to i made for him, but you can easily have used a large socket thats sized to fit the diff ears!
NOTE:
One side the metal sleeve flares inward and is easy to do, the other side is a thin race, and requires either the 1-7/8" piece of steel or a perfectly sized socket to sit on the race.
PRESS METHOD:
One bushing had silicone liquid in there and when it popped it was JUICY! You can see the liquid all over the floor and on my press..
To do the press method, i just got a razor blade and started slicing at the bushing to help initiate tear......the press then ripped it out with ease.
Saw Zaw METHOD:
The saw zaw cutting of the "race" is easy as well. It comes right out - it was WAY easier that I had thought -

you can use needle nose pliers once it comes loose and comes RIGHT out.

Ready for the new goodness

LOL at diff on jackstands....
From here, you just easily hammer the SPL diff bushings into the diff ears. Its not super hard, but takes a few normal whacks!
Also note,
That the diff has a breather hose on top!!! in order to put the SPL diff ears on, you need to flip the diff upside down! Its best to cap up the breather hose hole or reattach the rubber line and fold it in half and zip tie it so no diff fluid leaks out!!! -- get it??
-J
Hammer method:
Call a local steel yard and get a 1-7/8" solid piece of steel about 2 to 3 inches long and use that to pound down on the diff ears.........
Acidjake75 used the little frank socket from the Translink bushing HOW to i made for him, but you can easily have used a large socket thats sized to fit the diff ears!
NOTE:
One side the metal sleeve flares inward and is easy to do, the other side is a thin race, and requires either the 1-7/8" piece of steel or a perfectly sized socket to sit on the race.
PRESS METHOD:
One bushing had silicone liquid in there and when it popped it was JUICY! You can see the liquid all over the floor and on my press..
To do the press method, i just got a razor blade and started slicing at the bushing to help initiate tear......the press then ripped it out with ease.
Saw Zaw METHOD:
The saw zaw cutting of the "race" is easy as well. It comes right out - it was WAY easier that I had thought -
you can use needle nose pliers once it comes loose and comes RIGHT out.
Ready for the new goodness
LOL at diff on jackstands....
From here, you just easily hammer the SPL diff bushings into the diff ears. Its not super hard, but takes a few normal whacks!
Also note,
That the diff has a breather hose on top!!! in order to put the SPL diff ears on, you need to flip the diff upside down! Its best to cap up the breather hose hole or reattach the rubber line and fold it in half and zip tie it so no diff fluid leaks out!!! -- get it??
-J
Last edited by JasonZ-YA; 08-05-2010 at 07:33 AM.
08-02-2010, 05:56 PM
#16

Thanks for this. Better then the one i was hoping to do within the next month. Unfortunately i have the blue ones but this info still helps out. You write the best DIY stuff ever.
How you liking the differences?
Any word when SPL is doing subframe bushings instead of whitelines poly ones?
How you liking the differences?
Any word when SPL is doing subframe bushings instead of whitelines poly ones?
08-02-2010, 07:16 PM
#19
350Z-holic
Thread Starter
iTrader: (60)
Join Date: Jan 2006
Location: San Antonio/I miss DFW, TX
Posts: 11,204
Likes: 0
Received 28 Likes
on
19 Posts
Did you get some from SPL??
LOL thanks, i love paint! lol....
ya man, i need to go back and tally up all these beers, all my how to's i get beer offers......i need to cash them in and get.......well........

exactly, i have a Nismo LSD, and now the lsd engages more or the tires grab and the diff clunks......its given me a even more predictable feel out of the LSD, when i thought anymore couldnt be felt........making turns, etc, i know exactly how the rear is gonna respond......its a great feeling when you know and can predict the cars responses that well....
-J

ya man, i need to go back and tally up all these beers, all my how to's i get beer offers......i need to cash them in and get.......well........
exactly, i have a Nismo LSD, and now the lsd engages more or the tires grab and the diff clunks......its given me a even more predictable feel out of the LSD, when i thought anymore couldnt be felt........making turns, etc, i know exactly how the rear is gonna respond......its a great feeling when you know and can predict the cars responses that well....
-J
08-02-2010, 07:24 PM
#20
350Z-holic
Thread Starter
iTrader: (60)
Join Date: Jan 2006
Location: San Antonio/I miss DFW, TX
Posts: 11,204
Likes: 0
Received 28 Likes
on
19 Posts
as for subframe bushings, i see no real need unless the car is a dedicated hard core track car!.......i have inspected and seen many Z's......the 4 unibody mount subframe bushings don't tear or go out and the performance difference in the whitelines i doubt to be substantial or worth it otherwise....my opinion, but ya...
Example of all out track car and solid 4 unibody subframe bushings: (see the first 4 pics in this thread)
https://my350z.com/forum/autocross-r...verything.html
-J